Introduction
Using an on-screen keyboard can be useful for individuals who have difficulty typing on a physical keyboard or for those who need a virtual keyboard on certain devices like tablets or touch-screen laptops. However, there may be times when you want to turn off the on-screen keyboard to optimize your device’s performance or simply because you prefer using a physical keyboard.
In this article, we will explore various methods to turn off the on-screen keyboard in different versions of Windows, including Windows 10, Windows 8, and Windows 7. Whether you want to temporarily disable the on-screen keyboard or permanently deactivate it, we’ve got you covered.
With several methods at your disposal, you can choose the one that works best for your specific needs and operating system. From using the taskbar and settings menu to accessing the control panel and registry editor, you’ll have the flexibility to control the on-screen keyboard functionality on your Windows device.
Before we dive into the different methods, it’s important to note that disabling the on-screen keyboard does not remove it from your device entirely. You can always re-enable it using the same steps. Additionally, some methods may require administrative access, so make sure you have the necessary permissions before making any changes to your system.
Let’s explore the various methods to turn off the on-screen keyboard in Windows and regain full control of your typing experience.
Method 1: Using the Taskbar
One of the easiest ways to turn off the on-screen keyboard in Windows is by using the taskbar. This method is applicable to both Windows 10 and older versions of Windows.
To begin, locate the language icon on the right side of the taskbar. It usually appears as two letters representing the current input language, such as “EN” for English. Right-click on the language icon to open a menu.
In the menu that pops up, you will see an option for “Show touch keyboard button.” Make sure this option is unchecked. If it is checked, click on it to disable the on-screen keyboard button on the taskbar.
Once you’ve unchecked the “Show touch keyboard button” option, the on-screen keyboard button will be removed from the taskbar, effectively turning off the on-screen keyboard.
If you ever need to access the on-screen keyboard again, you can simply repeat the steps and check the “Show touch keyboard button” option to enable it.
This method is a quick and convenient way to toggle the on-screen keyboard on or off directly from the taskbar. However, keep in mind that if you are using a touch-screen device, removing the on-screen keyboard button will also remove the touch keyboard from the screen.
Now that you know how to disable the on-screen keyboard using the taskbar, you can move on to exploring other methods if you need more advanced control over the on-screen keyboard functionality in Windows.
Method 2: Using the Settings Menu
If you prefer using the Settings menu in Windows to manage system preferences, you can also turn off the on-screen keyboard using this method. The steps may vary slightly depending on the version of Windows you are using.
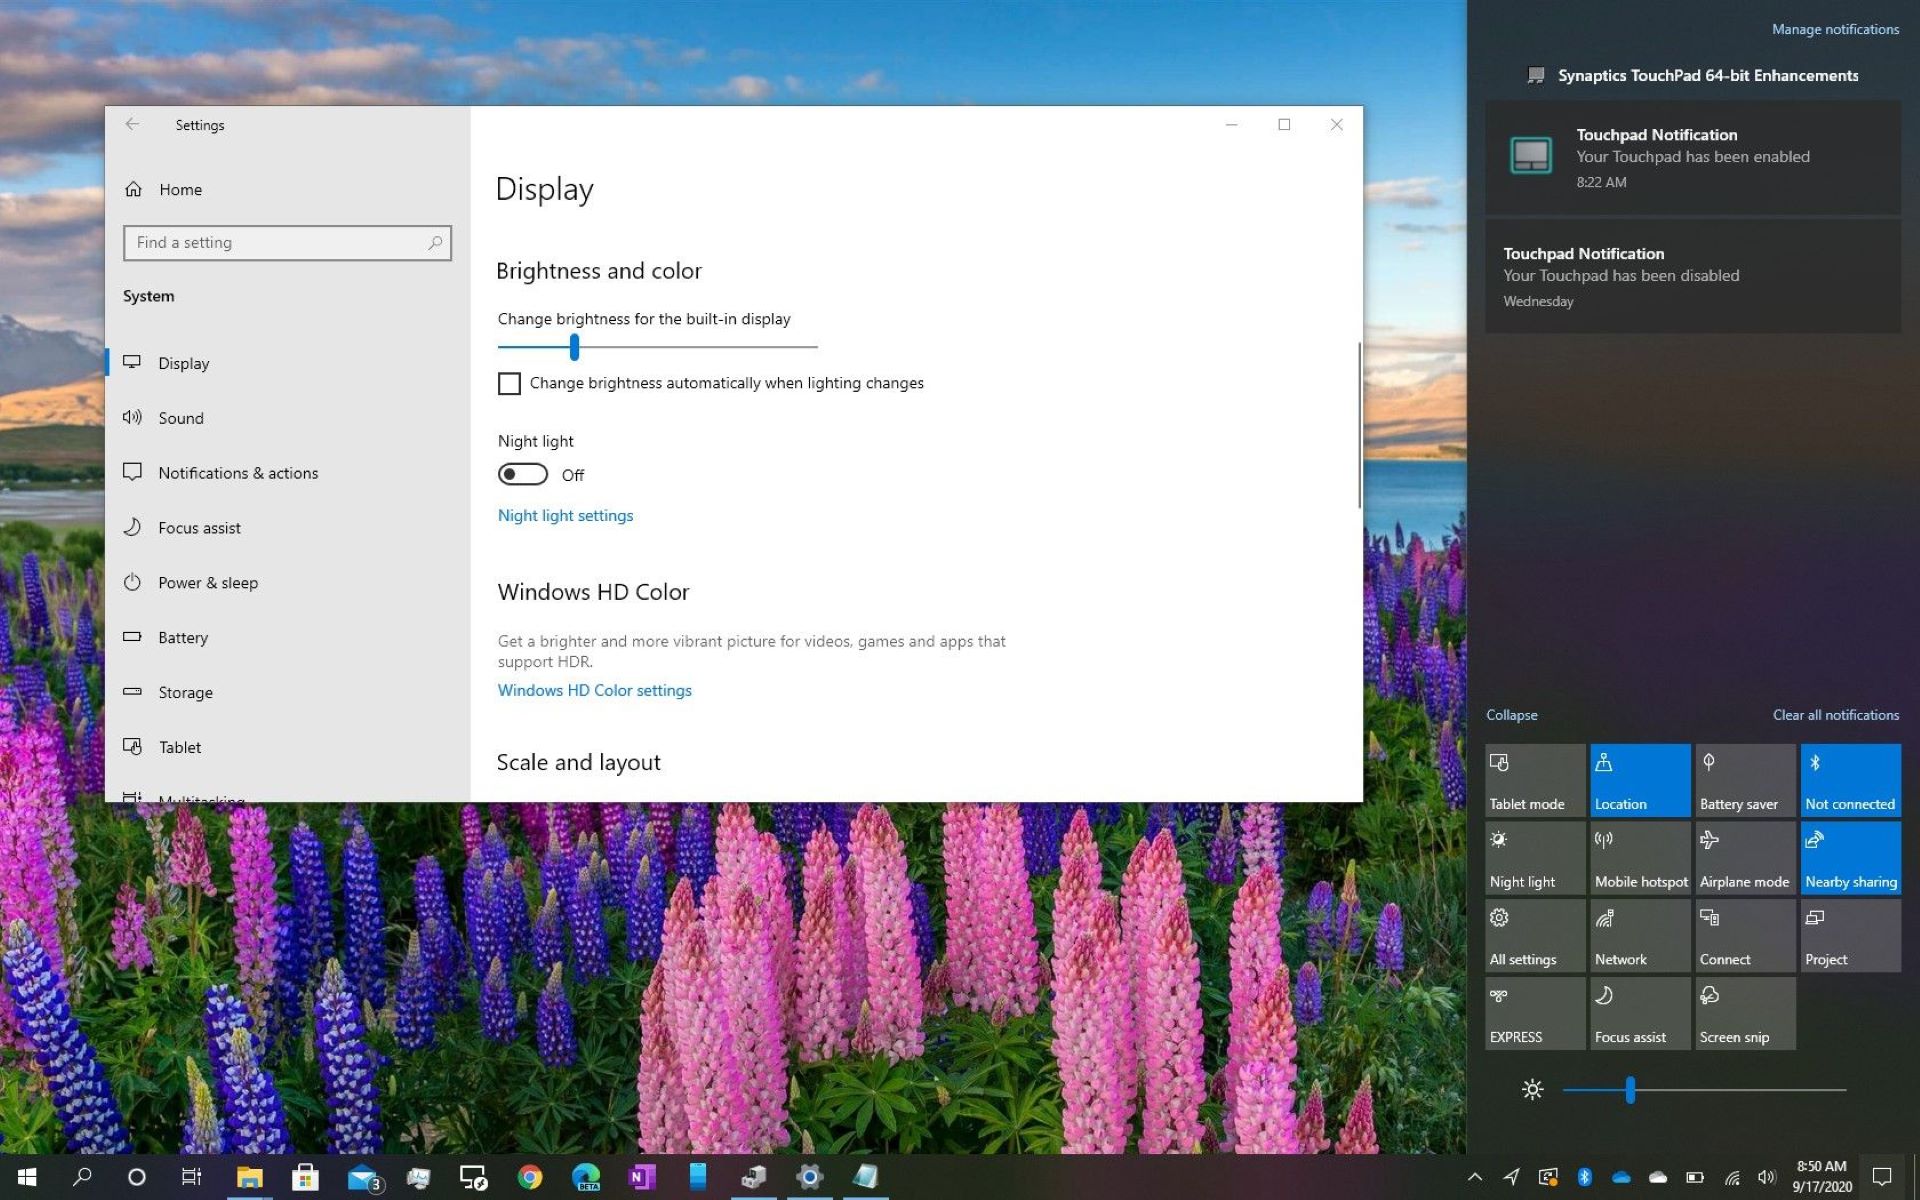
For Windows 10 users, start by clicking on the Start menu and selecting the “Settings” gear icon. In the Settings menu, click on the “Devices” option.
In the Devices menu, select the “Typing” option from the sidebar. Scroll down and locate the “Touch keyboard” section.
Under the “Touch keyboard” section, you will see an option that says “Automatically show the touch keyboard in windowed apps when there’s no keyboard attached to your device.” Make sure this option is turned off.
By disabling this option, the on-screen keyboard will no longer appear automatically in windowed apps when you are not using a physical keyboard.
For older versions of Windows, such as Windows 8 or Windows 7, the process may be slightly different. Start by accessing the Control Panel by clicking on the Start menu and selecting “Control Panel” from the list of options.
In the Control Panel, navigate to the “Ease of Access” or “Ease of Access Center” section, depending on your version of Windows.
Click on the “Ease of Access Center” option and then select “Use the computer without a mouse or keyboard.”
In the following menu, select “Use the computer without a keyboard.” You will then see an option to enable or disable the on-screen keyboard.
By deselecting this option, you can effectively turn off the on-screen keyboard in Windows 8 and Windows 7.
Using the Settings menu provides a straightforward and user-friendly way to disable the on-screen keyboard. Whether you are using Windows 10 or an older version, you can easily access the appropriate settings to enable or disable this feature.
Method 3: Using the Control Panel
If you prefer using the Control Panel to manage system settings in Windows, you can also turn off the on-screen keyboard using this method. The steps may vary slightly depending on the version of Windows you are using.
For Windows 10 users, start by clicking on the Start menu and then selecting the “Settings” gear icon. In the Settings menu, click on the “Ease of Access” option.
In the Ease of Access menu, click on the “Keyboard” option from the sidebar. Scroll down and locate the “On-Screen Keyboard” section.
Under the “On-Screen Keyboard” section, you will find a toggle switch to turn it on or off. Simply toggle the switch to the “Off” position to disable the on-screen keyboard.
For older versions of Windows, such as Windows 8 or Windows 7, the process may be slightly different. Start by accessing the Control Panel by clicking on the Start menu and selecting “Control Panel” from the list of options.
In the Control Panel, navigate to the “Ease of Access” or “Ease of Access Center” section, depending on your version of Windows.
Click on the “Ease of Access Center” option and then select “Use the computer without a mouse or keyboard.”
In the following menu, click on the “Set up On-Screen Keyboard” option. This will open the On-Screen Keyboard settings window.
In the On-Screen Keyboard settings window, you will see a checkbox that says “Turn on the On-Screen Keyboard.” If this checkbox is checked, uncheck it to turn off the on-screen keyboard.
Using the Control Panel is another effective way to disable the on-screen keyboard in Windows. Whether you are using Windows 10 or an older version, you can easily access the appropriate settings and toggle the on-screen keyboard on or off to suit your preferences.
Method 4: Using the Registry Editor
If you’re comfortable making changes to the Windows Registry, you can use this method to disable the on-screen keyboard in Windows. However, proceed with caution as making incorrect changes to the Registry can cause unexpected issues with your system.
To begin, press the Windows key + R on your keyboard to open the Run dialog box. Type “regedit” and press Enter to launch the Registry Editor.
In the left-hand pane of the Registry Editor, navigate to the following location:
HKEY_LOCAL_MACHINE\SOFTWARE\Microsoft\Windows\CurrentVersion\Authentication\LogonUI
Once you’ve reached the LogonUI key, you’ll need to create a new DWORD (32-bit) value. Right-click an empty space in the right-hand pane and select New > DWORD (32-bit) Value.
Name the new DWORD value “ShowTabletKeyboard” (without the quotation marks).
Double-click on the newly created “ShowTabletKeyboard” value and set its value data to 0. Click OK to save the changes.
After modifying the Registry, you may need to restart your computer for the changes to take effect. When your computer boots up again, the on-screen keyboard should be disabled.
Please note that modifying the Registry can have unintended consequences if not done correctly. It is recommended to create a backup of your Registry or create a System Restore point before making any changes.
The Registry Editor method provides a more advanced way of disabling the on-screen keyboard in Windows. If you’re comfortable with editing the Registry and want more control over the system settings, this method is worth considering.
Method 5: Disabling the Touch Keyboard Service
If you want to completely disable the touch keyboard functionality on your Windows device, you can do so by disabling the Touch Keyboard and Handwriting Panel Service. Disabling this service will prevent the on-screen keyboard from appearing altogether.
To begin, press the Windows key + R on your keyboard to open the Run dialog box. Type “services.msc” and press Enter to open the Services window.
In the Services window, scroll down or use the search function to locate the “Touch Keyboard and Handwriting Panel Service”.
Double-click on the service to open its properties.
In the properties window, click on the “Stop” button to stop the service if it is currently running. Then, under the “Startup type” dropdown menu, select “Disabled” to prevent the service from starting automatically.
Click on the “Apply” or “OK” button to save the changes.
By disabling the Touch Keyboard and Handwriting Panel Service, you effectively disable the on-screen keyboard feature on your Windows device.
If you ever need to re-enable the touch keyboard functionality, simply follow the same steps and change the Startup type back to “Automatic” or “Manual”.
Disabling the Touch Keyboard Service is a more drastic approach that completely removes the on-screen keyboard from your device. This method is most suitable for users who have no need for the touch keyboard and want to maximize their device’s performance.
Conclusion
Turning off the on-screen keyboard in Windows can be done using various methods, allowing you to regain control over your typing experience. Whether you prefer using the taskbar, the settings menu, the Control Panel, the Registry Editor, or disabling the Touch Keyboard Service, you have options to suit your preferences and needs.
Using the taskbar is a quick and convenient method that is accessible in both Windows 10 and older versions. Simply right-clicking on the language icon and unchecking the “Show touch keyboard button” option will remove the on-screen keyboard button.
For more advanced control, the settings menu and Control Panel provide user-friendly interfaces to manage the on-screen keyboard functionality. In the settings menu, you can disable the automatic appearance of the touch keyboard in Windows 10 or navigate through the Control Panel to turn off the on-screen keyboard in older versions of Windows.
If you are comfortable making changes to the Windows Registry, the Registry Editor method allows you to modify the “ShowTabletKeyboard” value to disable the on-screen keyboard. However, be cautious as incorrect changes can lead to system issues.
Finally, as a more drastic approach, disabling the Touch Keyboard and Handwriting Panel Service completely removes the touch keyboard functionality from your device, suitable for users who have no need for it.
Remember to always consider your specific requirements and exercise caution when making changes to your system settings. By following the appropriate method, you can easily turn off the on-screen keyboard in Windows and enhance your typing experience.