Introduction
Connecting a wireless keyboard to your Mac can provide you with greater flexibility and convenience while working or browsing. By eliminating the need for physical cables, a wireless keyboard allows you to have more freedom of movement and declutter your workspace. Whether you’re using a Macbook, iMac, or Mac mini, the process of connecting a wireless keyboard remains fairly straightforward.
In this article, we will guide you through the steps required to connect a wireless keyboard to your Mac. By following these instructions, you’ll be able to seamlessly pair your keyboard with your Mac and enjoy the benefits of a wireless setup.
Before we dive into the details, it’s worth mentioning that the process may vary slightly depending on the model of your wireless keyboard and the version of macOS you’re running. However, the general steps we’ll outline should apply to most wireless keyboards and Mac devices.
So, if you’re ready to enhance your Mac experience by going wireless with your keyboard, let’s get started!
Step 1: Check Compatibility
Before you begin the process of connecting a wireless keyboard to your Mac, it’s important to ensure that the keyboard is compatible with your device. Most wireless keyboards support Mac operating systems, but it’s always a good idea to double-check.
Start by checking the system requirements or compatibility information provided by the manufacturer of your wireless keyboard. This information can usually be found on the packaging or in the product manual. Look for any specific mention of compatibility with macOS, as well as any system version requirements.
If you’re unsure about the compatibility of your wireless keyboard, you can also consult the manufacturer’s website or customer support. Additionally, you may find online forums or user reviews where others have shared their experiences connecting the same keyboard model to a Mac.
It’s worth noting that in most cases, newer wireless keyboards with Bluetooth connectivity are more likely to be compatible with Mac devices. However, if you have an older wireless keyboard that uses a USB dongle for connectivity, make sure it’s compatible with Mac before proceeding.
Once you’ve confirmed that your wireless keyboard is compatible with your Mac, you’re ready to move on to the next step. An important aspect of compatibility is also ensuring that your keyboard has sufficient battery charge or is appropriately powered, so keep that in mind as you proceed with the connection process.
Step 2: Turn on your Keyboard
Before you can pair your wireless keyboard with your Mac, you’ll need to ensure that it’s turned on and ready for connection.
Start by locating the power button on your keyboard. This button may be labeled “Power” or have a symbol that represents power, such as a circle with a line through it. Press and hold the power button until the indicator lights on the keyboard begin to flash or turn on.
If your wireless keyboard uses batteries, make sure they are properly inserted and have sufficient charge. Some keyboards may include a battery indicator light that shows the current battery level. If the battery charge is low, consider replacing or recharging the batteries before proceeding with the connection process.
On the other hand, if your wireless keyboard is rechargeable, connect it to a power source using the provided charging cable. Allow the keyboard to charge for a sufficient amount of time to ensure it has enough power for the connection process.
Once your keyboard is turned on and ready, make sure it’s within a reasonable range of your Mac. Ideally, you should position the keyboard within 30 feet of your Mac to ensure a stable and reliable connection.
With your keyboard powered on and in proximity to your Mac, you’re now ready to move on to the next step and begin the pairing process.
Step 3: Open Bluetooth Preferences
Now that your wireless keyboard is turned on and ready, it’s time to open the Bluetooth preferences on your Mac. This is where you’ll initiate the pairing process between your keyboard and your Mac.
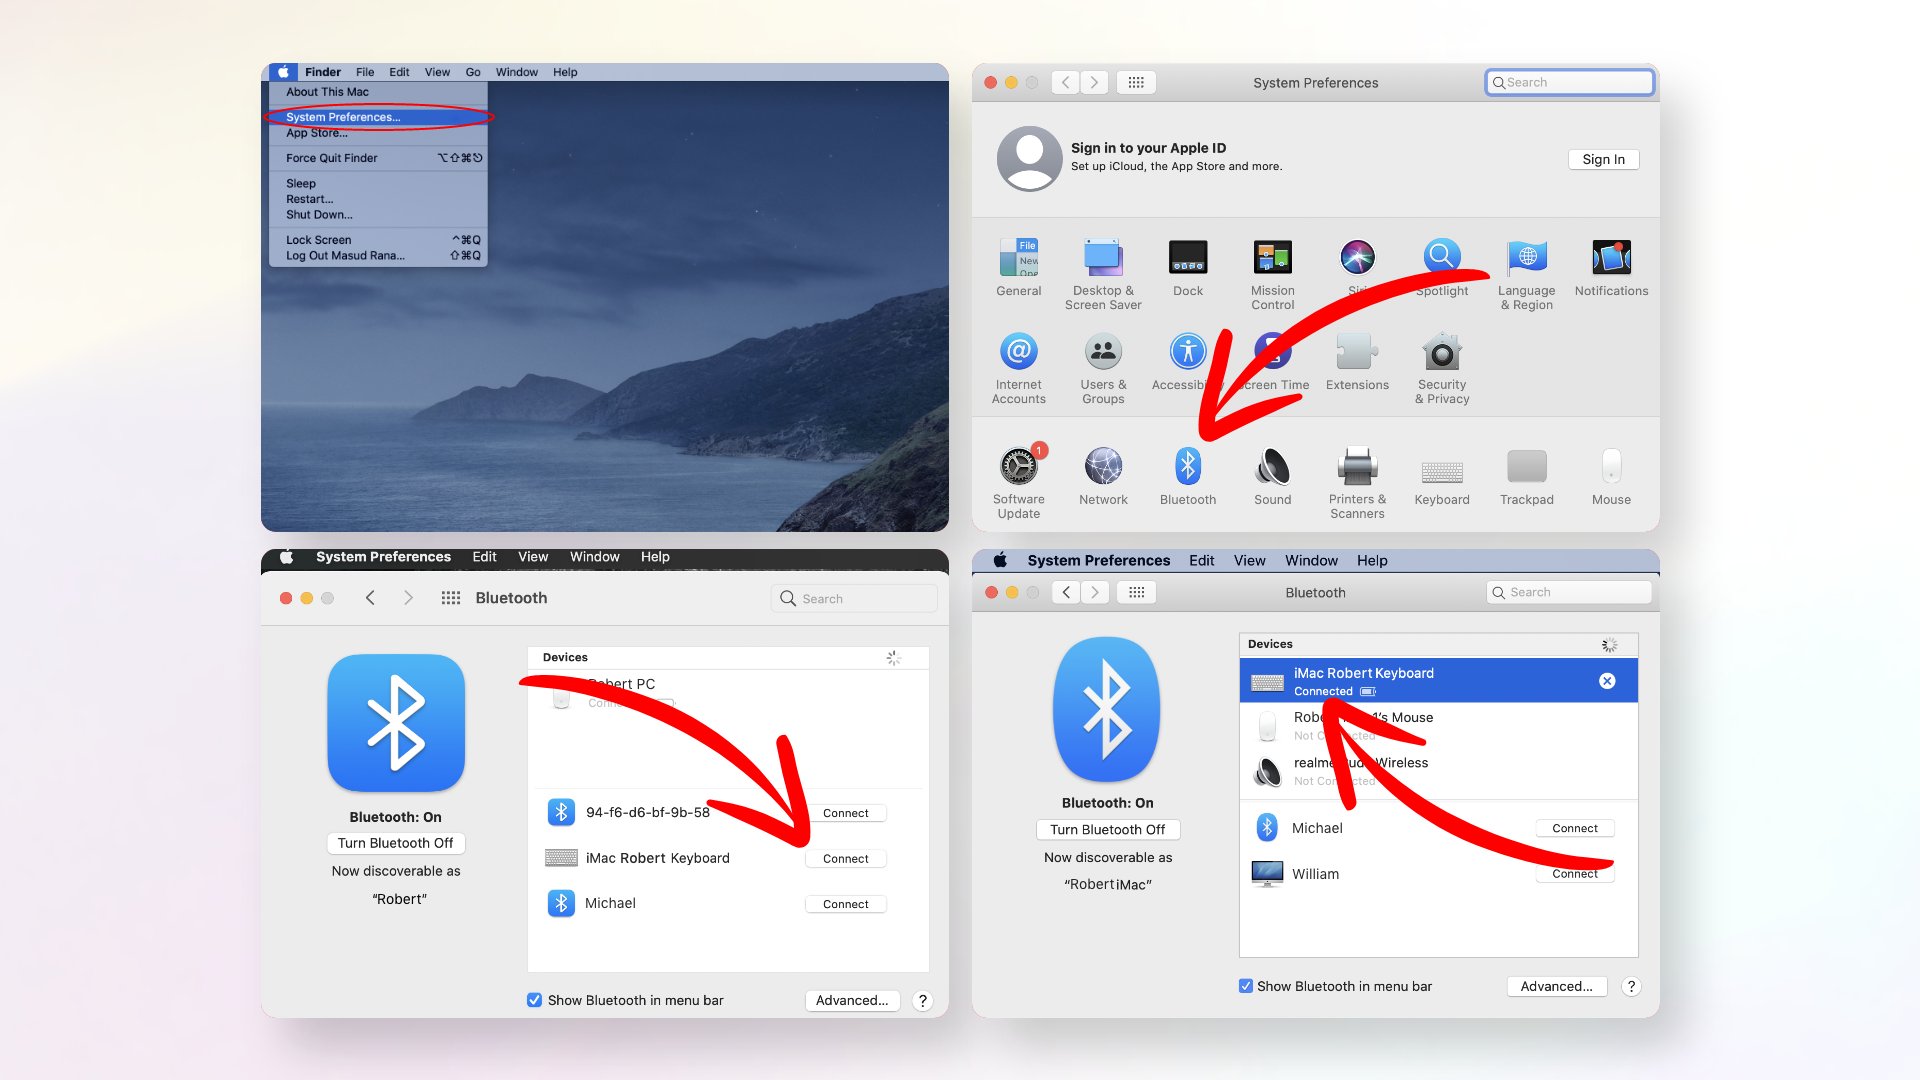
To access the Bluetooth preferences, start by clicking on the Apple menu located on the top left corner of your screen. From the drop-down menu, select “System Preferences.”
In the System Preferences window, locate and click on the “Bluetooth” icon. This will open the Bluetooth preferences panel, where you’ll be able to manage and customize your Mac’s Bluetooth devices.
Once inside the Bluetooth preferences panel, make sure the Bluetooth feature on your Mac is turned on. If it’s off, you can toggle it on by clicking the “Turn Bluetooth On” button.
Your Mac will start searching for nearby Bluetooth devices, including your wireless keyboard. You may see the name or model of your keyboard appear in the list of available devices. Keep in mind that the name of your keyboard may vary depending on the manufacturer.
If you don’t see your keyboard listed, don’t worry. Simply click on the “+” button located at the bottom left of the preferences window. This will trigger a scan for nearby Bluetooth devices and should make your keyboard visible.
Now that you’ve opened the Bluetooth preferences and ensured that Bluetooth is turned on, you’re ready to proceed with the pairing process in the next step.
Step 4: Pair your Keyboard
With the Bluetooth preferences panel open on your Mac, it’s time to pair your wireless keyboard. This process establishes a secure connection between your keyboard and your Mac, allowing them to communicate seamlessly.
In the Bluetooth preferences panel, locate your wireless keyboard in the list of available devices. It should appear with its name or model number. Click on the keyboard’s name to select it.
Once you’ve selected your keyboard, you may be prompted to enter a passcode. Some keyboards require a passcode for an added layer of security. If this is the case, refer to the documentation that came with your keyboard or check the manufacturer’s website for the specific passcode.
Enter the passcode on your Mac using the keyboard on-screen or your existing wired keyboard if you have one. Press the “Return” or “Enter” key after entering the passcode to proceed.
Your Mac will now attempt to establish a connection with your wireless keyboard. This process may take a few seconds, and you may see a message indicating that the pairing is in progress. Once the pairing is successful, you should see a confirmation message that your keyboard is now connected to your Mac.
After pairing your keyboard, you can customize any additional settings or preferences for your wireless keyboard in the Bluetooth preferences panel. This may include options for keyboard settings, such as key repeat rate, function keys, or multimedia controls.
At this point, your wireless keyboard is successfully paired with your Mac, and you’re ready to move on to the final step to ensure your connection is working correctly.
Step 5: Test your Connection
Now that you’ve successfully paired your wireless keyboard with your Mac, it’s important to test the connection to ensure that everything is working correctly. This will help you verify that your keyboard is sending signals to your Mac and that your keystrokes are being registered.
To test your connection, open any application or document where you can type, such as a text editor or a web browser. Start typing on your wireless keyboard and check if the characters are appearing on your screen. Try typing different keys to ensure that all of them are functioning properly.
Pay close attention to any special features or functions of your keyboard, such as multimedia keys or programmable buttons. Verify whether they are working as intended. If your keyboard has backlighting or other lighting features, check if they are functioning correctly as well.
If you experience any issues with the connection or notice that certain keys are not registering, there are a few troubleshooting steps you can try. First, make sure that your keyboard is within range of your Mac and that there are no obstructions blocking the wireless signal.
Another troubleshooting step is to restart both your keyboard and your Mac. Turn off your keyboard, wait a few moments, and then turn it back on. Likewise, restart your Mac and allow it to fully reboot. This can help resolve any temporary connection issues.
If the issues persist, you may need to unpair and re-pair your keyboard. To do this, navigate back to the Bluetooth preferences panel, locate your keyboard, and click on the “X” button next to its name to remove it. Then, follow the pairing process again as outlined in step 4.
By testing your connection and troubleshooting any issues that arise, you can ensure that your wireless keyboard is properly connected and functioning flawlessly with your Mac.
Conclusion
Connecting a wireless keyboard to your Mac can significantly improve your productivity and enhance your overall user experience. By following the simple steps outlined in this guide, you can successfully pair your wireless keyboard with your Mac and enjoy the freedom and convenience of a wireless setup.
Remember to ensure compatibility between your wireless keyboard and your Mac before starting the connection process. Check the system requirements and compatibility information provided by the manufacturer to avoid any compatibility issues.
Once you’ve confirmed compatibility, turn on your keyboard and make sure it’s within range of your Mac. Then, open the Bluetooth preferences on your Mac and initiate the pairing process. Enter any required passcodes and complete the pairing process.
After successfully pairing your keyboard, test the connection by typing in applications or documents to confirm that your keystrokes are registered and that all functions and features of your keyboard are working as expected.
If you encounter any issues during the connection or experience any problems with the keyboard’s functionality, refer to the troubleshooting steps outlined in this guide, such as restarting your keyboard and Mac or unpairing and re-pairing the keyboard.
By following these steps and troubleshooting any issues that arise, you can connect your wireless keyboard to your Mac and enjoy the convenience and flexibility of a wireless setup. So go ahead, connect your wireless keyboard and take your Mac user experience to the next level!