Introduction
Windows 11 is the latest operating system from Microsoft, offering a host of new features and an upgraded user interface. One of the most essential settings on any computer is the display brightness, as it directly affects the visibility and comfort of using the device. Whether you find the brightness level too bright for your eyes or you’re looking to conserve battery life, adjusting the brightness on Windows 11 is a simple yet effective solution.
In this article, we will explore various methods to turn down the brightness on Windows 11. Whether you prefer using the brightness slider, adjusting settings, utilizing keyboard shortcuts, or customizing power plans, we have you covered. By the end of this article, you’ll have the knowledge and tools to accurately adjust the brightness level on your Windows 11 device.
Additionally, we will discuss how to make use of the display settings to fine-tune the brightness according to your preference. Whether you’re using a laptop, desktop, or even a tablet, these methods can be applied across all Windows 11 devices.
So, if you’re ready to improve your visual experience and customize the brightness settings on your Windows 11 device, let’s dive right in and explore the various methods at your disposal.
Method 1: Using the Brightness Slider
Windows 11 provides a convenient way to adjust the brightness level using the brightness slider. This method is ideal for quickly and easily fine-tuning the brightness on your device.
To access the brightness slider, you can follow these simple steps:
- Click on the “Action Center” icon located in the system tray at the bottom-right corner of the screen. Alternatively, you can press the Windows key + A on your keyboard to open the Action Center.
- In the Action Center, you will find the brightness slider at the bottom. Slide the bar to the left to decrease brightness or to the right to increase brightness.
- As you adjust the slider, you will notice the brightness level changing in real-time, allowing you to find the perfect setting for your comfort level.
The brightness slider provides a visual representation of the brightness level, making it easy to find the desired brightness quickly. Whether you’re in a dimly lit room or working in a well-lit environment, this method allows for a seamless adjustment without the need for additional settings.
Keep in mind that the exact appearance of the brightness slider may vary depending on your device and display settings. However, the general process remains the same across all Windows 11 devices.
Using the brightness slider offers a straightforward and intuitive way to control the brightness level on your Windows 11 device. Whether you need to decrease the brightness to reduce eye strain or increase it for improved visibility, the brightness slider provides a convenient solution at your fingertips.
Method 2: Adjusting Brightness in Settings
If you prefer a more detailed and comprehensive approach to adjusting the brightness on Windows 11, you can utilize the display settings. This method provides a range of options for fine-tuning the brightness level according to your specific preferences.
Here’s how you can adjust the brightness in the Windows 11 Settings:
- Click on the “Start” button located in the taskbar or press the Windows key on your keyboard to open the Start Menu.
- From the Start Menu, click on the “Settings” gear icon to open the Windows Settings app.
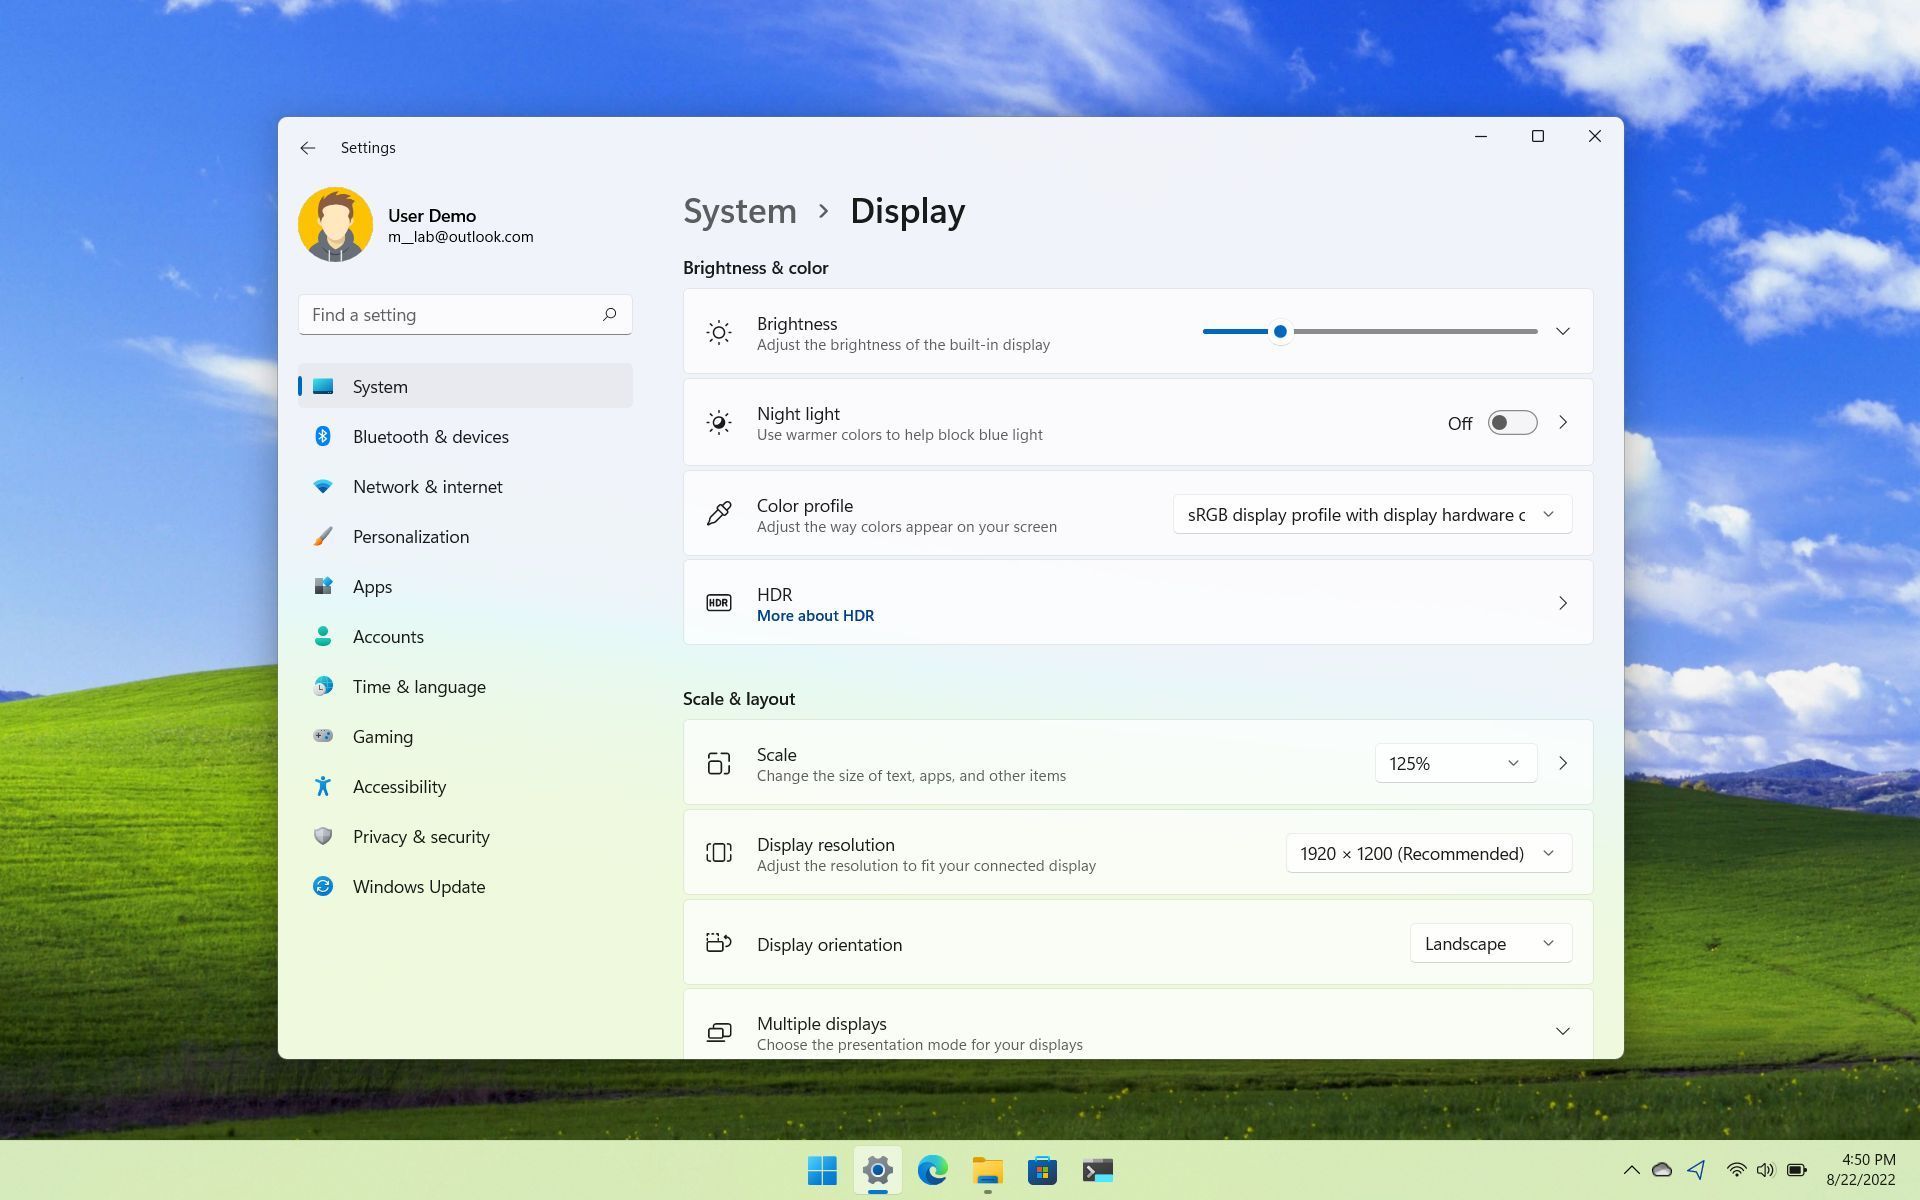
- In the Settings app, select the “System” category.
- In the System settings, click on the “Display” tab located in the left-hand sidebar.
- Under the Display settings, you will find a “Brightness and color” section.
- Adjust the brightness level by dragging the slider to the left to decrease brightness or to the right to increase brightness.
- As you make adjustments, the brightness level will update in real-time, allowing you to find the perfect balance for your needs.
Utilizing the brightness settings in the Windows 11 Settings app gives you greater control over the display options. In addition to adjusting the brightness, you can also explore other display-related settings in this section, such as the display resolution and night light.
This method is particularly useful if you prefer a more comprehensive approach to customizing your display settings. By accessing the Windows Settings app, you have access to a wide range of display options beyond just the brightness level.
Take the time to explore the different settings available to find the combination that best suits your preferences and workspace environment. Whether you need to increase the brightness for detailed tasks or decrease it for a more comfortable viewing experience, the display settings offer the flexibility to meet your unique needs.
Method 3: Using Keyboard Shortcuts
If you’re someone who prefers using keyboard shortcuts for quick and efficient actions, adjusting the brightness on Windows 11 can also be done using specific key combinations. This method allows you to seamlessly control the brightness level without the need to navigate through menus or settings.
Here are the keyboard shortcuts to adjust brightness on Windows 11:
- To decrease brightness: Press the Fn key (if available) along with the F11 key.
- To increase brightness: Press the Fn key (if available) along with the F12 key.
Depending on your device and keyboard layout, you may need to use the Function (Fn) key in combination with the appropriate function key to adjust the brightness. The function keys are usually marked with symbols like a sun or light bulb representing brightness control.
This method offers a convenient and quick way to adjust the brightness level without the need for additional menus or settings. By familiarizing yourself with these keyboard shortcuts, you can easily increase or decrease the brightness at any time, enhancing your viewing experience.
It’s worth mentioning that not all keyboards or devices may feature function keys or the Fn key. In such cases, you can utilize alternative methods like the brightness slider or settings to adjust the brightness level.
Using keyboard shortcuts is ideal for those who prefer a hands-on approach, allowing you to make instantaneous brightness adjustments with a simple keystroke. Whether you’re working on a laptop or a desktop, mastering these keyboard shortcuts can significantly improve your workflow and user experience on Windows 11.
Method 4: Using Power Plans
Another effective method for adjusting the brightness on Windows 11 is by utilizing power plans. Power plans allow you to optimize various settings, including the brightness level, based on your power usage preferences. By adjusting the power plan settings, you can easily regulate the brightness to suit your needs while maximizing energy efficiency.
Follow these steps to adjust the brightness using power plans:
- Click on the “Start” button located in the taskbar or press the Windows key on your keyboard to open the Start Menu.
- From the Start Menu, click on the “Settings” gear icon to open the Windows Settings app.
- In the Settings app, select the “System” category.
- In the System settings, click on the “Power & sleep” tab located in the left-hand sidebar.
- Under the Power & sleep settings, you will find the “Power mode” section.
- Select the power plan that suits your needs. Typically, there are options for Balanced, Power saver, and High performance.
- Click on “Additional power settings” to access more advanced power plan settings.
- Within the advanced power settings, locate the display-related settings, usually under the “Display” or “Battery” category.
- Adjust the brightness level according to your preference by dragging the slider or adjusting the percentage value.
- Save the changes and exit the power plan settings.
By customizing the brightness level in specific power plans, you can ensure that the brightness automatically adjusts to your desired level when the corresponding power plan is activated. For example, you can set a lower brightness level in the Power saver mode to conserve battery, while having a higher brightness level in the High-performance mode for optimal visibility.
This method is especially helpful for laptop users who frequently switch between power modes. By utilizing different power plans with customized brightness settings, you can easily adapt to different usage scenarios and maximize your device’s battery life.
Experiment with different power plans and brightness settings to find the perfect balance between brightness, power consumption, and your individual requirements. Whether you need to prioritize battery life or require maximum brightness for a specific task, the flexibility of power plans allows for seamless customization.
Method 5: Using Display Settings
Windows 11 offers a robust set of display settings that allow you to have full control over the brightness and other display-related options. This method gives you the flexibility to fine-tune the brightness level according to your exact preferences, ensuring a comfortable and visually pleasing experience.
Here’s how you can adjust the brightness using the Display Settings:
- Click on the “Start” button located in the taskbar or press the Windows key on your keyboard to open the Start Menu.
- From the Start Menu, click on the “Settings” gear icon to open the Windows Settings app.
- In the Settings app, select the “System” category.
- In the System settings, click on the “Display” tab located in the left-hand sidebar.
- Under the Display settings, you will find various options to customize your display.
- Scroll down to the “Brightness and color” section and click on “Advanced display settings”.
- In the Advanced display settings, you can adjust the brightness by dragging the slider to the left to decrease brightness or to the right to increase brightness.
- You can also click on the “Color calibration” option to further customize the color settings of your display.
- Explore the additional options available, such as Night light settings or HDR settings, to enhance your display experience.
- Once you have adjusted the brightness and other display settings to your preference, close the Display settings.
Using the Display settings allows for a more detailed and nuanced approach to adjusting the brightness on Windows 11. You can fine-tune the brightness level precisely according to your surroundings and personal preferences by utilizing the slider.
Furthermore, the Display settings provide access to other useful options like color calibration and night light settings. Calibrating your display’s colors and enabling the night light feature can greatly enhance your visual experience, reducing eye strain and improving readability.
Take the time to experiment with different brightness levels and explore the various display settings available. By customizing the display to your liking, you can enjoy a visually appealing and comfortable experience while using your Windows 11 device.
Conclusion
Adjusting the brightness on Windows 11 is a simple yet essential task that allows you to enhance your visual experience and ensure comfortable usage of your device. By utilizing different methods such as the brightness slider, display settings, keyboard shortcuts, power plans, and more, you can easily customize the brightness level to suit your preferences and specific needs.
The brightness slider, found in the Action Center, offers a quick and convenient way to adjust the brightness with a visual representation of the level. On the other hand, the Windows Settings app provides comprehensive control over various display settings, including brightness, color calibration, and more.
If you prefer using keyboard shortcuts, specific key combinations can instantly increase or decrease the brightness, providing a seamless adjustment process. Power plans allow you to optimize brightness settings based on power usage preferences, while the display settings provide access to a wide range of customization options like night light and color calibration.
Remember to strike a balance between achieving your desired brightness level and considering factors such as eye strain and battery life optimization. Experiment with different methods and settings to find the combination that works best for you.
With these methods at your disposal, you can easily turn down the brightness on your Windows 11 device, improving visibility, reducing eye strain, and ensuring a comfortable and visually pleasing experience across various usage scenarios.
So, take control of your brightness settings, customize your display, and optimize your Windows 11 experience for maximum comfort and productivity.