Introduction
Welcome to the guide on how to add a new user in Windows 10 Pro on an HP Ultrabook. Adding a new user to your computer is a common task that allows multiple individuals to have personal accounts and settings on the same device. Whether you want to create a separate account for a family member, a friend, or a colleague, this step-by-step tutorial will show you how to do it effortlessly.
By adding a new user, you can ensure that each person using the HP Ultrabook has their own personalized experience, including their own desktop background, application preferences, and privacy settings. This not only promotes a sense of ownership but also allows for greater privacy and productivity, as each user can customize their account to suit their individual needs.
While Windows 10 Pro offers various methods to add new users, in this guide, we will focus on the process of adding a user without a Microsoft account. This approach is particularly useful when you want to create a local user account that is not linked to an online Microsoft account. By following the steps outlined here, you’ll be able to successfully create a new user profile on your HP Ultrabook.
So, if you’re ready to learn how to add a new user in Windows 10 Pro on your HP Ultrabook, let’s get started with the first step: opening the Settings menu.
Step 1: Open the Settings menu
The first step to add a new user in Windows 10 Pro on your HP Ultrabook is to open the Settings menu. The Settings menu provides access to various system configurations and options, including user management.
To open the Settings menu, click on the Start button located at the bottom left corner of the screen. The Start menu will appear, displaying a list of apps and settings.
Next, locate the gear icon labeled “Settings” and click on it. This will open the Settings menu, where you can customize various aspects of your computer’s setup.
Alternatively, you can also use the keyboard shortcut by pressing the Windows key + I at the same time. This will directly open the Settings menu, saving you a few clicks.
Once you have successfully opened the Settings menu, you will be presented with a wide range of options to choose from. These options are categorized into different sections, making it easier to navigate and find the desired settings.
Now that you have opened the Settings menu, you are ready to proceed to the next step: selecting the “Accounts” option.
Step 2: Select the “Accounts” option
After opening the Settings menu, the next step in adding a new user in Windows 10 Pro on your HP Ultrabook is to select the “Accounts” option. The “Accounts” section is where you can manage all user-related settings and configurations.
To select the “Accounts” option, look for the icon that resembles a person or a silhouette, labeled “Accounts.” This icon is typically located towards the top of the Settings menu, in close proximity to other system categories.
Clicking on the “Accounts” option will take you to the Accounts settings page, which provides you with several options for managing user accounts on your HP Ultrabook.
On the Accounts settings page, you will find a sidebar on the left side of the screen. This sidebar contains different account-related categories, such as “Your info,” “Email & accounts,” “Sign-in options,” “Family & other users,” and more.
For the purpose of adding a new user, we will focus on the “Family & other users” category on the sidebar. This category allows you to manage the user accounts on the device, including adding new users and linking existing accounts to online Microsoft accounts.
By selecting the “Family & other users” option, you will be directed to a new page that displays information and settings related to user accounts.
Now that you have successfully selected the “Accounts” option and accessed the “Family & other users” category, you are ready to move on to the next step of adding a new user: clicking on the “Add someone else to this PC” button.
Step 3: Click on the “Family & other users” tab
After selecting the “Accounts” option in the Settings menu, the next step in adding a new user in Windows 10 Pro on your HP Ultrabook is to click on the “Family & other users” tab. This tab is where you can manage user accounts, including adding new users and configuring their permissions.
On the Accounts settings page, you will find a sidebar on the left side of the screen. Among the different categories listed in the sidebar, locate and click on the “Family & other users” tab. Clicking on this tab will open a page dedicated to managing user accounts on your HP Ultrabook.
By clicking on the “Family & other users” tab, you will have access to a variety of options related to user accounts. This includes the ability to add family members, as well as other users who may use the device.
Furthermore, under the “Family & other users” tab, you will see two sections: “Your family” and “Other users.” The “Your family” section is primarily used for managing accounts of family members linked through Microsoft Family. The “Other users” section focuses on creating separate accounts for individuals who do not have a Microsoft account.
Since we are adding a new user without a Microsoft account for this tutorial, our main focus will be on the “Other users” section. This section allows you to create new user accounts for individuals who do not have a Microsoft account or do not want to link it to their personal account.
By clicking on the “Family & other users” tab, you have successfully navigated to the appropriate section for managing user accounts. You are now ready to proceed to the next step: clicking on the “Add someone else to this PC” button.
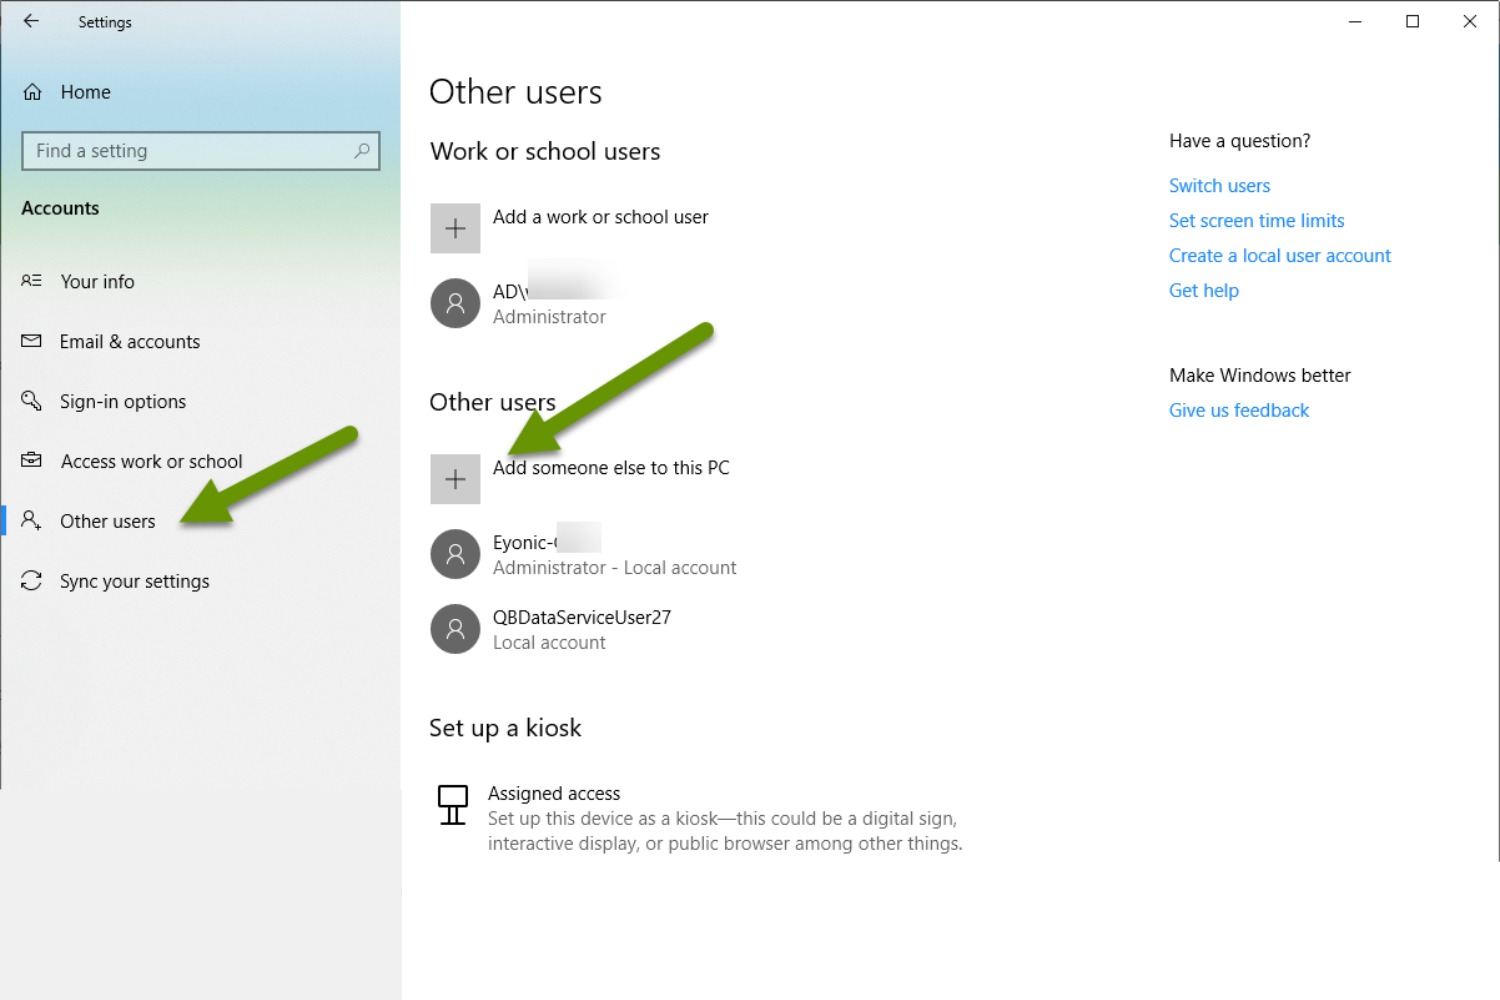
Step 4: Click on the “Add someone else to this PC” button
After accessing the “Family & other users” tab in the Accounts settings, the next step in adding a new user in Windows 10 Pro on your HP Ultrabook is to click on the “Add someone else to this PC” button. This button allows you to initiate the process of creating a new user account on your device.
When you click on the “Add someone else to this PC” button, a dialog box will appear, presenting you with different options to set up the new user account. This dialog box is where you can specify whether the new user has a Microsoft account or not.
Since we are focusing on creating a new user without a Microsoft account for this tutorial, you will need to choose the option that states, “I don’t have this person’s sign-in information.” This selection indicates that you will be creating a local user account that is not linked to an online Microsoft account.
By clicking on the “Add someone else to this PC” button, you are signaling your intention to create a new user on your HP Ultrabook. This step is crucial in the process of adding a new user and paves the way for the subsequent steps of entering the user’s sign-in information and setting up their account.
Now that you have successfully clicked on the “Add someone else to this PC” button, you are ready to proceed to the next step: selecting the option to add a user without a Microsoft account.
Step 5: Select “I don’t have this person’s sign-in information”
After clicking on the “Add someone else to this PC” button, the next step in adding a new user in Windows 10 Pro on your HP Ultrabook is to select the option that states, “I don’t have this person’s sign-in information.” This option is applicable when you want to create a new user account without a Microsoft account.
By selecting “I don’t have this person’s sign-in information,” you indicate that the new user account will be a local account, which means it will not be linked to an online Microsoft account. This is useful if the user prefers not to have their account connected to a Microsoft account or if they do not have an existing Microsoft account.
After selecting this option, click on the “Next” button to proceed with the creation of a new user account.
It’s important to note that if you plan to create a user account with a Microsoft account, you can choose the option that says, “Add a user with a Microsoft account.” This option will prompt you to enter the user’s Microsoft email address or phone number and guide you through the account creation process accordingly.
By selecting “I don’t have this person’s sign-in information,” you are now ready to move on to the next step: clicking on the “Add a user without a Microsoft account” option.
Step 6: Click on the “Add a user without a Microsoft account” option
After selecting the option “I don’t have this person’s sign-in information,” the next step in adding a new user in Windows 10 Pro on your HP Ultrabook is to click on the “Add a user without a Microsoft account” option. This option allows you to create a new user account that is not associated with an online Microsoft account.
By clicking on the “Add a user without a Microsoft account” option, you are indicating your choice to create a local user account that is solely tied to your device. This means that the new user will not have access to Microsoft services like Outlook.com or OneDrive using this account.
Choosing this option is ideal if you want to create an independent user account or if the user does not have or want to use a Microsoft account. It provides flexibility and privacy as the user’s data will be stored locally on the HP Ultrabook.
Once you have clicked on the “Add a user without a Microsoft account” option, you will proceed to the next step, where you can enter the new user’s name and password.
It’s important to note that if you want to create a user account with a Microsoft account, you can select the “Sign in with a Microsoft account instead” option. This will prompt you to enter the user’s Microsoft email address or phone number, and guide you through the account creation process accordingly.
By clicking on the “Add a user without a Microsoft account” option, you have successfully completed this step. You are now ready to move on to the next step of entering the new user’s name and password.
Step 7: Enter the new user’s name and password
After selecting the “Add a user without a Microsoft account” option, the next step in adding a new user in Windows 10 Pro on your HP Ultrabook is to enter the new user’s name and password. This step involves providing the necessary information to create the user account.
On the page that appears after selecting the “Add a user without a Microsoft account” option, you will be prompted to enter the new user’s name. Type the desired name for the user account in the designated field. It’s recommended to use a name that is easily identifiable and distinguishable from other user accounts on the device.
Below the name field, you will find a section to set a password for the new user account. Click on the “Password” field, and enter a password for the account. It’s important to choose a strong password that includes a combination of letters, numbers, and special characters to ensure the security of the user’s account.
As you enter the password, you will notice that the characters will be displayed as dots or asterisks to keep it hidden from view. This is a security measure to prevent anyone from seeing the password while you are typing it.
Additionally, you have the option to enable the “Password hint” field. If the user forgets their password in the future, this hint will assist them in remembering it. It can be a helpful reminder without revealing the actual password to others.
Once you have entered the new user's name and password, take a moment to review the information to ensure accuracy. Double-check the name spelling and password strength before proceeding to the next step.
Now that you have successfully entered the new user's name and password, you are ready to move on to the next step: optionally setting an account picture and password hint.
Step 8: Optional: Set an account picture and password hint
After entering the new user’s name and password, you have the option to further customize the user account by setting an account picture and providing a password hint. Although optional, these additional settings can enhance the user’s experience and personalize their account.
To set an account picture, click on the “Choose a picture” button or icon that represents a profile picture. This will open a gallery of default pictures that you can choose from. Alternatively, you can click on the “Browse” button to select a picture from your computer’s local storage.
Selecting an appropriate account picture can help visually identify the user’s account and add a personal touch. You can opt for a picture of the user, an image representing their interests, or a generic avatar that suits their personality.
Next, you have the option to set a password hint. The password hint can be a clue or reminder that helps the user recall their password if they forget it. It should be something that would not be obvious to others but serves as a memory jogger for the user.
It’s important to note that while a password hint can be helpful, it should not be too explicit or obvious, as this could compromise the security of the user’s account. Choose a password hint that is known only to the user or within their close circle.
Setting an account picture and password hint are optional steps that allow for personalization and convenience. Take a moment to consider whether these customizations would be beneficial for the new user and adjust accordingly.
Now that you have optionally set an account picture and password hint, you are ready to move on to the next step: clicking on the “Next” button to proceed.
Step 9: Click on the “Next” button
After entering the new user’s name, password, and optionally setting an account picture and password hint, the next step in adding a new user in Windows 10 Pro on your HP Ultrabook is to click on the “Next” button. This button serves as a confirmation to proceed with the creation of the new user account.
By clicking on the “Next” button, you validate the information provided and initiate the process of creating the user account. This step ensures that all necessary details are correctly entered and prepares the system for setting up the new user’s account.
Before clicking the “Next” button, it’s important to verify that all the information entered is accurate and meets your requirements. Check the spelling of the user’s name, the strength and accuracy of the password, and ensure that the optional account picture and password hint reflect the user’s preferences.
Once you are satisfied with the information provided, click on the “Next” button to proceed to the next step in the user account creation process.
After clicking on the “Next” button, the system may take a few moments to finalize the setup. Depending on the speed of your HP Ultrabook and the system resources available, the process may complete quickly or take a bit longer.
It’s important to note that if there is an issue with the information provided or any conflicting entries, you may receive an error message or prompt to review and correct the details. In such cases, carefully check the information and make the necessary adjustments before clicking the “Next” button again.
By clicking on the “Next” button, you have successfully confirmed the creation of the new user account and initiated the setup process. Now, you can proceed to the final step: setting up the new user’s privacy settings.
Step 10: Set up the new user’s privacy settings
After clicking on the “Next” button to confirm the creation of the new user account, the next step in adding a new user in Windows 10 Pro on your HP Ultrabook is to set up the privacy settings for the newly created account.
On the privacy settings page, you will be presented with various options to customize the level of privacy and control for the new user. These settings include options related to location, camera access, microphone access, app permissions, and more.
Go through each privacy setting option and select the desired level of privacy for the new user account. You can adjust settings individually based on your preferences and the requirements of the user. It’s important to strike a balance between privacy and functionality, ensuring the user has adequate access to the resources they need while maintaining their privacy and security.
Take the time to review each privacy setting and understand its implications. Each setting may have an impact on how certain features or apps function for the user. For example, enabling camera access allows the user to use the device’s camera for various purposes.
You can also choose to set all the privacy settings to their recommended defaults, which is a balanced configuration based on Microsoft’s general recommendations. This option offers a convenient way to ensure a reasonable level of privacy without requiring manual customization of individual settings.
After setting up the privacy preferences for the new user account, you can proceed to the final step: clicking on the “Finish” button to complete the process of adding a new user to your HP Ultrabook.
It’s worth noting that privacy preferences can be adjusted later as needed. The user can access and modify their privacy settings at any time through the Windows Settings menu.
By setting up the new user's privacy settings, you ensure that their account is configured according to your desired level of privacy and aligns with their specific needs and requirements.
Step 11: Click on the “Finish” button
After setting up the privacy settings for the new user account, the final step in adding a new user in Windows 10 Pro on your HP Ultrabook is to click on the “Finish” button. This button marks the completion of the user account creation process and finalizes the setup of the new user on your device.
By clicking on the “Finish” button, you confirm that all the necessary information has been provided, privacy settings have been configured, and you are ready to proceed with the new user account.
After clicking “Finish,” Windows 10 Pro will finalize the creation of the new user account and make the necessary adjustments to the system. This may take a few moments, depending on the performance of your HP Ultrabook and the complexity of the account setup.
Once the process is complete, you will be redirected to the Accounts settings page, where you can review and manage the newly created user account. From here, you can make any necessary adjustments, such as changing account settings, adding or removing permissions, and more.
At this point, the new user can sign in to their account using their specified username and password. They will have access to a personalized account on your HP Ultrabook, allowing them to customize their desktop, install applications, and enjoy a tailored computing experience.
It’s important to note that as the administrator of the device, you have the ability to manage user accounts, including adding or removing users, changing permissions, and monitoring activity. This gives you control over the usage and accessibility of your HP Ultrabook.
By clicking on the “Finish” button, you have successfully completed the process of adding a new user in Windows 10 Pro on your HP Ultrabook. The new user can now enjoy their own personalized account and benefit from the features and functionalities offered by Windows 10 Pro.
Conclusion
Adding a new user in Windows 10 Pro on your HP Ultrabook is a straightforward process that allows for personalized user accounts and enhanced privacy settings. By following the step-by-step guide outlined in this tutorial, you can successfully create a new user account on your device.
Starting from opening the Settings menu and selecting the “Accounts” option, to entering the new user’s name and password, setting an account picture and password hint, configuring privacy settings, and clicking on the “Finish” button, each step plays a critical role in the creation and customization of the new user account.
Creating separate user accounts benefits both individuals and organizations by providing personalization, privacy, and productivity. With unique desktop backgrounds, application preferences, and privacy settings, each user can tailor their Windows experience to their specific needs, whether it’s for family members, friends, or colleagues.
It’s important to note that as the device administrator, you have control over the management of user accounts. You can add or remove users, adjust permissions, and monitor activity to ensure the security and efficient usage of your HP Ultrabook.
By following this guide, you are empowered to create a new user account without relying on a Microsoft account, allowing for the flexibility and control of local user accounts. Additionally, you have the option to customize the user’s privacy settings to strike a balance between functionality and personal data protection.
Now that you have completed the process of adding a new user in Windows 10 Pro on your HP Ultrabook, each user can enjoy a personalized and secure computing experience, tailored to their individual needs. With the ability to have multiple accounts on a single device, you can ensure that everyone using your HP Ultrabook has their own unique environment.
So, go ahead and create new user accounts on your HP Ultrabook to accommodate the needs of your family, friends, or colleagues. With the step-by-step instructions provided, you can easily manage user accounts and foster a productive and enjoyable computing experience.