Introduction
Recording a presentation on Zoom is a valuable tool for various purposes, whether you want to capture important information for future reference, share a lecture with others who couldn’t attend, or create online courses. Zoom, a popular video conferencing platform, offers a user-friendly interface and robust recording features that make it easy to record and save your presentations.
In this article, we will guide you through the step-by-step process of recording a presentation on Zoom. From downloading and installing the Zoom software to accessing and sharing the recorded presentation, we’ve got you covered. So, let’s get started!
Before we delve into the details, it’s important to note that recording a Zoom presentation requires the host or someone with recording permission. If you’re not the host, make sure to communicate with the host and obtain the necessary permissions to record the presentation.
Recording your presentation on Zoom offers numerous benefits. It allows you to revisit the presentation at any time, ensuring that you don’t miss any important details. You can also share the recording with others who were unable to attend the live presentation, providing them with an opportunity to catch up on the information.
Additionally, recording presentations on Zoom can serve as a valuable resource for creating online courses or training materials. By utilizing recorded presentations, you can create educational content that can be accessed by a wider audience, increasing your reach and impact.
Now, let’s move on to the steps involved in recording a presentation on Zoom. From downloading and installing Zoom to adjusting the recording settings and accessing the recorded presentation, we will guide you through the process, ensuring that you have all the information you need to make the most of this powerful feature.
Step 1: Download and install Zoom
The first step in recording a presentation on Zoom is to download and install the Zoom software on your computer. Follow these simple steps to get started:
- Visit the official Zoom website at zoom.us in your web browser.
- Click on the “Sign Up, It’s Free” button to create a new Zoom account. Alternatively, if you already have an account, you can sign in using your existing credentials.
- Once logged in, navigate to the “Resources” menu at the top of the page and select “Download Zoom Client” from the dropdown menu.
- On the download page, click on the “Download” button under the “Zoom Client for Meetings” section.
- The Zoom application setup file will now begin downloading. Once the download is complete, locate the file in your computer’s downloads folder and double-click on it to start the installation process.
- Follow the on-screen instructions to install Zoom on your computer. Make sure to read and accept the terms of service when prompted.
- After the installation is complete, launch the Zoom application and sign in using your Zoom account credentials.
Once you have successfully downloaded and installed Zoom, you are ready to move on to the next step of scheduling a meeting for your presentation. Zoom provides a seamless and user-friendly interface, making it easy to navigate and access the various features that will enhance your presentation experience.
It’s worth mentioning that Zoom is available for both Windows and Mac operating systems, ensuring compatibility with a wide range of computers. Additionally, Zoom offers mobile applications for iOS and Android devices, allowing you to access and record presentations on-the-go.
By downloading and installing Zoom, you gain access to a powerful platform that offers not only presentation recording capabilities but also a host of other collaborative features. Whether you’re recording a business presentation or an educational lecture, Zoom provides a reliable and user-friendly environment for capturing and sharing your valuable content.
Step 2: Schedule a meeting on Zoom
After downloading and installing Zoom, the next step in recording a presentation is to schedule a meeting on the Zoom platform. Scheduling a meeting allows you to set a specific date and time for your presentation and invite participants to join. Follow these steps to schedule a meeting on Zoom:
- Open the Zoom application on your computer and sign in using your Zoom account credentials.
- Click on the “Schedule” button located at the bottom right corner of the application window.
- In the “Schedule Meeting” window, enter a meaningful topic for your presentation in the “Topic” field.
- Set the date and time for your presentation by selecting the desired options in the “When” section.
- Specify the meeting duration in the “Duration” field. If you’re unsure how long your presentation will take, it’s better to allocate some extra time to account for any unexpected delays.
- Customize the meeting settings according to your needs. You can enable or disable features such as video, audio, screen sharing, and recording. For recording a presentation, make sure to tick the box next to “Record the meeting automatically on the local computer.”
- Invite participants to join your presentation by entering their email addresses in the “Invite Participants” section. You can also copy the meeting invitation link and share it with participants via email or other communication channels.
- Review the meeting details and settings to ensure everything is correct. Once you’re satisfied, click on the “Schedule” button to finalize and schedule the meeting.
By scheduling a meeting on Zoom, you establish a dedicated session for your presentation and provide a structured environment for all participants. Scheduling also enables you to send invitations to participants and ensure that everyone is aware of the date and time of the presentation.
Moreover, the ability to customize meeting settings allows you to tailor the presentation experience to your specific requirements. For example, you can choose to enable or disable participants’ video and audio, control screen sharing, and even enforce meeting password protection for added security.
Once you have successfully scheduled a meeting on Zoom, you’re one step closer to recording your presentation. In the next section, we will explore how to adjust the recording settings to ensure that your presentation is captured with the desired settings and quality.
Step 3: Adjust the recording settings
Before you start recording your presentation on Zoom, it’s essential to adjust the recording settings to ensure that you capture the desired aspects of your presentation. Zoom offers several recording options and settings that can be customized according to your preferences. Follow these steps to adjust the recording settings:
- Open the Zoom application on your computer and sign in using your Zoom account credentials.
- If you haven’t already done so, join the scheduled meeting for your presentation by clicking on the “Meetings” tab and selecting the appropriate meeting.
- Once you’re in the meeting room, navigate to the bottom toolbar and click on the “Record” button.
- A menu will appear with different recording options:
- Record on this Computer: This option allows you to record the meeting locally on your computer.
- Record to the Cloud: This option enables you to save the recording directly to the cloud storage provided by Zoom.
- Choose the appropriate recording option based on your needs and preferences. If you have sufficient storage space on your computer and want to have the recording readily available, select “Record on this Computer.”
- If you select “Record on this Computer,” you can further customize the recording settings by clicking on the small arrow next to the “Record” button. Here, you can specify the location on your computer where you want the recording to be saved.
- Additionally, you can select whether to record video, audio, or both by ticking the relevant checkboxes. If you want to include the participants’ video and audio in the recording, make sure to enable these options.
- Once you have adjusted the recording settings to your satisfaction, click on the red “Record” button to start recording your presentation.
By adjusting the recording settings on Zoom, you have the flexibility to choose the recording method (local or cloud) and customize the various aspects of the recording, such as video and audio inclusion. This allows you to tailor the recording to your specific needs, ensuring that you capture all the essential elements of your presentation.
It’s worth noting that Zoom provides high-quality recording capabilities, preserving the visual and audio aspects of your presentation with clarity. This ensures that your recorded presentation maintains its integrity and can be easily comprehended by viewers.
Now that you have adjusted the recording settings, you’re ready to start recording your presentation. In the next step, we will explore how to utilize the Zoom recording controls effectively to capture your presentation smoothly and effortlessly.
Step 4: Start the presentation recording
With the recording settings adjusted, you’re now ready to start recording your presentation on Zoom. Follow these steps to begin the recording:
- Make sure you’re in the meeting room for your scheduled presentation.
- Navigate to the bottom toolbar and locate the red “Record” button.
- Click on the “Record” button to initiate the recording.
- A small indicator will appear on the top-left corner of the meeting window, indicating that the recording has started.
- You can now begin your presentation as usual. Speak clearly and engage your audience, knowing that your presentation is being recorded.
- During the presentation, you can utilize Zoom’s features such as screen sharing, chat, and annotation tools to enhance the experience.
- Remember to pace yourself and allow sufficient time for participants to ask questions or provide input if necessary.
- Keep an eye on the recording indicator to ensure that it remains visible throughout the presentation, indicating that the recording is in progress.
By starting the presentation recording on Zoom, you ensure that every moment of your presentation is captured and saved for future reference. This allows you to focus on delivering your content confidently, knowing that you have a reliable recording to refer back to if needed.
During the recording, it’s important to maintain a steady pace and deliver your presentation with clarity and enthusiasm. Speak slowly and articulate your words to ensure that the recording captures your message effectively. Engage with your audience and make eye contact with the camera to create a more personal connection with viewers who will watch the recorded presentation later.
Remember that while the recording is in progress, you can utilize the available Zoom features to enhance your presentation. Whether it’s sharing your screen to demonstrate slides or utilizing the chat function to engage with participants, these features can add depth and interactivity to your recorded presentation.
Now that you have started the recording, it’s important to be mindful of the Zoom recording controls to ensure a smooth and uninterrupted recording experience. In the next step, we will explore how to effectively use the Zoom recording controls during your presentation.
Step 5: Use the Zoom recording controls
As you progress with your recorded presentation on Zoom, it’s important to familiarize yourself with the available recording controls. These controls give you the flexibility to manage the recording and make adjustments as needed. Here’s a guide on using the Zoom recording controls:
- During the presentation, you can access the recording controls by hovering your cursor over the meeting window. The controls will appear at the bottom of the screen.
- To pause the recording temporarily, click on the “Pause” button. This can be useful if you need to take a break or address any unexpected interruptions.
- To resume the recording, click on the “Resume” button. This will continue the recording from where it was paused.
- If you need to stop the recording completely, click on the “Stop Recording” button. A pop-up message will appear asking for confirmation. Click on “Stop” to end the recording.
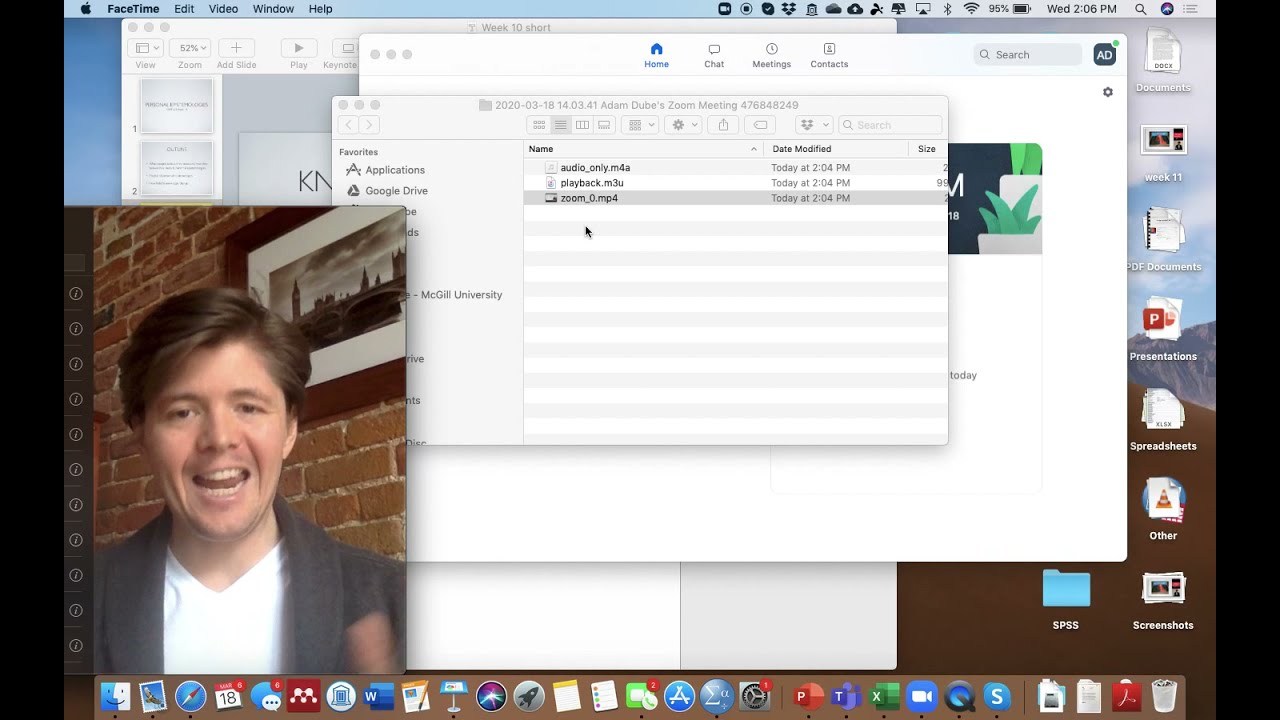
- Once you stop the recording, Zoom will process the recording and save it to the designated location on your computer or cloud storage, depending on your chosen recording option.
- After the recording is complete, you can access and manage your recorded presentations in the “Recordings” section of your Zoom account.
- From the “Recordings” section, you can play, rename, delete, and share your recorded presentations as needed.
Utilizing the Zoom recording controls allows you to have control over your recorded presentation. Pausing the recording when necessary or stopping it at the end ensures that you capture only the intended content. This allows you to create a high-quality recording that effectively communicates your presentation message.
In addition, having access to the recorded presentations in your Zoom account gives you the flexibility to manage and share the recordings as needed. You can review the recordings, make any necessary edits, and share them with participants or a wider audience for further engagement.
Remember to review your recorded presentation before sharing it to ensure its quality and consistency. This gives you the opportunity to make any necessary adjustments or edits, ensuring that the final recording accurately represents your presentation.
Now that you have successfully utilized the Zoom recording controls, you’re ready to proceed to the final step, where we will explore how to access and share your recorded presentation.
Step 6: End the recording
Once you have completed your presentation and no longer need to record, it’s important to properly end the recording on Zoom. This ensures that the recording is saved and can be accessed for future use. Follow these steps to end the recording:
- When you have finished your presentation, navigate to the recording controls at the bottom of the meeting window.
- Click on the “Stop Recording” button.
- A pop-up message will appear asking for confirmation to stop the recording. Click on “Stop” to complete the recording process.
- Zoom will process the recording and save it to the designated location on your computer or cloud storage, depending on your chosen recording option.
It’s important to properly end the recording to ensure that all the content from your presentation is captured and saved. Ending the recording triggers the final processing and saving of the recorded file, making it ready for access and further use.
Before ending the recording, take a moment to ensure that you have included all the necessary information and key points in your presentation. Double-check that your recording captured the entire duration of your presentation and that there are no gaps or missing sections.
Once the recording is complete and saved, you can move on to the next step of accessing and sharing your recorded presentation. In the following section, we will explore how to access and manage your recorded presentations for future use and distribution.
Step 7: Access and share the recorded presentation
After you have successfully ended the recording on Zoom, you can now access and share your recorded presentation with others. Follow these steps to access and share the recorded presentation:
- Go to your Zoom account and navigate to the “Recordings” section. This can usually be found in the main menu or sidebar of your Zoom account dashboard.
- In the “Recordings” section, you will find a list of all your recorded presentations. Locate the specific recording you want to access and click on it.
- A playback page will open, allowing you to view and review the recorded presentation. Here, you can play the recording, adjust the playback settings, and make any necessary edits.
- Take the time to review the recorded presentation carefully. Check for any audio or video issues, ensure that all the content is captured correctly, and make any necessary edits if needed.
- Once you are satisfied with the recording, you can share it with others. Zoom provides various sharing options, such as generating a sharing link, downloading the recording, or embedding it in a website or online platform.
- If you choose to share the recording link, copy the link provided and send it to your intended recipients via email, messaging apps, or other communication channels.
- If you prefer to download the recording, click on the “Download” button on the playback page. This will save the recording file to your computer, allowing you to distribute it as needed.
- If you want to embed the recording in a website or online platform, click on the “Embed” button on the playback page. Follow the provided instructions to generate the embed code and integrate it into your desired platform.
Accessing and sharing the recorded presentation is a crucial step in making sure that your hard work reaches a wider audience. Whether you want to share it with participants who couldn’t attend the live presentation or make it available for on-demand viewing, Zoom provides flexible sharing options to suit your needs.
Before sharing the recording, it’s important to review it to ensure its quality and accuracy. Double-check that all the audio, video, and presentation content are captured correctly. This allows you to confidently share a professional recording that accurately represents your original presentation.
Remember to consider the privacy and permissions associated with your recorded presentation. If there are any sensitive or confidential information shared during the presentation, make sure to take the necessary steps to protect and restrict access to the recording as needed.
By accessing and sharing your recorded presentation, you extend the reach of your content and provide an opportunity for others to benefit from your knowledge and expertise. Make the most of the sharing options provided by Zoom to distribute your recorded presentation effectively.
Now that you have successfully accessed and shared your recorded presentation, you have completed the entire process of recording a presentation on Zoom. Congratulations! You can now leverage the power of Zoom to enhance your presentations and provide a valuable resource for your audience.
Conclusion
Recording a presentation on Zoom opens up a world of possibilities for sharing and preserving valuable content. In this article, we have walked you through the step-by-step process of recording a presentation on Zoom, from downloading and installing the software to accessing and sharing the recorded presentation.
By leveraging the features and controls offered by Zoom, you can create high-quality recordings that capture your presentation in its entirety. Adjusting the recording settings, utilizing the recording controls effectively, and ending the recording appropriately ensures that your content is properly captured and saved for future use.
Furthermore, accessing and sharing the recorded presentation allows you to extend the reach of your content and provide a valuable resource to others. Whether you want to share the recording with participants who couldn’t attend the live presentation or create online courses, Zoom provides flexible options for sharing and distributing your recorded presentations.
It’s worth noting that while Zoom provides a user-friendly and robust platform for recording presentations, it’s important to ensure that you have the necessary permissions and adhere to any privacy or confidentiality considerations. Respect the rights and privacy of your participants and take steps to protect sensitive information as needed.
Recording presentations on Zoom is not only a practical solution for archiving and sharing information but also a way to enhance your overall presentation skills. By reviewing the recorded presentations, you can analyze your delivery, identify areas for improvement, and refine your presentation techniques.
Whether you’re hosting a business presentation, conducting an educational lecture, or sharing your expertise with a global audience, Zoom empowers you to capture and distribute your presentations effectively. Embrace the power of Zoom and take advantage of its recording capabilities to elevate your presentations to the next level.
Now that you have the knowledge and tools to record presentations on Zoom, it’s time to put them into practice. Start creating engaging and informative presentations, record them on Zoom, and share your knowledge with the world!