Introduction
An SD card, also known as a Secure Digital card, is a widely used portable storage device that can be found in smartphones, tablets, digital cameras, and other electronic devices. It provides users with a convenient way to store photos, videos, documents, and other files. While most SD cards come pre-formatted with a single partition, there may be instances when you’d like to partition the card into multiple sections. This allows for better organization of data and can be particularly useful if you want to use the same SD card for different purposes, such as storing media files and app data separately.
Partitioning an SD card involves dividing the storage space into multiple sections or partitions that operate independently. Each partition can have its own file system and be treated as a separate drive by the operating system. This means you can assign different purposes to each partition and even use them on different devices.
In this article, we will guide you through the process of partitioning an SD card. We will provide step-by-step instructions, along with screenshots, to ensure a clear and straightforward experience. However, before we dive into the process, let’s take a moment to discuss why you might want to partition an SD card in the first place.
Why Partition an SD Card?
Partitioning an SD card can offer several benefits and advantages, depending on your specific needs and usage. Here are a few reasons why you might consider partitioning your SD card:
- Organization: When you have a large SD card with a significant amount of storage space, partitioning allows you to separate different types of files or data. For example, you could create separate partitions for photos, videos, music, and documents. This helps to keep your data organized, making it easier to find and access specific files when needed.
- Data Protection: By creating separate partitions, you can isolate and protect sensitive data. For instance, you can allocate a partition solely for confidential files or personal information. In case you need to share your SD card with others or transfer files, you can provide access to specific partitions without revealing all the data stored on the SD card.
- Optimized Performance: Partitioning an SD card enables you to optimize its performance based on different usage scenarios. For instance, if you predominantly use the card for capturing high-resolution photos or recording videos, creating a dedicated partition with a specific file system can enhance the overall read and write speed of those files.
- Compatibility: In some cases, certain devices or operating systems require specific file systems to be recognized and used properly. By partitioning an SD card, you can allocate different file systems to different partitions, ensuring compatibility across various devices and operating systems.
It’s important to note that partitioning an SD card is not always necessary or recommended for everyone. If you have a small SD card and primarily use it for basic file storage, partitioning may not offer significant advantages. However, if you frequently deal with large amounts of data or require specific data organization and protection, partitioning can be a valuable solution.
Now that we’ve discussed the benefits of partitioning an SD card, let’s move on to the next section, where we’ll outline the things you’ll need to successfully partition your SD card.
Things You’ll Need
Before you begin the process of partitioning your SD card, make sure you have the following items and information:
- An SD card reader: You will need an SD card reader to connect your SD card to your computer. Most computers have built-in SD card readers, but if yours doesn’t, you can purchase an external USB SD card reader.
- A computer with administrative privileges: You will need access to a computer with administrative privileges to perform the necessary disk management operations.
- An SD card with sufficient storage: Ensure that you have an SD card with enough storage space to accommodate the partitions you plan to create. Keep in mind that the partitioning process will divide the available storage among the different partitions, so plan accordingly.
- A backup of your data: Before partitioning your SD card, it is essential to create a backup of all the data stored on the card. Partitioning involves modifying the disk structure, which could potentially result in data loss. By having a backup, you can restore your files if any issues arise during the partitioning process.
- Knowledge of existing data: Take note of the data already present on your SD card, as partitioning will erase all existing data. Ensure that you have a copy of any important files stored on the SD card to avoid losing them.
- Familiarity with your operating system: Depending on your operating system (Windows, macOS, Linux), the steps involved in partitioning an SD card may vary. It’s important to have a basic understanding of your operating system and its disk management tools.
By having these items and information ready, you will be well-prepared to partition your SD card successfully. Once you have everything in place, you can move on to the next section, where we’ll guide you through the step-by-step process of partitioning your SD card.
Step 1: Back Up Your Data
Before you proceed with partitioning your SD card, it is crucial to create a backup of all the data stored on the card. Partitioning involves modifying the disk structure, which could potentially result in data loss if not done correctly. Therefore, it is always recommended to have a backup of your files to ensure their safety.
To back up your data from the SD card, follow these steps:
- Connect your SD card: Insert your SD card into the SD card reader and connect it to your computer.
- Copy your files: Open the File Explorer (Windows) or Finder (Mac) and locate your SD card. Select the files and folders you wish to back up and copy them to a secure location on your computer’s hard drive or an external storage device.
- Verify your backup: Once the files are copied, ensure that you can access them and that they are intact. Double-check that all the important data has been successfully backed up before proceeding.
- Eject your SD card: Safely eject your SD card from the computer to avoid any potential data corruption. Follow the proper procedure to eject the card, which may involve right-clicking on the SD card icon and selecting “Eject” or dragging the card to the trash (Mac).
By backing up your data, you can ensure that you have a copy of all your files in case anything goes wrong during the partitioning process. It provides a safety net and gives you peace of mind knowing that your important data is secure.
Once you have successfully created a backup of your data, you are ready to proceed to the next step. In the following section, we will guide you through the process of inserting the SD card and opening the Disk Management tool on your computer.
Step 2: Insert the SD Card
In this step, you will need to insert your SD card into the appropriate slot or port on your computer. Follow these simple instructions to ensure a proper connection:
- Locate the SD card slot: Depending on your computer, the SD card slot may be located on the side, front, or back of the machine. Look for a small rectangular slot with a symbol indicating an SD card.
- Insert the SD card: Take your SD card and carefully insert it into the slot. Pay attention to the orientation and make sure the contacts on the card align with the contacts in the slot. Gently push the card in until it is fully inserted and clicks into place.
- Wait for detection: Once the SD card is inserted, your computer should automatically detect it and mount it as a removable storage device. If a window pops up asking how you’d like to open the contents of the SD card, you can close it for now since we’ll be using the Disk Management tool in the following step.
- Verify the connection: To ensure the SD card is properly connected, open the File Explorer (Windows) or Finder (Mac) and look for the SD card under the list of available drives or devices. You should see the SD card listed with its assigned drive letter or name.
Once the SD card is inserted and detected by your computer, you are ready to move on to the next step: opening the Disk Management tool. This tool will allow you to perform the necessary actions to partition the SD card and manage its disk space effectively.
Note: If your computer does not have a built-in SD card slot, you can use an external USB SD card reader. Simply connect the reader to an available USB port on your computer, and then follow the same steps to insert the SD card into the reader.
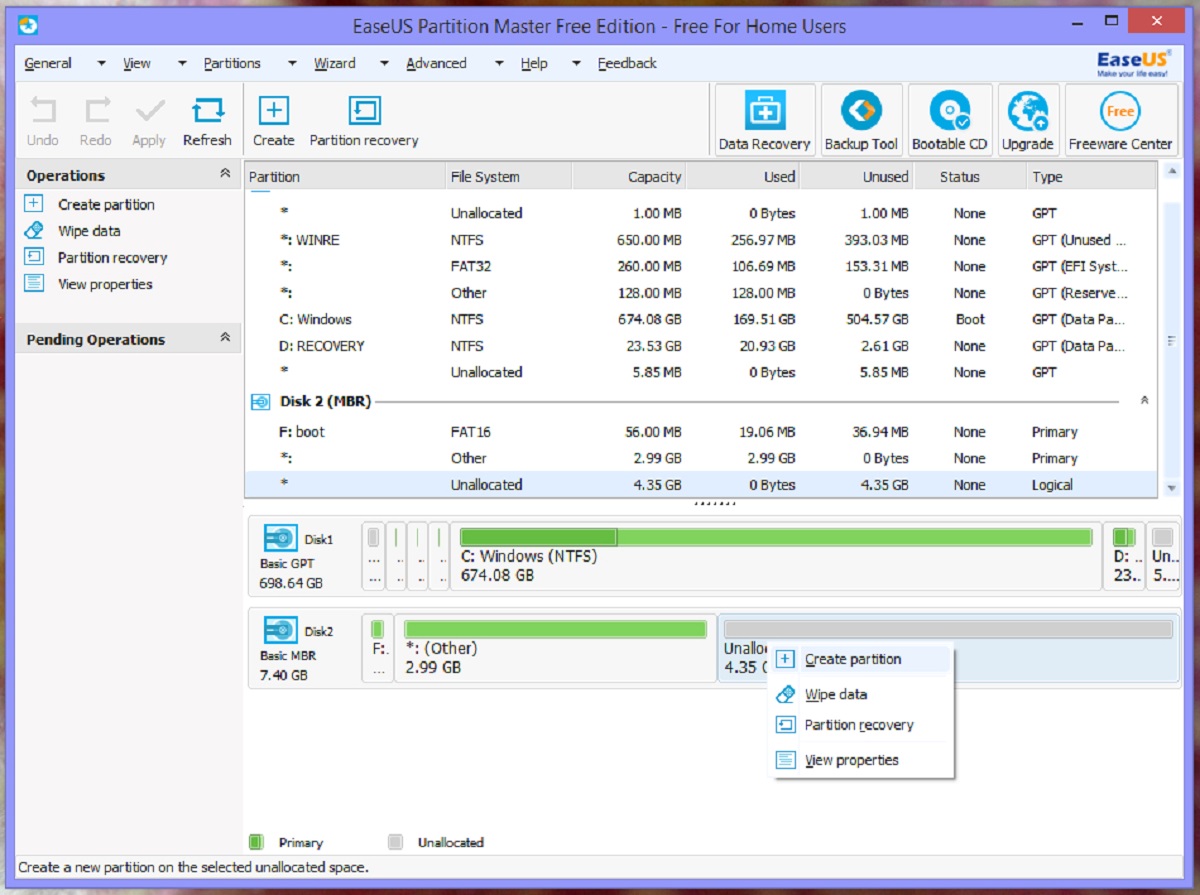
Step 3: Open Disk Management
In order to partition your SD card, you will need to access the Disk Management tool on your computer. Disk Management is a built-in utility in Windows that allows you to manage and modify disk partitions. Follow these steps to open Disk Management:
- Open the Start menu: Click on the Start menu in the lower-left corner of your screen. You can also press the Windows key on your keyboard to open the Start menu.
- Search for Disk Management: In the search bar at the bottom of the Start menu, type “Disk Management” and wait for the search results to appear.
- Select Disk Management: From the search results, click on the “Create and format hard disk partitions” or “Disk Management” option. This will open the Disk Management tool.
- Wait for Disk Management to load: It may take a few moments for Disk Management to load and display the information about the connected drives and disks on your computer.
Once Disk Management is open, you will see a list of your connected drives and disks, including your SD card. The SD card will be labeled as a “Removable” disk and may not have a drive letter assigned to it. It is important to identify the correct disk to avoid making changes to the wrong one.
Now that you have successfully opened Disk Management, you are ready to proceed to the next step: selecting the SD card for partitioning.
Step 4: Select the SD Card
After opening the Disk Management tool, the next step is to select the SD card that you want to partition. Follow these steps to identify and select the correct disk:
- Locate the SD card: In the Disk Management window, look for the disk that represents your SD card. The disk will be labeled as “Removable” and might not have a drive letter assigned to it.
- Identify the correct disk: Take note of the disk size to identify the correct SD card. If you are unsure, you can remove the SD card, refresh the Disk Management window, and then reinsert the SD card to see which disk disappears and reappears.
- Right-click on the SD card: Once you have identified the correct disk, right-click on it to display a context menu with various options.
- Select “Delete Volume” (optional): If the SD card has an existing partition or volume, you may choose to delete it before proceeding with the partitioning process. This step is optional and should only be performed if you want to remove any existing partitions.
- Verify the selection: Double-check that you have selected the correct disk and that you have taken any necessary steps to delete any existing volumes. Making changes to the wrong disk could result in data loss.
By properly selecting the SD card in the Disk Management tool, you have laid the foundation for partitioning the card. In the next step, we will guide you through shrinking the volume of the SD card to create unallocated space that can be used for the new partition.
Step 5: Shrink the Volume
Before creating a new partition on your SD card, you’ll need to shrink the existing volume to create unallocated space. Follow these steps to shrink the volume:
- Right-click on the existing volume: In the Disk Management tool, locate the existing volume on your SD card and right-click on it.
- Select “Shrink Volume”: From the context menu, select the “Shrink Volume” option. This will launch the Shrink dialog box.
- Specify the amount of space to shrink: In the Shrink dialog box, you’ll see the current size of the volume and an option to enter the amount of space you want to shrink. Enter the desired size for the new partition in megabytes (MB).
- Verify the new size: After entering the desired size, the Shrink dialog box will display the new size of the volume after shrinking. Verify that the size aligns with your intention.
- Click “OK” to shrink the volume: Once you are satisfied with the new size, click the “OK” button to proceed. The shrinking process may take a moment to complete.
By shrinking the volume, you have created unallocated space on your SD card. This unallocated space will be used to create the new partition in the upcoming steps. It is important to note that the amount of space you shrink from the volume will become available as unallocated space and will no longer be part of the existing partition. Make sure you have selected the appropriate size to accommodate your partitioning needs.
In the next step, we will guide you through creating a new partition using the unallocated space on your SD card.
Step 6: Create a New Partition
Now that you have successfully shrunk the volume on your SD card, you can proceed to create a new partition using the unallocated space. Follow these steps to create a new partition:
- Right-click on the unallocated space: In the Disk Management tool, locate the unallocated space on your SD card. Right-click on it to display a context menu with different options.
- Select “New Simple Volume”: From the context menu, choose the “New Simple Volume” option. This will open the New Simple Volume Wizard to guide you through the partition creation process.
- Click “Next” to start the wizard: In the New Simple Volume Wizard, click the “Next” button to begin.
- Specify the partition size: Set the desired size for your new partition. You can use the maximum available size by default or adjust it based on your requirements. Keep in mind that the size will be displayed in megabytes (MB).
- Assign a drive letter or path: Choose a unique drive letter or path for your new partition. This will be used to access the partition later. You can select an available letter from the drop-down menu or choose to let Windows automatically assign a letter.
- Select the file system: Choose the file system that best suits your needs. For compatibility with different devices and operating systems, FAT32 is a widely used and recommended option. However, if you require a larger partition size or support for file sizes larger than 4GB, consider using the exFAT or NTFS file system.
- Provide a volume label (optional): You can optionally provide a name or label for your new partition. This label will help you identify the partition easily.
- Check the summary: Review the summary of your new partition configuration. Make sure all the settings are correct and adjust any parameters if necessary.
- Click “Finish” to create the partition: Once you are satisfied with the configuration, click the “Finish” button to create the new partition. Windows will now create the partition using the specified settings.
After completing these steps, you have successfully created a new partition on your SD card using the unallocated space. This partition will be accessible like any other drive, and you can begin using it to store files and data separately from the existing partition.
In the next step, we will guide you through adjusting the partition size if needed.
Step 7: Adjust the Partition Size
After creating a new partition on your SD card, you have the flexibility to adjust its size if needed. Follow these steps to adjust the partition size:
- Open the Disk Management tool: If you have closed the Disk Management tool after creating the partition, reopen it by following the steps mentioned in earlier sections.
- Locate the new partition: In the Disk Management window, locate the new partition on your SD card. It will be labeled with the assigned drive letter and its file system.
- Right-click on the partition: Right-click on the new partition that you want to adjust in terms of size.
- Select “Extend Volume”: From the context menu, choose the “Extend Volume” option. This will open the Extend Volume Wizard.
- Click “Next” to start the wizard: In the Extend Volume Wizard, click the “Next” button to proceed.
- Specify the amount of space to add: In the wizard, you can specify the amount of space you want to add to the partition. Select the desired size for the extension.
- Check the summary: Review the summary of your new partition size configuration. Ensure it aligns with your intended changes.
- Click “Finish” to adjust the partition size: Once you are satisfied with the configuration, click the “Finish” button to adjust the partition size. Windows will now extend the partition to the specified size.
With these steps, you can easily adjust the size of your newly created partition on the SD card. This allows you to allocate more space or reduce the size based on your evolving storage needs. Ensure that you are confident with the adjustments before proceeding to avoid unintended changes to your data.
In the next step, we will guide you through formatting the new partition to make it usable and accessible.
Step 8: Format the New Partition
After adjusting the size of the new partition, the next step is to format it. Formatting a partition involves preparing it with a file system that your operating system can recognize and use. Follow these steps to format the new partition:
- Open the Disk Management tool: If you have closed the Disk Management tool after adjusting the partition size, reopen it by following the steps mentioned earlier.
- Locate the new partition: In the Disk Management window, locate the new partition on your SD card. It should be labeled with the assigned drive letter and its file system.
- Right-click on the partition: Right-click on the new partition that you want to format.
- Select “Format”: From the context menu, choose the “Format” option. This will open the Format dialog box.
- Choose the file system: In the Format dialog box, select the file system you want to use for the new partition. Consider compatibility with different devices and operating systems when making your selection.
- Provide a volume label (optional): You can optionally provide a name or label for the new partition. This label will help you identify the partition easily.
- Enable “Perform a quick format”: For most cases, it is recommended to enable the “Perform a quick format” option. This will speed up the formatting process. However, if you are concerned about data security, leave the option unchecked for a more thorough format.
- Click “OK” to format the partition: Once you have selected the desired file system and made any additional choices, click the “OK” button to initiate the format. A warning prompt may appear, reminding you that formatting will erase all data on the partition. Confirm your decision to proceed with the format.
After completing these steps, Windows will format the new partition on your SD card. The formatting process may take a few moments to complete. Once finished, the partition will be ready for use, and you can start storing files and data on it.
In the next step, we will guide you through assigning a drive letter to the new partition.
Step 9: Assign a Drive Letter
After formatting the new partition on your SD card, you’ll need to assign a drive letter to it. A drive letter allows your operating system to recognize and access the partition as a separate storage device. Follow these steps to assign a drive letter:
- Open the Disk Management tool: If you have closed the Disk Management tool after formatting the partition, reopen it following the steps mentioned earlier.
- Locate the new partition: In the Disk Management window, find the newly formatted partition on your SD card. It should be labeled with the assigned drive letter and its file system.
- Right-click on the partition: Right-click on the new partition that you want to assign a drive letter.
- Select “Change Drive Letter and Paths”: From the context menu, choose the “Change Drive Letter and Paths” option. This will open the Change Drive Letter and Paths dialog box.
- Click “Add” to assign a drive letter: In the dialog box, click the “Add” button to assign a drive letter to the partition.
- Select a drive letter: Choose an available drive letter from the drop-down menu. It is recommended to select a letter that is not already assigned to avoid conflicts.
- Click “OK” to confirm: After selecting a drive letter, click the “OK” button to assign it to the partition. Windows will assign the chosen drive letter to the partition.
After completing these steps, the new partition on your SD card will be assigned the selected drive letter. You can now access the partition through File Explorer (Windows) or Finder (Mac) using the assigned drive letter.
Congratulations! You have successfully created and configured a new partition on your SD card. It is now ready to be used for your specific storage needs.
In the final step, we will summarize the process and conclude the guide.
Step 10: Done!
Congratulations! You have completed the process of partitioning your SD card. By following the steps outlined in this guide, you have successfully organized your data and created separate partitions on your SD card. Here’s a quick recap of the journey you’ve taken:
- Backed up your data: You started by creating a backup of all the data stored on the SD card to ensure its safety.
- Inserted the SD card: You inserted the SD card into your computer’s SD card slot or used an external SD card reader to connect it.
- Opened Disk Management: You accessed the Disk Management tool on your computer to prepare for the partitioning process.
- Selected the SD card: You identified and selected the SD card within the Disk Management tool, making sure to choose the correct disk.
- Shrunk the volume: You shrunk the existing volume on the SD card to create unallocated space for the new partition.
- Created a new partition: Using the unallocated space, you created a new partition with a specified size and file system.
- Adjusted the partition size: If necessary, you adjusted the size of the new partition to better suit your storage needs.
- Formatted the new partition: You formatted the new partition, preparing it with a file system for your operating system to recognize and use.
- Assigned a drive letter: You assigned a unique drive letter to the new partition, allowing easy access and identification.
With these steps, you have successfully partitioned your SD card and prepared it for storing different types of data or utilizing it for specific purposes. Enjoy the organized and optimized storage experience that multiple partitions can provide.
Remember, partitioning an SD card is a powerful tool, but it requires caution and understanding. Always ensure you have a backup of your data, double-check your actions, and be mindful of the potential risks associated with modifying disk partitions.
Thank you for following this guide. If you have any further questions or need additional assistance, feel free to refer back to this article or seek support from the relevant manufacturer or software documentation.