Introduction
The Raspberry Pi 4 is a powerful single-board computer that offers an impressive array of features. While it comes with built-in storage options like microSD cards, it is also possible to use an external solid-state drive (SSD) with the Raspberry Pi 4. An SSD provides several advantages over traditional storage solutions, including faster data transfer rates, increased reliability, and improved overall performance.
In this article, we will explore the benefits of using an SSD with the Raspberry Pi 4 and guide you through the process of setting it up. Whether you are using your Raspberry Pi 4 for personal projects, media centers, or even as a home server, utilizing an SSD can significantly enhance its capabilities.
Using an SSD with the Raspberry Pi 4 is an excellent choice for those who require faster storage and seek a seamless user experience. By utilizing the SSD’s high-speed data transfer rates, you can access your files and applications quicker, reducing load times and increasing overall system responsiveness. Furthermore, using an SSD will greatly benefit tasks that involve large file transfers, such as video editing or data processing.
Additionally, an SSD offers superior reliability compared to microSD cards, which are prone to wear and corruption over time. The solid-state nature of an SSD eliminates mechanical parts, making it more durable and less susceptible to physical damage. This increased reliability ensures your data is safe and reduces the risk of sudden storage failures.
Moreover, the Raspberry Pi 4’s compatibility with SSDs makes it an attractive choice for those seeking storage expansion options. The USB 3.0 ports on the Raspberry Pi 4 provide high-speed connectivity, allowing for efficient data transfer between the device and the SSD. This also allows you to free up the microSD card slot for other applications or use it for additional storage if required.
In the following sections, we will guide you through the process of preparing, connecting, and booting from an SSD on the Raspberry Pi 4. We will also discuss the benefits of using an SSD and explain why it is a worthwhile investment for maximizing the performance of your Raspberry Pi 4.
What is an SSD?
A solid-state drive (SSD) is a type of storage device that uses flash memory to store data. Unlike traditional hard disk drives (HDDs) that rely on spinning magnetic disks and mechanical parts, SSDs have no moving parts, making them faster, more durable, and less prone to failure.
SSDs offer several advantages over HDDs. One of the key benefits is their speed. Since there are no mechanical components involved, data can be accessed and transferred faster, resulting in significantly reduced loading and boot times. This makes SSDs ideal for tasks that require rapid storage access, such as running applications, gaming, or multitasking.
In addition to speed, SSDs also offer increased reliability. Because SSDs do not have moving parts, they are more resistant to physical shock and vibrations, making them less likely to experience mechanical failures. This means your data is better protected, and you can rely on the SSD to store your important files and documents without the fear of loss or corruption.
Moreover, SSDs are energy-efficient. As they do not require power to spin disks or move mechanical arms, SSDs consume less energy compared to HDDs. This can be especially beneficial for portable devices like the Raspberry Pi 4, as it helps maximize battery life and reduces heat generation.
Another advantage of SSDs is their compact form factor. SSDs are smaller and lighter than traditional HDDs, allowing for easier installation and integration in various devices, including the Raspberry Pi 4. The compact size of SSDs makes them a suitable choice for environments where space is limited or when you need to build a portable or compact system.
It is important to note that SSDs have a limited lifespan when it comes to writing data. Each cell in an SSD’s flash memory can only endure a certain number of write cycles before it becomes unreliable. However, modern SSDs come with advanced wear-leveling algorithms and other features to extend their lifespan and ensure optimal performance over time.
In summary, an SSD is a storage device that offers faster data transfer speeds, greater durability, improved energy efficiency, and a smaller form factor compared to traditional hard disk drives. Leveraging these benefits, using an SSD with the Raspberry Pi 4 can significantly enhance its performance and provide a more reliable storage solution for your projects and applications.
Why use an SSD with Raspberry Pi 4?
The Raspberry Pi 4 is a versatile single-board computer that offers numerous possibilities for hobbyists, developers, and enthusiasts. While the Raspberry Pi 4 comes with built-in storage options, such as microSD cards, using an external solid-state drive (SSD) with the device offers several advantages that make it a compelling choice.
One primary reason to use an SSD with the Raspberry Pi 4 is the significant improvement in performance. SSDs provide faster data transfer speeds compared to microSD cards, resulting in quicker file access and reduced load times for applications. This enhanced performance translates into a smoother and more responsive user experience, allowing you to run resource-intensive applications, multitask seamlessly, and perform data-intensive tasks with ease.
Another compelling reason to opt for an SSD is the increased reliability it offers. MicroSD cards can be prone to corruption and wear out over time due to continuous use. SSDs, on the other hand, are more durable and less susceptible to failure. With no moving parts, SSDs can withstand shock, vibration, and physical impact better than microSD cards. This reliability ensures the safety of your valuable data and reduces the risk of sudden failures or data loss.
Additionally, using an SSD with the Raspberry Pi 4 provides ample storage space for your projects and applications. MicroSD cards are often limited in terms of capacity, whereas SSDs come in various sizes ranging from a few gigabytes to terabytes. This expanded storage capacity allows you to store and access a large amount of data, ensuring you have sufficient space for all your files, media, and projects.
Furthermore, SSDs offer improved energy efficiency compared to microSD cards. As SSDs do not have any moving mechanical parts, they consume less power, resulting in reduced energy consumption and longer battery life for portable projects. This energy efficiency is particularly advantageous if you are using the Raspberry Pi 4 in a portable or battery-powered setup, as it helps maximize the device’s uptime without compromising performance.
Lastly, using an SSD with the Raspberry Pi 4 allows you to free up the microSD card slot for other purposes. This can be useful if you want to use the microSD card for additional storage, dual booting different operating systems, or experimenting with different configurations. By offloading the main storage to an SSD, you gain more flexibility and versatility in utilizing the available storage options on your Raspberry Pi 4.
In summary, using an SSD with the Raspberry Pi 4 offers improved performance, increased reliability, expanded storage capacity, enhanced energy efficiency, and greater flexibility in utilizing the device’s storage options. These benefits make using an SSD a highly recommended choice for maximizing the potential of your Raspberry Pi 4 and ensuring a seamless and efficient computing experience.
Compatibility of SSD with Raspberry Pi 4
The Raspberry Pi 4 is compatible with a wide range of solid-state drives (SSDs), making it easy to integrate high-speed storage into your projects. The compatibility of SSDs with the Raspberry Pi 4 is primarily dependent on the connectivity options provided by the device.
The Raspberry Pi 4 features two USB 3.0 ports, which offer faster data transfer speeds compared to the previous models. These USB 3.0 ports provide the necessary connectivity to connect external SSDs to the Raspberry Pi 4. USB 3.0 can reach speeds up to 5 Gbps, allowing for efficient and rapid data transfer between the SSD and the Raspberry Pi 4.
Most SSDs on the market today come with a USB interface, making them compatible with the Raspberry Pi 4 out of the box. However, it is important to ensure that the SSD is compatible with USB 3.0 or higher to take full advantage of the increased data transfer speeds. While USB 2.0 SSDs may work with the Raspberry Pi 4, they will be limited by the lower transfer rates of USB 2.0, resulting in suboptimal performance.
Aside from USB connectivity, it is worth noting that the power requirements of the SSD should also be considered. While some SSDs can draw power directly from the Raspberry Pi 4’s USB port, others may require an external power source. It is important to check the power requirements of the SSD and ensure that your chosen power supply can provide the necessary power for both the Raspberry Pi 4 and the SSD, especially if you are using multiple peripherals.
In terms of storage capacity, the Raspberry Pi 4 can support SSDs of varying sizes. From small capacities of a few gigabytes to larger sizes in the terabyte range, you have the flexibility to choose an SSD that suits your specific storage needs and project requirements. This ample storage capacity ensures that you can store a vast amount of data, including files, media, and applications, without worrying about running out of space.
Moreover, the Raspberry Pi 4 is compatible with various file systems commonly used in SSDs, such as FAT32, exFAT, and ext4. These file systems ensure compatibility across different operating systems and allow for seamless data access and transfer.
In summary, the Raspberry Pi 4 is compatible with a wide range of SSDs, thanks to its USB 3.0 ports. Ensuring that the SSD has USB 3.0 compatibility and checking power requirements will ensure optimal performance. With the flexibility to choose SSDs of different storage capacities and compatibility with common file systems, integrating an SSD with the Raspberry Pi 4 provides a reliable and efficient storage solution for your projects.
Choosing the right SSD for your Raspberry Pi 4
When selecting an SSD for your Raspberry Pi 4, there are several factors to consider to ensure optimal performance and compatibility. By choosing the right SSD, you can maximize the benefits and capabilities of your Raspberry Pi 4. Here are some key considerations to keep in mind when selecting an SSD for your Raspberry Pi 4.
1. Interface: The Raspberry Pi 4 features USB 3.0 ports, so it is important to choose an SSD with a USB 3.0 or higher interface for optimal performance. USB 3.0 offers faster data transfer speeds compared to USB 2.0, resulting in quicker file access and reduced loading times.
2. Capacity: Consider your storage needs when selecting the capacity of the SSD. SSDs are available in a wide range of sizes, from small capacities in gigabytes to larger sizes in terabytes. Assess the amount of data you need to store and consider any future expansion requirements before choosing the SSD’s capacity.
3. Power Requirements: Check the power requirements of the SSD and ensure that your Raspberry Pi 4’s power supply can meet those requirements. Some SSDs draw power directly from the USB port, while others may require an external power source. Ensure that you have adequate power supply considerations to ensure both the Raspberry Pi 4 and the SSD can function simultaneously without power constraints.
4. Reliability: Look for SSDs with a high level of reliability and data integrity. Consider SSDs that offer features like wear-leveling algorithms, error correction, and power-loss protection. These features can help ensure the longevity and durability of your SSD, reducing the risk of data loss or corruption.
5. Brand Reputation: Consider purchasing SSDs from reputable manufacturers known for producing reliable and high-performance storage solutions. Well-known brands often provide better customer support, firmware updates, and long-term reliability for their products.
6. Budget: Set a budget for your SSD and consider affordable options without compromising on performance and reliability. While higher-end SSDs may offer advanced features and faster speeds, you can still find SSDs within a reasonable price range that meet your needs.
By considering these factors, you can choose an SSD that meets your storage requirements, budget, and performance expectations. Whether you are using the Raspberry Pi 4 for personal projects, media centers, or as a home server, selecting the right SSD will ensure a smooth and efficient computing experience.
Preparing your Raspberry Pi 4 for an SSD
Before connecting an SSD to your Raspberry Pi 4, there are a few steps you need to take to properly prepare and configure your device. By following these steps, you can ensure that your Raspberry Pi 4 is ready to work seamlessly with the SSD and take full advantage of its capabilities.
1. Update the firmware: Ensure that your Raspberry Pi 4 is running the latest firmware version. You can update the firmware by opening a terminal and running the command ‘sudo rpi-update’. This will ensure that your Raspberry Pi 4 is equipped with the latest compatibility and performance enhancements.
2. Backup your data: Before making any changes to your Raspberry Pi 4, it is essential to create a backup of your data. This step ensures that your important files and configurations are preserved in case any issues arise during the setup process. You can create a backup by using programs like rsync or by imaging your microSD card using tools like Win32 Disk Imager or Etcher.
3. Prepare the software: Depending on your preferred operating system, you may need to make some software preparations to ensure compatibility with the SSD. For example, if you are using Raspbian, you may need to enable the USB boot mode by adding the ‘program_usb_boot_mode=1’ line to the config.txt file located in the boot partition of your microSD card.
4. Update the bootloader: To enable booting from the SSD, you need to update the bootloader on the Raspberry Pi 4. You can do this by opening a terminal and running the command ‘sudo apt update’ followed by ‘sudo apt full-upgrade’. This will ensure that your bootloader is up to date and ready to support booting from an external storage device.
5. Shutdown the Raspberry Pi 4: Before connecting the SSD, make sure to properly shut down the Raspberry Pi 4 to avoid any potential data corruption. You can do this by running the command ‘sudo shutdown -h now’ or using the shutdown option from the desktop environment if you are using a graphical interface.
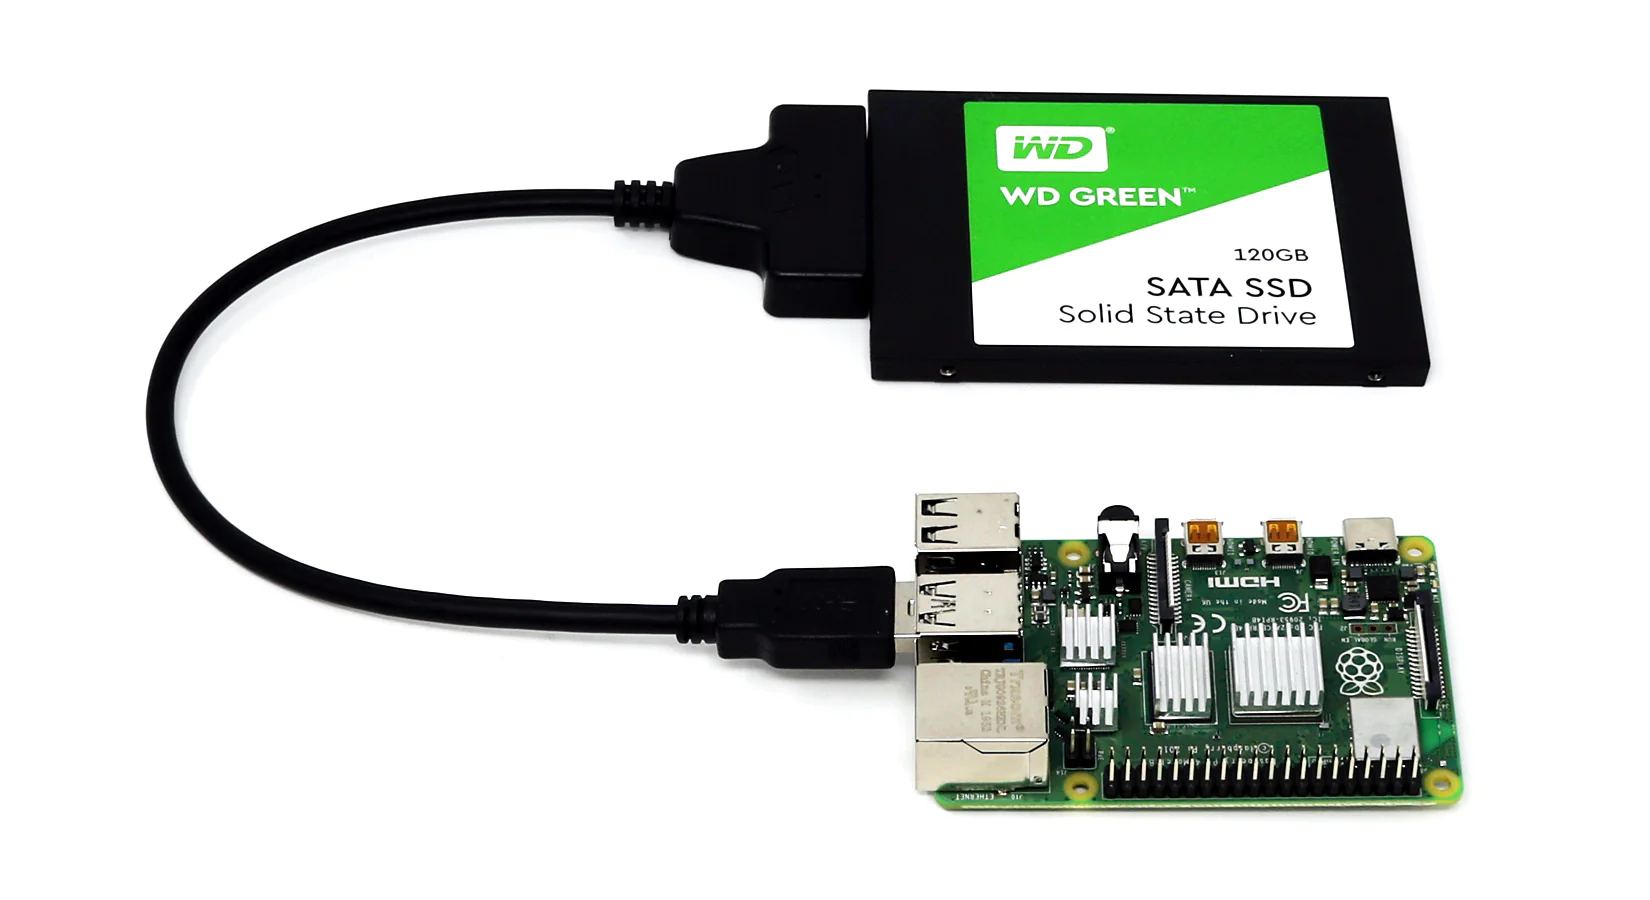
6. Connect the SSD: Once the Raspberry Pi 4 is properly shut down, you can connect the SSD to one of the USB 3.0 ports on your device. Ensure that the SSD is securely connected and powered on if required.
After following these steps, your Raspberry Pi 4 is prepared to work with the SSD. In the next sections, we will guide you through formatting, partitioning, and installing the operating system on the SSD. These steps will enable you to fully utilize the enhanced speed and performance of the SSD, providing a reliable and efficient storage solution for your Raspberry Pi 4 projects and applications.
Connecting the SSD to Raspberry Pi 4
Connecting an external solid-state drive (SSD) to your Raspberry Pi 4 is a straightforward process. By following these steps, you can ensure that the SSD is properly connected and ready to be utilized by your Raspberry Pi 4.
1. Power off your Raspberry Pi 4: To ensure the safety of your hardware and data, it is essential to power off your Raspberry Pi 4 before connecting the SSD. You can do this by shutting down the system through the operating system or by disconnecting the power supply.
2. Locate the USB 3.0 ports: The Raspberry Pi 4 has two USB 3.0 ports, located on the side of the device. These ports are compatible with USB 3.0 SSDs and provide high-speed data transfer rates.
3. Connect the SSD to a USB 3.0 port: Take the USB cable provided with your SSD or any USB 3.0 compatible cable and plug it into one of the USB 3.0 ports on your Raspberry Pi 4. Ensure that the connection is secure and that the SSD is powered on if it requires external power.
4. Power on your Raspberry Pi 4: Once the SSD is connected, you can power on your Raspberry Pi 4. Wait for the device to boot up fully, and ensure that the SSD is detected by the operating system.
5. Check the SSD connection: To verify that the SSD is connected and recognized by your Raspberry Pi 4, you can open a terminal and run the command ‘lsblk’, which lists all the available block devices. Look for the SSD in the list, usually identified as /dev/sda or /dev/sdb. This indicates that the SSD is successfully connected and ready to be formatted and used.
Once the SSD is connected and recognized, you can proceed with formatting and partitioning the SSD to prepare it for storing your files, applications, and operating system. These steps will be covered in the following sections to ensure that your SSD is fully utilized and integrated into your Raspberry Pi 4 setup.
By connecting an SSD to your Raspberry Pi 4, you can maximize the device’s storage capacity, improve data transfer speeds, and enhance the overall performance of your projects and applications. Whether you are using your Raspberry Pi 4 as a media center, home server, or for other purposes, the SSD integration will provide you with a reliable and efficient storage solution.
Formatting and Partitioning the SSD
Once you have successfully connected your solid-state drive (SSD) to your Raspberry Pi 4, the next step is to format and partition the SSD to prepare it for storing data and installing the operating system. Here’s a step-by-step guide on how to format and partition the SSD on your Raspberry Pi 4.
1. Identify the SSD: Open a terminal and run the command ‘lsblk’ to list all the connected block devices. Identify your SSD by looking for the correct device name, usually something like /dev/sda or /dev/sdb. Make a note of the device name, as it will be used in the following steps.
2. Partition the SSD: Use the ‘fdisk’ command followed by the SSD device name to start partitioning the SSD, e.g., ‘sudo fdisk /dev/sda’. Inside the fdisk utility, use the ‘n’ command to create a new partition, specify the partition type, and choose the size and location of the partition. Repeat this step if you want multiple partitions on your SSD.
3. Write the changes: After partitioning the SSD, use the ‘w’ command in fdisk to write the changes to the disk. This will save the partition table and exit the fdisk utility.
4. Format the partitions: Format each partition on the SSD with a filesystem of your choice. For example, you can use the ‘mkfs.ext4’ command to format a partition as ext4, or ‘mkfs.fat’ for FAT32. Specify the partition device name along with the filesystem type, e.g., ‘sudo mkfs.ext4 /dev/sda1’. Repeat this step for each partition on the SSD.
5. Mount the partitions: Create a directory where you want to mount each partition, such as ‘/mnt/ssd/partition1’ and ‘/mnt/ssd/partition2’. Use the ‘sudo mount’ command followed by the partition device name and the mount point to mount each partition to the desired location. For example, ‘sudo mount /dev/sda1 /mnt/ssd/partition1’. Repeat this step for each partition on the SSD.
6. Check the mounted partitions: Use the ‘df -h’ command to verify that the partitions are successfully mounted and listed in the output. This command shows the available disk space and the mount points of each partition.
Now that your SSD is formatted, partitioned, and mounted, you can start utilizing it to store your files, applications, and even install the operating system. The formatted partitions on the SSD provide a reliable and efficient storage solution for your Raspberry Pi 4, enhancing its performance and capacity.
Note that formatting and partitioning the SSD will erase any existing data on it, so make sure you have backed up any important files before proceeding. Additionally, if you are planning to install the operating system on the SSD, refer to the official documentation or guides specific to your chosen operating system for detailed instructions.
Installing the Operating System on the SSD
After formatting and partitioning your solid-state drive (SSD) on your Raspberry Pi 4, the next step is to install the operating system onto the SSD. By installing the operating system on the SSD, you can take full advantage of its speed and performance capabilities. Here’s a step-by-step guide on how to install the operating system on your SSD.
1. Download the operating system image: Visit the official website of your chosen operating system and download the image file that is compatible with the Raspberry Pi 4. Make sure to choose the version that is designed for ARM architecture.
2. Flash the image to the SSD: Use software like Etcher or Raspberry Pi Imager to flash the downloaded image file onto the SSD. Connect the SSD to your computer and select the image file and the SSD as the target. Follow the on-screen instructions to start the flashing process.
3. Insert the SSD into the Raspberry Pi 4: Once the image has been flashed to the SSD, safely eject it from your computer and insert it into one of the USB 3.0 ports on your Raspberry Pi 4.
4. Power on the Raspberry Pi 4: Connect the power supply to your Raspberry Pi 4 and power it on. The device will start booting up from the SSD.
5. Follow the setup process: Depending on the operating system, you will be guided through a setup process to configure the basic settings, such as language, time zone, and user account. Follow the on-screen instructions to complete the initial setup.
6. Update the operating system: After the initial setup, it is recommended to update the operating system to ensure you have the latest security patches and software updates. Open the terminal and run the appropriate update command for your operating system, such as ‘sudo apt update’ for Raspbian or ‘sudo dnf update’ for Fedora.
7. Install additional software: Customize your Raspberry Pi 4 by installing additional software and packages that meet your specific needs. This can be done through package managers like ‘apt’ or ‘dnf’, or through graphical software centers depending on the operating system.
By installing the operating system on the SSD, you can take full advantage of the increased speed and performance it offers. This ensures faster boot times, reduced application loading times, and overall improved responsiveness of your Raspberry Pi 4.
It is important to note that the steps for installing the operating system may vary depending on the chosen operating system and its specific requirements. Therefore, it is recommended to refer to the official documentation or guides provided by the operating system’s developers for detailed instructions tailored to your specific setup.
Booting from the SSD
Now that you have installed the operating system on your solid-state drive (SSD) and connected it to your Raspberry Pi 4, it’s time to configure your device to boot from the SSD. By booting directly from the SSD, you can fully leverage its speed and performance benefits. Here’s a step-by-step guide on how to configure your Raspberry Pi 4 to boot from the SSD.
1. Access the Raspberry Pi 4’s boot configuration: Open a terminal or SSH into your Raspberry Pi 4 and navigate to the /boot directory. Here, you will find the boot configuration file called ‘config.txt’.
2. Edit the boot configuration file: Use a text editor like nano or vi to open the ‘config.txt’ file. Look for the line ‘boot=usb’, and if it is commented out with a ‘#’ at the beginning, remove the ‘#’ to uncomment the line. If the line does not exist, add ‘boot=usb’ to the file.
3. Save and exit the text editor: After making the necessary changes, save the file and exit the text editor. In nano, you can do this by pressing ‘Ctrl + X’, followed by ‘Y’ to confirm the changes and ‘Enter’ to exit.
4. Restart the Raspberry Pi 4: To apply the boot configuration changes, restart your Raspberry Pi 4 by running the ‘sudo reboot’ command. The device will now boot from the SSD.
5. Confirm successful booting: After the restart, monitor the boot process to ensure that the Raspberry Pi 4 is successfully booting from the SSD. You should see the operating system’s boot sequence on your display or SSH terminal.
By configuring your Raspberry Pi 4 to boot from the SSD, you can experience faster boot times and improved overall performance. The SSD’s high-speed data transfer rates allow for quicker access to files and applications, resulting in a more responsive and efficient computing experience.
It is important to note that different operating systems and setups may require additional steps or modifications to successfully boot from the SSD. In some cases, you may need to update the firmware or modify the bootloader configuration. Therefore, it is always recommended to refer to the official documentation or guides provided by the operating system’s developers for detailed instructions specific to your setup.
Benefits of using an SSD with Raspberry Pi 4
Using a solid-state drive (SSD) with the Raspberry Pi 4 offers a multitude of benefits that significantly enhance its performance and provide a smoother computing experience. Here are some key advantages of using an SSD with your Raspberry Pi 4.
1. Faster data transfer speeds: SSDs have significantly faster data transfer rates compared to traditional storage options like microSD cards. With an SSD, file access and transfer times are greatly reduced, resulting in snappier application loading and improved overall system responsiveness.
2. Improved reliability: SSDs are more reliable than microSD cards due to their lack of mechanical parts. The absence of moving components in an SSD makes it less vulnerable to physical damage and less prone to failures caused by vibrations or shocks. This increased reliability ensures the safety and integrity of your data.
3. Enhanced endurance: SSDs are designed to withstand a high number of read and write cycles, providing better endurance and longevity compared to microSD cards. This endurance is especially crucial when dealing with data-intensive tasks or using the Raspberry Pi 4 in applications that require sustained storage access.
4. Larger storage capacity: SSDs offer significantly larger storage capacities compared to microSD cards, providing ample space for your files, applications, and projects. With terabytes of storage available, you can store large media libraries, databases, and other data-intensive resources without worry of running out of space.
5. Energy-efficient: SSDs consume less power compared to traditional hard disk drives, resulting in energy savings. This is particularly advantageous in battery-powered setups or when using the Raspberry Pi 4 in energy-conscious projects, as it helps extend battery life and reduces heat generation.
6. Noise and vibration-free operation: Since SSDs do not have any moving mechanical parts, they operate silently and produce no vibrations. This makes SSDs ideal for projects that require a noise-free environment or for applications where vibrations can be detrimental, such as in sensitive measurement systems or audio setups.
7. Flexibility and scalability: Using an SSD with the Raspberry Pi 4 frees up the microSD card slot for other applications or additional storage. This flexibility allows you to expand the capabilities of your Raspberry Pi 4 or allocate the microSD card slot for different purposes, such as running multiple operating systems or utilizing it as a backup storage solution.
In summary, incorporating an SSD into your Raspberry Pi 4 setup unlocks a range of benefits, including faster data transfer speeds, improved reliability, increased endurance, larger storage capacity, energy efficiency, and noise-free operation. These advantages enhance the overall performance and provide stability, ensuring a seamless and efficient computing experience for a wide range of applications and projects.
Conclusion
Using a solid-state drive (SSD) with the Raspberry Pi 4 can significantly enhance its capabilities and performance. The faster data transfer speeds, improved reliability, increased storage capacity, and energy efficiency that an SSD provides make it an excellent storage option for various projects and applications.
By connecting an SSD to your Raspberry Pi 4, you can experience reduced loading times, quicker file access, and improved responsiveness. This is particularly beneficial for resource-intensive tasks such as running applications, media centers, and home servers.
Furthermore, SSDs offer enhanced reliability compared to microSD cards, as they lack mechanical parts that can fail or suffer damage due to vibrations or shocks. The durability of an SSD ensures the safety and integrity of your valuable data, minimizing the risk of sudden failures or data loss.
The larger storage capacity provided by SSDs allows you to store a significant amount of data without worrying about running out of space. Whether you are working on multimedia projects, managing databases, or storing large files, an SSD provides ample storage for your Raspberry Pi 4.
Additionally, SSDs consume less power, making them energy-efficient and extending the battery life in portable projects. The elimination of noise and vibrations in the operation of SSDs makes them suitable for noise-sensitive environments and projects where vibrations can be detrimental.
Configuring the Raspberry Pi 4 to boot from the SSD further optimizes the device’s performance and ensures faster boot times, reducing the overall time it takes to start working with your Raspberry Pi 4.
In conclusion, integrating an SSD with the Raspberry Pi 4 expands its storage capabilities, increases performance, and provides a more reliable and efficient storage solution. Whether you are a hobbyist, developer, or enthusiast, using an SSD with the Raspberry Pi 4 opens up a world of possibilities and maximizes the potential of this powerful single-board computer.