Introduction
Welcome to this step-by-step guide on how to open a Toshiba external hard drive. Whether you need to replace a malfunctioning component, recover data, or simply satisfy your curiosity, this article will provide you with the necessary instructions and insights to safely open your Toshiba external hard drive.
Toshiba external hard drives are known for their high performance and reliable storage capabilities. However, there may come a time when you need to access the internals of the drive. It could be to diagnose an issue, replace a faulty component, or even upgrade the storage capacity. Regardless of the reason, it’s important to approach the process with caution and care to avoid causing any further damage to your device.
In this guide, we will walk you through the step-by-step process of opening a Toshiba external hard drive. We will cover the necessary tools you’ll need, how to prepare your workspace, and provide clear instructions on safely opening the casing, disconnecting the hard drive, and reassembling everything back together. By following these instructions, you can have your Toshiba external hard drive open in no time.
It is important to note that opening your Toshiba external hard drive may void the warranty, so proceed at your own risk. If your device is still under warranty and you encounter any issues, it is recommended to contact Toshiba support or your authorized service provider for assistance.
Before we dive into the step-by-step process, let’s gather the necessary tools and materials to ensure a smooth and successful opening of your Toshiba external hard drive.
Tools Required
Before you start opening your Toshiba external hard drive, it’s important to gather the necessary tools and materials. Having these items on hand will ensure a smooth and efficient process. Here are the tools you will need:
- Screwdriver set: You will need a set of screwdrivers with various sizes and types to remove the screws securing the casing of the external hard drive.
- Anti-static wrist strap: This is crucial to prevent any damage caused by static electricity, which can harm the sensitive electronic components of your hard drive. Make sure the strap is properly grounded.
- Plastic spudger or opening tool: This tool will help you gently pry open the casing without causing any damage. It is recommended to use a plastic spudger to avoid scratching or damaging the external hard drive.
- Container or tray: It’s always a good idea to have a small container or tray nearby to keep track of the screws and small parts during the disassembly process. This will prevent any loss or confusion when it’s time to reassemble the hard drive.
- Clean, dust-free cloth: To clean any dust or debris that may have accumulated inside the casing or on the components, it’s advisable to have a soft, lint-free cloth on hand.
Make sure you have all these tools ready before proceeding with the disassembly process. It’s better to be prepared than to encounter any unnecessary delays or difficulties due to the lack of proper tools. Once you have everything in place, you can move on to the next step: preparing your workspace.
Step 1: Gather Your Materials
Before you embark on the process of opening your Toshiba external hard drive, it’s essential to gather all the necessary materials. Having everything ready beforehand will ensure a smooth and efficient disassembly process. Here’s what you’ll need for this step:
- Screwdriver set: Make sure you have a screwdriver set with various sizes and types, as different screws may be used to secure the casing of your Toshiba external hard drive.
- Anti-static wrist strap: To prevent any damage caused by static electricity, invest in an anti-static wrist strap and ensure it is properly grounded. This will safeguard the sensitive electronic components of your hard drive.
- Plastic spudger or opening tool: To gently pry open the casing without causing any damage, use a plastic spudger or an opening tool. This will prevent scratches or any other harm to your external hard drive.
- Container or tray: Have a small container or tray nearby to keep track of the screws and small parts during the disassembly process. This will help prevent loss or confusion when it’s time to reassemble the hard drive.
- Clean, dust-free cloth: Prior to starting the disassembly process, ensure you have a soft, lint-free cloth on hand. This will be used to clean any dust or debris that may have accumulated inside the casing or on the components.
Having all these materials readily available will save you time and ensure a smooth disassembly process. It’s crucial to be well-prepared before proceeding to the next step. Once you have gathered all the required materials, you can proceed to preparing your workspace.
Step 2: Prepare Your Workspace
Preparing your workspace before opening your Toshiba external hard drive is essential for a successful and efficient disassembly process. Here are the key steps to follow when setting up your workspace:
- Select an appropriate location: Choose a clean, well-lit area where you can comfortably work on your Toshiba external hard drive. Make sure the space is free from any clutter or distractions.
- Clean your workspace: Clear away any dust, debris, or other potential hazards from your workspace. Wipe down the surface with a clean, lint-free cloth to ensure a clean and safe working environment.
- Ground yourself: To prevent static electricity from damaging the sensitive components of your hard drive, it’s crucial to ground yourself. Wear an anti-static wrist strap and connect it to a grounded surface, such as a metal part of your workstation.
- Organize your tools: Lay out all the necessary tools and materials you gathered in Step 1 within easy reach. This will help you stay organized during the disassembly process and prevent any unnecessary delays or frustration from searching for tools.
- Prepare the container or tray: Place the container or tray nearby to hold the screws and small parts you remove from the external hard drive. This will prevent them from getting lost and make the reassembly process much easier.
By following these steps, you will create an ideal workspace that promotes efficiency, cleanliness, and safety during the disassembly of your Toshiba external hard drive. With your workspace prepared, you’re now ready to move on to the next step, which involves disconnecting the power source.
Step 3: Disconnect Power Source
Before you proceed with opening your Toshiba external hard drive, it is crucial to disconnect the power source. This step ensures that the hard drive is completely powered off, preventing any potential damage or data loss during the disassembly process. Follow these steps to disconnect the power source:
- Power down your computer: If your external hard drive is connected to your computer, shut down your computer properly before proceeding. This will ensure that the hard drive is not actively being used and minimize the risk of data corruption.
- Unplug the external hard drive: If your Toshiba external hard drive is connected to a power outlet, unplug the power cable from the wall socket. This will completely disconnect the power source from the external hard drive.
- Wait for a few minutes: After disconnecting the power source, it’s a good practice to wait for a few minutes before proceeding. This allows any residual power in the device to dissipate, ensuring a safe disassembly process.
By diligently following these steps, you will ensure that your Toshiba external hard drive is completely powered off and ready for disassembly. Disconnecting the power source is an important precautionary measure that helps safeguard your data and prevent any potential damage to the hard drive’s components. With the power source disconnected, you’re now ready to move on to the next step, which involves removing the screws securing the casing.
Step 4: Remove Screws
Now that you have disconnected the power source, it’s time to remove the screws that secure the casing of your Toshiba external hard drive. The casing is typically held together by several screws, and removing them will allow you to access the internals of the hard drive. Follow these steps to remove the screws:
- Refer to the user manual: Before you begin, it’s advisable to consult the user manual or documentation that came with your Toshiba external hard drive. It may provide specific instructions on the placement and types of screws used to secure the casing.
- Use the appropriate screwdriver: Select the proper screwdriver from your set that fits the screw heads. Carefully insert the screwdriver into each screw head and turn counterclockwise to loosen and remove them. Place the screws in the container or tray you prepared earlier to keep them safe.
- Take note of screw locations: As you remove the screws, pay attention to their positions and lengths. Some screws might be longer or shorter, or located in different areas of the casing. This information will be helpful during the reassembly process.
- Set aside the screws and casing: Once all the screws have been removed, carefully set aside the casing and screws in a safe place. Avoid placing them on a surface that can potentially scratch or damage them.
By following these steps, you will successfully remove the screws that secure the casing of your Toshiba external hard drive. Be sure to keep the screws in a secure location and take note of their positions to facilitate an easier reassembly process. With the screws removed, you’re now ready to progress to the next step, which involves opening the casing to access the internal components.
Step 5: Open the Casing
With the screws removed, it’s time to open the casing of your Toshiba external hard drive. This step will grant you access to the internal components of the hard drive. Follow these instructions to safely open the casing:
- Locate the tabs or latches: Inspect the sides or edges of the casing for any tabs, latches, or indentations. These are typically the points where the casing is secured or held together. You may need to use a plastic spudger or opening tool to gently pry the casing open.
- Gently pry open the casing: Insert the plastic spudger or opening tool into the tabs or latches you located in the previous step. Apply gentle pressure and carefully work your way around the casing, gradually prying it open. Take your time to avoid any damage to the casing or internal components.
- Avoid excessive force: It’s important to note that some casings may be more tightly secured than others. Avoid using excessive force, as this may lead to the casing cracking or breaking. If you encounter significant resistance, double-check for any remaining screws that may still be holding the casing in place.
- Set aside the opened casing: Once the casing is opened, set it aside in a safe and clean area. Be mindful not to misplace any small screws or components that may be attached to or within the casing.
Opening the casing of your Toshiba external hard drive can give you an inside look at the internal components and make it easier to perform any necessary repairs or upgrades. Remember to be careful and methodical during this step to avoid causing any damage. With the casing successfully opened, you can proceed to the next step, which involves disconnecting the hard drive.
Step 6: Disconnect the Hard Drive
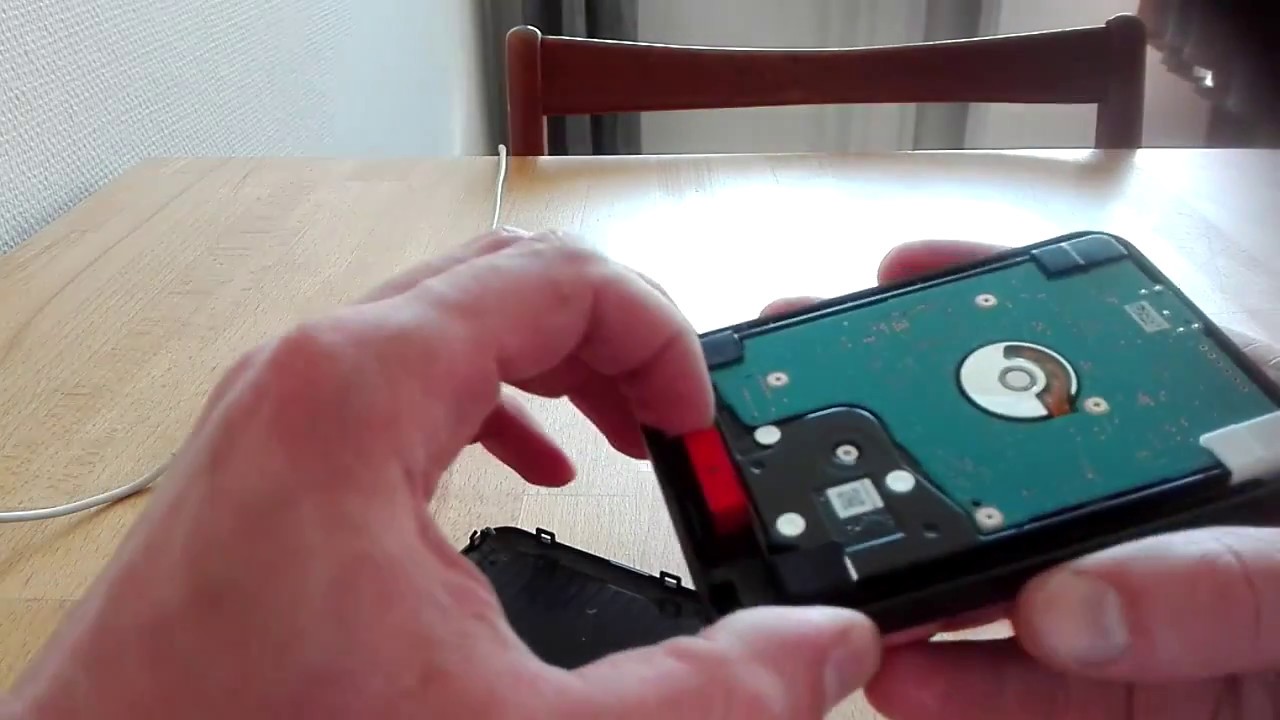
Now that you have opened the casing of your Toshiba external hard drive, it’s time to disconnect the hard drive itself. This step will allow you to access the hard drive individually, making it easier to perform any necessary repairs or recover data. Follow these steps to safely disconnect the hard drive:
- Locate the hard drive: Within the opened casing, you will see the hard drive component. It is typically a rectangular-shaped device with a SATA or USB connector.
- Identify the connection type: Determine whether your hard drive is connected using a SATA or USB connector. SATA connectors have two small L-shaped connectors, while USB connectors have a rectangular-shaped connector.
- Disconnect the cables: If your hard drive is connected using a SATA connector, gently unplug the power and data cables from the hard drive. If your hard drive is connected using a USB connector, unplug the USB cable from the hard drive.
- Handle the hard drive with care: When disconnecting the hard drive, be gentle and avoid applying excessive force. It’s important to handle the hard drive delicately to prevent any damage to the connectors or other components.
- Set aside the disconnected hard drive: Once the hard drive is disconnected, carefully set it aside on a clean and static-free surface. Take care not to drop or mishandle the hard drive, as it is a sensitive electronic device.
By following these steps, you will safely disconnect the hard drive from your Toshiba external hard drive. Remember to exercise caution and handle the hard drive with care to prevent any damage. With the hard drive successfully disconnected, you can proceed to the next step, which involves connecting the hard drive for further inspection or troubleshooting.
Step 7: Connect the Hard Drive
After disconnecting the hard drive in the previous step, you may need to reconnect it for further inspection, data recovery, or troubleshooting. Follow these steps to safely connect the hard drive back to your Toshiba external hard drive:
- Identify the connection type: Determine whether your hard drive uses a SATA or USB connection. SATA connectors have two small L-shaped connectors, while USB connectors have a rectangular-shaped connector.
- Position the hard drive: Take the disconnected hard drive and align it with the appropriate connection slot within the casing of your Toshiba external hard drive.
- Connect the cables: If your hard drive uses a SATA connection, plug the power and data cables back into the respective connectors on the hard drive. If your hard drive uses a USB connection, simply plug the USB cable back into the hard drive.
- Ensure secure connections: Double-check that the cables are securely plugged into the hard drive and that there are no loose or disconnected connections. This will prevent any issues during operation and ensure proper functionality.
- Close the casing: Carefully align the casing of your Toshiba external hard drive and gently press it back together. Make sure all the tabs or latches are securely in place.
- Secure any screws: If necessary, use the appropriate screwdriver to reinstall any screws that were removed earlier during the disassembly process. This will ensure that the casing is securely closed.
By following these steps, you will successfully connect the hard drive back to your Toshiba external hard drive. Take care to ensure that all connections are secure and that the casing is properly closed. With the hard drive reconnected, you can proceed to the next step, which involves reassembling the casing of your external hard drive.
Step 8: Reassemble the Casing
Now that the hard drive is connected and secured, it’s time to reassemble the casing of your Toshiba external hard drive. Follow these steps to ensure a proper and secure reassembly:
- Align the casing: Take the top part of the casing and align it with the bottom part, making sure all the edges and tabs are properly lined up.
- Gently press the casing together: Apply gentle pressure to the casing to snap the tabs or latches back into place. Take care not to force the casing, as it should fit together smoothly and without excess pressure.
- Inspect the casing: Once the casing is snapped back together, visually inspect it to ensure there are no gaps or misalignments. A proper reassembly should result in a secure and snug fit.
- Secure any screws: If you had removed any screws earlier, use the appropriate screwdriver to reinstall them. Be sure to tighten them securely, but avoid overtightening to prevent damage to the casing or threads.
By following these steps, you will successfully reassemble the casing of your Toshiba external hard drive. Make sure the casing is aligned properly, securely closed, and any screws are tightened appropriately. With the casing reassembled, you can proceed to the final step, which involves testing the functionality of your external hard drive.
Step 9: Test the External Hard Drive
After reassembling the casing of your Toshiba external hard drive, it’s crucial to test the functionality of the device. Follow these steps to ensure that your hard drive is functioning properly:
- Connect the power source: If your Toshiba external hard drive uses an external power source, plug it back in. If it is a USB-powered drive, connect it to your computer using a USB cable.
- Power on the device: If necessary, turn on your computer or power on the Toshiba external hard drive by pressing the power button.
- Listen for any unusual noises: As the device powers on, listen for any unusual sounds such as clicking, grinding, or high-pitched noises. These may indicate a potential issue with the hard drive.
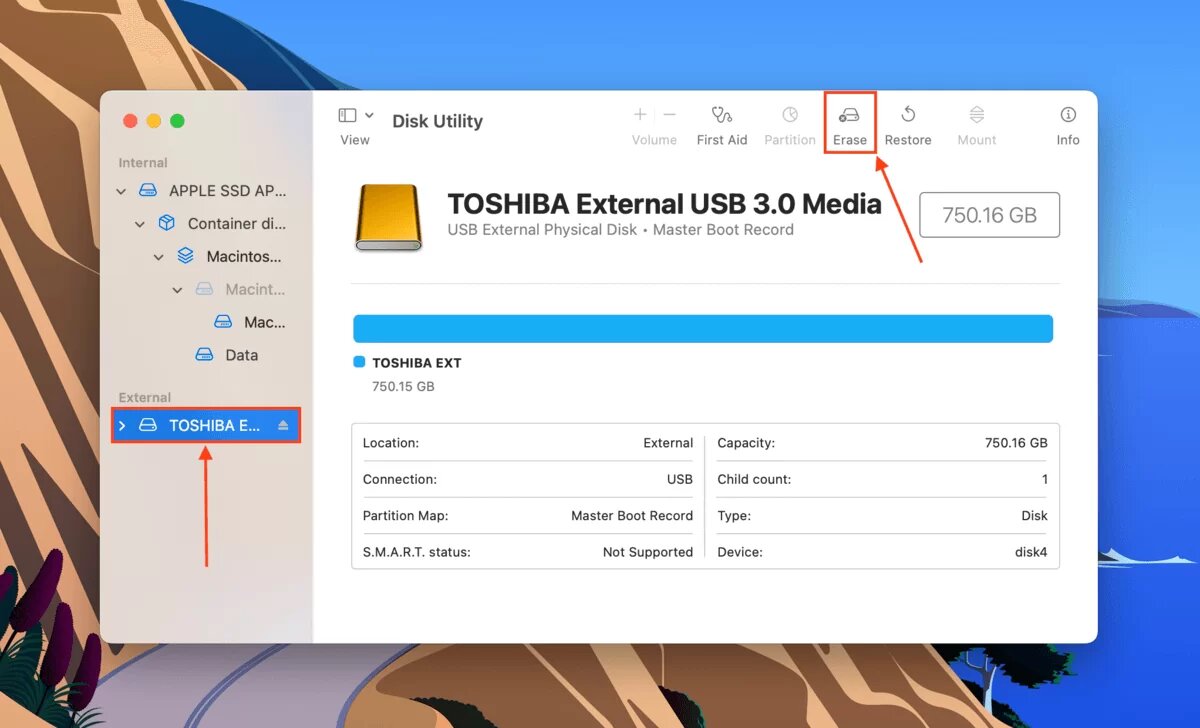
- Check for device recognition: Open your computer’s file explorer or disk management utility to check if the Toshiba external hard drive is recognized and accessible. Ensure that it appears as a connected storage device.
- Transfer test: Copy a few files to and from the external hard drive as a test. Check the transfer speed and ensure that files can be successfully read and written to the device.
- Run a disk check: Use disk utility software to perform a thorough disk check on the external hard drive. This will help identify any errors or issues with the drive’s performance or integrity.
By following these steps, you will be able to test the functionality of your Toshiba external hard drive. If any issues or abnormalities arise during the testing process, consult the user manual or contact Toshiba support for further assistance. It’s essential to ensure that your external hard drive is in proper working condition before resuming regular use or storing important data on it.
Conclusion
Congratulations! You have successfully learned how to open your Toshiba external hard drive. Following the step-by-step instructions in this guide, you gathered the necessary tools, prepared your workspace, disconnected the power source, removed the screws, opened the casing, disconnected and connected the hard drive, and reassembled the casing. Finally, you tested the functionality of your external hard drive to ensure it is working properly.
By opening your Toshiba external hard drive, you have gained access to the internal components, allowing you to perform repairs, upgrades, or data recovery if needed. It’s important to remember that opening the casing may void the warranty, so only proceed with caution and at your own risk. If your device is still under warranty and you encounter any issues, it is recommended to contact Toshiba support or your authorized service provider for assistance.
We hope that this guide has provided you with the knowledge and confidence to safely open your Toshiba external hard drive. Remember to always handle the device and its components with care to avoid any damage. If you have any further questions or need additional support, consult the user manual or reach out to Toshiba support for assistance. Good luck with your Toshiba external hard drive endeavors!