Introduction
Welcome to this guide on how to open a PC case Dell. Whether you need to clean the internal components, upgrade hardware, or troubleshoot an issue, accessing the inside of your Dell PC case is a crucial step. However, opening a PC case can seem daunting, especially for those who are not familiar with the process. But fear not, as we will walk you through each step, ensuring a safe and successful experience.
Before we begin, it’s important to note that opening your PC case should only be done if you are comfortable working with computer hardware. If you are unsure or uncomfortable, it’s always best to seek assistance from a professional. Additionally, ensure that you have all the necessary tools and take necessary precautions, such as grounding yourself, to avoid any damage to the components.
In this guide, we will cover everything from gathering the necessary tools to closing the PC case securely. By following these steps, you will be able to open your Dell PC case with confidence and carry out any required maintenance or upgrades.
Without further ado, let’s dive into the step-by-step process of opening a PC case Dell.
Step 1: Gather the necessary tools
Before you start opening your PC case Dell, it’s important to gather the necessary tools to ensure a smooth process. Here are the tools you will need:
- Screwdriver: Depending on your Dell model, you may need a Phillips screwdriver or a Torx screwdriver. Check the screws on your case to determine the type of screwdriver required.
- Grounding strap (optional): While not essential, a grounding strap can be useful to prevent static electricity discharge from damaging sensitive components. If you don’t have a grounding strap, ensure that you regularly touch a grounded metal object to discharge any static electricity from your body.
- Flashlight: A small flashlight can come in handy to provide additional lighting inside the case, especially if your PC’s case doesn’t have built-in lighting.
Once you have gathered these tools, place them within reach to ensure easy access throughout the opening process.
It’s always a good idea to have a clean, well-organized workspace as well. Clear any clutter from the area and use a static-free surface if available. This will help prevent any accidental damage to your PC components and make it easier to work.

Now that you have the tools ready, you can proceed to the next step: powering down the computer.
Step 2: Power down the computer
Before you begin opening the PC case Dell, it is important to power down the computer properly. This ensures that all components are safely turned off and reduces the risk of electrical shock during the process. Here’s how to power down your computer:
- Save your work: Make sure to save any open documents or files and close all applications to avoid losing any unsaved data.
- Shut down the operating system: Click on the “Start” button in the bottom left corner of the screen and choose “Shut Down” from the options. Wait for the operating system to shut down completely.
- Turn off the power supply: Locate the power button on your computer tower or case and press and hold it for a few seconds until the computer powers off. Alternatively, you can unplug the power cord from the wall outlet if the power button doesn’t turn off the computer.
- Disconnect peripherals: Unplug any external devices, such as monitors, keyboards, mice, and speakers, from the back of the computer.

By following these steps, you ensure that your computer is fully powered down and ready for the next step. It is crucial to wait until the computer is completely turned off and disconnected from the power source before proceeding to the next steps to avoid any electrical accidents.
With the computer powered down, we can now move on to the next step: unplugging all cables.
Step 3: Unplug all cables
Now that your computer is powered off, it’s time to unplug all cables connected to the PC case Dell. This step ensures that you have a clear and unobstructed path when removing the side panel later on.
Here’s what you need to do:
- Turn off the power strip: If your computer is connected to a power strip or surge protector, make sure to turn it off. This prevents any residual current from flowing through the system.
- Disconnect the power cable: With the power strip turned off, unplug the power cable from the back of your computer. This cable is typically attached to the power supply unit (PSU).
- Remove other cables: Carefully unplug any peripheral cables connected to your PC case, such as the monitor cable, keyboard cable, mouse cable, Ethernet cable, USB cables, and any audio cables.

It’s important to handle the cables with care and avoid pulling on them forcefully. Gently grasp the connectors and pull straight out to avoid damaging the cables or the ports on your PC case.
This step ensures that all cables are disconnected from your computer, allowing for easier access to the internals of the PC case later on. With the cables unplugged, we can now move on to the next step: removing the side panel screws.
Step 4: Remove the side panel screws
With the cables unplugged, we can now proceed to remove the side panel of your PC case Dell. The side panel is typically held in place by screws that need to be removed to gain access to the internal components. Here’s how to remove the side panel screws:
- Locate the side panel screws: Examine your PC case to identify the screws that secure the side panel. These screws are usually located at the back or side of the case. They may be Phillips head screws or thumb screws, depending on the model of your Dell PC case.
- Loosen or remove the screws: Use a screwdriver or your fingers to loosen or remove the screws that hold the side panel in place. Some cases may have multiple screws, so make sure to remove all of them.

When removing the screws, be careful not to drop them inside the case or misplace them. It is a good practice to place the screws in a small container or on a magnetic tray to keep them organized and prevent loss.
Once you have removed all the side panel screws, you can move on to the next step: sliding the side panel off the case.
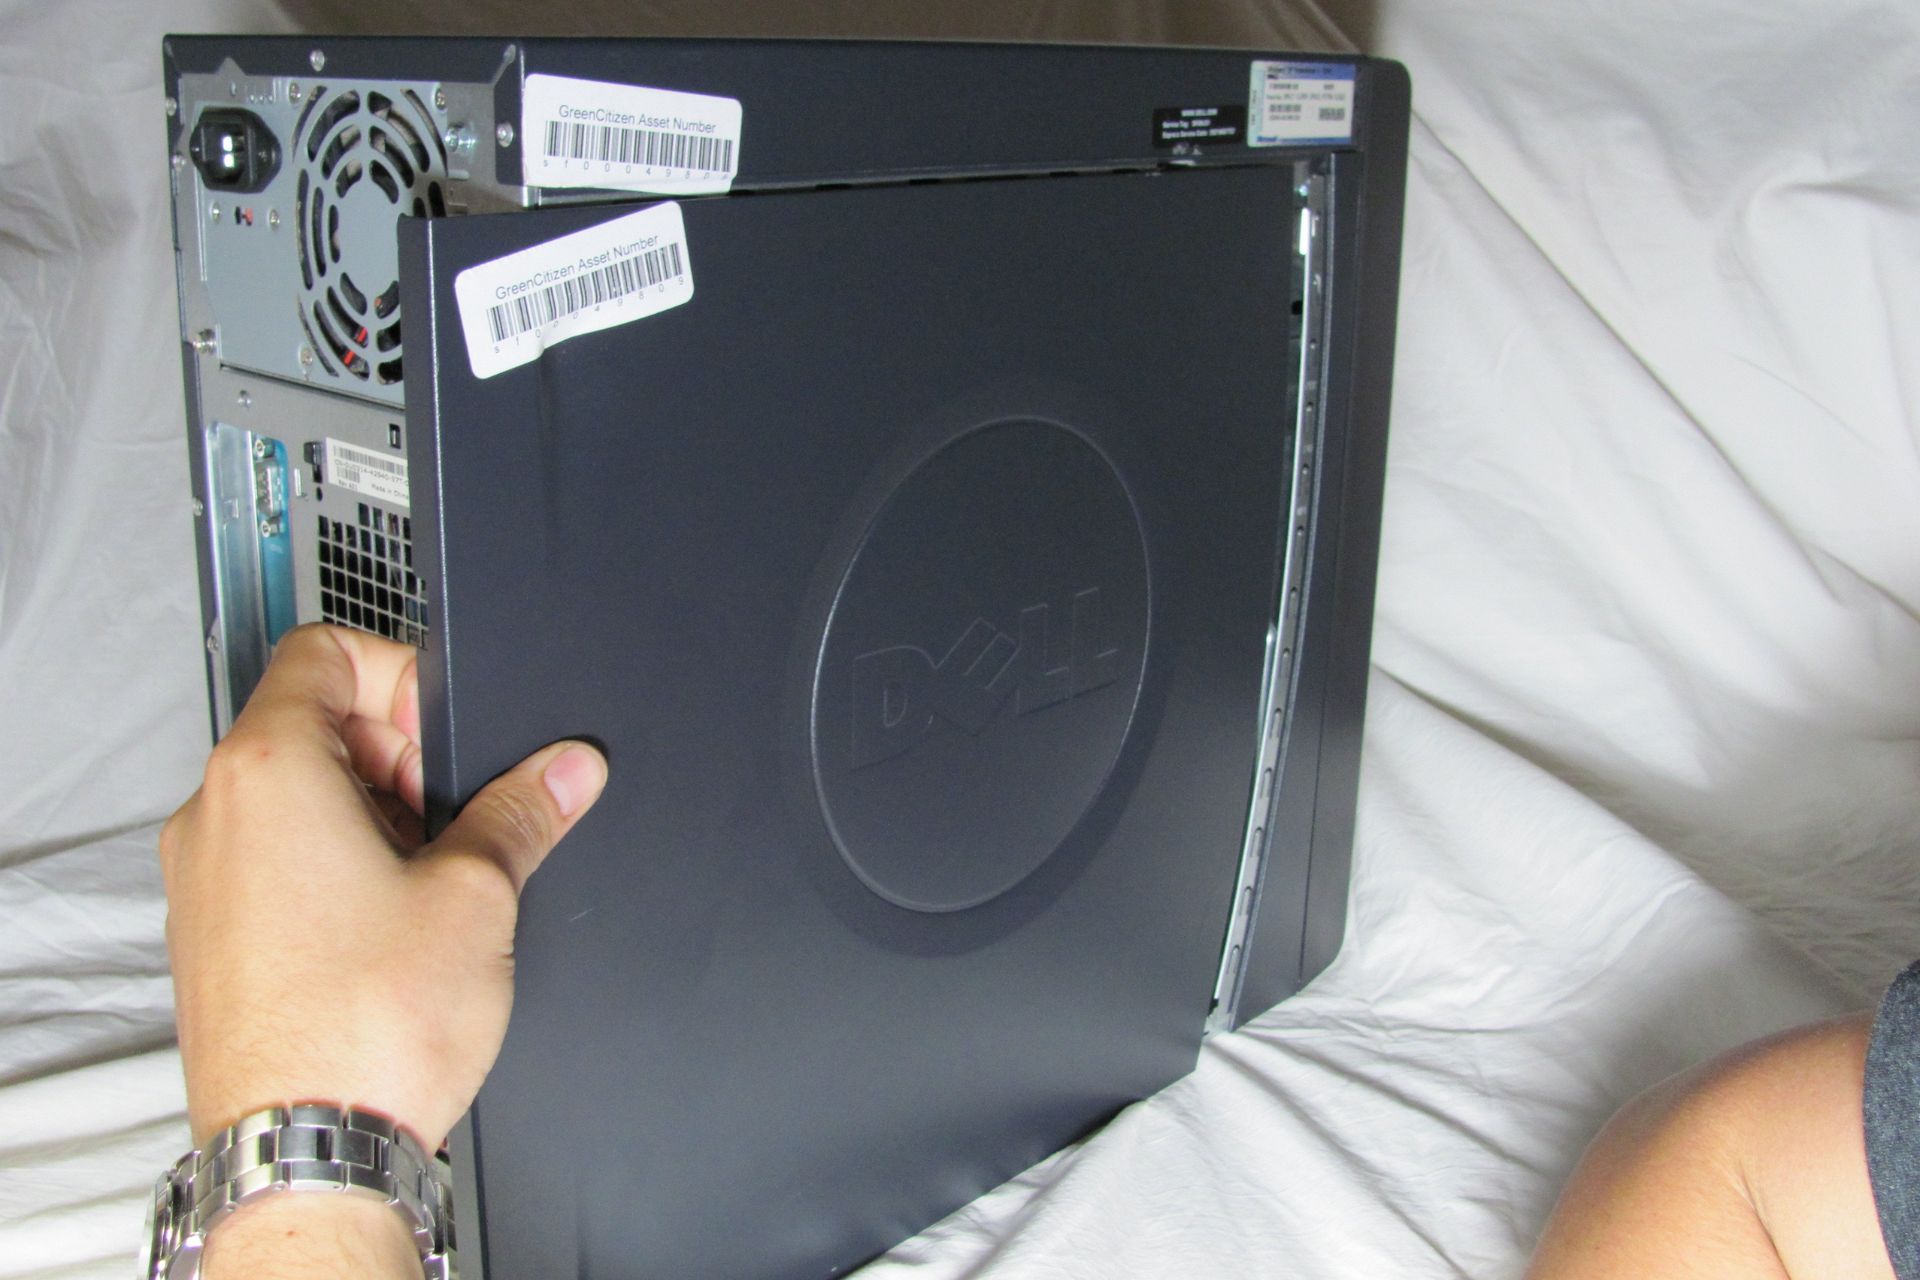
Step 5: Slide the side panel off
With the side panel screws removed, it’s time to slide off the side panel of your PC case Dell. This step will grant us access to the internal components and allow for maintenance or upgrades. Follow these steps to slide the side panel off:
- Identify the side panel: Take a close look at your PC case to determine which side is the panel that needs to be removed. In most cases, the side panel opposite the motherboard is the one that will slide off.
- Hold the case securely: Gently hold the PC case with one hand to stabilize it while using your other hand to slide the side panel. This will prevent the case from tipping or falling during the process.
- Slide the side panel: Carefully slide the side panel towards the back of the case. Some cases may have release mechanisms or latches that need to be disengaged before sliding off the panel. Refer to your PC case’s manual or manufacturer’s instructions for specific guidance.

As you slide the side panel off, be aware of any cables or wires that may be attached to the panel. Make sure they are not tangled or caught on any components as you remove the panel. If necessary, gently disconnect any cables to fully remove the side panel.
With the side panel successfully removed, you now have unhindered access to the internal components of your PC case Dell. This will allow you to perform any necessary maintenance, upgrades, or troubleshooting. Proceed to the next step to open the PC case Dell safely.
Step 6: Open the PC case Dell safely
Now that the side panel has been successfully removed, it’s time to open the PC case Dell safely. Opening the case will provide you with a clear view of the internal components and allow you to carry out any necessary maintenance or upgrades. Follow these steps to open the PC case safely:
- Locate the release latch or screws: Look for a release latch or screws that secure the top or front panel of the case. The location and type of latch or screws may vary depending on the model of your Dell PC case.
- Release the latch or unscrew: If your case has a release latch, press or lift it to release the top or front panel. If there are screws, use a screwdriver to carefully unscrew them, ensuring not to strip the screws.
- Open the case: With the latch released or screws removed, gently lift or slide the top or front panel of the case towards you to open it. Be cautious of any cables or wires that may be connected to the panel.

Please note that some Dell PC cases may have different mechanisms for opening, such as a push-to-open design or a removable front panel. Refer to your PC case’s manual or manufacturer’s instructions for detailed guidance on how to open the case safely.
By opening the PC case, you now have direct access to the internal components of your Dell computer. This will allow you to clean, upgrade, or troubleshoot more effectively. Proceed to the next step to learn how to access and clean the internal components of your PC case Dell.
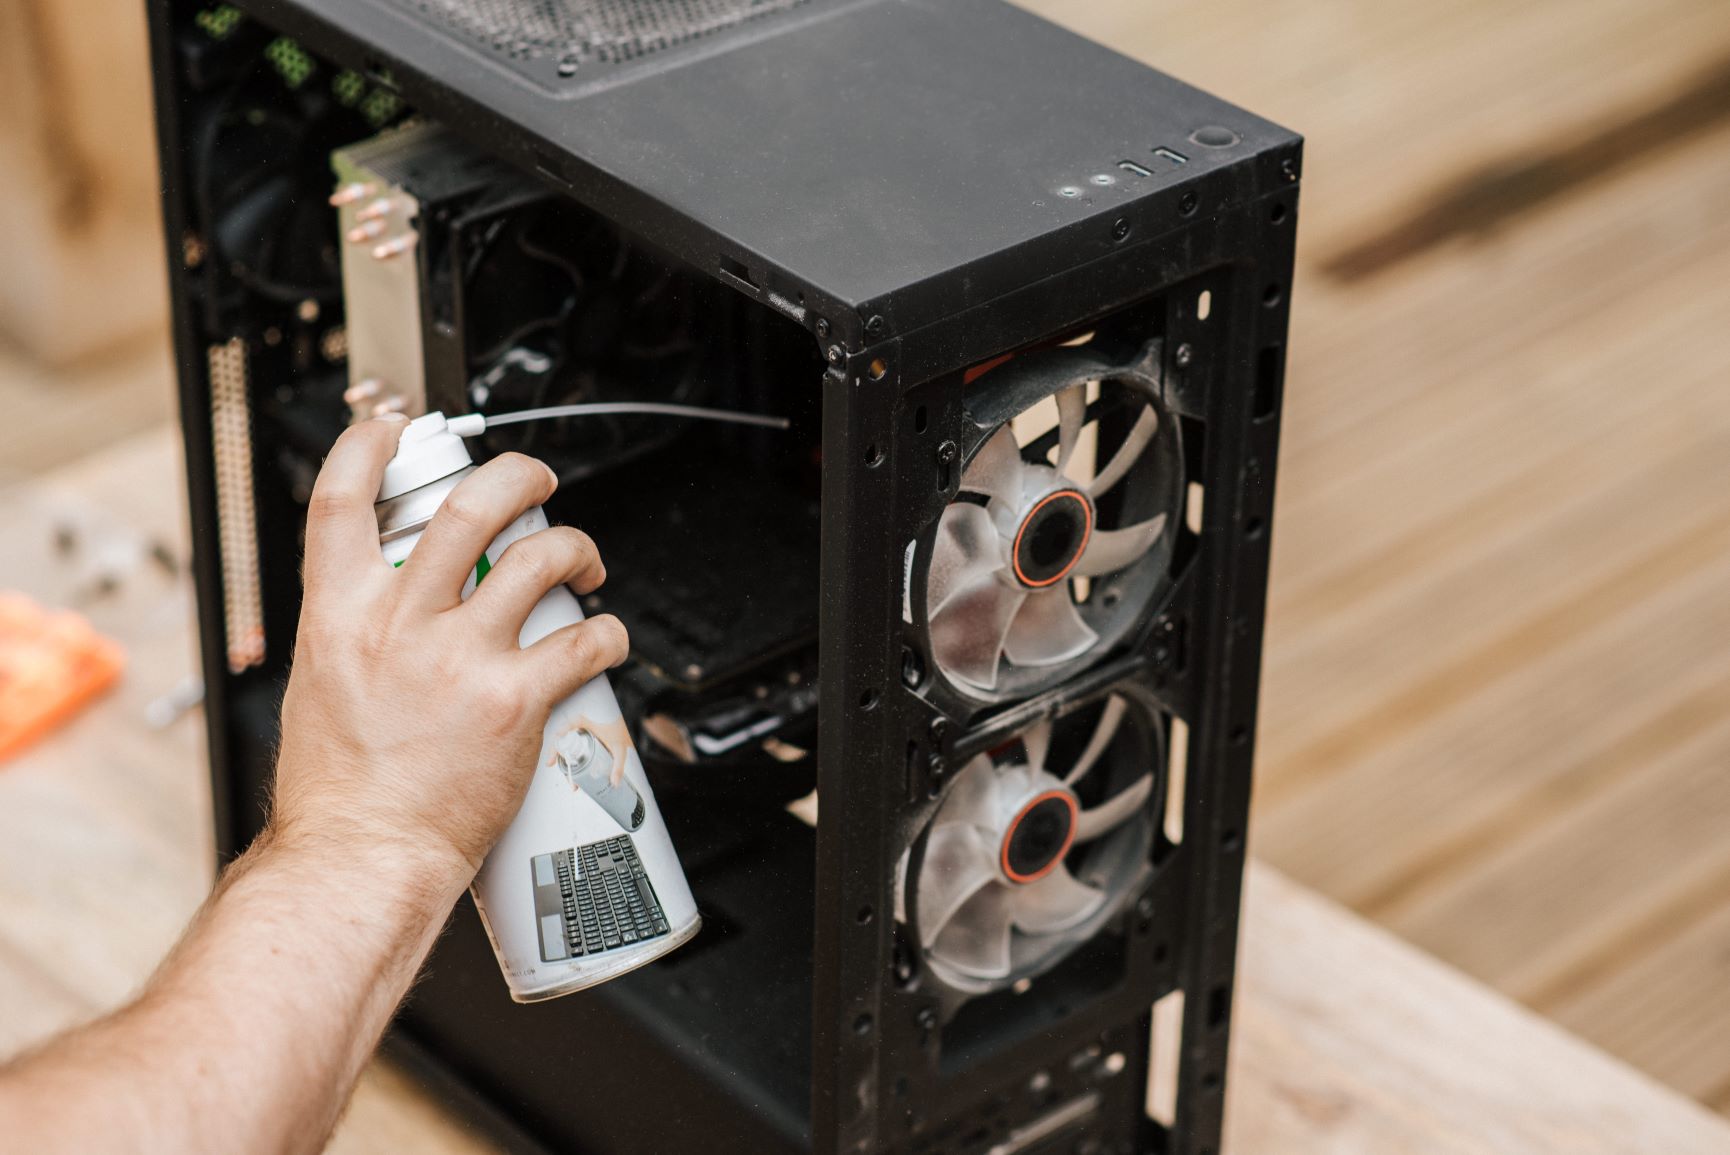
Step 7: Access and clean the internal components
Now that the PC case Dell is open, you have unrestricted access to the internal components. This step will guide you on how to access and clean the internal components effectively:
- Identify the internal components: Familiarize yourself with the various components inside the PC case, which may include the motherboard, graphics card, RAM modules, hard drives, and power supply unit (PSU).
- Cleaning the components: Use compressed air or an anti-static brush to remove dust and debris from the components. Pay special attention to the fans, heatsinks, and vents, as they tend to accumulate the most dust. Make sure to hold the fans in place while cleaning to prevent them from spinning and potentially causing damage.
- Do not use liquid cleaners: Avoid using liquid cleaners or spraying any cleaning solutions directly onto the components, as this can cause damage. Stick to dry methods of cleaning, such as compressed air or anti-static brushes.
- Remove stubborn dust: For stubborn dust or debris that cannot be easily removed, you can use a soft, lint-free cloth slightly dampened with isopropyl alcohol. Gently wipe the affected areas, being careful not to apply excessive pressure or moisture.
- Ensure proper airflow: While cleaning, take note of any cables or obstructions that may impede proper airflow inside the PC case. Ensure that cables are neatly organized and secured, away from any fans or heatsinks.

Cleaning the internal components of your PC case Dell regularly is essential for maintaining optimal performance and preventing overheating. A clean system allows for better airflow, which in turn keeps the components cool and prolongs their lifespan.
Once you have finished cleaning the internal components, you can proceed to the next step: closing the PC case Dell.
Step 8: Close the PC case Dell
After accessing and cleaning the internal components of your PC case Dell, it’s time to close the case to ensure everything is securely in place. This step will guide you on how to close the PC case safely:
- Position the side panel: Take the side panel that you removed earlier and align it with the case. Make sure the panel is positioned correctly and ready to be secured back in place.
- Slide the side panel: Slowly slide the side panel back onto the case, ensuring it fits snugly. Be careful not to force it or misalign any cables or components inside the case.
- Secure the side panel screws: Once the side panel is in place, use the screws that were removed earlier to secure it back onto the case. Tighten the screws firmly, but avoid overtightening to prevent damage to the case.

Double-check that all screws are properly tightened and make a final visual inspection to ensure that the case is securely closed. This will help prevent any potential damage or components becoming loose during operation.
With the PC case Dell securely closed, you are almost ready to power on your computer. Before doing so, make sure to complete the remaining steps to ensure a smooth and successful process.
Let’s move on to the next step: reconnecting all cables.
Step 9: Reconnect all cables
With the PC case Dell closed, it’s time to reconnect all the cables that were previously disconnected. Properly reconnecting the cables ensures that all components are powered and allows your computer to function correctly. Follow these steps to reconnect all cables:
- Reconnect power cables: Begin by reconnecting the power cable to the back of your PC case, ensuring it is securely plugged into the power supply unit (PSU).
- Reconnect peripheral cables: Reconnect any peripheral cables that were previously unplugged, such as the monitor cable, keyboard cable, mouse cable, Ethernet cable, and any audio cables. Make sure each cable is plugged into the appropriate port on your PC case.
- Organize and secure cables: As you reconnect the cables, take the opportunity to organize and secure them using cable ties or clips. This will help improve airflow, maintain a neat appearance, and reduce the risk of accidental disconnection or tangling.

Take your time to ensure that each cable is properly inserted and connected. Verify that all connections are secure and snug. In addition, double-check that no cables are being pinched or obstructing any fan or component inside the case.
Once you have finished reconnecting all the cables, you are ready for the final step: powering on the computer.
Step 10: Power on the computer
Now that you have reconnected all the cables, it’s time to power on your computer and ensure that everything is functioning correctly. This final step will guide you on how to power on the computer:
- Double-check connections: Before powering on the computer, inspect all the connections one last time to ensure they are secure and properly inserted.
- Turn on the power supply: Locate the power switch on the back of the power supply unit (PSU) and flip it to the “on” position. This will provide power to your computer.
- Press the power button: Find the power button on the front of your PC case, typically located near the top or front panel. Press it briefly to turn on the computer.

Once you have powered on the computer, you should hear the fans spinning and the various components initializing. Monitor the computer as it starts up to ensure that it boots up properly without any error messages or abnormal behavior.
If your computer does not turn on or if you encounter any issues during startup, double-check all the connections and consult your manufacturer’s documentation or seek professional assistance for troubleshooting.
Congratulations! You have successfully opened your PC case Dell, accessed and cleaned the internal components, reconnected all cables, and powered on the computer. Your computer is now ready for use, and you can enjoy improved performance and functionality.
Conclusion
Congratulations on successfully completing the process of opening your PC case Dell! By following the step-by-step guide provided, you have gained access to the internal components, cleaned them, and reconnected all the necessary cables. This process is crucial for maintaining the performance and longevity of your computer.
Opening a PC case can be intimidating for some, but with the right tools, precautions, and knowledge, it can be a straightforward and rewarding experience. Remember to always power down your computer, unplug all cables, and exercise caution while handling the internal components.
Cleaning the internal components of your PC case helps to prevent dust buildup, improves airflow, and keeps your system running cool. Regular cleaning can have a positive impact on the overall performance and stability of your computer.
After reassembling your PC case and reconnecting all the cables, you are now ready to power on your computer. Take a moment to marvel at your work and listen to the comforting hum of your system starting up. If any issues arise during this process, refer to your manufacturer’s documentation or seek professional assistance for troubleshooting.
Remember, this guide serves as a general overview for opening a PC case Dell. Specific models may have slight variations in the process, so always consult your manufacturer’s documentation for detailed instructions tailored to your computer.
Thank you for following this guide. We hope it has been helpful in your journey of opening and maintaining your PC case Dell. Enjoy using your computer with its refreshed internals and improved performance!