Introduction
Welcome to our guide on how to move your Steam installation to an SSD! If you’re a gamer, you’re probably well aware of how frustrating it can be to deal with long loading times and slow game performance. That’s where moving your Steam installation to a solid-state drive (SSD) comes in.
An SSD is a much faster storage option compared to traditional hard disk drives (HDDs). By moving your Steam games and installation files to an SSD, you can significantly reduce load times and experience smoother gameplay. This guide will walk you through the steps to successfully move your Steam installation to an SSD, so you can start enjoying faster gaming performance.
Before we get started, it’s essential to note that moving your Steam installation requires cautious preparation and execution. It’s crucial to back up your game files and follow the steps precisely to avoid any data loss or complications. By following this guide, you’ll be able to seamlessly transfer your Steam installation to an SSD without any hiccups.
This guide is suitable for both Windows and Mac users, as the steps are generally the same for both operating systems. However, there may be slight differences in some of the steps, which we’ll address along the way. So, whether you’re a PC enthusiast or a Mac gamer, this guide has got you covered.
Are you ready to boost your gaming experience by moving Steam to an SSD? Let’s dive in and get started with step one: backing up your games.
Step 1: Backing up your games
Before you begin the process of moving your Steam installation to an SSD, it’s essential to back up your games to ensure that none of your precious progress is lost. Follow the steps below to backup your games:
- Open the Steam application on your computer and log in to your account.
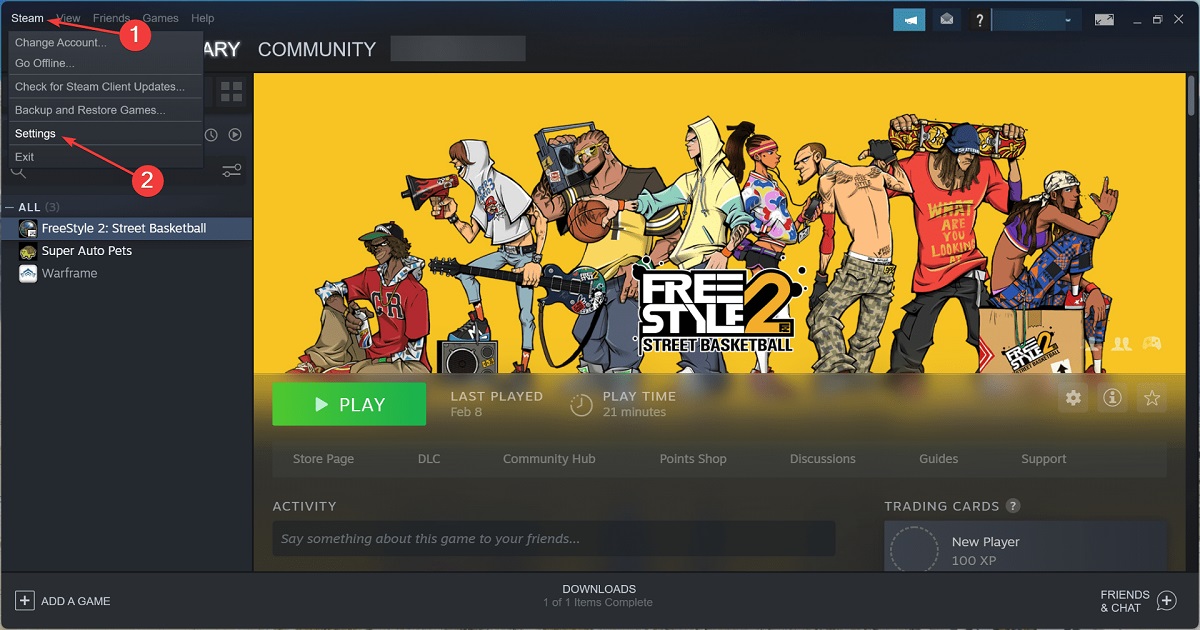
- Click on the “Steam” menu at the top left corner of the screen and select “Backup and Restore Games” from the drop-down menu.
- In the “Backup and Restore Games” window, select “Backup currently installed programs” and click “Next”.
- You will see a list of all the games currently installed in your Steam library. Check the boxes next to the games you want to back up or select the “Select All” option if you want to back up your entire library.
- Choose a location on your computer or an external storage device where you want to save the backup files. Make sure you have enough free space to accommodate the games.
- Click on the “Next” button to start the backup process. This may take a while depending on the size of your games and the speed of your system.
- Once the backup process is complete, you will see a confirmation message. Click “Finish” to close the backup window.
It’s important to note that the backup files can consume a significant amount of storage space, especially if you have a large game library. Ensure that you have enough storage available before proceeding to the next steps.
By following these steps, you have successfully backed up your Steam games, ensuring that your progress and game files are safe. In the next step, we will prepare your SSD for the Steam migration process.
Step 2: Preparing your SSD
Now that you have successfully backed up your games, it’s time to prepare your SSD for the Steam migration. Follow these steps to get your SSD ready:
- Connect your SSD to your computer. If you’re using an external SSD, connect it via USB. If you have an internal SSD, ensure that it is properly installed in your computer.
- Make sure your SSD has enough free space to accommodate your Steam games and installation files. It’s recommended to have at least double the amount of space that your current Steam installation occupies to allow for future game updates and expansions.
- Format your SSD to the appropriate file system if needed. If your SSD is new or hasn’t been formatted, you may need to format it to a compatible file system. For Windows users, you can format the SSD to NTFS, while Mac users can format it to APFS or Mac OS Extended (Journaled).
- If you’re using Windows, assign a drive letter to your SSD. This step is necessary to ensure that your computer recognizes the SSD as a separate storage device. To assign a drive letter, right-click on “This PC” or “My Computer” and select “Manage”. Then, go to “Disk Management”, right-click on your SSD, select “Change Drive Letter and Paths”, and assign a letter to the SSD.
- Ensure that your SSD is functioning properly. You can do this by checking if it is recognized by your computer, accessing its properties, and verifying that it has the correct storage capacity.
By following these steps, you have successfully prepared your SSD for the Steam migration process. Your SSD is now ready to accommodate your Steam games and installation files. In the next step, we will move your Steam installation to the SSD.
Step 3: Moving your Steam installation
Now that your SSD is prepared, it’s time to move your Steam installation to the new drive. Follow these steps to ensure a smooth transition:
- Close the Steam application if it is currently running on your computer.
- Locate your current Steam installation directory. For Windows users, the default directory is usually “C:\Program Files (x86)\Steam”. Mac users can find the installation directory at “~/Library/Application Support/Steam”.
- Copy the entire Steam folder and its contents from your current installation directory to the desired location on your SSD. This might take some time, depending on the size of your Steam library.
- Once the copying process is complete, go to the location of your new Steam installation directory on the SSD.
- Find the “Steam.exe” or “Steam.app” file in the new directory and double-click to launch it. This will start the Steam application from the SSD.
- Steam will automatically detect that it has been moved to a new location and will update its settings accordingly. You may be prompted to log in to your Steam account again.
- After logging in, Steam will verify the integrity of your game files. This may take some time as it compares the files on your SSD with the ones in the Steam database. Allow the process to complete without interruption.
- Once the verification is complete, Steam will be fully functional from your SSD. You can now access your games and enjoy faster loading times and improved performance.
Congratulations! You have successfully moved your Steam installation to your SSD. All your games and data should now be accessible from the new location. In the next step, we will change the default game installation location to the SSD.
Step 4: Changing the default game installation location
Now that your Steam installation is on your SSD, it’s a good idea to change the default game installation location to ensure that any future game installations are saved directly to the SSD. Follow these steps to change the default game installation location:
- Open the Steam application on your computer and log in to your account if you’re not already logged in.
- Click on the “Steam” menu at the top left corner of the screen and select “Settings” from the drop-down menu.
- In the Settings window, click on the “Downloads” tab located on the left sidebar.
- Under the “Content Libraries” section, click on the “Steam Library Folders” button.
- A new window will appear, showing the current game installation locations. Click on the “Add Library Folder” button located at the bottom left corner of the window.
- Select the location on your SSD where you want to save future game installations and click on the “New Folder” button. Give the folder a descriptive name to identify it as the default game installation location.
- Click on the “Select” button to add the new library folder to Steam. The SSD location will now appear in the list of Steam Library Folders.
- To make the newly added folder the default game installation location, right-click on it and select “Make Default Folder” from the drop-down menu.
- Click on the “OK” button to save the changes and close the Steam Library Folders window.
By following these steps, you have successfully changed the default game installation location to your SSD. Any future game installations will be saved to the new location, ensuring that your SSD remains the primary storage for your Steam games.
With the default game installation location updated, you’re now ready to enjoy faster game installations and improved gaming performance. In the next step, we will cover the process of verifying game files and re-installing Steam to finalize the migration.
Step 5: Verifying game files and re-installing Steam
After moving your Steam installation to your SSD and changing the default game installation location, it’s important to verify the integrity of your game files and, if necessary, re-install Steam. Follow these steps to complete the final steps of the migration process:
- Open the Steam application on your computer and log in to your account.
- Click on the “Library” tab at the top of the Steam window to access your game library.
- Scroll through your game library and right-click on each game, then select “Properties” from the drop-down menu.
- In the Properties window, click on the “Local Files” tab located on the left sidebar.
- Click on the “Verify Integrity of Game Files” button. This will check the game files and repair any issues that may have occurred during the migration process.
- Allow the verification process to complete. This may take some time, depending on the size of the game and the speed of your system.
- Once the verification is complete, repeat this process for each game in your library.
- If you encounter any game files that fail to verify or other issues, consider re-installing the problem game(s) to ensure a clean installation on your SSD. To do this, right-click on the game in your library, select “Uninstall” then “Install” to initiate the re-installation process.
- If you’re experiencing recurring issues or want to start fresh, you may need to re-install Steam itself. To do this, click on the “Steam” menu at the top left corner of the Steam window and select “Settings”. From there, click on the “Downloads” tab and click on the “Steam Library Folders” button. Right-click on the default Steam library folder (the one on your SSD) and select “Delete Library Folder”. Confirm the deletion and proceed to uninstall Steam from your computer. After uninstalling, re-download the Steam client from the official website and install it to your SSD. Log in to your account, and your game library will be synchronized.
By following these steps and verifying your game files, you ensure that all your games are installed correctly on your SSD and that any issues are resolved. Now, you’re ready to launch Steam from your SSD and enjoy a faster and smoother gaming experience.
In the next step, we will cover how to launch Steam from your SSD and make sure everything is working as expected.
Step 6: Launching Steam from your SSD
Now that you have completed the migration process and verified your game files, it’s time to launch Steam from your SSD and ensure that everything is working correctly. Follow these steps to get started:
- Open the Steam application on your computer.
- Log in to your Steam account if you aren’t already logged in.
- From the Steam library, select a game and click on the “Play” button to launch it. This will help confirm that the game is running smoothly from your SSD.
- Monitor the game’s loading time and performance. You should notice significantly faster loading times compared to when the game was installed on your old storage drive.
- Try launching and playing other games from your library to verify their performance as well. If you encounter any issues, make sure to troubleshoot or re-install the problematic games from the SSD following the previous steps.
- Ensure that game saves, achievements, and other progress have been successfully transferred to your new Steam installation on the SSD. Check if your game libraries and settings are preserved as well.
- Take a moment to enjoy the enhanced gaming experience offered by your SSD. Faster load times, smoother gameplay, and improved performance are just a few of the benefits you can expect.
By following these steps and launching Steam from your SSD, you have completed the migration process successfully. You can now enjoy all your favorite games with improved speed and performance.
Congratulations! You have successfully moved your Steam installation to an SSD, ensuring faster loading times and a smoother gaming experience. Remember to regularly back up your game progress and files to avoid any potential data loss. If you ever need to migrate your Steam installation to a new SSD or a different computer, you can refer back to this guide for assistance.
Now, go and immerse yourself in the world of gaming with the power of your SSD!
Conclusion
Moving your Steam installation to an SSD is a tremendous upgrade that can significantly improve your gaming experience. By following the steps outlined in this guide, you have successfully migrated your Steam installation to an SSD and can now enjoy faster load times, smoother gameplay, and improved performance.
Throughout the process, we covered the essential steps, including backing up your games, preparing your SSD, moving your Steam installation, changing the default game installation location, verifying game files, and launching Steam from your SSD. By diligently following each step, you have successfully completed the migration process and set yourself up for an enhanced gaming experience.
Remember, it’s crucial to back up your games before making any changes, as this will ensure that your progress and data remain intact. Additionally, regularly checking for game updates, maintaining enough free space on your SSD, and ensuring the integrity of your game files will help keep your gaming experience smooth and uninterrupted.
We hope this guide has been helpful in assisting you with moving your Steam installation to an SSD. Enjoy the benefits of faster loading times, improved gameplay, and a smoother gaming experience. Should you ever need to migrate your Steam installation to a new SSD or a different computer, you can always refer back to this guide as a reference.
Now, go ahead and immerse yourself in the world of gaming with the speed and performance of your SSD. Happy gaming!