Introduction
Welcome to the world of gaming! When it comes to playing your favorite games, having a fast and efficient storage solution is essential for a smooth and enjoyable gaming experience. One of the most popular options for gamers is to install their games on a solid-state drive (SSD). With its lightning-fast speeds and quick load times, an SSD can significantly improve your gaming performance.
In this guide, we will walk you through the process of installing Steam games on an SSD. Steam, developed by Valve Corporation, is a widely used gaming platform that allows you to purchase, download, and play a vast library of games. By following our step-by-step instructions, you’ll be able to get your games up and running on your SSD in no time.
Before we dive into the installation process, it’s essential to note that having enough SSD storage space is crucial. While SSDs offer faster speeds, they typically have less capacity compared to traditional hard disk drives (HDDs). Therefore, it’s important to ensure that your SSD has sufficient storage available for your games. If needed, you may need to upgrade your SSD to a larger capacity before proceeding with the installation.
Additionally, we recommend checking the system requirements of the games you plan to install. Some games may have specific storage requirements or recommend installing on an SSD. By verifying the specifications beforehand, you can ensure compatibility and optimal performance.
Now that we’ve covered the basics, let’s jump into the installation process and get your Steam games running smoothly on your SSD. Just follow the steps outlined in this guide, and you’ll be on your way to a faster and more immersive gaming experience.
Step 1: Check your SSD storage
Before you start installing your Steam games on your SSD, it’s essential to check the available storage space on your SSD. This step will help you determine if you have enough room to accommodate the games you want to install.
To check your SSD storage, you can follow these simple steps:
- Open the “File Explorer” on your computer by clicking on the folder icon on your taskbar or pressing the “Windows key + E” on your keyboard.
- On the left sidebar of the File Explorer, locate and click on “This PC” or “My Computer.”
- A list of drives will appear, including your SSD. Look for the drive labeled with the name or model of your SSD.
- Right-click on your SSD drive and select “Properties” from the drop-down menu.
- A new window will open, displaying the properties of your SSD. Here, you will find information about the total capacity and available free space on your SSD.
It’s important to ensure that you have enough free space on your SSD to accommodate the games you intend to install. Keep in mind that games can vary in size, with some requiring several gigabytes or even tens of gigabytes of storage space. If your SSD does not have enough space, you may need to consider upgrading to a larger capacity SSD or deleting unnecessary files to free up storage.
Checking your SSD storage is a vital first step to ensure a smooth installation process and prevent any issues due to insufficient storage. Once you have determined that you have enough space on your SSD, you can proceed to the next steps to download and install Steam.
Step 2: Download and install Steam
Now that you’ve checked your SSD storage, it’s time to download and install the Steam platform. Steam is the digital distribution platform where you can access a wide range of games and manage your gaming library.
To download and install Steam, follow these steps:
- Visit the official Steam website by opening your preferred web browser and going to store.steampowered.com.
- Once you’re on the website, locate the “Install Steam” button and click on it.
- A download page will appear, offering you the option to download the Steam installer for your operating system, whether it’s Windows, macOS, or Linux. Click on the appropriate download button to start the download.
- Once the download is complete, locate the downloaded file and double-click on it to run the installer.
- Follow the on-screen prompts to complete the installation process. You may be asked to agree to the Steam terms and conditions or choose a destination folder for the installation. Make sure to read and review all the options before proceeding.
- After the installation is complete, the Steam application will launch automatically.
- At this stage, you might be prompted to log in to your existing Steam account or create a new account if you don’t have one already. Follow the instructions to sign in or create an account.
- Once you’ve successfully logged in to your Steam account, you’re ready to start exploring the vast library of games and get ready to install them on your SSD.
Congratulations! You’ve successfully downloaded and installed Steam on your computer. In the next step, we’ll guide you through changing the default installation folder to direct Steam games to your SSD.
Step 3: Change Steam installation folder
By default, Steam installs games on your primary hard drive. However, we want to change the installation location to your SSD to take advantage of its faster speeds. Follow these steps to specify the SSD as the installation folder for your Steam games:
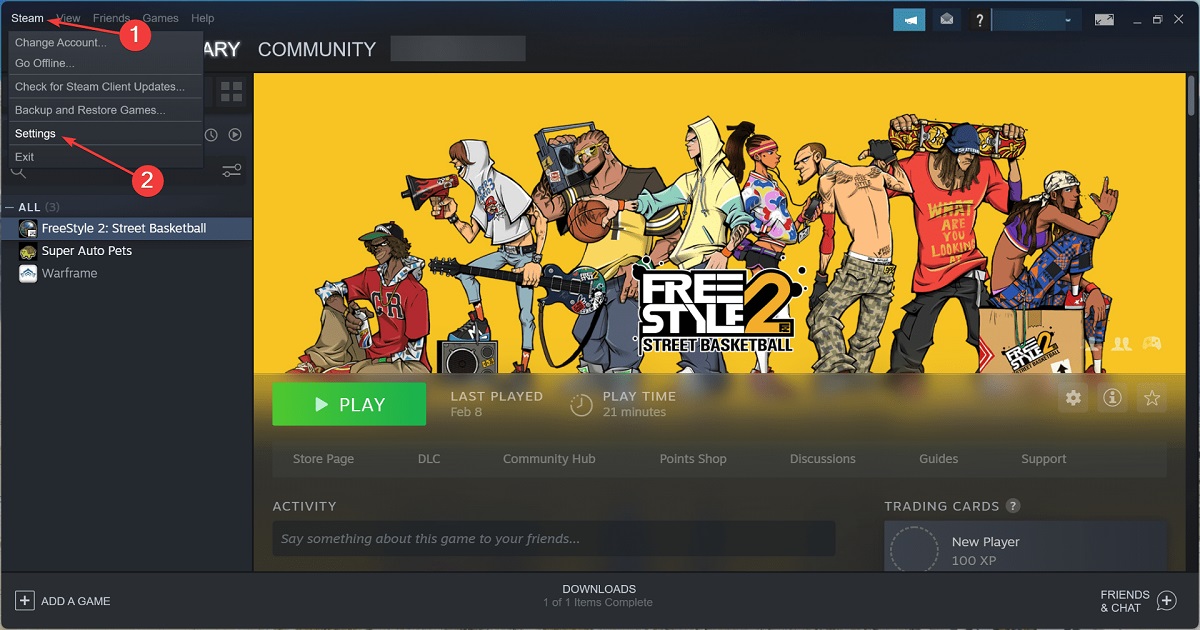
- Launch the Steam application that you installed in the previous step. If the Steam client is already open, exit and re-launch it to ensure the changes take effect.
- In the top-left corner of the Steam client, click on the “Steam” tab.
- A drop-down menu will appear. From this menu, select “Settings.”
- In the Settings window, navigate to the “Downloads” tab.
- Look for the “Steam Library Folders” section and click on the “STEAM LIBRARY FOLDERS” button.
- A new window will appear, displaying the current Steam library folders on your computer.
- To add a new folder on your SSD, click on the “ADD LIBRARY FOLDER” button.
- Navigate to your SSD drive by selecting it from the list of available drives or browsing through your computer’s file explorer.
- Choose a suitable folder on your SSD where you want to store your Steam games. You can create a new folder specifically for this purpose or select an existing one.
- Click “Select” to confirm the chosen folder on your SSD as the new Steam library location.
Once you’ve successfully added the new library folder on your SSD, Steam will recognize it as an additional storage location for your games. It will also become the default location for future installations.
Changing the Steam installation folder to your SSD is a crucial step to ensure that your games are stored and loaded from the faster storage drive. In the next step, we’ll guide you through moving your existing games to the SSD to maximize its performance benefits.
Step 4: Move existing games to SSD
If you already have games installed in your Steam library, you’ll want to move them to your SSD to take advantage of its faster loading times. Follow these steps to move your existing games to your SSD:
- Open the Steam application on your computer.
- In the top-left corner of the Steam client, click on the “Steam” tab.
- From the drop-down menu, select “Settings.”
- In the Settings window, navigate to the “Downloads” tab.
- Click on the “STEAM LIBRARY FOLDERS” button to view your existing library folders.
- Identify the game you want to move to the SSD from the list of installed games.
- Once you’ve selected the game, right-click on it and choose “Properties” from the context menu.
- In the Properties window, click on the “LOCAL FILES” tab.
- Click on the “MOVE INSTALL FOLDER” button.
- A pop-up window will appear, displaying your Steam library folders. Select the SSD library folder you created earlier as the new installation location for the game.
- Click “MOVE FOLDER” to start the process of moving the game files to the SSD.
Steam will now begin moving the game files from the original location to the new SSD library folder. The time it takes to complete this process depends on the size of the game and the read and write speeds of both the source and destination drives.
Repeat these steps for any other games you want to move to the SSD. By moving your existing games to the SSD, you’ll ensure that they benefit from the improved load times and performance offered by the faster storage drive.
In the next step, we’ll guide you through changing the default installation location for future games to ensure they are installed directly on your SSD.
Step 5: Change future game installation location
To ensure that all future game installations are directly saved onto your SSD, you need to adjust the default installation location within the Steam settings. Follow these steps to set the SSD as the primary installation location for future games:
- Launch the Steam application on your computer.
- In the top-left corner of the Steam client, click on the “Steam” tab.
- Select “Settings” from the drop-down menu.
- Navigate to the “Downloads” tab in the Settings window.
- In the “Content Libraries” section, you’ll see the SSD library folder you created earlier.
- Click on the “STEAM LIBRARY FOLDERS” button to view the library folders.
- From the list of library folders, right-click on the SSD library folder and select “Make Default Folder.”
- Now, whenever you install games through Steam, the SSD library folder will be the default location.
By setting the SSD library folder as the default, you ensure that all future games are installed directly onto your SSD. This streamlines the installation process and maximizes the performance benefits of using an SSD.
Congratulations! You’ve successfully adjusted the installation location in Steam to prioritize your SSD for all future game installations. Your gaming experience will now be enhanced with faster loading times and improved overall performance.
In the next step, we’ll provide some additional tips on optimizing game settings specifically for your SSD.
Step 6: Optimize game settings for SSD
Now that you have successfully installed your Steam games on your SSD, it’s time to optimize the game settings to fully leverage the benefits of your fast storage drive. By making a few adjustments, you can further enhance the gaming performance and ensure a smooth and seamless experience. Here are some tips to optimize game settings for SSD:
- Enable SSD-friendly options: Some games offer specific settings that are designed to maximize performance on SSDs. Look for options such as “Fast-Load” or “SSD Mode” in the game settings and enable them if available. These options may reduce loading times and improve overall responsiveness.
- Adjust graphics settings: Tweaking the graphics settings of your games can help achieve smoother gameplay and improve performance on your SSD. Lowering graphics options, such as shadows, anti-aliasing, or texture quality, can reduce the strain on your system and ensure faster load times.
- Update your drivers: Keeping your graphics card drivers up to date is crucial for optimal performance. Check the website of your graphics card manufacturer for the latest driver updates and install them regularly. Updated drivers often include optimizations that can improve game performance.
- Regularly defragment your SSD: Contrary to popular belief, it is unnecessary and even harmful to defragment an SSD. SSDs use a different storage technology that does not require defragmentation. Instead, ensure that the “TRIM” command is enabled in your operating system to maintain the performance of your SSD.
- Monitor your SSD health: It’s always a good practice to keep an eye on the health of your SSD. Various software tools can monitor the health, temperature, and overall performance of your SSD. By regularly checking the health status, you can take necessary actions, such as firmware updates or backups, to maintain the longevity and performance of your SSD.
By following these optimization tips, you’ll ensure that your games run smoothly and efficiently on your SSD. Taking the time to fine-tune game settings and monitor your SSD’s health will help you get the most out of your gaming experience.
Congratulations! You have successfully completed all the steps to install and optimize your Steam games on your SSD. Now you can enjoy faster load times, improved performance, and a seamless gaming experience. Happy gaming!
Conclusion
Congratulations! You have successfully installed and optimized your Steam games on your SSD. By following the steps outlined in this guide, you have ensured faster load times, improved performance, and an overall enhanced gaming experience.
By checking your SSD storage, downloading and installing Steam, changing the installation and future game location to your SSD, and optimizing game settings, you have maximized the benefits of using an SSD for gaming. You’ll enjoy reduced loading times, faster level transitions, and smoother gameplay, all contributing to a more immersive and enjoyable gaming session.
Remember to regularly monitor the health and performance of your SSD and keep your graphics card drivers up to date for continued optimal performance. Additionally, consider periodically adjusting your game settings to find the perfect balance between graphical fidelity and performance.
We hope this guide has been helpful in assisting you with installing your Steam games on your SSD. By utilizing the speed and efficiency of your SSD, you can take your gaming to the next level. So go ahead, immerse yourself in the world of gaming, and enjoy the benefits of lightning-fast load times and seamless gameplay.
Happy gaming!