Adjusting column width in Google Sheets
One of the key features of Google Sheets is the ability to adjust the column width to accommodate the content within them. This is particularly helpful when you have text that is too long to fit within a cell and gets cut off. In this section, we will explore various methods to adjust the column width in Google Sheets and ensure that your text fits perfectly within the cells.
When your text is too long to fit within a cell, it can make reading the data difficult and may hide important information. Fortunately, Google Sheets provides several options to make your text fit comfortably.
The easiest and most efficient way to adjust column width is by using the “Fit to data” option. To do this, simply double-click on the column header line between the two columns you want to adjust. Google Sheets will automatically resize the column width to accommodate the longest data entry within it.
If you prefer to wrap the text within a cell instead of adjusting the column width, you can use the “Wrap text” option. This will force the text to wrap within the cell, displaying it in multiple lines instead of getting cut off.
In addition to these options, you can also modify the font size to make the text fit within the cells. Simply select the cells, go to the “Format” menu, and choose “Text size”. Decreasing the font size can help in fitting longer text while maintaining readability.
For more precise adjustments or specific formatting requirements, you can manually adjust the column width by dragging the column header line to the desired width. This gives you full control over the appearance of the data in your spreadsheet.
Alternatively, you can use the “Auto Fit” option to automatically adjust the column width based on the content. To do this, right-click on the column letter, select “Resize column”, and then choose “Auto fit”. Google Sheets will adjust the width to fit the longest content within the column.
It’s important to note that adjusting column width can be more challenging when dealing with merged cells or wrapped text. In these cases, some trial and error may be required to find the best combination of column width and text wrapping to ensure that all the content is clearly visible.
By using these methods to adjust column width in Google Sheets, you can make your text fit comfortably within the cells and improve readability. Experiment with different options to find the best fit for your data, ensuring that all important information is visible and accessible.
Making your text fit within a cell
One common issue that Google Sheets users face is the challenge of fitting long text within a cell. When text exceeds the width of a cell, it can become cut off, making it difficult to read and potentially hiding important information. In this section, we will explore different options to ensure that your text fits perfectly within a cell in Google Sheets.
One simple and effective way to make your text fit within a cell is by adjusting the column width. By default, Google Sheets will automatically adjust the column width to fit the contents of the cell. However, there are times when you may need to manually adjust the column width to ensure that the text is fully visible. To do this, simply hover over the boundary line between two column headers, and when the cursor changes to a double-headed arrow, drag the column boundary to the desired width.
Another option to make your text fit is by adjusting the font size. Decreasing the font size can help to make longer text fit within a cell. To modify the font size, select the cells containing the text, go to the “Format” menu, and choose “Text size”. Experiment with different font sizes until you find the right balance between fitting the text and maintaining readability.
If adjusting the column width or font size is not enough to fit your text, you can also consider using the “Wrap text” option. Enabling text wrapping will automatically wrap the text within the cell, displaying it in multiple lines instead of getting cut off. To wrap text in Google Sheets, select the cells, go to the “Format” menu, and choose “Wrap text. This will ensure that even long sentences or paragraphs are fully visible within the cell.
When making your text fit within a cell, it’s important to ensure that the information remains clear and legible. Avoid using overly long text that may compromise readability, and consider restructuring the information if necessary. Breaking the text into smaller, more manageable chunks or using bullet points can help improve readability and make the text fit more easily within the cell.
By utilizing these approaches – adjusting the column width, modifying the font size, and utilizing text wrapping – you can ensure that your text fits within a cell in Google Sheets, eliminating the problem of cut-off or hidden information. Experiment with different methods to find the best fit for your data and enhance the readability of your spreadsheets.
Using the “Fit to data” option
Google Sheets provides a convenient “Fit to data” option that allows you to automatically adjust the column width to accommodate the data within it. This option is particularly useful when you have varying lengths of text in different cells and want to ensure that all the content is visible without any truncation.
To use the “Fit to data” option, simply double-click on the boundary line between two column headers. Google Sheets will automatically resize the column width to fit the longest data entry within it. This means that even if you have cells with different lengths of text, the column will adjust accordingly to display all the content without cutting it off.
This option is especially helpful when working with large datasets or importing data from other sources where the text length can vary. It eliminates the need for manual adjustments and ensures that every piece of data is clearly visible without any extra effort.
When using the “Fit to data” option, it’s important to note that the column width will adjust based on the content of the cells. If you have empty cells within the column, they will not impact the width adjustment. This means that the column will only resize to fit the necessary data and not any additional empty spaces.
It’s also worth mentioning that the “Fit to data” option works best when the data within the column is relatively consistent in terms of length. If you have extreme variations in text length, the column width may become too narrow or too wide, affecting the overall layout of your spreadsheet. In such cases, manual adjustments or other formatting options may be required to achieve the desired presentation.
Using the “Fit to data” option in Google Sheets is a quick and efficient way to ensure that all your data is clearly visible without compromising the layout of your spreadsheet. It saves time and effort by automatically adjusting the column width to fit the longest data entry within it. Experiment with this option to find the perfect balance between fitting the data and maintaining a visually appealing spreadsheet.
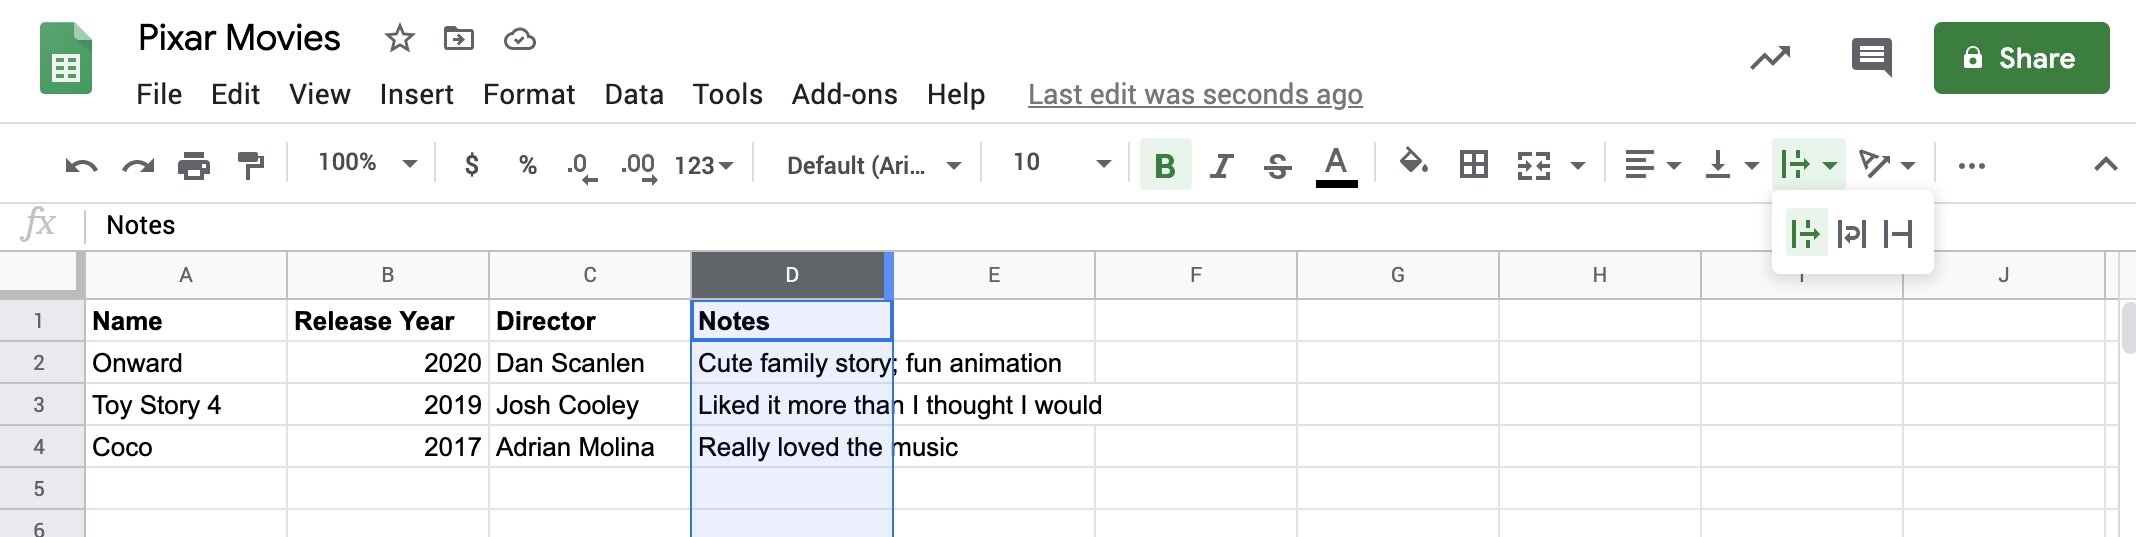
Using the “Wrap text” option
In Google Sheets, the “Wrap text” option allows you to display text within a cell on multiple lines, ensuring that all the content is visible without being cut off. This can be especially useful when dealing with long sentences or paragraphs that exceed the width of a cell.
To use the “Wrap text” option, select the cells containing the text that you want to wrap. Then, go to the “Format” menu, click on “Text wrapping,” and choose “Wrap”. This will automatically make the text wrap within the cell, displaying it in multiple lines instead of truncating it.
Enabling text wrapping not only ensures that all the content is visible, but it also improves the readability of the text. Instead of having to scroll horizontally to read the entire piece of text, it is presented in a more organized and structured manner.
It’s important to note that when using the “Wrap text” option, the height of the cell will adjust to accommodate the additional lines of text. This means that if the text wraps onto multiple lines, the cell height will increase accordingly. However, you can manually adjust the row height to create a consistent row appearance by selecting the row, right-clicking, and selecting “Resize row”.
It’s worth mentioning that text wrapping may not always be the best option for every situation. In some cases, especially when dealing with limited space or large datasets, wrapping long text can make the cells appear cluttered and difficult to read. In such instances, adjusting the column width or modifying the font size may be more suitable approaches to make the text fit within the cells.
Using the “Wrap text” option in Google Sheets provides a simple and effective way to ensure that all the content within a cell is fully visible and readable. Experiment with this option to enhance the presentation and readability of your spreadsheets, especially when working with longer sentences or paragraphs.
Modifying the font size
In Google Sheets, modifying the font size is a useful technique to make your text fit within cells and improve overall readability. By adjusting the font size, you can ensure that the text is legible without sacrificing the appearance of your spreadsheet.
To modify the font size in Google Sheets, select the cells containing the text that you want to resize. Then, go to the “Format” menu, click on “Text size,” and choose the desired font size. Decreasing the font size can help accommodate longer text within a cell, allowing it to fit without getting cut off.
It’s important to find the right balance when adjusting the font size. While reducing the font size can help fit more text within a cell, you should consider the readability of the content. Ensure that the text remains clear and easily legible, even with the smaller font size.
Keep in mind that adjusting the font size will affect the appearance of all selected cells. If you have varying lengths of text within a range of cells, resizing the font can help maintain consistency across the spreadsheet.
When modifying the font size, it’s essential to consider the overall layout and space available in your spreadsheet. If decreasing the font size excessively compromises the readability or if you find that the text still does not fit comfortably within the cells, you may need to explore other options such as adjusting the column width or utilizing the “Wrap text” option.
Another approach you can take is to selectively modify the font size for specific cells or ranges of cells. This can be done by selecting the cells and accessing the “Text size” option in the toolbar or using shortcut keys such as Ctrl + Shift + F followed by T.
Experiment with different font sizes to find the optimal balance between fitting the text within cells and maintaining clear readability. Regularly reviewing and adjusting the font size ensures that your spreadsheet remains visually appealing and easy to navigate, even when dealing with varying text lengths.
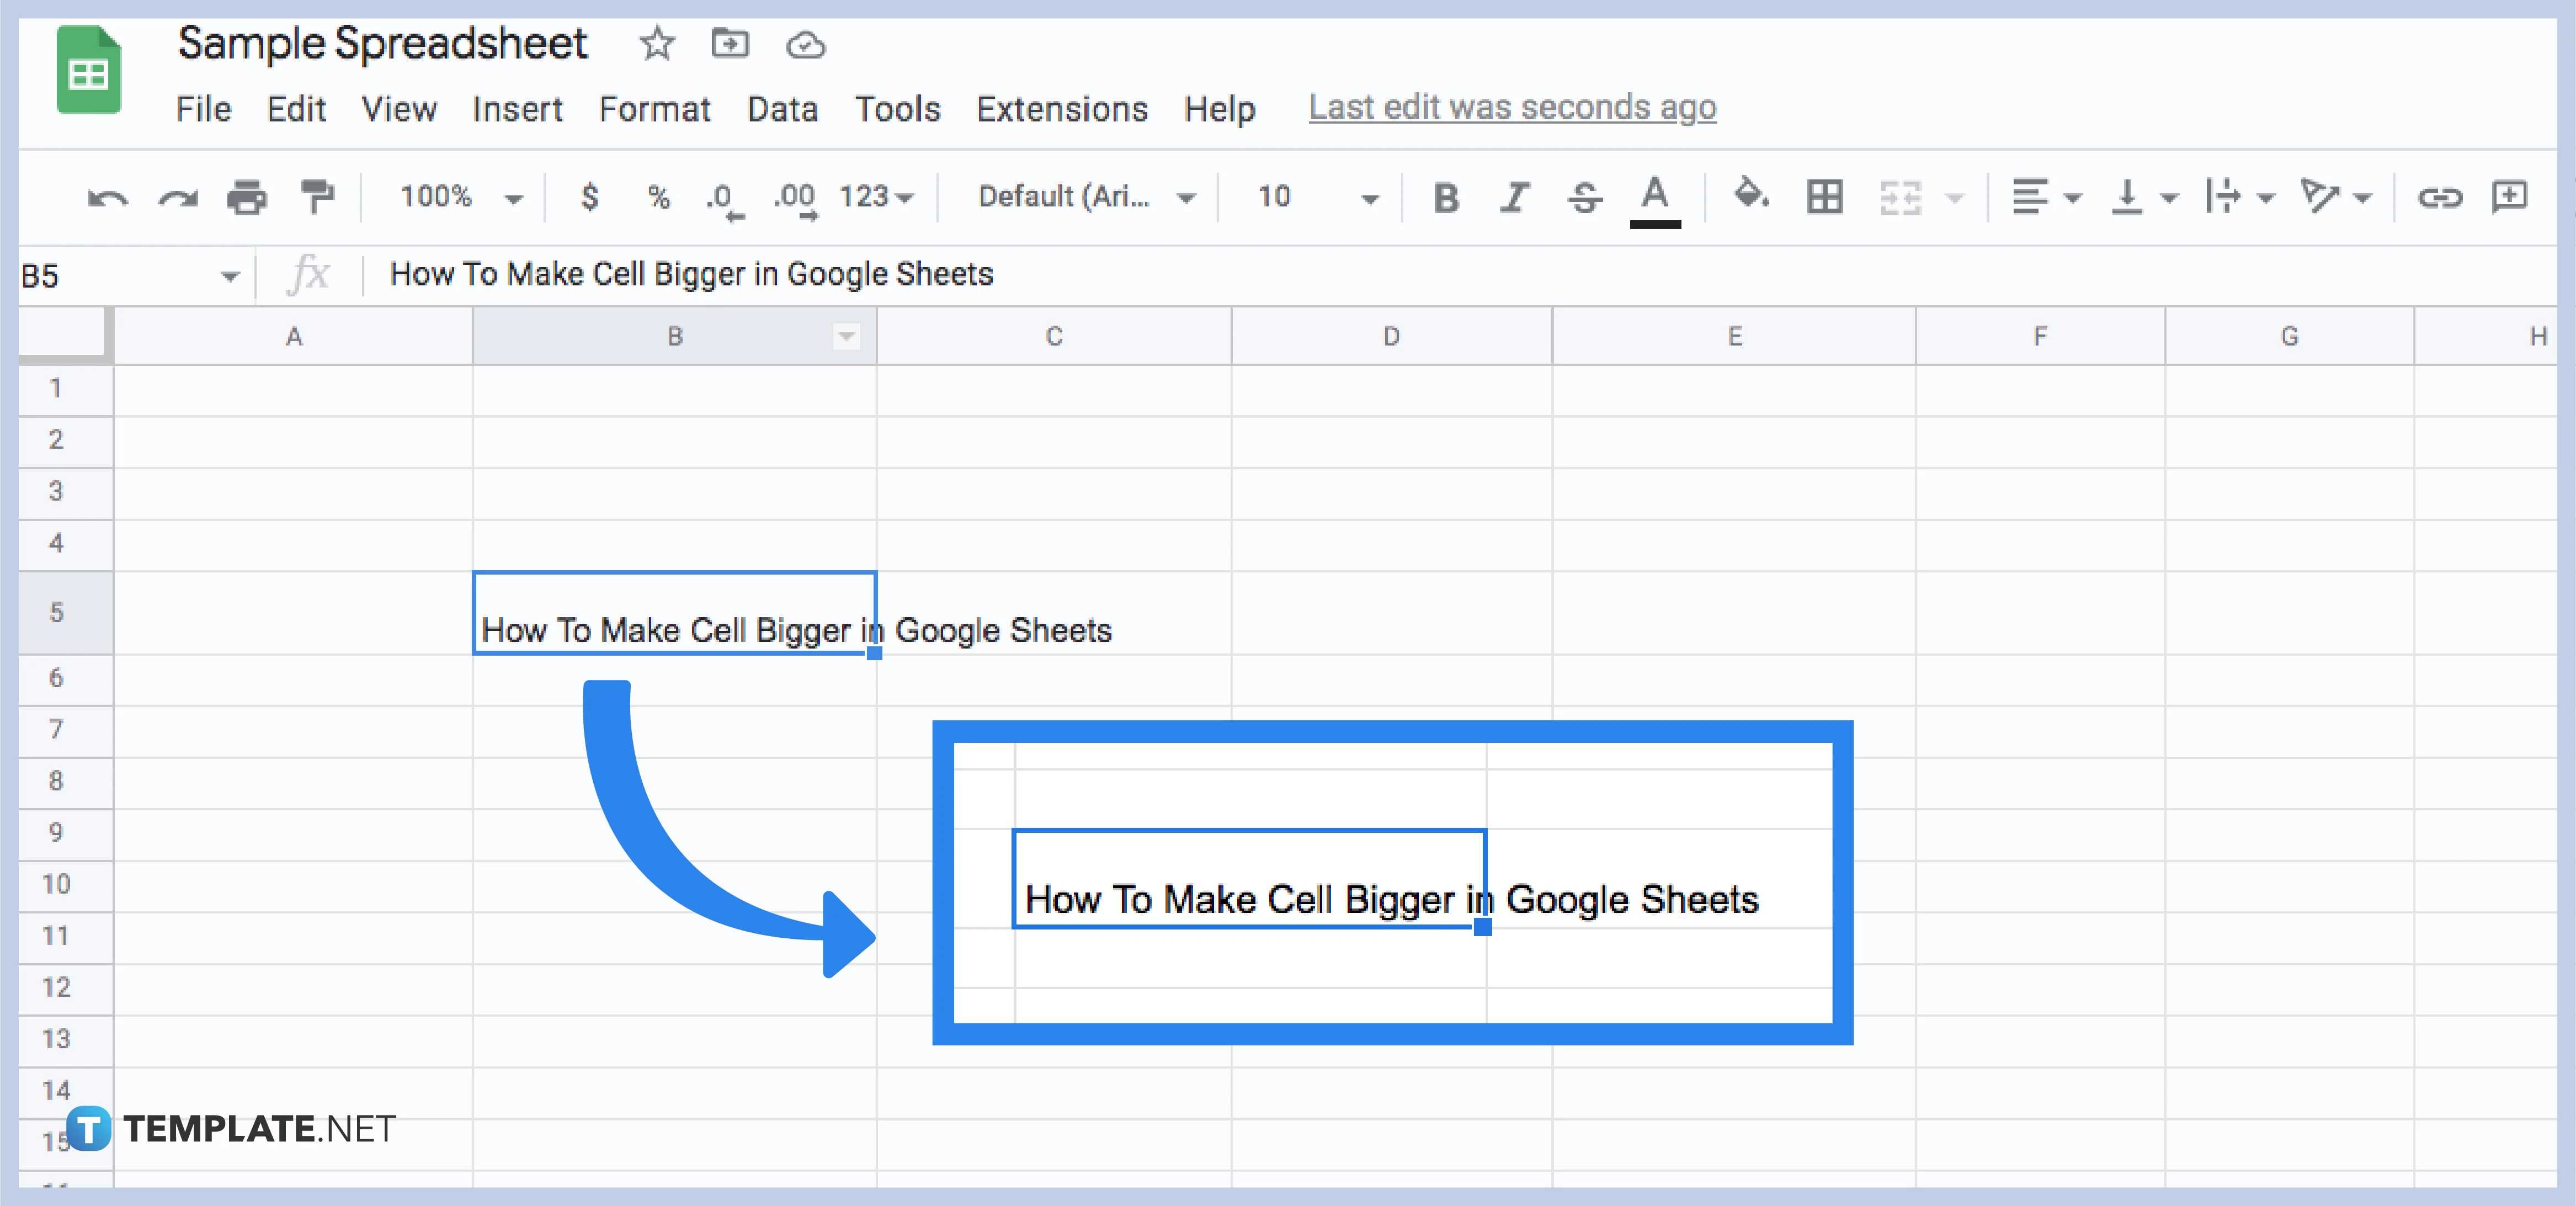
Adjusting column width manually
In Google Sheets, you have the flexibility to manually adjust the column width to fit your specific needs. This allows you to customize the appearance of your spreadsheet and ensure that your text fits comfortably within the cells.
To adjust the column width manually, simply position your cursor on the boundary line between two column headers until it changes to a double-headed arrow. Then, click and drag the boundary line to the left or right to increase or decrease the column width, respectively.
By manually adjusting the column width, you have control over how much space is allocated to each column. This is especially useful when you have varying text lengths within a column or when you want to emphasize certain columns that contain important information.
When determining the ideal column width, consider the content within the cells. If you have lengthy text or numbers in a column, you may need to increase the column width to prevent the content from being cut off. On the other hand, if the content is relatively short, you can reduce the column width to make the most efficient use of space.
A benefit of manually adjusting the column width is that it allows you to achieve precise formatting. You can align columns neatly and evenly, giving your spreadsheet a polished and professional appearance. However, keep in mind that excessively wide columns may cause unnecessary horizontal scrolling for users, so it’s important to find a balance between readability and space optimization.
If you want to adjust multiple columns at once, simply select the desired columns by clicking and dragging the column headers, and then adjust the width as described above. This batch adjustment feature can be particularly helpful when you want to maintain consistent column widths or when you have similar content across multiple columns.
Remember that manual adjustments to the column width will override the default auto-sizing feature of Google Sheets. Therefore, if you make subsequent changes to the content within the cells, you may need to readjust the column width to ensure that everything fits properly.
By manually adjusting the column width in Google Sheets, you have the power to fine-tune the appearance of your spreadsheet and ensure that your text fits neatly within the cells. Experiment with different column widths to find the optimal sizing for your data while maintaining a visually appealing layout.
Utilizing the “Auto Fit” option
In Google Sheets, the “Auto Fit” option allows you to automatically adjust the column width based on the content within the cells. This feature is particularly convenient when you want to quickly optimize the width of your columns to fit the data without the need for manual adjustments.
To utilize the “Auto Fit” option, right-click on the column letter at the top of the spreadsheet that you want to adjust. Then, select “Resize column” from the drop-down menu and choose “Auto fit”. Google Sheets will automatically adjust the column width to fit the longest content within the column.
The “Auto Fit” feature is handy when you have varying text lengths or when you import data from other sources with irregular column widths. It ensures that all the content is fully visible without any text getting cut off. This allows for an organized and easily readable spreadsheet.
It’s important to note that the “Auto Fit” option adjusts the column width based on the current content within the column. If you later add longer text, the column width will not automatically readjust, and you may need to use the “Auto Fit” option again or manually adjust the column width.
One advantage of the “Auto Fit” option is its ability to maintain consistent column widths across your spreadsheet. By selecting multiple columns at once, you can ensure that all selected columns are adjusted to fit the widest content within them. This can be particularly useful when you want to achieve a uniform and symmetrical formatting for your data.
Keep in mind that while the “Auto Fit” option saves you time and effort in adjusting column widths, it may not always provide the desired outcome in terms of appearance. Occasionally, you may need to fine-tune the column width manually to achieve a more balanced and visually pleasing layout.
By utilizing the “Auto Fit” option in Google Sheets, you can easily and efficiently adjust the column width to fit the content within your cells. This feature saves you time and ensures that all your data is clearly visible in its entirety. Experiment with “Auto Fit” to enhance the readability and organization of your spreadsheet.
Dealing with merged cells and wrapped text
In Google Sheets, merged cells and wrapped text can present unique challenges when it comes to adjusting column width and ensuring that all content is properly displayed. Understanding how to handle these situations will help you maintain the readability and organization of your spreadsheet.
When dealing with merged cells, it’s important to note that adjusting the column width will affect the entire merged cell range. If you try to adjust the column width of one individual cell within the merged range, it will adjust the width of all the cells in that range. To address this, you may need to unmerge the cells if you want to independently adjust the column widths.
Additionally, wrapped text can affect the visibility of content within merged cells. If the text within a merged cell is too long to fit within the designated width, it may spill over into adjacent cells. In this case, you can try adjusting the column width to fit the wrapped text. Alternatively, you can unmerge the cells or modify the wrapping options to ensure that all content remains within the merged cell range.
When wrapped text spills into adjacent cells, it’s important to be cautious of the impact on the readability and organization of your spreadsheet. If the content becomes fragmented or difficult to follow, consider resizing the column width, adjusting the wrapping settings, or reorganizing the layout of your data.
Adjusting the column width for merged cells with wrapped text may require some trial and error to find the best combination. Start by unmerging the cells if necessary, and then adjust the column width to fit the content. If the text still exceeds the column width, consider modifying the font size, altering the wrapping settings, or rethinking the structure of your data to ensure a clean and organized presentation.
It’s important to regularly review and adjust the column width and wrapping options when dealing with merged cells and wrapped text. As your data evolves, you may need to make ongoing adjustments to maintain the readability and ensure that all content remains visible within the appropriate cell locations.
By understanding how to handle merged cells and wrapped text, you can avoid potential issues with truncated or hidden content. Take the time to fine-tune the column width and wrapping settings to create a visually appealing and logically organized spreadsheet.
Troubleshooting common issues
While working with Google Sheets, you may encounter common issues that can affect the way your text fits within cells. Understanding these issues and how to troubleshoot them will help you overcome any challenges and ensure your spreadsheet is organized and easily readable.
One common issue is when your text is being cut off within a cell, despite adjusting the column width or using text wrapping. This may occur when the cell contains a long string of text without any spaces. To resolve this, try manually adding line breaks within the cell by pressing Enter or using the keyboard shortcut Ctrl + Enter. This will allow the text to wrap within the cell and display on multiple lines, preventing truncation.
Another issue that can arise is when the font size is too large for the cell, causing the text to overflow or hide behind adjacent cells. If this occurs, decrease the font size to a more appropriate level. You can do this by selecting the cell or range of cells and adjusting the font size using the formatting options in the toolbar or the “Text size” option in the “Format” menu.
Sometimes, the content within a cell may not fit properly even after adjusting the column width and font size. This could be due to other formatting elements such as borders or images that are occupying additional space within the cell. To troubleshoot this issue, consider removing any unnecessary formatting or adjusting the positioning of elements within the cell to create more space for the text.
An issue that can occur with wrapped text is when it spills over into adjacent cells, affecting the readability and organization of your spreadsheet. To address this, you can try adjusting the column width to create more space for the wrapped text. Additionally, you can experiment with different wrapping options, such as wrapping text only within specific cells or ranges, to minimize the impact on neighboring cells.
If you are still experiencing difficulties in making your text fit within cells, consider reviewing the overall layout and design of your spreadsheet. You may need to reorganize the structure of your data, adjust column widths for specific sections, or reevaluate the formatting elements to achieve a more cohesive and legible presentation of your content.
Regularly reviewing and troubleshooting common issues in Google Sheets will ensure that your text fits properly within cells, enhancing the readability and organization of your spreadsheet. Experiment with the various troubleshooting techniques to resolve any challenges that arise, and don’t hesitate to explore additional resources and forums for further assistance.
Conclusion
Ensuring that your text fits within cells in Google Sheets is vital for maintaining the readability and usability of your spreadsheets. By utilizing various techniques such as adjusting column widths, modifying font sizes, and using wrapping options, you can optimize the presentation of your data.
The “Fit to data” option allows for automatic adjustment of column widths to fit the longest content within each column. This saves time and ensures that all data remains visible without being truncated. However, manual adjustments may be necessary for more precise formatting or when dealing with merged cells and wrapped text.
Modifying font sizes provides flexibility in making text fit within cells. Balancing readability and space optimization is key, ensuring that the content remains clear and legible, even with smaller font sizes. Experiment with different sizes to find the optimal fit for your data.
The “Wrap text” option is a helpful tool for accommodating longer text within cells, allowing it to display in multiple lines. This improves readability, especially for lengthy sentences or paragraphs. However, keep in mind that excessive wrapping or large amounts of wrapped text can impact the overall layout and organization of your spreadsheet.
Manually adjusting column widths provides flexibility and control over the appearance of your spreadsheet. Consider content length and readability when resizing columns, and be mindful of merged cells and their impact on the overall layout. Strive for consistency in column widths to ensure a polished and professional look.
Troubleshooting common issues, such as text cut off, large font sizes, or wrapped text spilling into adjacent cells, is crucial for eliminating any formatting obstacles. Be proactive in identifying and resolving these issues by adjusting formatting, adding line breaks, or optimizing your spreadsheet’s layout.
In conclusion, mastering the techniques for fitting text within cells in Google Sheets allows for improved readability, better organization, and enhanced usability of your spreadsheets. Experiment with the various options available, troubleshoot common issues, and customize your approach to meet the unique needs of your data. With practice and attention to detail, you can create visually appealing and easily understandable spreadsheets that effectively present your information.