Introduction
Creating a new email account is a simple and essential task in today’s digital age. Whether you need another email address for personal or professional use, having multiple accounts can help you stay organized and separate different aspects of your life. With the variety of email providers available, getting started with a new email account is quick and easy.
In this guide, we will walk you through the step-by-step process of creating another email account. We will cover everything from choosing an email provider to customizing your account and managing it effectively. So, if you’re ready to dive into the world of email creation, let’s get started!
Before we begin, it is important to note that email providers may have slightly different procedures and interfaces. However, the general principles remain the same. We will provide instructions that are applicable to most providers, but you may need to adapt them slightly depending on the platform you choose.
Creating a new email account can be done in just a few minutes, and it offers you a wealth of possibilities. Whether you want to keep personal and professional communications separate, create a dedicated account for online shopping, or simply have a backup email, having another email account can be highly advantageous.
Throughout this guide, we will cover the necessary steps, including choosing an email provider, signing up for a new email address, customizing your account, setting up account recovery options, and managing your new email account effectively. So, let’s dive into the exciting world of creating another email account!
Step 1: Choose an Email Provider
Before you can create a new email account, you need to choose an email provider. There are several popular email providers available, each with its own unique features and advantages. Here are a few popular options to consider:
- Gmail: Gmail, provided by Google, is one of the most widely used email services. It offers a user-friendly interface, ample storage space, and powerful integration with other Google services like Google Drive and Google Calendar.
- Outlook: Outlook, offered by Microsoft, brings together email, calendar, contacts, and tasks in one convenient platform. It boasts a clean and intuitive interface, robust spam filtering, and seamless integration with Microsoft Office tools.
- Yahoo Mail: Yahoo Mail is another popular choice with a clean interface and a wide range of features such as customizable themes, powerful search capabilities, and disposable email addresses.
- Zoho Mail: Zoho Mail is a business-oriented email provider that offers a professional email platform with advanced features like task management, document collaboration, and integration with other Zoho productivity apps.
These are just a few examples, and there are many other email providers available. Take some time to research and compare the features, storage space, and privacy policies of different providers before making your decision.
Consider factors such as the ease of use, available storage space, security measures, spam filtering, and any unique features that may be important to you. Additionally, it’s helpful to check if the email provider offers mobile applications or webmail access to ensure you can access your account from anywhere.
Once you have chosen an email provider that suits your needs, you are ready to move on to the next step: signing up for a new email address.
Step 2: Sign Up for a New Email Address
Now that you have selected an email provider, it’s time to sign up for a new email address. Here’s a step-by-step guide on how to do it:
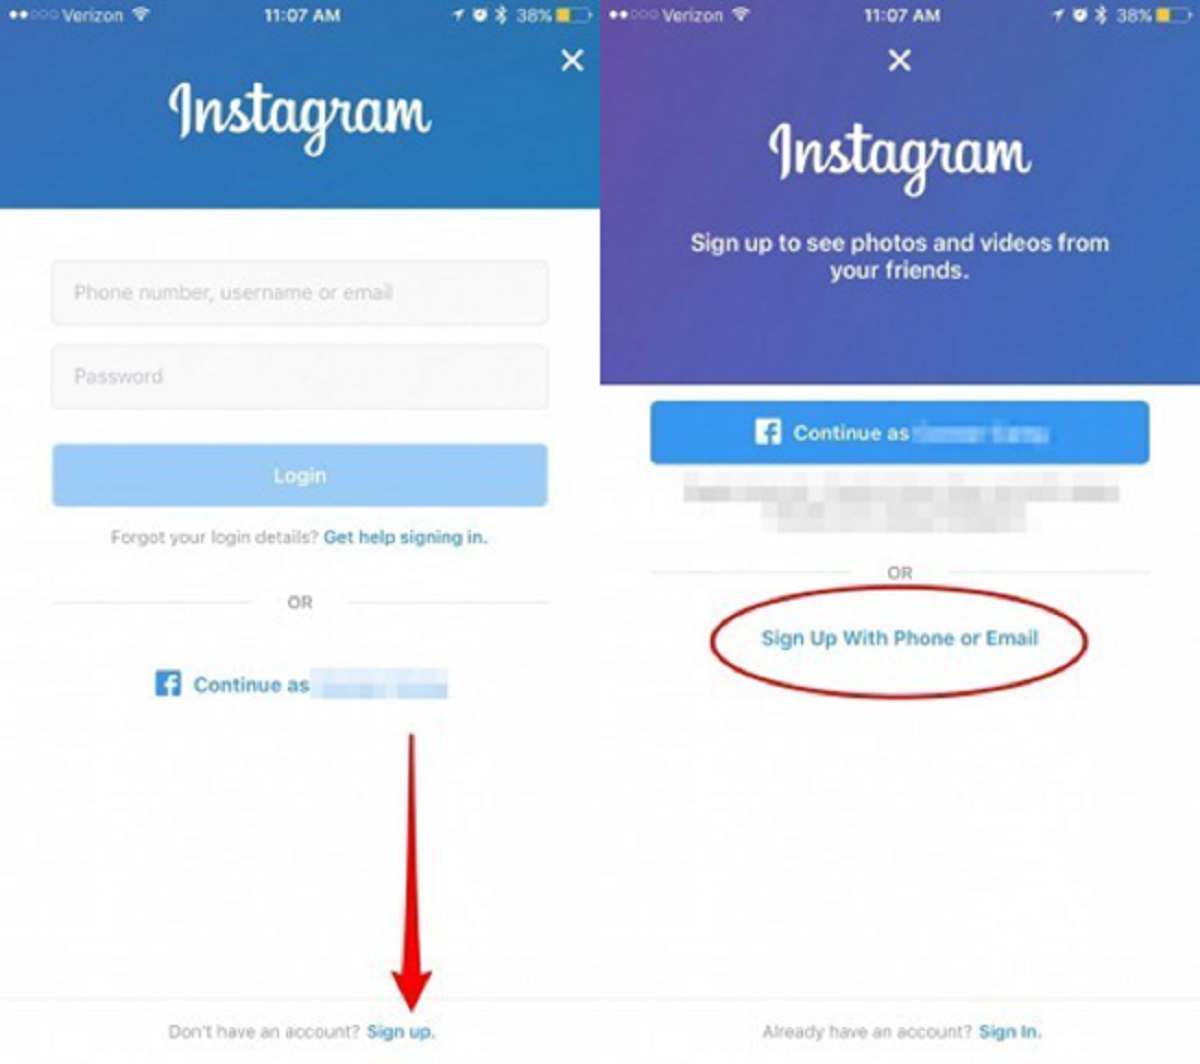
- Visit the website of your chosen email provider. Look for a “Sign Up,” “Create an Account,” or similar button to begin the registration process.
- Click on the registration button, and you will be directed to a sign-up page where you will enter your personal information.
- In the sign-up form, provide the required information such as your name, desired email address, and a strong, unique password. Consider choosing an email address that is professional, easy to remember, and reflects your identity.
- Some email providers may require you to enter additional information, such as your phone number or an alternative email address, for added account security and account recovery purposes. Fill in the requested details if prompted.
- Once you have entered all the required information, review the terms of service and privacy policy of the email provider, and check the box to indicate that you agree to them. It’s important to understand the terms and conditions before proceeding.
- Complete the registration process by clicking on the “Sign Up” or “Create Account” button. Depending on the email provider, you may receive a verification email to confirm your registration. Follow the instructions provided in the email to verify your account.
It’s worth noting that some email providers offer additional features or subscription plans that you can opt for during the sign-up process. Take a moment to explore these options and see if any of them align with your needs.
Once you have completed the sign-up process and verified your account, congratulations! You now have a brand-new email address ready to be used. In the next step, we will explore how to customize your email account to suit your preferences.
Step 3: Customize Your Email Account
Now that you have signed up for a new email account, it’s time to customize it to make it feel more personalized and tailored to your needs. Here are a few ways you can customize your email account:
- Profile Information: Update your profile information, such as your name, photo, and signature, to ensure that recipients can easily identify you.
- Theme and Layout: Many email providers offer the option to customize the theme or layout of your inbox. Choose a color scheme or layout that best suits your style and preferences.
- Organization and Folders: Create folders or labels to help you organize your emails. You can categorize them by subject, sender, importance, or any other criteria that make sense to you.
- Filters and Rules: Take advantage of email filtering options to automatically sort incoming emails into specific folders or apply certain actions to them. This can help streamline your inbox and prioritize important messages.
- Autoresponders: Set up automatic email responses for when you’re away or out of the office. This is especially useful for maintaining professional communication and managing expectations.
- Keyboard Shortcuts: Learn and customize keyboard shortcuts offered by your email provider. This can save you time and make navigating your inbox more efficient.
- Notifications and Reminders: Adjust your notification settings to receive alerts for new emails, calendar events, or important tasks. You can choose between email notifications, push notifications on your mobile device, or both.
Take some time to navigate through the settings of your email provider’s platform and explore the various customization options available. Every email provider has different features and settings, so familiarize yourself with the options specific to your chosen provider.
By personalizing your email account, you can create a more enjoyable and efficient email experience. The next step will cover setting up account recovery options to ensure the security of your new email account.
Step 4: Set Up Account Recovery Options
When it comes to your email account, it’s crucial to take steps to secure and protect it. One essential aspect of account security is setting up account recovery options. These options will help you regain access to your account in case you forget your password or encounter any account-related issues. Follow these steps to set up account recovery options:
- Go to the account settings or security settings of your email provider’s platform.
- Look for the “Account Recovery” or “Security” section.
- Choose a recovery email address or phone number. It’s recommended to use an alternative email address or phone number that you have access to in case you ever need to recover your account.
- Enter the requested information to verify the recovery option. This may involve entering a verification code or confirming your ownership of the alternate email or phone number.
- Once you have set up the account recovery option, make sure to save the changes.
Having a recovery email address or phone number linked to your account gives you a safety net in case you ever lose access to your account. It’s important to keep your recovery information up-to-date and secure.
In addition to setting up account recovery options, it’s a good practice to enable two-factor authentication (2FA) if your email provider offers it. Two-factor authentication adds an extra layer of security by requiring two forms of identification, typically your password and a unique one-time code sent to your phone or email.
By taking these steps to secure your email account and set up account recovery options, you can have peace of mind knowing that your account is well-protected and easily recoverable if needed. In the next step, we will discuss how to effectively manage your new email account.
Step 5: Manage Your New Email Account
Now that you have created and customized your new email account, it’s important to effectively manage it to stay organized and ensure efficient communication. Here are some tips for managing your email account:
- Email Organization: Create folders or labels to categorize your emails and keep your inbox organized. Set aside time regularly to sort and archive emails, keeping your inbox clutter-free.
- Email Filters: Utilize email filters to automatically sort incoming emails into specific folders based on criteria you define. This will help you prioritize important messages and reduce the noise in your inbox.
- Email Prioritization: Develop a system for prioritizing emails, such as responding to urgent messages first or flagging emails that require follow-up. This will help you stay on top of important emails and avoid missing critical information.
- Email Etiquette: Follow proper email etiquette by keeping your emails concise, using a professional tone, and responding in a timely manner. It’s also a good practice to proofread your emails before sending to avoid errors or miscommunication.
- Email Notifications: Adjust your notification settings to receive alerts for important emails or events. However, be mindful not to be overwhelmed by constant notifications. Find a balance that keeps you informed without disrupting your workflow.
- Email Security: Be cautious of suspicious emails, avoid clicking on unknown links or downloading attachments from unverified sources. Regularly update your password and keep your account information secure.
- Email Maintenance: Periodically review and clean up your email account by deleting unnecessary emails, unsubscribing from unwanted newsletters, and managing your contact list.
Remember, effective email management is about finding a system that works for you. Experiment with different strategies and refine your approach based on your specific needs and preferences.
Additionally, consider integrating your email account with other productivity tools, such as calendar apps or task management software, to streamline your workflow and enhance your productivity.
By effectively managing your new email account, you can ensure that it remains a valuable communication tool rather than a source of stress or overwhelm. Take control of your inbox, stay organized, and enjoy the benefits of efficient email management.
Conclusion
Congratulations! You have successfully completed the process of creating another email account. By following the steps outlined in this guide, you have chosen an email provider, signed up for a new email address, customized your account, set up account recovery options, and learned how to effectively manage your new email account.
Having another email account can greatly enhance your organization, productivity, and communication skills. With separate accounts for different purposes, you can keep personal and professional emails separate, maintain a clutter-free inbox, and effectively manage your correspondence.
Remember to take advantage of the customization options offered by your email provider to personalize your account and make it truly yours. By setting up account recovery options, you can ensure that you can regain access to your account if needed.
Once your new email account is up and running, it’s important to develop good email management habits. Organize your emails, prioritize important messages, and be mindful of email etiquette to maintain clear and effective communication.
Lastly, don’t forget to regularly review and update the security measures for your email account. Be vigilant against phishing attempts, use strong and unique passwords, and consider enabling two-factor authentication for added protection.
By following these steps and implementing the best practices for email management, you are well on your way to maintaining a well-organized and efficient email account. Enjoy the benefits of streamlined communication and improved productivity as you navigate the digital landscape.
Thank you for choosing this guide as your resource for creating another email account. We hope it has been helpful in guiding you through the process. Best of luck with your new email account, and happy emailing!