Introduction
Welcome channels are a fantastic way to make new members feel welcomed and engaged in your Discord community from the moment they join. By setting up a well-designed welcome channel, you can introduce new members to the community, provide them with important information, and even offer a warm greeting from the community members. In this article, we will explore how to make a welcome channel on Discord, step-by-step, to ensure that your new members feel valued and excited to be a part of your community.
Creating a dedicated welcome channel serves multiple purposes. Firstly, it helps new members become familiar with your server’s rules, guidelines, and important announcements. Secondly, it fosters a sense of belonging and community by giving new members a warm introduction from existing members. Lastly, it provides an opportunity to showcase the unique aspects of your server and spark interest in your community’s activities and discussions.
To set up a welcoming channel effectively, we will need a Discord bot that can automate various tasks and streamline the process for us. There are several Discord bots available, such as MEE6, Dyno, or Carl-bot, that offer welcome message functionality. They help us set up automatic welcome messages, assign user roles, and enforce guidelines, making the process significantly easier.
In the following sections, we will explore the step-by-step process of choosing the right bot, setting up the welcome channel, designing a welcoming message, configuring auto-role assignments, customizing permissions and restrictions, and finally testing and troubleshooting to ensure a smooth experience for your new members.
Choosing the Right Bot
When it comes to setting up a welcome channel on discord, selecting the right bot is crucial. There are several discord bots available, each offering different features and functionalities. Here are a few considerations to keep in mind when choosing the right bot for your server.
1. Features: Look for a bot that offers a wide range of features specifically designed for managing welcome channels. Some key features to consider include auto-welcome messages, role assignments, and the ability to customize the welcome message.
2. User-Friendly Interface: Opt for a bot that has an intuitive and user-friendly interface. A bot with a clear and easy-to-navigate dashboard will make the setup process much simpler and more enjoyable.
3. Customization Options: It’s important to choose a bot that allows for extensive customization. Look for a bot that enables you to personalize the welcome message, choose different formatting options, and include dynamic variables like the user’s name or the server name.
4. Reliability and Support: Select a bot that is reliable and has a strong community support system. It should have regular updates, bug fixes, and a responsive support team to assist you in case of any issues or queries.
5. Integration: Consider whether the bot can integrate with other popular bots or plugins that you may be using in your server. Ensuring compatibility and smooth functioning with other essential bots can enhance the overall user experience.
6. Reviews and Recommendations: Take the time to read reviews and seek recommendations from other server owners or communities. Feedback from users who have had experience with different bots can provide valuable insight into their pros and cons.
It’s important to thoroughly research and consider these factors when choosing a bot for your welcome channel. Once you have selected the right bot, you’ll be well-equipped to move forward with the setup process and create an engaging and welcoming environment for your new members.
Setting Up the Welcome Channel
Now that you’ve chosen the right bot for your discord server, it’s time to set up the welcome channel. Follow these step-by-step instructions to create a dedicated and engaging channel for welcoming new members.
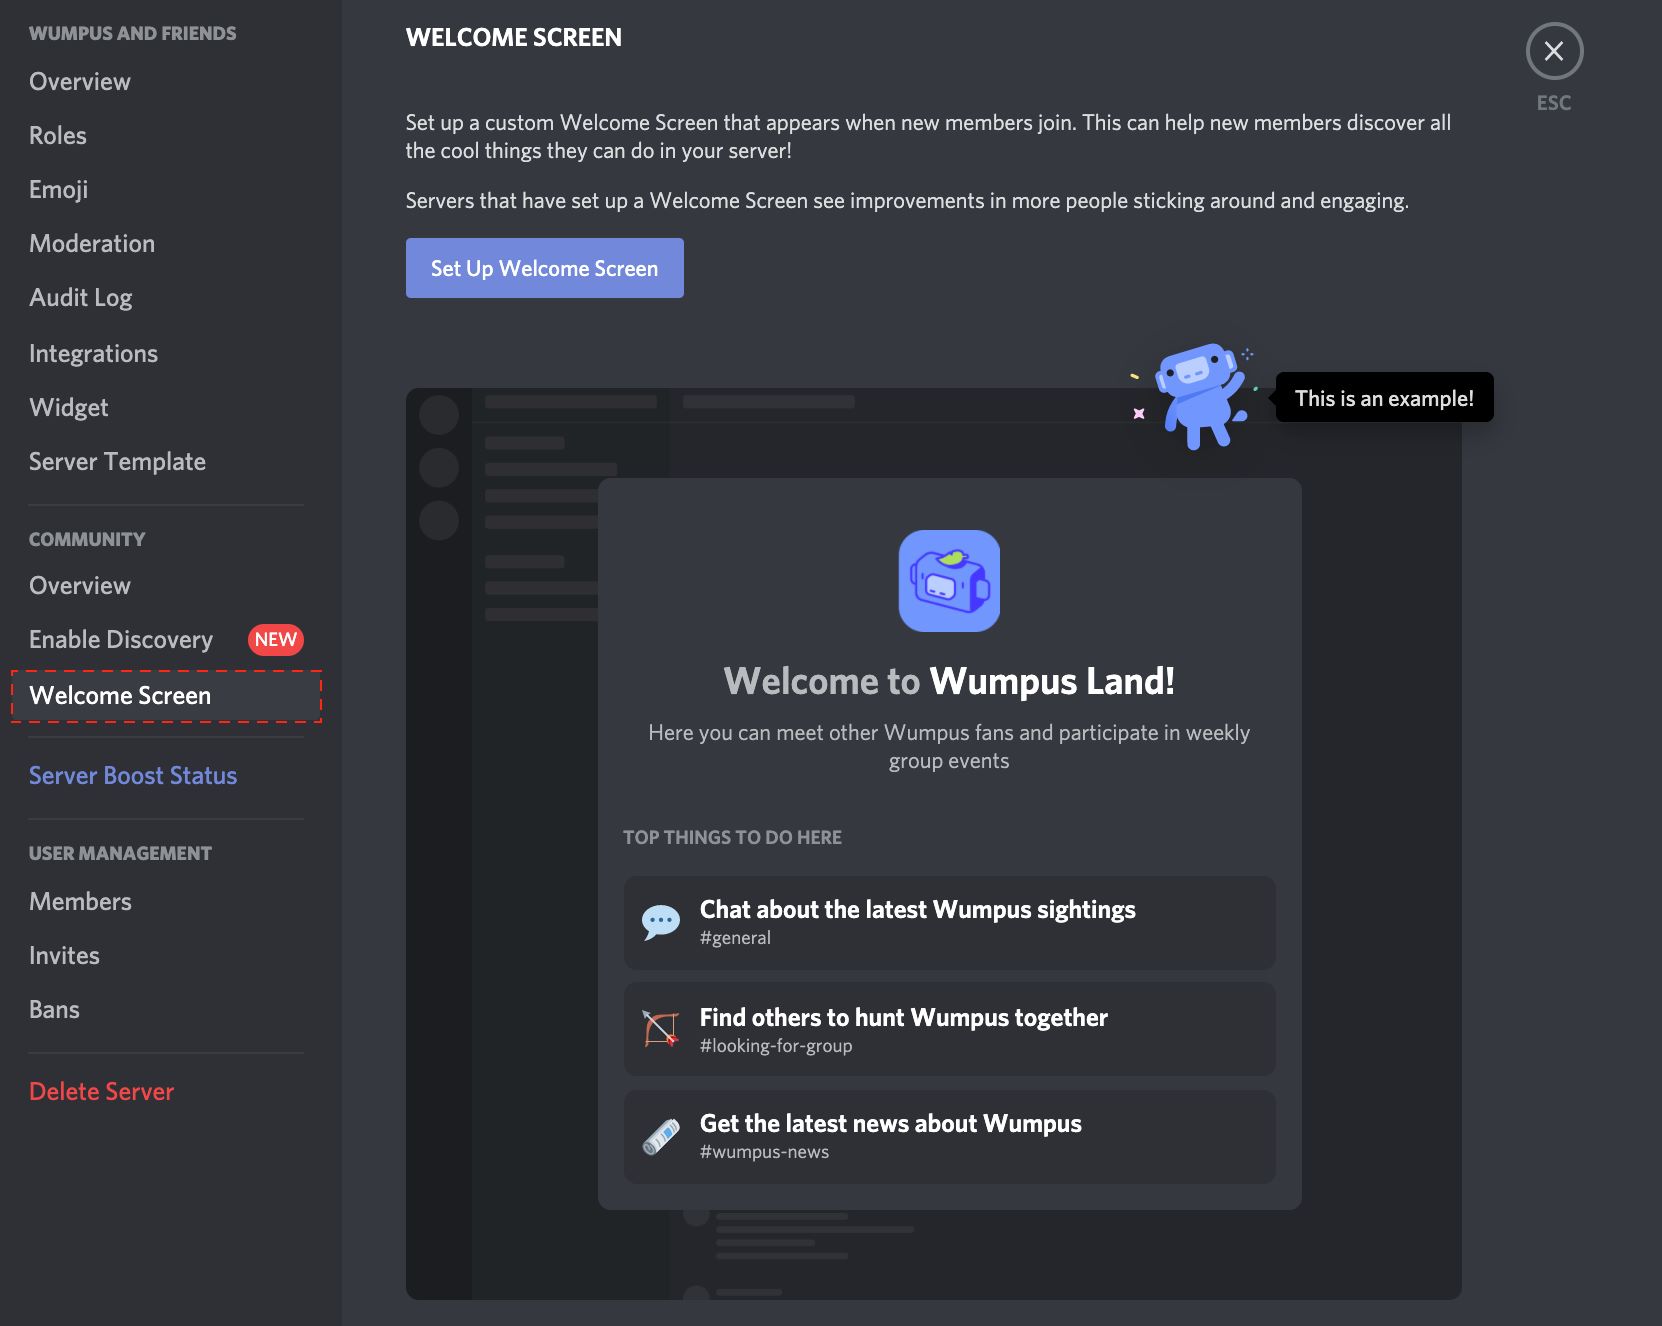
1. Create a New Channel: Start by creating a new channel specifically for welcoming new members. To do this, right-click on your server’s name and select “Create Channel.” Choose a name for your channel, such as “Welcome” or “New Members,” and select the appropriate category.
2. Set Channel Permissions: It’s crucial to define the channel’s permissions to ensure that only authorized users can send messages. Navigate to the channel settings, click on “Permissions,” and adjust the settings as desired. Generally, it’s recommended to allow only administrators and moderators to send messages in the welcome channel, while new members can read and react to messages.
3. Configure Bot Settings: Access your chosen bot’s dashboard or command interface and locate the settings related to welcome messages. Enable the welcome message feature and specify the target channel as the one you created in the previous step.
4. Customize the Welcome Message: Personalize the welcome message to create a warm and inviting atmosphere. You can include a brief greeting, introduce your server’s purpose, and provide any additional information or links new members may find useful. Consider using dynamic variables like the user’s name or the server name to add a personal touch.
5. Test the Welcome Message: Before making the welcome channel public, it’s essential to test the welcome message. Have a test account join the server and observe whether the message appears as intended. Make any necessary adjustments to ensure a seamless experience for new members.
6. Additional Customization: Depending on the features offered by your chosen bot, you may have additional options for customization. Explore these options and customize the welcome message’s appearance, formatting, or any other relevant details based on your server’s unique style.
By following these step-by-step instructions, you can successfully set up a dedicated welcome channel in your Discord server. This channel will serve as a warm and informative space for new members, ensuring they feel valued and engaged right from the moment they join your community.
Designing a Welcome Message
Designing an impactful and welcoming message is essential to create a positive first impression on new members joining your discord server. A well-crafted welcome message sets the tone for their experience and helps them feel immediately connected to your community. Here are some tips to design an effective welcome message:
1. Start with a Warm Greeting: Begin your welcome message with a friendly and warm greeting. Use a welcoming phrase like “Welcome to our server” or “Hello and welcome!” to create a friendly atmosphere right from the start.
2. Introduce the Server’s Purpose: Clearly state the purpose of your server in the welcome message. Explain what topics or interests the server focuses on and highlight the benefits of being a member. This will help new members understand what to expect and encourage them to engage with the community.
3. Provide Important Information: Include essential information that new members should be aware of in your welcome message. This could include server rules, guidelines, or any specific instructions they need to follow. Ensure that this information is concise and easy to understand.
4. Encourage Engagement: Encourage new members to introduce themselves and engage with the community. Let them know that their opinions, questions, and contributions are valuable. By fostering a welcoming and inclusive environment, you can encourage active participation right from the beginning.
5. Highlight Special Features: If your server offers any unique features, events, or activities, make sure to highlight them. Inform new members about any giveaways, contests, or exclusive content they can look forward to. This will generate excitement and pique their interest in being a part of your community.
6. Use Engaging Formatting: Make your welcome message visually appealing by using engaging formatting. Incorporate bold or italicized text, bullet points, or even emojis to draw attention to important information. However, ensure that the formatting is not overwhelming and maintains readability.
7. Personalize the Message: Consider using dynamic variables to personalize the welcome message. Address new members by their username or mention the server name to make them feel seen and acknowledged. This personal touch helps create a sense of belonging from the very beginning.
By following these tips, you can design a thoughtful and compelling welcome message for your discord server. Remember to review and update the welcome message periodically to keep it relevant and engaging for all new members joining your community.
Setting Up Auto-Role Assignments
Auto-role assignments are a powerful feature that allows you to automatically assign specific roles to new members when they join your discord server. This feature helps streamline the onboarding process and ensures that new members have the appropriate permissions and access to relevant channels right from the start. Here’s how you can set up auto-role assignments:
1. Identify Role Requirements: Determine which roles you want to automatically assign to new members. Consider the different roles available in your server and decide which roles are necessary for newcomers or align with their interests.
2. Access Bot settings: Open your chosen bot’s dashboard or command interface and navigate to the settings related to auto-role assignments. Look for options like “Auto-Role” or “Role Management.”
3. Configure Auto-Role: Enable the auto-role feature and specify the role(s) you want to assign to new members. Depending on the bot, you may be able to assign multiple roles or set specific criteria for role assignment, such as verifying email addresses or accepting server rules.
4. Customize Role Settings: Depending on your bot’s capabilities, you may have additional options to customize role settings. For example, you can assign different colors to roles to make them visually distinct or modify role permissions to control access to specific channels or features.
5. Test Auto-Role Assignment: It’s essential to test the auto-role feature to ensure it is working correctly. Create a test account or ask a friend to join your server, and observe if they are automatically assigned the designated role upon joining. Adjust any settings if necessary to ensure the desired outcome.
6. Additional Role Management: Once auto-roles are set up, you can also manually assign or remove roles from individual members based on their behavior, contribution, or progression within the server. This level of customization helps create a dynamic and engaging environment for your community.
With auto-role assignments in place, you can streamline the process of granting appropriate access and permissions to new members in your discord server. This ensures a seamless onboarding experience and encourages active participation from the moment they join your community.
Customizing Permissions and Restrictions
Customizing permissions and restrictions in your Discord server is essential to maintain a safe and organized community. By setting up specific permissions and restrictions, you can ensure that members have the appropriate access levels and maintain the integrity of your server. Here’s how you can customize permissions and restrictions:
1. Understand Permission Hierarchy: Familiarize yourself with Discord’s permission hierarchy to effectively customize permissions. The hierarchy includes server-wide roles, channel-specific roles, and individual member permissions. Roles higher in the hierarchy will override lower roles, so plan your roles accordingly.
2. Define Server-wide Roles: Create server-wide roles that define the basic permissions and restrictions for your members. These roles can include moderators, administrators, or any other specific roles that have broader access across the server.
3. Set Channel-specific Permissions: Customize permissions for specific channels based on their purposes. For example, you can restrict certain channels to specific roles or limit the ability to send messages or files in sensitive channels. Configure these permissions to ensure the appropriate level of privacy and engagement in each channel.
4. Modify Individual Member Permissions: Modify individual member permissions when necessary. This can include granting certain members additional permissions or restricting permissions for specific reasons. Individual member permissions can be useful for exceptional cases or unique circumstances that require personalized access levels.
5. Regularly Review and Update Permissions: Regularly review and update permissions and restrictions to adapt to the evolving needs of your server. The dynamics of your community may change over time, necessitating adjustments to ensure an optimal experience for all members.
6. Communicate Guidelines and Expectations: Clearly communicate the guidelines and expectations related to permissions and restrictions to your members. Make sure they understand which actions are allowed and which are restricted. This will help foster a positive and respectful environment where everyone understands their responsibilities.
7. Empower Moderators and Administrators: Empower your moderators and administrators with the appropriate permissions to effectively manage the server. They should have the necessary tools to enforce server rules, moderate discussions, and address any issues that arise.
By customizing permissions and restrictions in your Discord server, you can create a well-organized and controlled environment that offers the right access and privileges to your community members. Regularly reviewing and updating these settings will ensure that your server remains safe, secure, and enjoyable for everyone.
Testing and Troubleshooting
Once you have set up the welcome channel, customized the welcome message, configured auto-role assignments, and customized permissions and restrictions, it’s crucial to thoroughly test and troubleshoot your Discord server to ensure everything is functioning as intended. Here are some steps to effectively test and troubleshoot:
1. Test the Welcome Channel: Create a test account or ask a trusted friend to join your server. Observe if the welcome message appears in the designated welcome channel as expected. Ensure that the message is well-formatted, includes the necessary information, and engages new members effectively.
2. Verify Auto-Role Assignments: Join the server with a new account to verify if the auto-role assignments are working correctly. Check if the designated roles are automatically assigned upon joining. Confirm that the assigned roles have the appropriate permissions and grant access to the necessary channels and features.
3. Test Permissions and Restrictions: Test the permissions and restrictions you have set up by using different roles or accounts with varying privileges. Ensure that members are able to access the intended channels, send messages, and perform actions according to their assigned roles. Verify that restricted actions or channels are inaccessible as per your configurations.
4. Seek Feedback from Community Members: Encourage feedback from your community members on their experience with the welcome channel, roles, and permissions. Ask for their input on the clarity of the welcome message, the effectiveness of auto-role assignments, and any difficulties they encountered. This feedback can help you identify and address any issues or areas that require improvement.
5. Monitor and Address Issues: Continuously monitor your server for any issues or errors that may arise. Stay vigilant for any improper functioning of auto-roles, faulty permissions, or other technical glitches. Address these issues promptly by adjusting settings, seeking support from the bot provider, or reaching out to your server members for assistance.
6. Keep Up with Bot Updates: Regularly check for updates or new features provided by your chosen Discord bot. Stay informed about any bug fixes, enhancements, or new functionalities that can improve the performance of your welcome channel. Keeping your bot up-to-date will ensure a smooth experience for new members.
Testing and troubleshooting your Discord server is a crucial step to deliver a seamless user experience for your community members. By verifying the functionality of key elements such as the welcome channel, auto-role assignments, and permissions, you can address any issues and provide a welcoming environment where new members can thrive.
Conclusion
Setting up a welcome channel on Discord is a valuable strategy to make new members feel welcomed and engaged in your community from the moment they join. By following the steps outlined in this article, you can create a dedicated and inviting welcome channel that introduces new members to your community, provides important information, and automates key tasks to streamline the onboarding process.
Choosing the right Discord bot is essential to ensure the smooth functioning of your welcome channel. Consider factors such as features, user-friendly interface, customization options, reliability, and community support when selecting a bot that aligns with your server’s needs.
Once you have chosen the bot, you can set up the welcome channel, design a welcoming message, configure auto-role assignments, and customize permissions and restrictions. Testing and troubleshooting are vital to ensure that the welcome channel and associated features are working as intended. Seek feedback from community members and regularly monitor your server to identify and address any issues that arise.
By investing time and effort into creating an engaging and welcoming environment, you are more likely to attract and retain active members who feel valued and connected to your community. A well-crafted welcome channel sets the tone for new members’ experience and fosters a strong sense of belonging.
Remember to regularly review and update your welcome channel, welcome message, and associated features to ensure their continued relevance and effectiveness. By maintaining an inviting and inclusive atmosphere, you can create a thriving Discord community where members feel motivated to participate and contribute.