Introduction
Welcome to the world of Google Meet on Chromebook! In this era of remote work and online communication, being able to efficiently connect with colleagues, friends, and family is essential. With Google Meet, you can host video conferences, collaborate in real-time, and stay connected no matter where you are. And with the convenience of using a Chromebook, you have a powerful tool at your disposal for accessing Google Meet.
In this guide, we will walk you through the steps of setting up Google Meet on your Chromebook, creating meetings, and inviting participants. We will also explore the various audio and video settings available to enhance your meeting experience. Additionally, we will cover screen sharing, troubleshooting common issues, and provide useful tips for optimizing your Google Meet sessions on Chromebook.
Whether you are using Google Meet for work, school, or personal reasons, this guide will equip you with the knowledge and tools to make the most out of this powerful video conferencing platform on your Chromebook. So, let’s dive in and learn how to make a Google Meet on Chromebook!
Setting up a Google Account
Before you can start using Google Meet on your Chromebook, you’ll need to have a Google Account. If you already have one, you can skip this step. If not, follow the instructions below to set up a Google Account:
- Open your Chromebook and go to the sign-in screen. Click on “Add person” and then “More options.”
- Select “Create account” and follow the on-screen instructions to provide your name, desired email address, password, and recovery information.
- Agree to the terms of service and privacy policy, then click on “Next.”
- Follow any additional prompts to set up additional security measures, such as two-factor authentication.
- Once your Google Account is created, sign in to your Chromebook using the newly created account.
Having a Google Account not only enables you to use Google Meet, but also gives you access to other Google services like Gmail, Google Drive, and Google Calendar, which can seamlessly integrate with your Google Meet experience.
Remember to keep your Google Account credentials secure and use a strong, unique password to protect your account from unauthorized access.
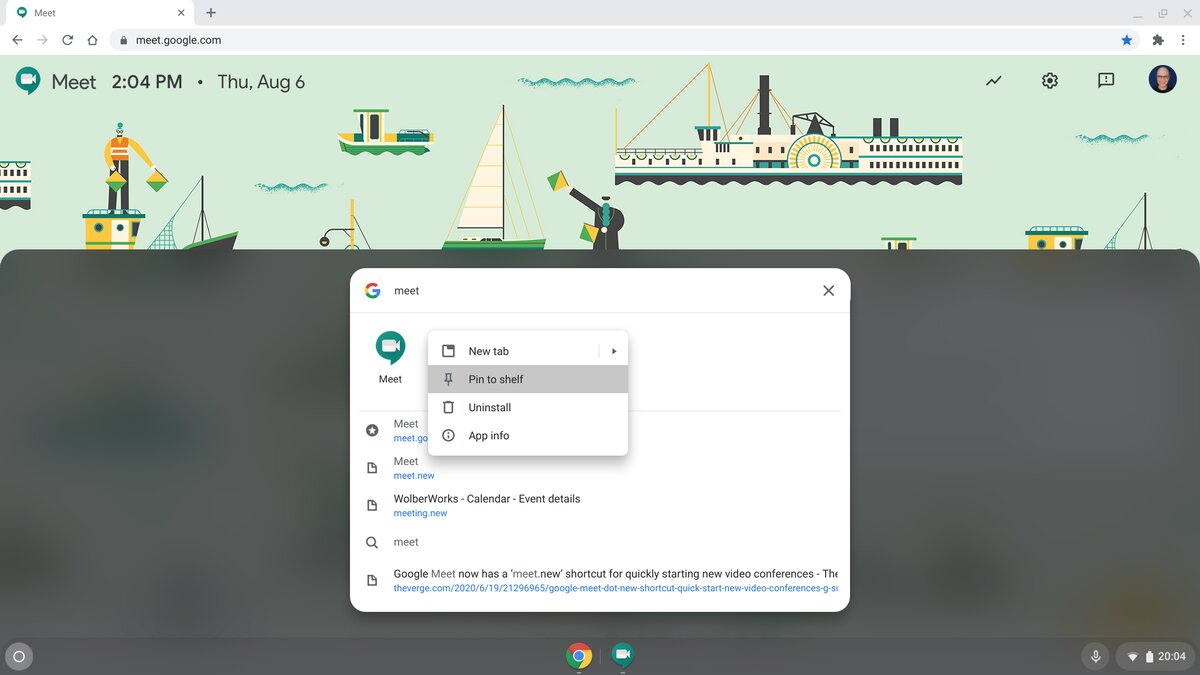
Installing the Google Meet App
To enhance your Google Meet experience on your Chromebook, it is recommended to install the Google Meet app from the Chrome Web Store. Follow the steps below to install the app:
- Open the Chrome browser on your Chromebook.
- Go to the Chrome Web Store by typing “chrome://apps” in the address bar and pressing Enter.
- Once in the Chrome Web Store, search for “Google Meet” using the search bar at the top.
- Click on the “Add to Chrome” button next to the Google Meet app.
- A pop-up box will appear, asking for confirmation to add the app. Click on “Add app” to proceed.
- The Google Meet app will now be added to your Chromebook’s app launcher.
By installing the Google Meet app, you can easily access and launch Google Meet without having to open the Chrome browser each time. The app provides a more streamlined and optimized experience, making it easier to join and host meetings on your Chromebook.
Keep in mind that the Google Meet app may require certain permissions to be granted for optimal functionality. Make sure to review and accept any permission requests during the installation process.
Once the app is installed, you are ready to start using Google Meet on your Chromebook. Let’s move on to the next section, where we will guide you through accessing Google Meet on your Chromebook.
Accessing Google Meet on your Chromebook
Now that you have set up your Google Account and installed the Google Meet app, it’s time to access Google Meet on your Chromebook. Here’s how:
- Open your Chromebook and sign in to your Google Account.
- Click on the “Launcher” button in the bottom-left corner of the screen (or press the Search key).
- Search for “Google Meet” in the search bar and select the Google Meet app from the results.
- The Google Meet app will launch, and you will be greeted with the main interface.
Alternatively, you can also access Google Meet directly through the Chrome browser by following these steps:
- Open the Chrome browser on your Chromebook.
- Type “meet.google.com” in the address bar and press Enter.
- You will be redirected to the Google Meet homepage, where you can join a meeting or start a new one.
Whether you choose to use the Google Meet app or the Chrome browser, accessing Google Meet on your Chromebook is quick and straightforward. Now that you’re in, let’s move on to the next section where we will explore how to create a Google Meet session.
Creating a Google Meet session
Creating a Google Meet session on your Chromebook is simple and can be done in just a few steps. Follow the instructions below to get started:
- Open the Google Meet app or go to meet.google.com in the Chrome browser on your Chromebook.
- If using the app, click on the “+ New Meeting” button at the bottom-right corner of the screen. If using the Chrome browser, click on “Join or start a meeting.”
- Enter a name for your meeting in the “Meeting name” field. This name will be visible to participants when they join.
- By default, the meeting will have a unique URL that you can share with others. If you prefer, you can toggle off the “Generate meeting URL” option and only allow people you invite directly to join the meeting.
- Click on the “Continue” button to proceed.
Once your Google Meet session is created, you will be able to see a preview of your video, audio, and settings before joining the meeting. Take a moment to review and adjust these settings as needed.
Additionally, you may see options to enable or disable captions, select different audio and video devices, and adjust other meeting settings. Explore these options to customize your meeting experience according to your preferences.
Now that you have created your Google Meet session, it’s time to invite participants to join. In the next section, we will guide you through the process of inviting others to your Google Meet on your Chromebook.
Inviting participants to your Google Meet
Once you have created a Google Meet session on your Chromebook, it’s time to invite participants to join the meeting. There are several ways to invite participants and share the meeting details. Here’s how:
- From the Google Meet app or the Chrome browser, click on the “Copy joining info” button or the “Add people” button, respectively. This will copy the meeting details, including the meeting URL and dial-in number, to your clipboard.
- Paste the meeting details into an email, chat, or any other communication platform of your choice, and send it to the participants you want to invite. They will be able to join the meeting by clicking on the provided link or dialing in using the given phone number.
- If you want to invite participants directly from the Google Meet app, click on the “Add people” button, enter their email addresses, and click “Send invite.”
- Alternatively, you can click on the “More options” button and select “Share joining info” to generate a meeting link that you can copy and share with participants through other means.
Remember to provide clear instructions and any necessary meeting details to your participants when inviting them. If desired, you can also schedule the meeting in advance using Google Calendar and send out invitations directly from there.
Inviting participants to your Google Meet is a straightforward process, ensuring that everyone you want to join the meeting has the necessary information to connect and collaborate with you on your Chromebook. In the next section, we will explore how to adjust audio and video settings in Google Meet on Chromebook.
Adjusting audio and video settings
Google Meet on your Chromebook offers various audio and video settings that allow you to customize your meeting experience according to your preferences. Follow the steps below to adjust these settings:
- When in a Google Meet session on your Chromebook, click on the three vertical dots located at the bottom-right corner of the screen.
- A menu will appear. Click on “Settings” to access the audio and video settings.
- In the settings menu, you can adjust your camera and microphone settings, switch between different audio devices if connected, and test your audio and video to ensure they are working properly.
- You can also choose to enable or disable captions for real-time transcription during the meeting.
- Click on “Done” once you have made the desired changes.
Additionally, during a Google Meet session, you can manage your audio and video settings through the icons located at the bottom-right corner of the screen. You can toggle your microphone on or off, disable or enable your camera, and adjust your speaker and microphone volume.
Remember to test your audio and video settings before joining a meeting to ensure that you can hear and be heard clearly. Adjusting the settings to your preference allows for a smoother and more effective communication experience during your Google Meet sessions on your Chromebook.
In the next section, we will discuss how to share your screen during a Google Meet, which can be useful for presentations, demonstrations, and collaboration.
Sharing your screen during a Google Meet
Sharing your screen during a Google Meet session on your Chromebook allows you to showcase presentations, documents, or any other content with the participants. Here’s how you can share your screen:
- When in a Google Meet session on your Chromebook, locate the toolbar at the bottom of the screen.
- Click on the “Present now” button, which is represented by a square icon with an upward arrow.
- A pop-up window will appear, giving you options to choose what to share. You can select to share your entire screen, a specific window, or a Chrome tab.
- Select the desired option and click on “Share” to start sharing your screen.
Once you start sharing your screen, the participants in the Google Meet session will be able to see the content you are sharing. You can navigate through different windows or tabs, making it easy to present slides, demonstrate software, or collaborate on documents.
While sharing your screen, you can also access additional options by hovering your cursor near the top of the screen. This allows you to pause or stop screen sharing, switch between sharing options, or adjust the screen sharing settings.
Remember to close any unrelated windows or tabs and prepare your content beforehand to ensure a smooth screen sharing experience. Screen sharing in Google Meet on your Chromebook enhances collaboration and engagement, making it a valuable feature to utilize in your meetings.
In the next section, we will cover some common issues that you might encounter with Google Meet on your Chromebook and how to troubleshoot them.
Troubleshooting common issues with Google Meet on Chromebook
While Google Meet is designed to work seamlessly on Chromebooks, you may encounter some common issues while using the platform. Here are a few troubleshooting steps to help you resolve these issues:
1. Audio or video not working:
- Check that your microphone and camera are properly connected and not muted or disabled.
- Ensure that your audio and video settings are configured correctly in Google Meet.
- Try refreshing the page or restarting your Chromebook if the issue persists.
2. Poor call quality:
- Close any unnecessary apps or browser tabs that may be consuming system resources.
- Move closer to your Wi-Fi router or connect to a stronger network signal to improve your internet connection.
- Consider using a wired Ethernet connection for a more stable connection, if possible.
3. Echo or feedback during the call:
- Make sure that you and the participants are using headphones or earphones to minimize audio feedback.
- Lower the speaker volume or adjust the microphone sensitivity to avoid echo issues.
4. Unable to join or start a meeting:
- Double-check the meeting URL or ID to ensure you are using the correct information.
- Make sure you are signed in to your Google Account and have the necessary permissions to join or start the meeting.
- If the issue persists, try clearing your browser cache or using an incognito window to rule out any browser-related issues.
If the above troubleshooting steps do not resolve your issue, you can reach out to Google Support or consult the Google Meet Help Center for further assistance. These resources provide detailed troubleshooting guides and can help you resolve more complex issues that you may encounter while using Google Meet on your Chromebook.
Now that you’re equipped with troubleshooting knowledge, you can overcome any potential issues and enjoy a seamless Google Meet experience on your Chromebook.
Now that you have learned the ins and outs of using Google Meet on your Chromebook, you are ready to take full advantage of this powerful video conferencing platform. Whether it’s for work, school, or personal use, Google Meet offers a reliable and user-friendly solution for connecting with others from the comfort of your Chromebook.
Remember to keep your Chromebook and Google Meet app updated to access the latest features and improvements. So, go ahead and start hosting productive and engaging Google Meet sessions on your Chromebook!
Conclusion
Using Google Meet on your Chromebook provides an efficient and convenient way to connect and collaborate with others, whether it’s for work, school, or personal purposes. Throughout this guide, we have covered various aspects of setting up and using Google Meet on your Chromebook, including creating meetings, inviting participants, adjusting audio and video settings, and troubleshooting common issues.
By following the steps outlined in this guide, you can make the most out of Google Meet on your Chromebook and ensure a seamless and productive experience during your video conferences. Whether you’re hosting a team meeting, attending a virtual classroom, or catching up with friends and family, Google Meet on your Chromebook offers the tools and capabilities to communicate effectively and stay connected.
Remember to keep your Chromebook and Google Meet app up to date to benefit from the latest features and enhancements. Additionally, familiarize yourself with the Google Meet Help Center and Google Support resources for further assistance and troubleshooting, should you encounter any challenges along the way.
Now that you have the knowledge and tools to navigate Google Meet confidently on your Chromebook, it’s time to embrace the power of video conferencing and enjoy seamless communication and collaboration from anywhere, anytime. So go ahead, set up your Google Account, install the Google Meet app, and start hosting successful Google Meet sessions on your Chromebook today!