Introduction
Apple TV is a popular streaming device that allows users to enjoy a wide range of movies, TV shows, and other content on their television screens. While watching videos, having subtitles can greatly enhance the viewing experience, especially for those with hearing impairments or for those who prefer to watch movies and shows in different languages. Luckily, Apple TV offers several methods to enable subtitles, ensuring that users can easily follow along with the content they are watching.
In this article, we will explore different methods to get subtitles on Apple TV. Whether you are using the Apple TV settings, the Remote app on your iPhone, iPad, or iPod Touch, or even the Apple TV app on your mobile device, we have you covered. With these simple methods, you will be able to enable subtitles and enjoy your favorite movies and shows without missing any dialogue or plot details.
So, if you’re ready to take your Apple TV viewing experience to the next level, let’s dive into the different methods that will allow you to get subtitles on your Apple TV!
Method 1: Using the Apple TV Settings
One of the simplest ways to get subtitles on Apple TV is by using the built-in settings. Follow these steps to enable subtitles:
- Start by selecting the “Settings” app on your Apple TV home screen.
- In the settings menu, navigate to “General” and select it.
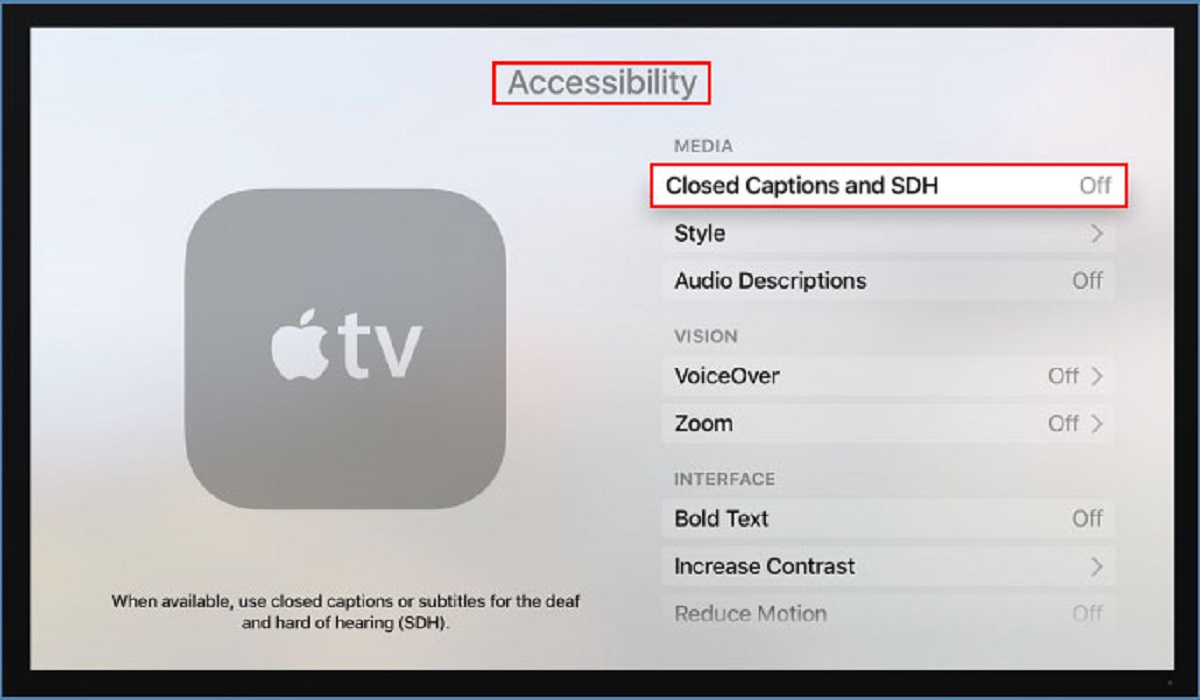
- Scroll down and choose “Accessibility.”
- Within the Accessibility menu, click on “Subtitles & Captioning.”
- Toggle the “Closed Captions + SDH” switch to turn on subtitles.
Once you have followed these steps, subtitles will be displayed on your Apple TV whenever they are available for the content you are watching. It’s important to note that subtitles may not be available for all movies or shows, as it depends on the content provider.
To customize the appearance of the subtitles, you can also make adjustments in the “Style” section within the “Subtitles & Captioning” menu. Here, you can change the size, font, color, and background style to suit your preferences.
Using the Apple TV settings to enable subtitles offers a straightforward and convenient way to enjoy your favorite content with added accessibility. Give it a try and start enjoying a more inclusive viewing experience on your Apple TV!
Method 2: Using the Remote App on iPhone
If you have an iPhone, you can take advantage of the Remote app to control your Apple TV and enable subtitles effortlessly. Follow these steps to get subtitles using the Remote app:
- First, ensure that your iPhone and Apple TV are connected to the same Wi-Fi network.
- Download and install the Remote app from the App Store, if you don’t already have it installed.
- Launch the Remote app on your iPhone.
- Tap on the Apple TV device that you want to control.
- Once connected, you will see a remote control interface on your iPhone screen.
- Swipe up to reveal the playback controls.
- Tap on the speech bubble icon on the top right corner of the remote control interface.
- In the subtitles menu, select your preferred language or choose “Auto” for automatic subtitle selection.
- Now, start playing the content on your Apple TV, and the selected subtitles will be displayed on the screen.
The Remote app makes it convenient to control your Apple TV and easily enable subtitles directly from your iPhone. This method provides a seamless and intuitive approach to enjoy your favorite videos with subtitles enabled.
So, if you have an iPhone and want to enhance your viewing experience with subtitles, give the Remote app a try and enjoy a more personalized and accessible content consumption on your Apple TV.
Method 3: Using the Remote App on iPad
If you prefer using your iPad to control your Apple TV, you can utilize the Remote app on your iPad to easily enable subtitles. Here’s how:
- Make sure your iPad and Apple TV are connected to the same Wi-Fi network.
- If you haven’t already, install the Remote app from the App Store on your iPad.
- Launch the Remote app on your iPad.
- Tap on your Apple TV device to establish a connection.
- Once connected, you will see a remote control interface on your iPad’s screen.
- Swipe up on the remote control interface to access the playback controls.
- Tap on the speech bubble icon located in the top-right corner of the interface.
- In the subtitles menu, select your desired language or opt for “Auto” to have subtitles automatically selected.
- Start playing the content on your Apple TV, and the selected subtitles will appear on the screen.
The Remote app on the iPad offers a hassle-free way to control your Apple TV and effortlessly enable subtitles. By using your iPad, you can conveniently manage the playback and accessibility features from a larger screen.
So, if you have an iPad and want to enhance your Apple TV experience with subtitles, give the Remote app a try. Enjoy your favorite content with the added convenience of subtitles right at your fingertips!
Method 4: Using the Remote App on iPod Touch
If you own an iPod Touch, you can also take advantage of the Remote app to control your Apple TV and enable subtitles effortlessly. Follow these steps to get subtitles using the Remote app on your iPod Touch:
- Ensure that your iPod Touch and Apple TV are connected to the same Wi-Fi network.
- Download and install the Remote app from the App Store if you haven’t already.
- Launch the Remote app on your iPod Touch.
- Tap on your Apple TV device to establish a connection.
- Once connected, you will see a remote control interface on your iPod Touch screen.
- Swipe up to reveal the playback controls.
- Tap on the speech bubble icon located in the top-right corner of the interface.
- Within the subtitles menu, select your preferred language or choose “Auto” for automatic subtitle selection.
- Start playing the content on your Apple TV, and the selected subtitles will be displayed on the screen.
The Remote app on the iPod Touch provides a convenient means to control your Apple TV and enable subtitles using a portable device. With this method, you can enjoy a personalized viewing experience and easily follow along with your favorite movies and shows.
If you have an iPod Touch and want to take full control of your Apple TV with subtitles enabled, give the Remote app a try. It’s a convenient tool that enhances your entertainment experience right from the palm of your hand.
Method 5: Using the Apple TV App on iPhone or iPad
If you have the Apple TV app installed on your iPhone or iPad, you can easily enable subtitles while streaming content. Here’s how:
- Open the Apple TV app on your iPhone or iPad.
- Navigate to the movie or TV show you want to watch.
- Tap on the content to start playing it.
- While the content is playing, tap on the screen to reveal the playback controls.
- Tap on the speech bubble icon located in the top-right corner of the screen.
- Select your preferred subtitle language from the options provided.
- The chosen subtitles will now be displayed while you continue watching the content.
The Apple TV app on your iPhone or iPad provides a seamless way to stream content and enable subtitles without having to navigate through complicated settings. By following these steps, you can customize your viewing experience and enjoy your favorite shows and movies with subtitles.
Whether you’re using your iPhone or iPad, the Apple TV app gives you control over subtitles, allowing you to immerse yourself in the content with ease. Give it a try and take your entertainment experience to new heights!
Method 6: Using the Apple TV App on Mac
If you’re using a Mac computer, you can leverage the Apple TV app to enable subtitles while enjoying your favorite movies and TV shows. Follow these steps:
- Open the Apple TV app on your Mac.
- Navigate to the content you want to watch.
- Click on the title to start playing the content.
- While the content is playing, move your cursor to reveal the playback controls.
- Click on the speech bubble icon located in the top-right corner of the screen.
- Choose the desired subtitle language from the available options.
- The selected subtitles will now be shown on the screen.
The Apple TV app on your Mac makes it convenient to enable subtitles for your viewing pleasure, ensuring that you don’t miss any dialogue or important details. By following these simple steps, you can personalize your viewing experience and enjoy your favorite content with subtitles.
The Apple TV app on Mac provides a seamless and user-friendly interface that enables you to control subtitles effortlessly. Whether you’re watching a movie or binging a TV series, this method gives you the flexibility to enjoy content with subtitles on your Mac computer. Give it a try and enhance your entertainment experience!
Method 7: Using the Apple TV App on Windows
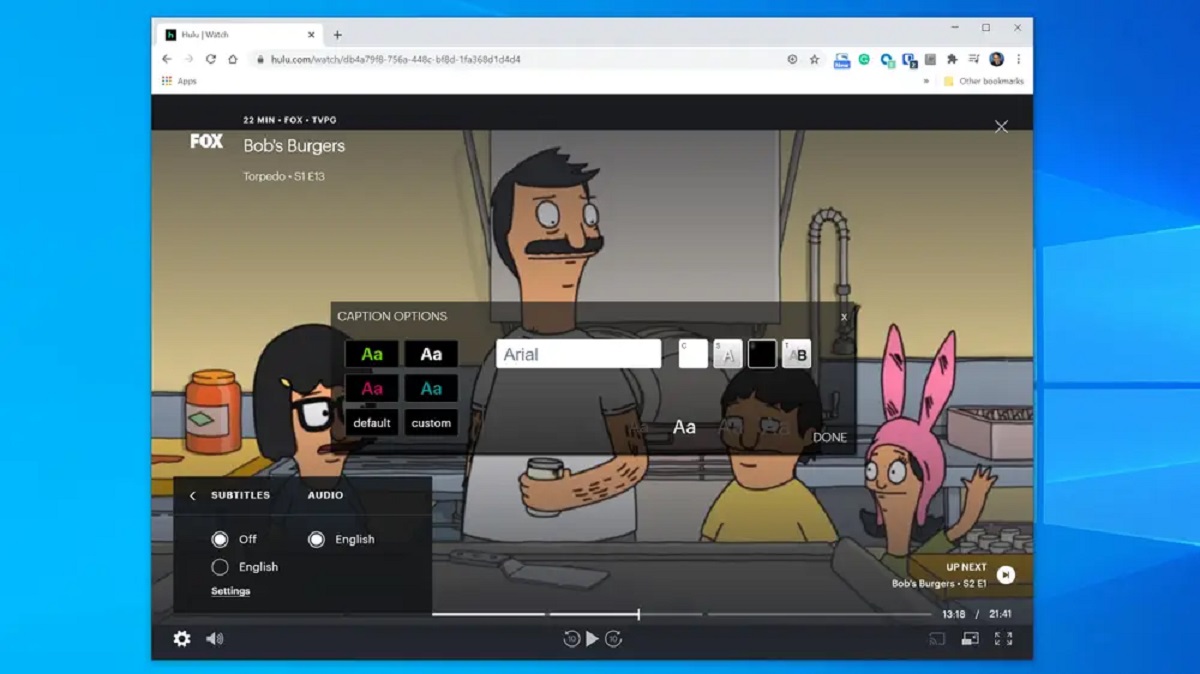
If you’re using a Windows computer, you can still enjoy the benefits of subtitles by utilizing the Apple TV app. Here’s how you can enable subtitles on the Apple TV app for Windows:
- Launch the Apple TV app on your Windows computer.
- Navigate to the movie or TV show you want to watch.
- Click on the content to start playing it.
- While the content is playing, move your cursor to reveal the playback controls.
- Click on the speech bubble icon located in the top-right corner of the screen.
- Select your preferred subtitle language from the available options.
- The chosen subtitles will now be displayed as you continue watching the content.
The Apple TV app for Windows offers a convenient way to watch your favorite movies and TV shows with subtitles enabled. By following these steps, you can easily customize your viewing experience and ensure that you don’t miss any dialogue or important details conveyed through subtitles.
Whether you’re using a Mac or Windows computer, the Apple TV app provides a seamless platform to enjoy content with subtitles. This method allows you to have a personalized and inclusive entertainment experience on your Windows computer. Give it a try and elevate your viewing pleasure!
Conclusion
Enabling subtitles on Apple TV enhances the viewing experience for users by providing accessibility and the ability to watch content in different languages. In this article, we explored several methods to get subtitles on Apple TV, including using the device settings, the Remote app on iPhone, iPad, or iPod Touch, and the Apple TV app on iPhone, iPad, Mac, or Windows.
By following the simple steps outlined in each method, users can easily enable subtitles and enjoy their favorite movies and TV shows without missing any dialogue or plot details. Whether you prefer using the Apple TV settings, the Remote app, or the Apple TV app, there is a method that suits your preferences and devices.
Enabling subtitles not only benefits individuals with hearing impairments but also allows users to watch content in different languages and enjoy foreign movies and shows. The Apple TV offers a range of customization options, such as selecting the subtitle language, adjusting the appearance of the subtitles, and even enabling automatic subtitle selection.
With the various methods discussed in this article, users can personalize their viewing experience and make their Apple TV more inclusive and accessible. Whether you have an iPhone, iPad, iPod Touch, Mac, or Windows computer, there is a method available to get subtitles on Apple TV that fits your needs.
So, next time you sit down to watch your favorite movie or TV show on Apple TV, don’t forget to enable subtitles using one of these convenient methods. Sit back, relax, and enjoy an enhanced viewing experience with subtitles that bring the content to life!