Introduction
Apple TV is a popular streaming device that allows you to access a wide variety of online content on your television. One of the features that makes Apple TV stand out is its ability to provide closed captioning for those who are deaf or hard of hearing. With closed captions, viewers can read the dialogue, sound effects, and other important audio information while watching their favorite TV shows, movies, or videos.
In this guide, we will walk you through the process of turning on closed captioning on your Apple TV. Whether you prefer to have the captions on at all times or you occasionally enable them for specific apps or channels, we will cover all the necessary steps to ensure that you can easily access and customize closed captions according to your preferences.
By enabling closed captioning on your Apple TV, you can create a more inclusive and enjoyable viewing experience for yourself and those around you. So, let’s get started and discover how to unlock the power of closed captions on your Apple TV!
Step 1: Accessing Apple TV settings
The first step to enabling closed captioning on your Apple TV is to access the settings menu. Here’s how you can do it:
- Make sure your Apple TV is turned on and connected to your television.
- Using the Apple TV remote, navigate to the home screen. You can do this by pressing the menu button, which is located at the top-left corner of the remote.
- On the home screen, you will see various app icons. Look for the “Settings” app and select it by highlighting it and pressing the touchpad on the remote.
- Once you are in the settings menu, you will see a list of options. Scroll down and look for the “General” option. Select it to proceed to the next step.
By following these simple steps, you will be able to access the settings menu on your Apple TV. Now that you are in the general settings, you can move on to the next step to enable closed captioning.
Step 2: Navigating to Accessibility settings
Once you have accessed the general settings on your Apple TV, the next step is to navigate to the accessibility settings. Here’s how you can do it:
- In the general settings menu, scroll down until you find the “Accessibility” option. Select it by highlighting it and pressing the touchpad on the remote.
- When you enter the accessibility settings, you will see a range of options that are designed to enhance the accessibility of Apple TV for individuals with different needs.
- Scroll down and look for the “Subtitles & Captioning” option. Select it to proceed to the next step.
The accessibility settings provide a variety of features to enhance the usability of Apple TV for individuals with visual, auditory, and physical impairments. By navigating to the subtitles and captioning section, you will be able to enable closed captioning and customize its appearance according to your preferences. Let’s move on to the next step to enable closed captioning on your Apple TV.
Step 3: Enabling Closed Captioning
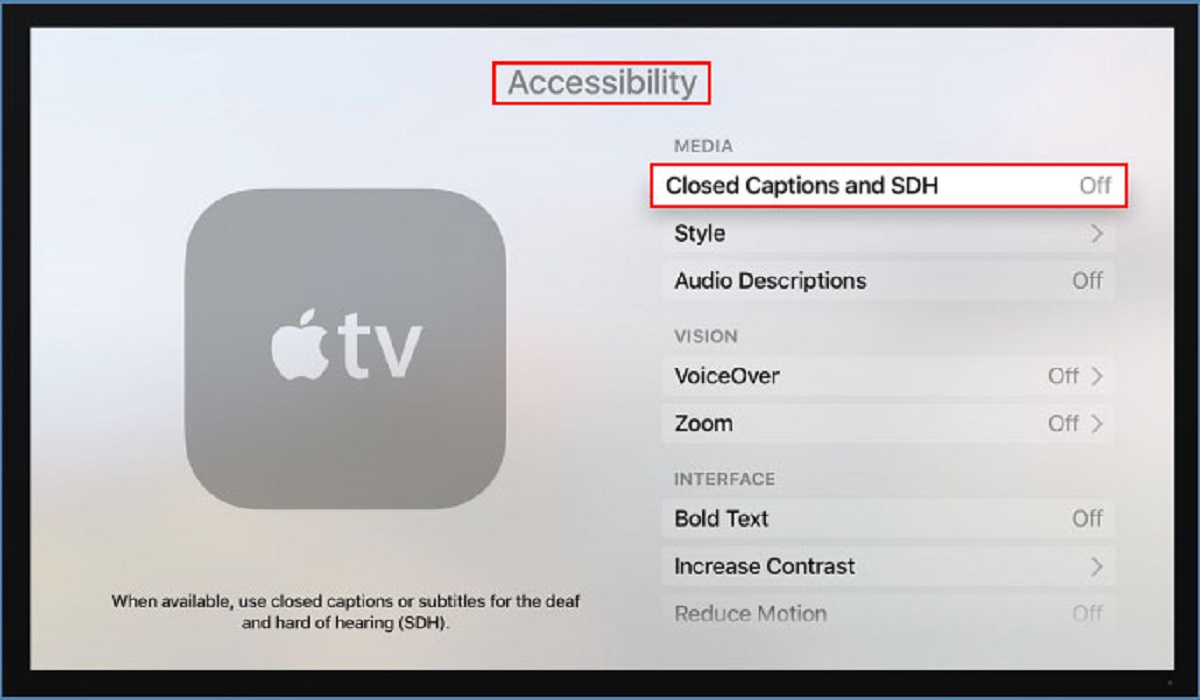
Now that you have reached the “Subtitles & Captioning” section in the accessibility settings, you can proceed to enable closed captioning on your Apple TV. Follow these steps:
- Within the “Subtitles & Captioning” section, you will see an option labeled “Closed Captions + SDH.” Select it by highlighting it and pressing the touchpad on the remote.
- In the next screen, you will find the option to toggle the closed captions switch to enable or disable closed captioning. Toggle the switch to the “On” position to enable closed captioning.
- Once you have enabled the closed captioning, you can press the menu button on the remote to exit the settings.
By following these steps, you have successfully enabled closed captioning on your Apple TV. Now, whenever you watch a TV show, movie, or video on your Apple TV, the closed captions will be displayed on the screen, allowing you to read the dialogue and other relevant audio information.
Enabling closed captioning is a simple process that ensures an inclusive viewing experience for all users. Let’s continue to the next step, where you can customize the appearance of closed captions on your Apple TV.
Step 4: Customizing Closed Captioning options
Once you have enabled closed captioning on your Apple TV, you can further customize the appearance and behavior of closed captions to suit your preferences. Here’s how you can do it:
- Go back to the settings menu by pressing the menu button on the remote.
- Navigate to the “Accessibility” section and select it.
- Scroll down and find the “Subtitles & Captioning” option. Select it to enter the closed caption customization settings.
- Under the closed caption settings, you will find various options to modify how the closed captions appear on the screen.
- To change the style and font of the captions, select the “Style” option. Choose from the available styles or select “Create New Style” to customize your own.
- If you want to modify the text size, color, background color, or opacity of the captions, select the “Text Size & Style” option.
- For users who prefer a larger text size, enabling “Increase Accessibility Sizes” under the “Accessibility” section can enlarge the closed captions.
By exploring these customization options, you can personalize the closed captioning experience on your Apple TV to suit your visual preferences and needs. Take some time to adjust the settings according to your liking and make watching your favorite shows even more enjoyable.
Now that you have learned how to customize the appearance of closed captions, let’s move on to the next step, where you can adjust the closed caption appearance in real-time while watching content on your Apple TV.
Step 5: Adjusting Closed Caption appearance
Apple TV provides the flexibility to adjust the appearance of closed captions in real-time while watching your favorite content. Here’s how you can do it:
- Start playing a video or TV show on your Apple TV.
- While the content is playing, swipe down on the touchpad of the Apple TV remote.
- A control panel will appear on the screen, displaying various options including closed captions.
- Select the closed captions icon to access the closed captioning settings.
- Within the closed captioning settings, you can adjust the text size, style, color, and background color of the closed captions to your preference.
- Once you have made the necessary adjustments, swipe up on the touchpad to dismiss the control panel and resume watching the content with the modified closed caption appearance.
With this handy feature, you can conveniently adjust the closed caption appearance while watching your favorite shows or movies on your Apple TV. This allows you to optimize the captions to your liking, ensuring a seamless viewing experience.
Now that you have learned how to adjust the closed caption appearance, let’s proceed to the final step where you can enable closed captioning for specific apps or channels on your Apple TV.
Step 6: Enabling Closed Captioning for specific apps or channels
If you prefer to have closed captioning enabled for specific apps or channels on your Apple TV, you can easily configure these settings. Here’s how:
- Start by accessing the settings menu on your Apple TV.
- Navigate to the “Accessibility” section and select it.
- Scroll down and find the “Subtitles & Captioning” option. Select it to enter the closed caption customization settings.
- Within the closed caption settings, scroll down to find the “Style” option.
- Select the option labeled “Default for [App/Channel Name].” This will apply closed captioning settings specifically for that app or channel.
- Repeat step 5 for each app or channel you want to have custom closed captioning settings.
By enabling custom closed captioning settings for specific apps or channels, you can ensure that closed captions are always available whenever you watch content from those sources. This allows for a more personalized viewing experience, tailored to your preferences.
Now that you have learned how to enable closed captioning for specific apps or channels, you are all set to enjoy your favorite content with accessible captions on your Apple TV. Take the time to explore the customization options and make the most out of your closed captioning experience.
Conclusion
Enabling closed captioning on your Apple TV provides an inclusive and accessible viewing experience for everyone. By following the steps outlined in this guide, you can easily enable closed captioning, customize its appearance, and even apply specific settings for individual apps or channels.
The process begins by accessing the Apple TV settings menu and navigating to the accessibility settings. From there, you can enable closed captioning and adjust its appearance to your liking. The real-time adjustments feature allows you to modify the closed caption appearance while watching content on your Apple TV.
Furthermore, you have the option to enable closed captioning for specific apps or channels, ensuring that captions are always available for your preferred sources of entertainment.
With closed captioning enabled on your Apple TV, you can enjoy your favorite TV shows, movies, and videos while keeping up with the dialogue, sound effects, and other audio details. It provides a more immersive and inclusive experience for individuals who are deaf or hard of hearing.
So, take advantage of the accessibility features on your Apple TV and unlock the power of closed captions. Personalize your closed captioning settings, create a viewing experience tailored to your preferences, and ensure that everyone can enjoy the content you love.
Now, grab your Apple TV remote, follow the steps outlined in this guide, and start watching with closed captions enabled. Sit back, relax, and immerse yourself in the world of entertainment, knowing that you won’t miss a single word.