Introduction
Welcome to this guide on how to get a QR code for Google Authenticator. In our increasingly digital world, the need for robust security measures has become imperative. One popular method of safeguarding our online accounts is through two-factor authentication (2FA). Google Authenticator is a widely used 2FA app, providing an additional layer of protection for online services and applications.
But what exactly is Google Authenticator? And why do you need a QR code for it? In this article, we will explore these questions, as well as provide a step-by-step guide to help you obtain a QR code for Google Authenticator.
Google Authenticator is a free app developed by Google for Android and iOS devices. It generates time-based one-time passwords (TOTP) that are used for two-factor authentication. Essentially, Google Authenticator adds an extra layer of security to your online accounts by requiring you to enter a code generated by the app when logging in.
The app works by syncing with the accounts you want to secure, such as email, social media, or banking accounts. Once set up, when you try to log in to one of these accounts, Google Authenticator generates a unique six-digit code that you need to enter along with your password. The code changes every 30 seconds, making it extremely difficult for hackers to gain unauthorized access to your accounts.
Now that we understand what Google Authenticator is, let’s explore why you need a QR code for it. The QR code serves as a convenient way to link or sync your online accounts with the Google Authenticator app.
Without a QR code, you would have to manually enter the account details into the app, which can be time-consuming and prone to errors. With the QR code, all the necessary information, such as the account name and secret key, is encoded and can be quickly scanned by the app, saving you time and ensuring accuracy.
So, if you’re ready to enhance the security of your online accounts by using Google Authenticator, let’s dive into the step-by-step guide on how to obtain a QR code for the app.
What is Google Authenticator?
Google Authenticator is a two-factor authentication (2FA) app developed by Google. It provides an additional layer of security for accessing your online accounts by generating time-based one-time passwords (TOTP). This means that in addition to entering your password, you also need to enter a unique code generated by the app.
The app works by synchronizing with your online accounts, including email, social media, and banking accounts. Once set up, when you attempt to log in to one of these accounts, Google Authenticator generates a six-digit code that you must enter along with your password. The code changes every 30 seconds, ensuring that even if someone sniffs or intercepts your password, they won’t be able to access your account without the valid code.
The primary purpose of Google Authenticator is to protect your accounts from unauthorized access by adding an extra layer of verification. This means that even if someone manages to obtain your password, they would still need physical access to your authorized device where the app is installed to generate the correct verification code.
Google Authenticator implements the industry-standard Time-Based One-Time Password (TOTP) algorithm, making it compatible with a wide range of online services and applications that support 2FA. This makes it a versatile and widely used option for enhancing the security of your online accounts.
One of the key advantages of using Google Authenticator is its simplicity and ease of use. It is a lightweight app that doesn’t require an internet connection to generate the verification codes, making it reliable even in areas with limited connectivity. Additionally, with its simple interface and straightforward setup process, users can quickly add and manage multiple accounts within the app.
It is worth noting that Google Authenticator is not the only app available for 2FA. There are alternative options, such as Authy and Microsoft Authenticator, which offer similar functionality. However, Google Authenticator remains a popular choice due to its simplicity, reliability, and the trust associated with the Google brand.
Now that we have an understanding of what Google Authenticator is and its purpose, let’s proceed to the next section, where we will explore why you need a QR code for Google Authenticator.
Why do you need a QR code for Google Authenticator?
Obtaining a QR code for Google Authenticator is an essential step in setting up the app and linking it to your online accounts. The QR code serves as a convenient and efficient way to transfer the necessary information from the service provider to the app, ensuring a seamless and accurate setup process.
Without a QR code, you would need to manually enter the account details into the Google Authenticator app. This includes the account name and the secret key, which is used to generate the time-based one-time passwords. Manual entry of these details can be time-consuming and prone to errors, increasing the risk of misconfiguration.
By using a QR code, all the required information is encoded and can be quickly scanned by the app, eliminating the need for manual input. This not only saves time but also ensures accuracy, as the risk of entering incorrect information is significantly reduced.
Another advantage of using a QR code for Google Authenticator is its compatibility with a wide range of service providers that support 2FA. When enabling 2FA on an online account, many platforms offer the option to scan a QR code rather than manually entering the details. This streamlined process makes it easier for users to set up Google Authenticator quickly and securely.
The QR code contains encrypted information such as the account name and secret key. This information is unique to each account and is used by the Google Authenticator app to generate the time-based one-time passwords. The secret key is stored securely within the app and is never transmitted over the internet, ensuring the confidentiality of your account information.
Furthermore, the QR code serves as a one-time transfer of the account details. Once the QR code is scanned and the account is added to Google Authenticator, there is no need to refer back to the QR code for future login attempts. The app will generate the verification codes automatically, providing an additional layer of security to verify your identity.
Having a QR code for Google Authenticator also facilitates the process of migrating the app to a new device. When upgrading to a new smartphone or tablet, you can simply scan the QR code again on the new device, eliminating the need to transfer the account details manually.
In summary, a QR code for Google Authenticator is essential for a smooth and secure setup process. It saves time, minimizes the risk of errors, and provides compatibility with various service providers. Additionally, it ensures the confidentiality of your account details and simplifies the transition to a new device. With these advantages in mind, let’s proceed to the step-by-step guide on how to obtain a QR code for Google Authenticator.
Step-by-Step Guide: How to Get a QR Code for Google Authenticator
Setting up Google Authenticator and obtaining a QR code is a straightforward process. Follow the steps below to ensure a smooth and secure setup:
- Step 1: Install and Set Up Google Authenticator
- Step 2: Add an Account
- Step 3: Retrieve QR Code
- Step 4: Scanning the QR Code
- Repeat for Additional Accounts
Start by downloading the Google Authenticator app from the App Store (for iOS) or Google Play Store (for Android). Once installed, open the app and follow the on-screen instructions to complete the initial setup. Make sure to set a strong password or use biometric authentication to protect the app itself.
After setting up the app, you can add your first account by tapping on the “+” icon or the “Add Account” button. This will prompt you to select the type of account you want to add (e.g., Google, Facebook, Amazon, etc.). Choose the appropriate option or select “Other” if the service is not listed.
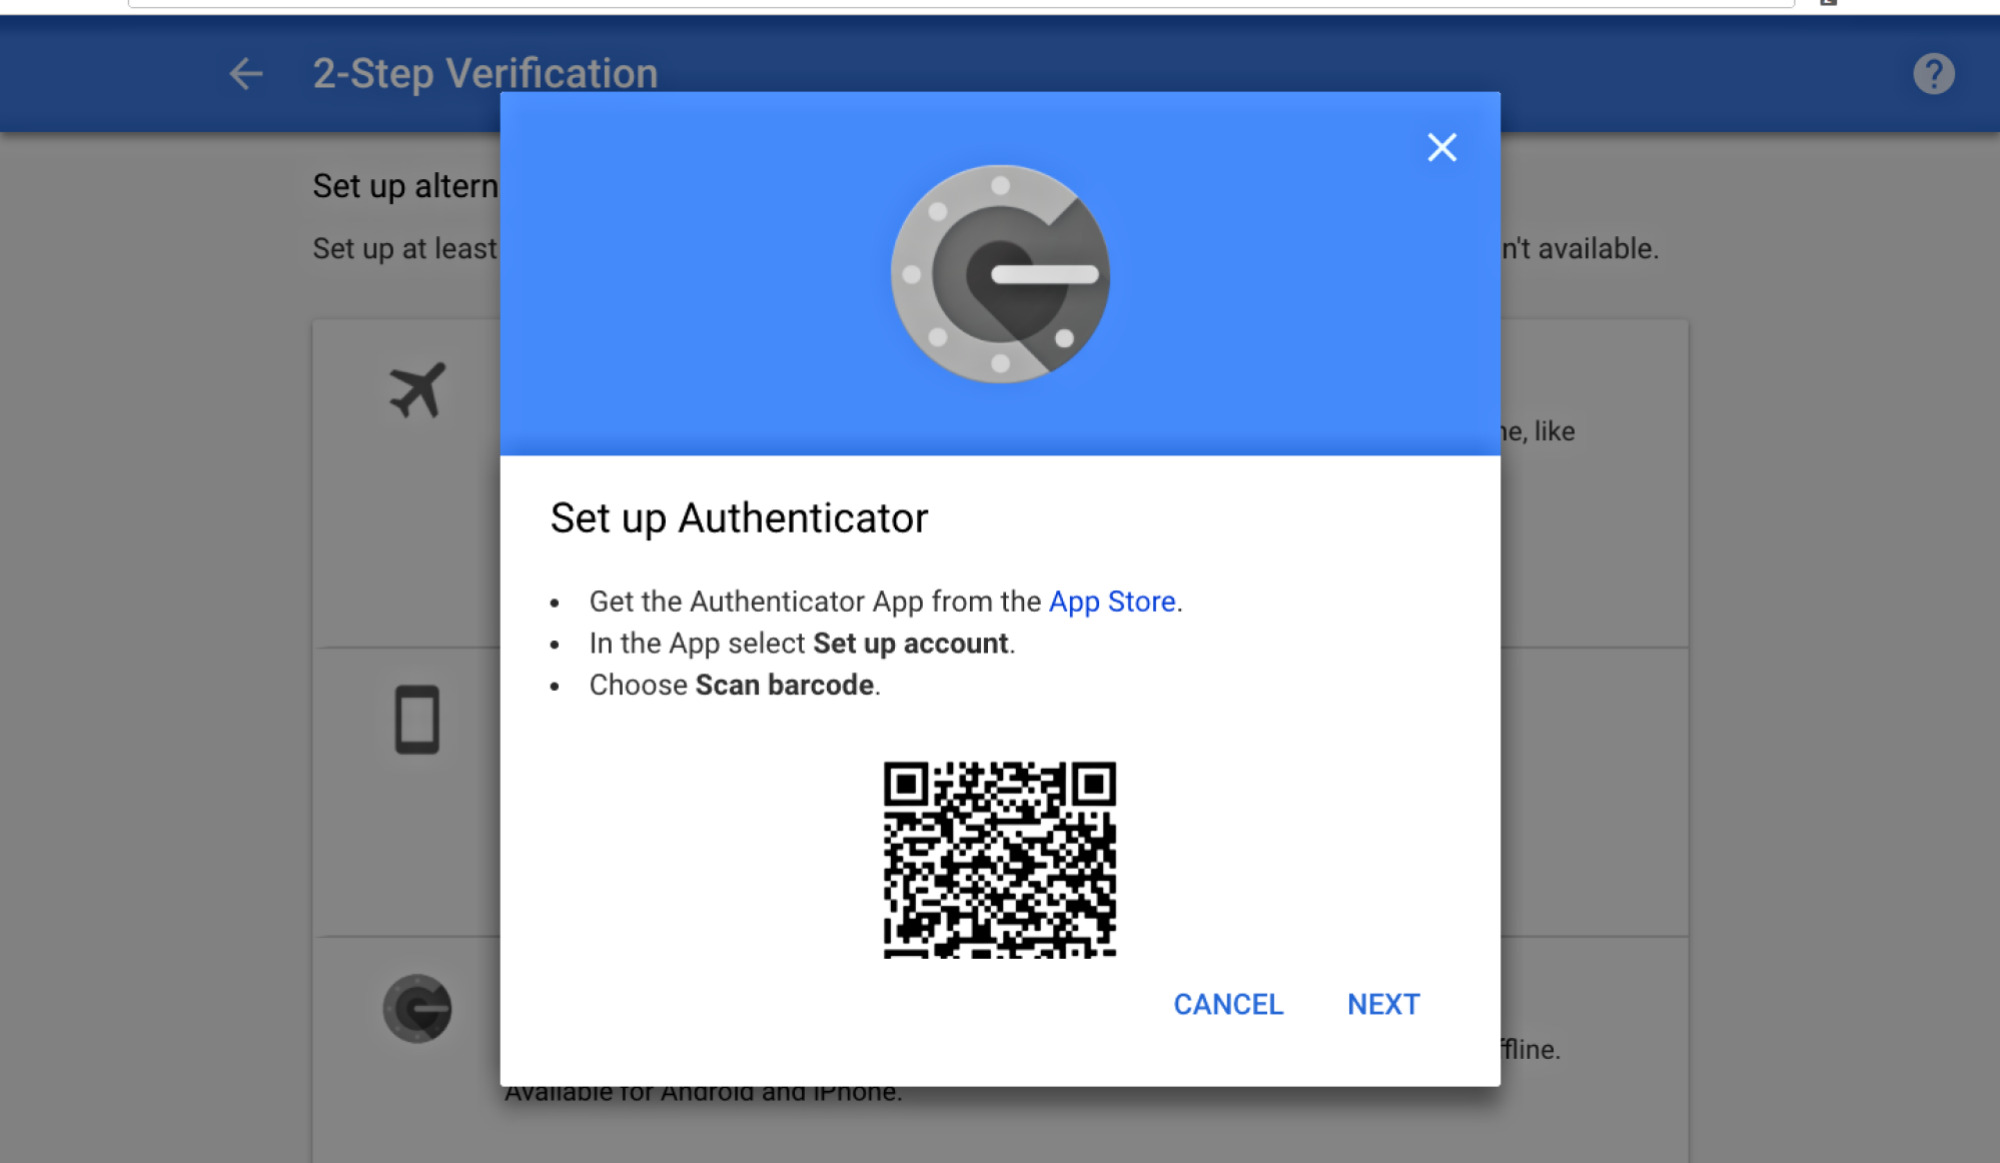
Now, the app will present you with two options: manual entry or scanning a QR code. To obtain the QR code, select the “Scan a QR code” option. This will activate your device’s camera. Proceed to the next step to retrieve the QR code.
Visit the website or service provider that you want to enable Google Authenticator for. Look for the option to enable two-factor authentication or 2FA. Typically, this can be found in the security or account settings of the platform. Select the option to set up 2FA and choose the “Scan QR code” or similar option.
Aim your device’s camera at the QR code displayed on the website or screen. The Google Authenticator app will automatically scan the code, extract the necessary information, and add the account to the app. You will see the account name displayed within the app, along with a six-digit verification code that updates every 30 seconds.
If you have multiple accounts to add, repeat steps 2 to 4 for each account. The Google Authenticator app can accommodate multiple accounts concurrently, providing you with secure access to each.
With these steps completed, you now have a QR code for Google Authenticator and your accounts securely added to the app. Remember to store your backup codes for each account in a secure location in case of a device loss or app reset. These backup codes will allow you to regain access to your accounts without relying on the Google Authenticator app.
By following this step-by-step guide, you have successfully obtained a QR code for Google Authenticator and enhanced the security of your online accounts. Enjoy the peace of mind that comes with knowing that your accounts are better protected from unauthorized access.
Step 1: Install and Set Up Google Authenticator
The first step in obtaining a QR code for Google Authenticator is to install the app and complete the initial setup. Follow the instructions below to get started:
- Install the App
- Set Up Google Authenticator
- Create a Password
- Backup Codes (Optional)
- App Interface Overview
Go to the App Store (for iOS devices) or Google Play Store (for Android devices) and search for “Google Authenticator.” Tap on the app, and then select “Install” or “Get” to download and install it onto your device. Once the installation is complete, locate the Google Authenticator app on your home screen and open it.
When you open the Google Authenticator app for the first time, you will be prompted to set it up. Follow the on-screen instructions to configure the app. You may be asked to grant permissions, such as access to your camera for scanning QR codes.
During the setup process, you will have the option to create a password for the Google Authenticator app. It is highly recommended to set a strong password to protect the app itself. Alternatively, if your device supports biometric authentication (such as fingerprint or face recognition), you can choose to enable that instead of a password for added convenience.
As part of the setup process, you may be given the option to generate backup codes. Backup codes are unique one-time-use codes that can be used to access your accounts in case you lose access to your device or need to reset the Google Authenticator app. It is essential to securely store these backup codes in a safe place, preferably offline, to ensure you can regain access to your accounts if needed.
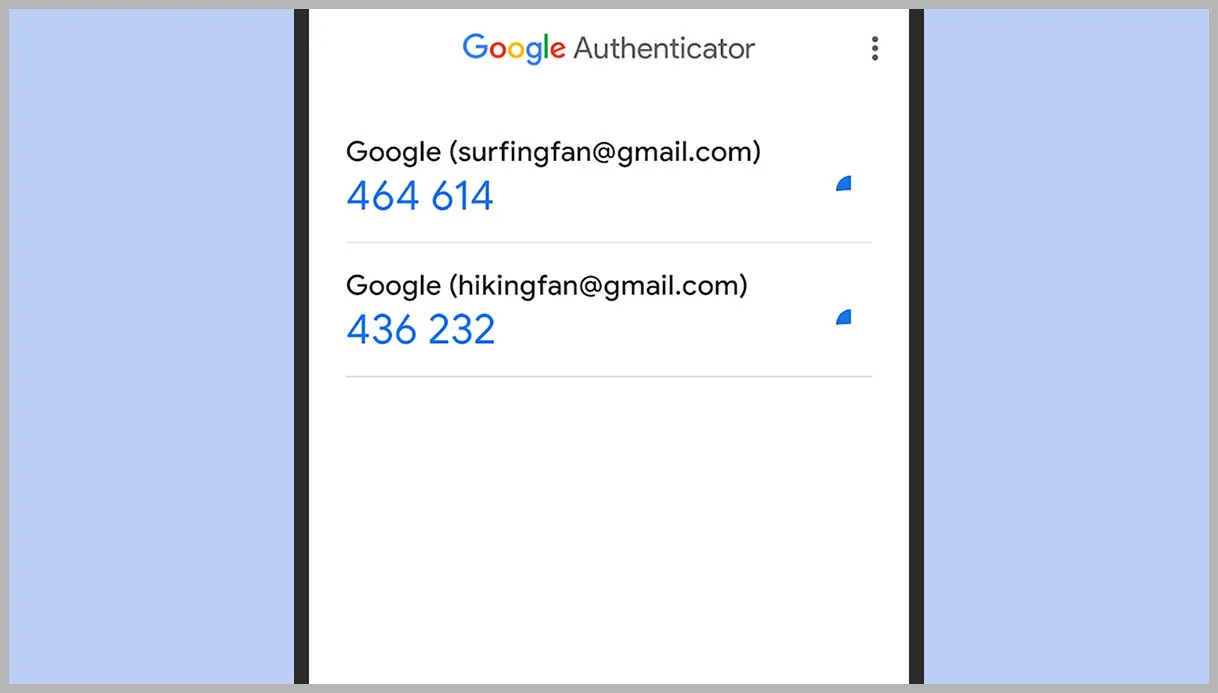
Once the initial setup is complete, you will be greeted with the main interface of the Google Authenticator app. The app typically consists of a list of your added accounts, each displaying the account name and a constantly changing six-digit verification code. Take a moment to familiarize yourself with the app’s interface and the location of important features, such as the “+” symbol to add new accounts or the settings menu for app preferences.
By following these steps, you have successfully installed and set up Google Authenticator on your device. You are now ready to proceed to the next steps in the process of obtaining a QR code for Google Authenticator.
Step 2: Add an Account
After installing and setting up the Google Authenticator app, the next step is to add an account to the app. Follow the instructions below to add your first account:
- Open the Google Authenticator App
- Tap on the “+” Symbol
- Select the Account Type
- Enter Account Details
- Save the Account
Locate the Google Authenticator app on your device and open it. You will be presented with the main interface that displays any previously added accounts.
To add a new account, tap on the “+” symbol usually located in the top-right corner of the app’s interface. This will initiate the process of adding a new account to the Google Authenticator app.
Choose the type of account you want to add from the available options. You may see popular platforms such as Google, Facebook, Amazon, or “Other” if the service is not listed. Select the appropriate account type for the account you want to add.
Depending on the selected account type, you will need to provide the necessary account details, such as the account name and the secret key. The account name is typically a identifiable label for you to recognize the account within the app. The secret key is a unique code provided by the service or website you are adding to Google Authenticator.
After entering the account details, tap on the “Save” or “Add Account” button to save the account. The Google Authenticator app will validate the account details and add it to the list of accounts. You will now see the account name and a changing six-digit verification code associated with it.
You have successfully added your first account to the Google Authenticator app. Repeat the above steps to add more accounts, ensuring that each account has its unique entry within the app. The Google Authenticator app can securely store and generate verification codes for multiple accounts simultaneously, giving you added security and convenience for each of your accounts.
With one or more accounts added to Google Authenticator, you are now ready to proceed to the next step in the process of obtaining a QR code for Google Authenticator.
Step 3: Retrieve QR Code
Once you have added an account to the Google Authenticator app, the next step is to retrieve the QR code that links your account with the app. Follow the steps below to retrieve the QR code:
- Open the Google Authenticator App
- Select the Account
- Choose “Scan a QR code”
- Ready to Scan
- Position the QR Code
- Scan the QR Code
Locate the Google Authenticator app on your device and open it. You will see the main interface displaying the list of accounts you have added.
Tap on the account for which you want to retrieve the QR code. This will bring up the account’s details, including the constantly changing six-digit verification code.
Within the account details, look for the option to scan a QR code. It is usually presented as a button or a link with a description like “Scan a QR code” or “Scan a barcode.” Tap on this option to proceed.
The Google Authenticator app will request access to your device’s camera. Grant the necessary permission, as this will allow the app to scan the QR code.
On the website or service provider’s screen where the QR code is displayed, position your device’s camera so that it can clearly see the QR code. Ensure that the QR code is centered and well-lit for optimal scanning.
Hold your device steady and allow the Google Authenticator app to scan the QR code automatically. It will extract the necessary information from the code, such as the account name and secret key, and link it to the app.
Once the QR code is successfully scanned, you will see the account name displayed within the Google Authenticator app. The app will then begin generating the time-based one-time passwords (TOTP) for that specific account, providing an additional layer of security when logging in.
Congratulations! You have now retrieved the QR code and successfully linked your account to the Google Authenticator app. Repeat these steps for any other accounts you want to add using QR codes. With all your accounts securely added, you can enjoy the peace of mind that comes with enhanced security and protection against unauthorized access.
Now that you have retrieved the QR code, let’s move on to the final step in obtaining a QR code for Google Authenticator.
Step 4: Scanning the QR Code
After retrieving the QR code for your account, the next step is to scan the QR code using the Google Authenticator app. Follow the instructions below:
- Visit the Account Settings
- Select “Scan QR Code”
- Display the QR Code
- Open the Google Authenticator App
- Tap on the “+” Symbol
- Scan the QR Code
- Verify the Account Details
- Complete the Setup
Go to the website or service provider where you want to enable two-factor authentication (2FA) using the Google Authenticator app. Access the account settings or security settings section of the platform. Look for the option to enable 2FA or set up authentication.
Within the account settings, select the option to scan a QR code. This may be labeled as “Scan QR code,” “Scan barcode,” or something similar. By choosing this option, you indicate that you want to use the Google Authenticator app for two-factor authentication.
A QR code should now be displayed on the website or within the service provider’s settings. Make sure the QR code is visible on your screen as you will need to scan it using the Google Authenticator app.
Open the Google Authenticator app on your device. Ensure that you are on the main interface, which displays the list of added accounts.
To add a new account via QR code, tap the “+” symbol located in the top-right corner of the app’s interface. This will initiate the process of adding a new account to the Google Authenticator app.
Allow the Google Authenticator app to access your device’s camera by granting the necessary permission. Point your device’s camera at the QR code displayed on the website or service provider’s screen. The app will automatically scan the QR code.
After successfully scanning the QR code, the Google Authenticator app will display the account name associated with the QR code. Take a moment to verify that the account details shown on the app match the account you are setting up 2FA for.
Once you have verified the account details, the Google Authenticator app will generate a unique six-digit verification code for the account. This code changes every 30 seconds and is used to verify your identity during the login process.
Repeat these steps for any additional accounts you want to add via QR code. By scanning the QR code, you have securely linked your account to the Google Authenticator app, enabling two-factor authentication for enhanced account security.
Congratulations! You have successfully scanned the QR code and set up two-factor authentication for your account using Google Authenticator. Enjoy the added layer of security that this brings to your online accounts.
Now that you have completed all the steps, you can rely on the Google Authenticator app to generate the time-based one-time passwords (TOTP) needed to access your accounts. Feel free to explore the app’s features and adjust any settings according to your preferences.
Conclusion
In conclusion, obtaining a QR code for Google Authenticator is a crucial step in securing your online accounts with two-factor authentication (2FA). The QR code serves as a convenient and efficient method to link your accounts to the Google Authenticator app, providing an additional layer of security to protect your sensitive information from unauthorized access.
Google Authenticator is a reliable and widely used app that generates time-based one-time passwords (TOTP) for 2FA. By requiring users to enter a unique verification code in addition to their password, it significantly reduces the risk of account compromise even if the password is somehow obtained by malicious actors.
Throughout this step-by-step guide, we discussed the importance of Google Authenticator and the need for a QR code to streamline the setup process. We explored how to install and set up the app, add accounts, retrieve the QR code, and scan it to link accounts to Google Authenticator.
By following these steps, you have successfully obtained QR codes and securely added your accounts to the Google Authenticator app. You can now enjoy the added peace of mind and increased security that comes with using two-factor authentication.
Remember to store your backup codes securely in case of device loss or app reset. These backup codes will enable you to regain access to your accounts in such situations without relying on the Google Authenticator app.
Keep in mind that while using Google Authenticator provides an added layer of security, it is important to follow other best practices for online safety, such as using strong and unique passwords, being cautious of phishing attempts, and regularly updating your devices and apps.
With your accounts linked to Google Authenticator, you can confidently access your online services and platforms, knowing that your information is better protected against unauthorized access. Stay vigilant, stay secure, and enjoy the peace of mind that comes with enhanced account security.