Introduction
When it comes to communicating with friends, family, or colleagues, iMessage is a popular choice for iPhone users. This messaging app allows you to send text messages, photos, videos, and even share your location, all conveniently within the Messages app on your iPhone. But what if you want to share a particular iMessage with someone else? That’s where the forwarding feature comes in handy!
In this article, we’ll guide you through the step-by-step process of forwarding an iMessage to another person. Whether you want to share a funny conversation, an important piece of information, or simply keep others in the loop, forwarding an iMessage is a quick and efficient way to do so.
Forwarding an iMessage not only allows you to share the message content with others but also ensures that the original sender’s details are preserved, giving credit where it’s due. So, whether you’re new to using iMessage or just unfamiliar with the forwarding feature, let’s dive in and learn how to forward an iMessage in a few simple steps.
Step 1: Opening the iMessage App
The first step in forwarding an iMessage is to open the iMessage app on your iPhone. Simply locate the green speech bubble icon with a white lightning bolt inside, usually found on your home screen or in your app drawer.
Once you tap on the iMessage app icon, it will open, and you’ll be ready to proceed to the next step.
If you have notifications enabled, you might see a badge with a number indicating the number of unread messages you have. Tap on the app icon to view the messages in your inbox.
Upon opening the iMessage app, you’ll be presented with your conversations in a threaded format, with the most recent messages at the top. Locate the conversation containing the iMessage you want to forward and tap on it to open the conversation.
Note that iMessage conversations are often labeled with the contact’s name or phone number, making it easy for you to quickly identify the desired conversation. If you have a lot of conversations, you can also use the search bar at the top to quickly find the conversation you’re looking for.
Step 2: Selecting the iMessage to Forward
Once you have opened the desired conversation in the iMessage app, it’s time to select the specific iMessage that you want to forward to someone else. Scroll through the conversation to locate the message you want to share.
iMessages can contain various types of content, such as text, photos, videos, links, and more. Identify the specific message within the conversation that you wish to forward.
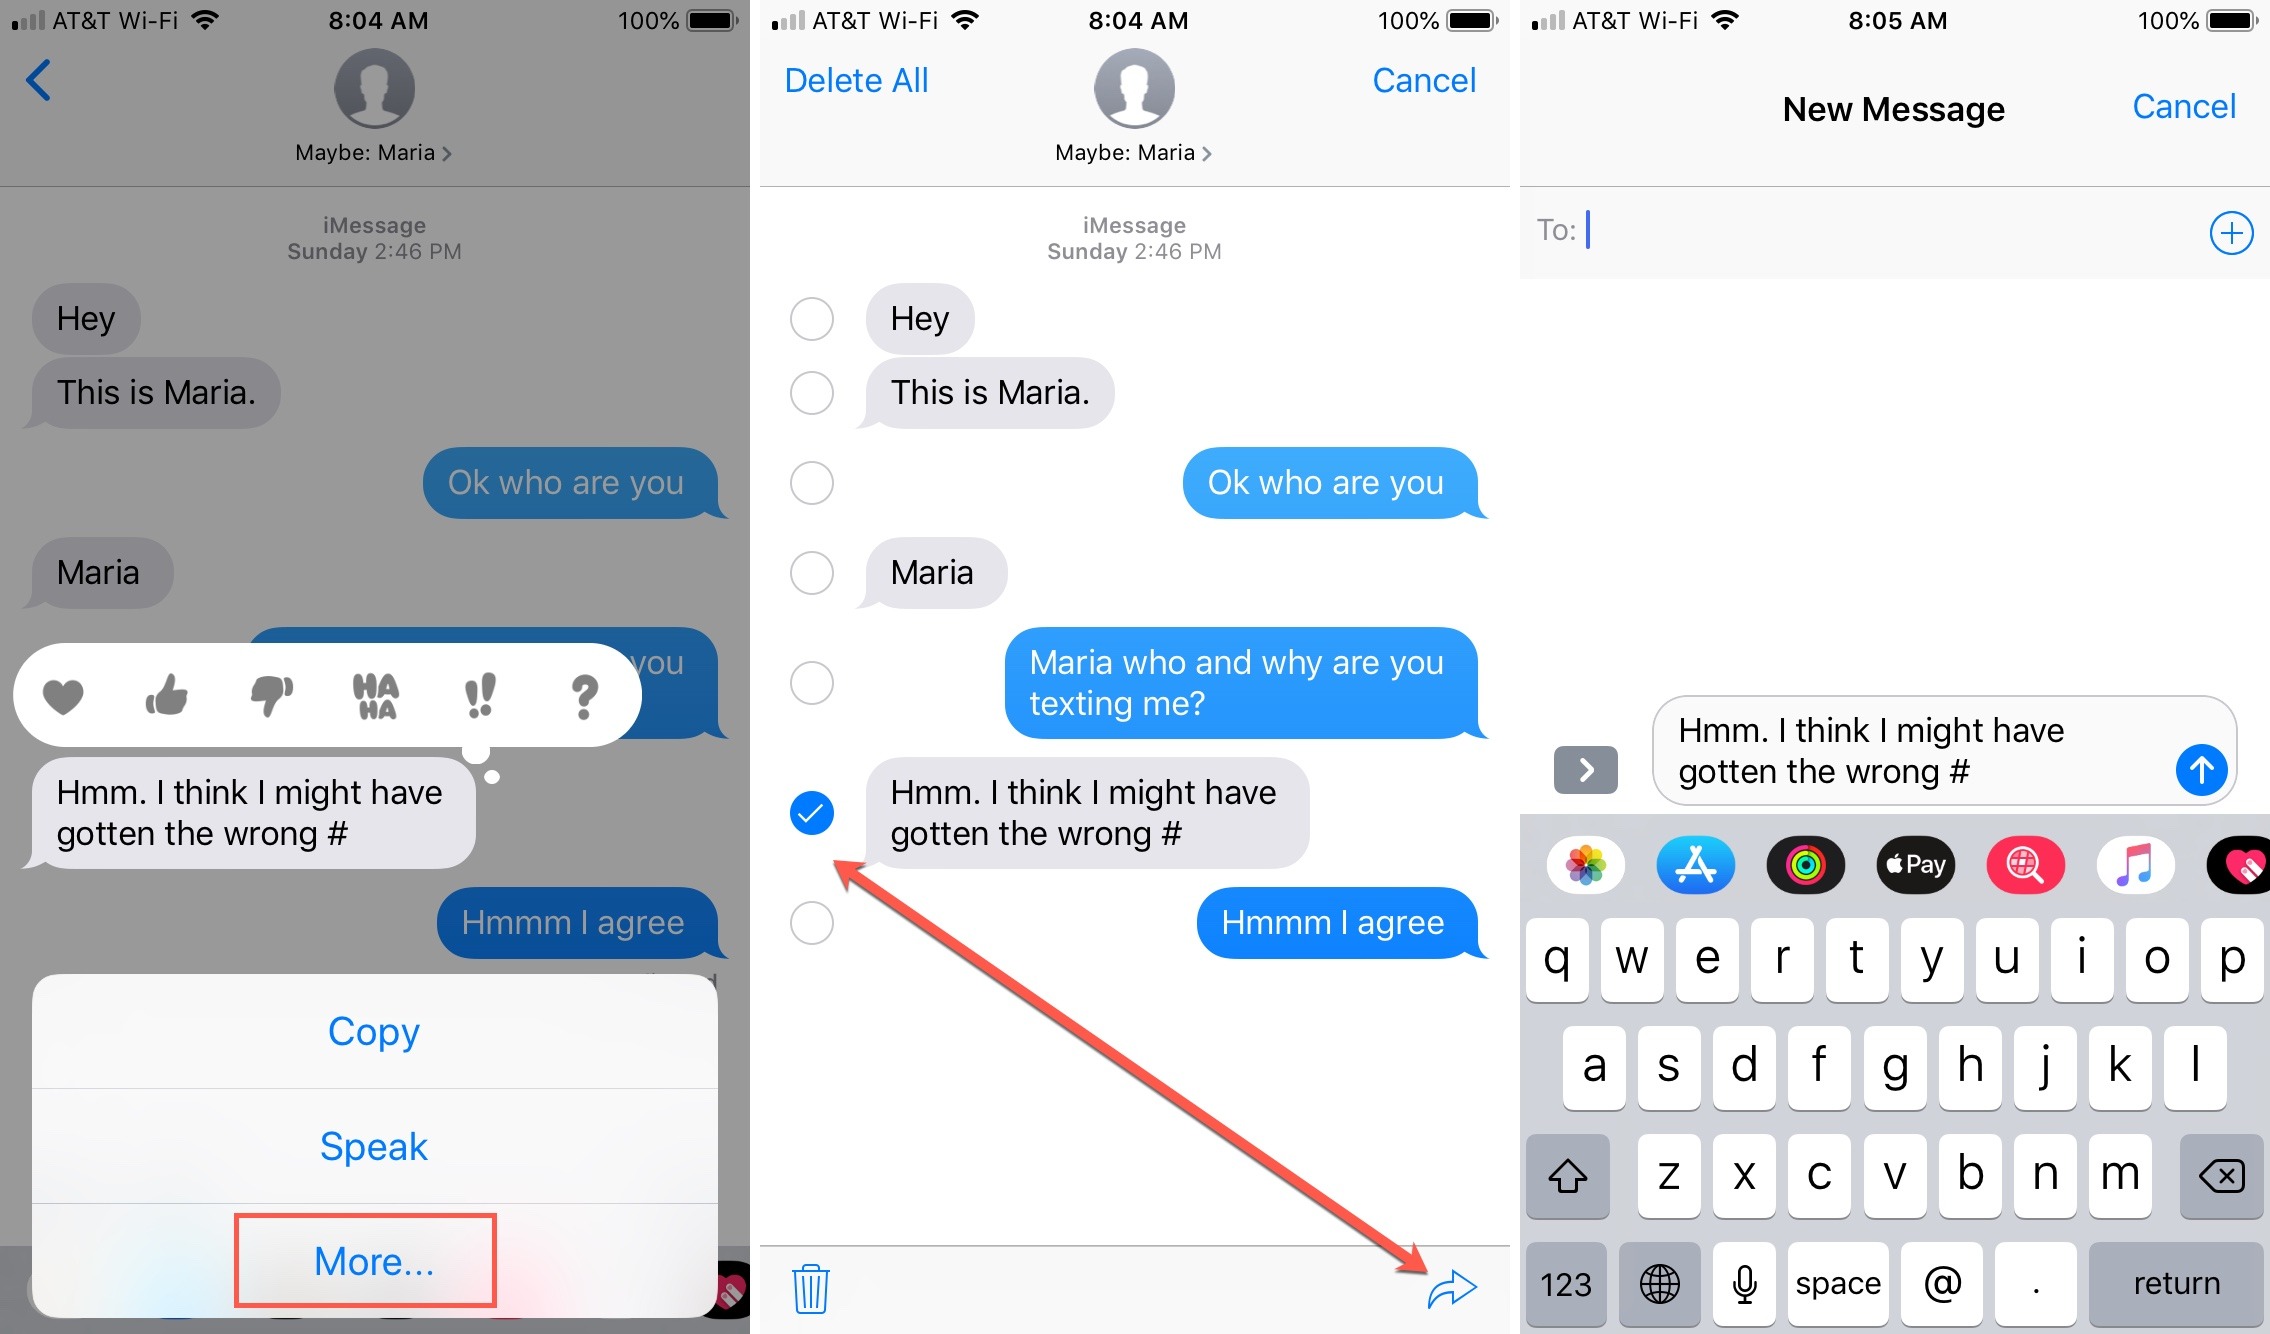
To select the message, tap and hold on it until a menu appears. You may see options like “Copy” and “More…” Select the “More…” option to continue.
The “More…” option allows you to perform additional actions on the selected message, including forwarding it. By choosing this option, you’ll be able to access the message options and prepare it for forwarding.
Alternatively, some iPhones have a quick reply feature that allows you to reply to a message directly from the lock screen or notification banner. If you’re viewing a message outside of the iMessage app, you can swipe left on the notification or lock screen and tap the “View” button to open the iMessage app and proceed to the next step.
Step 3: Accessing the Message Options
After selecting the iMessage you want to forward, a menu will appear with several options. Tap on the “More…” option to access the message options.
The message options screen allows you to perform various actions on the selected message, including forwarding it. You will also find options to copy the message, delete it, or even react with different emojis.
On this screen, you’ll see a list of checkboxes next to each message in the conversation. The selected message will already have a checkmark next to it. If you want to forward multiple messages, you can tap on the checkboxes next to those messages as well.
Take a moment to review the selected message and ensure it’s the one you want to forward. If you need to make any changes, you can tap on the checkboxes to select or deselect additional messages.
Before moving on to the next step, double-check that you have selected the correct message, as the forwarding process cannot be undone. Once you’re satisfied, proceed to the next step to choose the forwarding option.
Step 4: Choosing the Forward Option
With the desired message selected and the message options screen open, it’s time to choose the forwarding option. Look for the arrow icon, usually located at the bottom left or right corner of the screen, and tap on it.
Tapping on the arrow icon will bring up a menu where you can select the forwarding option. The menu may include options like “Forward” or “Share.” Tap on the appropriate option to proceed with forwarding the message.
After selecting the forward option, you may be taken to a new screen where you can enter the recipient of the forwarded iMessage. Alternatively, some iPhones display a list of your recent contacts or frequently contacted individuals for easier forwarding.
If you have a specific recipient in mind, you can start typing their name or phone number in the search bar provided. As you type, a list of suggested contacts will appear. Tap on the desired recipient to select them as the recipient of the forwarded iMessage.
If you prefer to forward the message to multiple recipients, you can repeat this step to add additional recipients. Simply tap on the search bar and enter the names or phone numbers of the recipients you want to include.
Once you have selected the recipient(s), you can proceed to the next step to send the forwarded iMessage and share the selected message with others.
Step 5: Entering the Recipient of the Forwarded iMessage
After selecting the forwarding option and choosing to forward the message, you will be prompted to enter the recipient of the forwarded iMessage. This step allows you to specify who you want to share the selected message with.
On the screen where you are prompted to enter the recipient, you will see a search bar or a contact selector. If you have a specific recipient in mind, type their name or phone number in the search bar.
As you type, the iPhone will suggest contacts that match your search criteria. You can tap on the desired recipient to select them as the recipient of the forwarded iMessage. If you want to forward the message to multiple recipients, simply repeat this step to add additional contacts.
If your iPhone shows a contact selector instead of a search bar, you can scroll through your contact list or use the search bar within the contact selector to find the desired recipient(s).
Keep in mind that you can forward the iMessage to both iPhone users and users of other messaging platforms, as long as you have their phone number or email address. The iMessage app will automatically send the message using the appropriate method based on the recipient’s device and contact information.
Once you have entered the recipient(s) of the forwarded iMessage, review your selection to ensure you have chosen the correct contact(s). Then, proceed to the final step to send the forwarded iMessage and share the selected message with the specified recipient(s).
Step 6: Finally, Sending the Forwarded iMessage
After entering the recipient(s) of the forwarded iMessage, you’re ready to send the message and share the selected message with the specified contact(s). Take a moment to review the recipients and ensure they are correct before proceeding.
To send the forwarded iMessage, simply tap on the “Send” button, typically represented by a paper airplane icon. This will initiate the sending process, and the iMessage app will take care of delivering the message to the designated recipient(s).
Once the forwarded iMessage has been sent, you may see a confirmation message or a brief message indicating that the message has been sent successfully. Depending on your device settings, you may also receive a notification that the recipient(s) have received and viewed the forwarded message.
It’s worth noting that forwarding an iMessage does not remove it from your conversation history. The original message will still be visible in the conversation, with an indication that it has been forwarded. This allows you to keep track of the messages you have shared with others.
Now that you’ve successfully sent the forwarded iMessage, you can feel confident knowing that the desired message has been shared with the intended recipient(s). Whether you’re sharing an important piece of information, a memorable conversation, or simply passing along a funny message, the forwarding feature in iMessage makes it quick and easy to share content with others.
Remember, the next time you come across a message that you want to share, simply follow these steps to forward it in a few simple taps. Happy forwarding!
Conclusion
Forwarding an iMessage is a valuable feature that allows you to easily share a specific message with others. Whether you want to pass along important information, share a funny conversation, or keep others in the loop, forwarding an iMessage is a quick and efficient way to do so.
In this article, we covered the step-by-step process of forwarding an iMessage on your iPhone. We started by opening the iMessage app and selecting the specific iMessage you want to forward. Then, we accessed the message options and chose the forward option.
Next, we entered the recipient of the forwarded iMessage, either by searching for their name or selecting them from the contacts list. Finally, we sent the forwarded iMessage by tapping the send button.
By following these simple steps, you can easily share any iMessage with others, ensuring that the original sender’s details are preserved. Whether you’re sharing information with colleagues, keeping family and friends updated, or simply passing along a funny conversation, forwarding an iMessage allows you to communicate effectively and effortlessly.
So, the next time you come across a message that you want to share, remember these steps and use the forwarding feature in the iMessage app on your iPhone. Enjoy sharing and communicating with ease!