Introduction
Welcome to this guide on how to format an SD card on a Mac. SD cards are versatile storage devices commonly used in digital cameras, smartphones, and other portable devices. Over time, these cards can become fragmented or cluttered with unnecessary files, leading to decreased performance and storage capacity. Formatting the SD card helps optimize its performance and ensures that it works smoothly with your Mac.
Before we dive into the steps of formatting an SD card on a Mac, it’s essential to note that formatting erases all data on the card. Therefore, it is crucial to back up any important files or data stored on the SD card to prevent permanent loss.
In this guide, we will walk you through the steps required to format your SD card on a Mac, ensuring that the process is seamless and hassle-free. Whether you need to format an SD card for additional storage space or to resolve any issues it may be experiencing, this guide will provide you with all the information you need.
Throughout the steps, we will provide clear instructions and tips to help you successfully format your SD card without any complications. So let’s get started and learn how to format your SD card on a Mac!
Step 1: Check the Compatibility of Your SD Card with Mac
Before formatting your SD card on a Mac, it’s important to ensure that the card is compatible with your Mac system. Most modern Mac computers have built-in SD card slots, while others may require the use of an external card reader.
To check the compatibility, follow these steps:
- Insert the SD card into the SD card slot or connect the card reader to your Mac.
- Open Finder, which is the default file management application on the Mac.
- Check the sidebar on the left-hand side of the Finder window. Look for the “Devices” section and locate your SD card. It should appear as a removable storage device with its name displayed.
- If you can see the SD card listed in the sidebar, this indicates that your Mac recognizes the card and it is compatible. If not, try removing and reinserting the card or try using a different card reader.
It’s worth mentioning that some older Mac models may require the use of an SD card adapter to connect the card to the computer. These adapters can be purchased separately and usually connect to the Mac through a USB or Thunderbolt port.
Once you have confirmed the compatibility of your SD card with your Mac, you can proceed with the formatting process. In the next steps, we will guide you through the necessary steps to format your SD card and optimize its performance on your Mac.
Step 2: Backup Your Data from the SD Card
Before formatting your SD card, it is crucial to create a backup of any important data or files stored on it. Formatting erases all the data on the card, so performing a backup ensures that you don’t lose any valuable information.
Here’s how you can back up your data from the SD card:
- Connect the SD card to your Mac through the card slot or an external card reader.
- Open Finder and locate the SD card in the sidebar under the “Devices” section.
- Double-click on the SD card to access its contents.
- Review the files and folders on the SD card and select the ones you want to back up.
- To back up the selected files, you can either drag and drop them to a different location on your Mac or copy and paste them to another folder.
- Ensure that the backup process is complete and verify that you have successfully copied all the necessary files.
It is a good practice to organize your backup files in a separate folder to easily locate them later. You can create a new folder on your Mac and name it accordingly to keep track of the backed-up data.
Once you have successfully backed up your data, you can proceed with the SD card formatting process without worrying about losing any important files.
Now that you have backed up your data, it’s time to move on to the next step: inserting the SD card into your Mac. Continue reading to learn how to do this.
Step 3: Insert the SD Card into Your Mac
Now that you have backed up your data from the SD card, it’s time to insert the card into your Mac. The process may vary slightly depending on the model and configuration of your Mac. Here are the general steps to follow:
- Locate the SD card slot on your Mac. Most newer Mac models have a built-in SD card slot on the side or back of the computer. If your Mac doesn’t have a built-in slot, you’ll need to use an external card reader connected to a USB or Thunderbolt port.
- For Macs with a built-in SD card slot, gently push the SD card into the slot until it clicks into place. Make sure not to force the card as it should slide in smoothly.
- If you’re using an external card reader, connect it to an available USB or Thunderbolt port on your Mac. Then, insert the SD card into the card reader slot.
Once the SD card is inserted into your Mac or card reader, it should be recognized by your system. You can now move on to the next step to locate and access the SD card on your Mac.
Please note that SD cards are small and can be easily misplaced or damaged. Handle them with care and avoid touching the metal contacts on the card to prevent static or physical damage.
Now that you have successfully inserted the SD card into your Mac, it’s time to proceed to the next step and locate the SD card in Finder. Continue reading to learn how to do this.
Step 4: Locate the SD Card in Finder
After inserting the SD card into your Mac, the next step is to locate the card in Finder. Finder is the default file management application on macOS, and it allows you to navigate and access files and folders on your Mac, including external storage devices like the SD card.
To locate the SD card in Finder, follow these steps:
- Open Finder by clicking on its icon in the Dock or by selecting it from the Go menu in the top menu bar.
- In the Finder window, you will see a sidebar on the left-hand side. Look for the “Devices” section, where your SD card should be listed. It will be displayed with its name or label, such as “Untitled” or the name you gave it previously.
- If you don’t see the “Devices” section in the sidebar, go to the Finder menu, select Preferences, click on the Sidebar tab, and make sure the “External disks” option is checked.
- Once you have located the SD card in the sidebar, you can click on it to access its contents. The SD card will open in a new Finder window, showing all the files and folders stored on it.
It’s worth noting that the SD card may have a different icon than regular folders or files in Finder, typically resembling a removable storage device icon. This helps distinguish it from other disks or storage locations on your Mac.
Now that you have located the SD card in Finder, you are ready to proceed with the next step: erasing the SD card. We will guide you through this process in the following step, so continue reading to learn how to do it.
Step 5: Erase the SD Card
Once you have located the SD card in Finder, the next step is to erase it. The erase process will delete all the data on the SD card, so make sure you have backed up any important files before proceeding.
To erase the SD card, follow these steps:
- In the Finder window displaying the contents of the SD card, go to the top menu bar and click on the “File” menu.
- From the dropdown menu, select “Get Info” or press the Command (⌘) and “I” keys together. This will open the Info window for the SD card.
- In the Info window, navigate to the “General” section and locate the “Format” option.
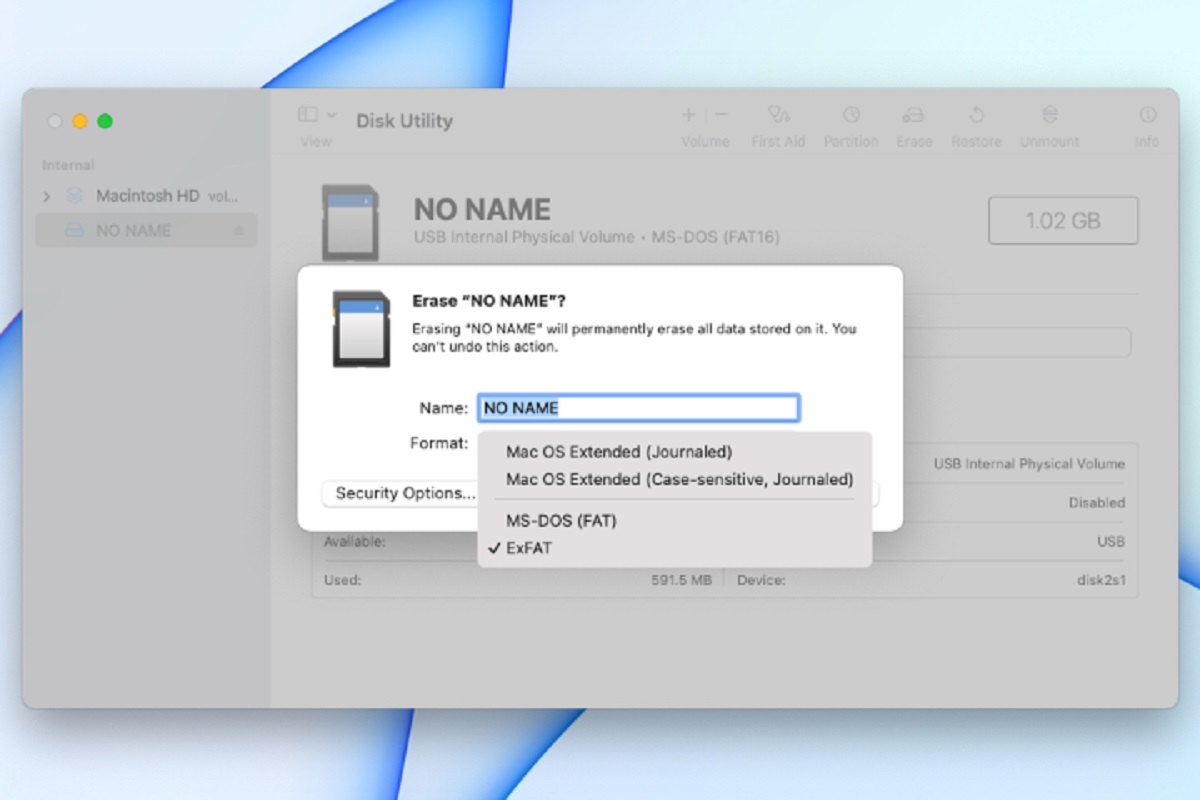
- Click on the format dropdown menu and choose the desired format for the SD card. The available options include:
- MS-DOS (FAT): This format is compatible with both Mac and Windows systems, making it ideal for cross-platform use.
- ExFAT: This format is also compatible with both Mac and Windows systems and supports larger file sizes compared to MS-DOS (FAT).
- Mac OS Extended (Journaled): This format is designed specifically for macOS and offers the best performance and compatibility on Mac computers.
- After selecting the format, click on the “Erase” button to initiate the erase process. A confirmation dialog box will appear, reminding you that this action will permanently erase all data on the SD card.
- Review the information and click on “Erase” again to confirm the erase operation.
The erasing process may take a few moments, depending on the size of the SD card and the chosen format. Once the process is complete, the SD card will be formatted and ready to use with the selected format.
It is important to note that once the SD card is erased, the data cannot be recovered. Therefore, double-check that you have backed up any necessary files before proceeding with the erase operation.
Now that you have successfully erased the SD card, you can proceed to the next step: choosing the file system format. Continue reading to learn how to do this.
Step 6: Choose the File System Format
After erasing the SD card, the next step is to choose the file system format. The file system determines how the data is organized and stored on the SD card. Different file system formats offer varying levels of compatibility and performance on different operating systems.
To choose the file system format for your SD card, follow these steps:
- Once the SD card is erased, go back to the Info window by clicking on the “File” menu in the Finder window and selecting “Get Info” or by pressing the Command (⌘) and “I” keys together.
- In the Info window, navigate to the “General” section and ensure that the format dropdown menu is still visible.
- Click on the format dropdown menu and choose the desired file system format for the SD card. The options may include:
- MS-DOS (FAT): This format is compatible with both Mac and Windows systems, making it ideal for cross-platform use. It has a file size limit of 4GB.
- ExFAT: This format is also compatible with both Mac and Windows systems and supports larger file sizes compared to MS-DOS (FAT). It is suitable for storing large files, such as videos or backups.
- Mac OS Extended (Journaled): This format is designed specifically for macOS and offers the best performance and compatibility on Mac computers. It is recommended for Mac-only usage.
- Once you have selected the desired format, you can close the Info window.
Choosing the appropriate file system format depends on your specific needs and the compatibility requirements of the devices you plan to use the SD card with. If you intend to use the SD card across multiple platforms, selecting a compatible format like MS-DOS (FAT) or ExFAT is recommended.
Now that you have chosen the file system format, you can optionally proceed to the next step: renaming the SD card. Continue reading to learn how to do this.
Step 7: Rename the SD Card (Optional)
Renaming the SD card is an optional step but can be helpful if you want to give it a more descriptive or recognizable name. By renaming the SD card, you can easily identify it when it is connected to your Mac or other devices.
To rename the SD card, follow these steps:
- Locate the SD card in the Finder window or sidebar.
- Click once on the SD card to select it.
- Press the “Return” key on your keyboard or right-click on the SD card and select “Rename” from the context menu.
- Enter the desired name for the SD card and press “Return” to save the new name.
It is important to choose a descriptive name that reflects the content or intended use of the SD card. This can help prevent confusion, especially if you have multiple SD cards or external storage devices.
Renaming the SD card does not affect the data on the card or its functionality. It is purely cosmetic and helps with easier identification and organization.
If you prefer to keep the default name or have already given the SD card a unique name, you can skip this step and proceed to the next one.
Now that you have the option to rename the SD card, we are almost done with the formatting process. Continue reading to learn how to safely eject the SD card in the next step.
Step 8: Eject the SD Card
Once you have completed the formatting and renaming process for your SD card, it’s important to safely eject it from your Mac before physically removing it. Ejecting the SD card ensures that all read and write operations are complete, minimizing the risk of data loss or damage to the card.
To safely eject the SD card, follow these steps:
- Ensure that no files or applications on your Mac are actively using the SD card.
- In the Finder window or sidebar, right-click on the SD card’s name.
- From the context menu that appears, select “Eject” or “Eject ‘Device Name'”.
- Wait for a few moments until you see a notification on your screen confirming that it is safe to remove the SD card.
It’s worth noting that you can also click on the eject icon next to the SD card’s name in the Finder sidebar to safely eject it.
Once you have ejected the SD card, you can physically remove it from the SD card slot or card reader. Pull it out gently and avoid using excessive force.
Properly ejecting the SD card ensures the integrity of its data and prevents any potential data corruption. It’s an essential step to follow, even if the card does not show any active read or write operations at the moment.
Congratulations! You have successfully formatted your SD card on your Mac, ensuring optimal performance and compatibility. You can now use the SD card for your specific needs, whether it’s storing photos, videos, or other files.
Keep in mind that formatting the SD card erases all the data on it, so make sure you have made a backup of any necessary files before proceeding with the formatting process.
Thank you for following this guide on how to format an SD card on a Mac. If you have any further questions or need additional assistance, feel free to refer back to this guide or seek help from the respective support forums or communities.
Conclusion
Formatting an SD card on a Mac is a straightforward process that can help optimize its performance and ensure compatibility with your system. By following the steps outlined in this guide, you have learned how to check the compatibility of your SD card, backup your data, insert the card into your Mac, locate it in Finder, erase it, choose the file system format, rename it if desired, and safely eject it.
Remember, formatting your SD card will erase all the data on it, so it is crucial to back up any important files before proceeding. Additionally, choosing the appropriate file system format depends on your specific needs and the devices you plan to use the SD card with.
By properly formatting and maintaining your SD card, you can optimize its performance and ensure that it functions smoothly with your Mac. Whether you’re using it for photography, storing documents, or any other purpose, a well-formatted SD card is essential for a seamless user experience.
We hope this guide has been helpful in assisting you with formatting your SD card on a Mac. If you have any further questions or need additional support, don’t hesitate to seek assistance from the relevant support forums or communities.
Thank you for reading, and happy formatting!