Introduction
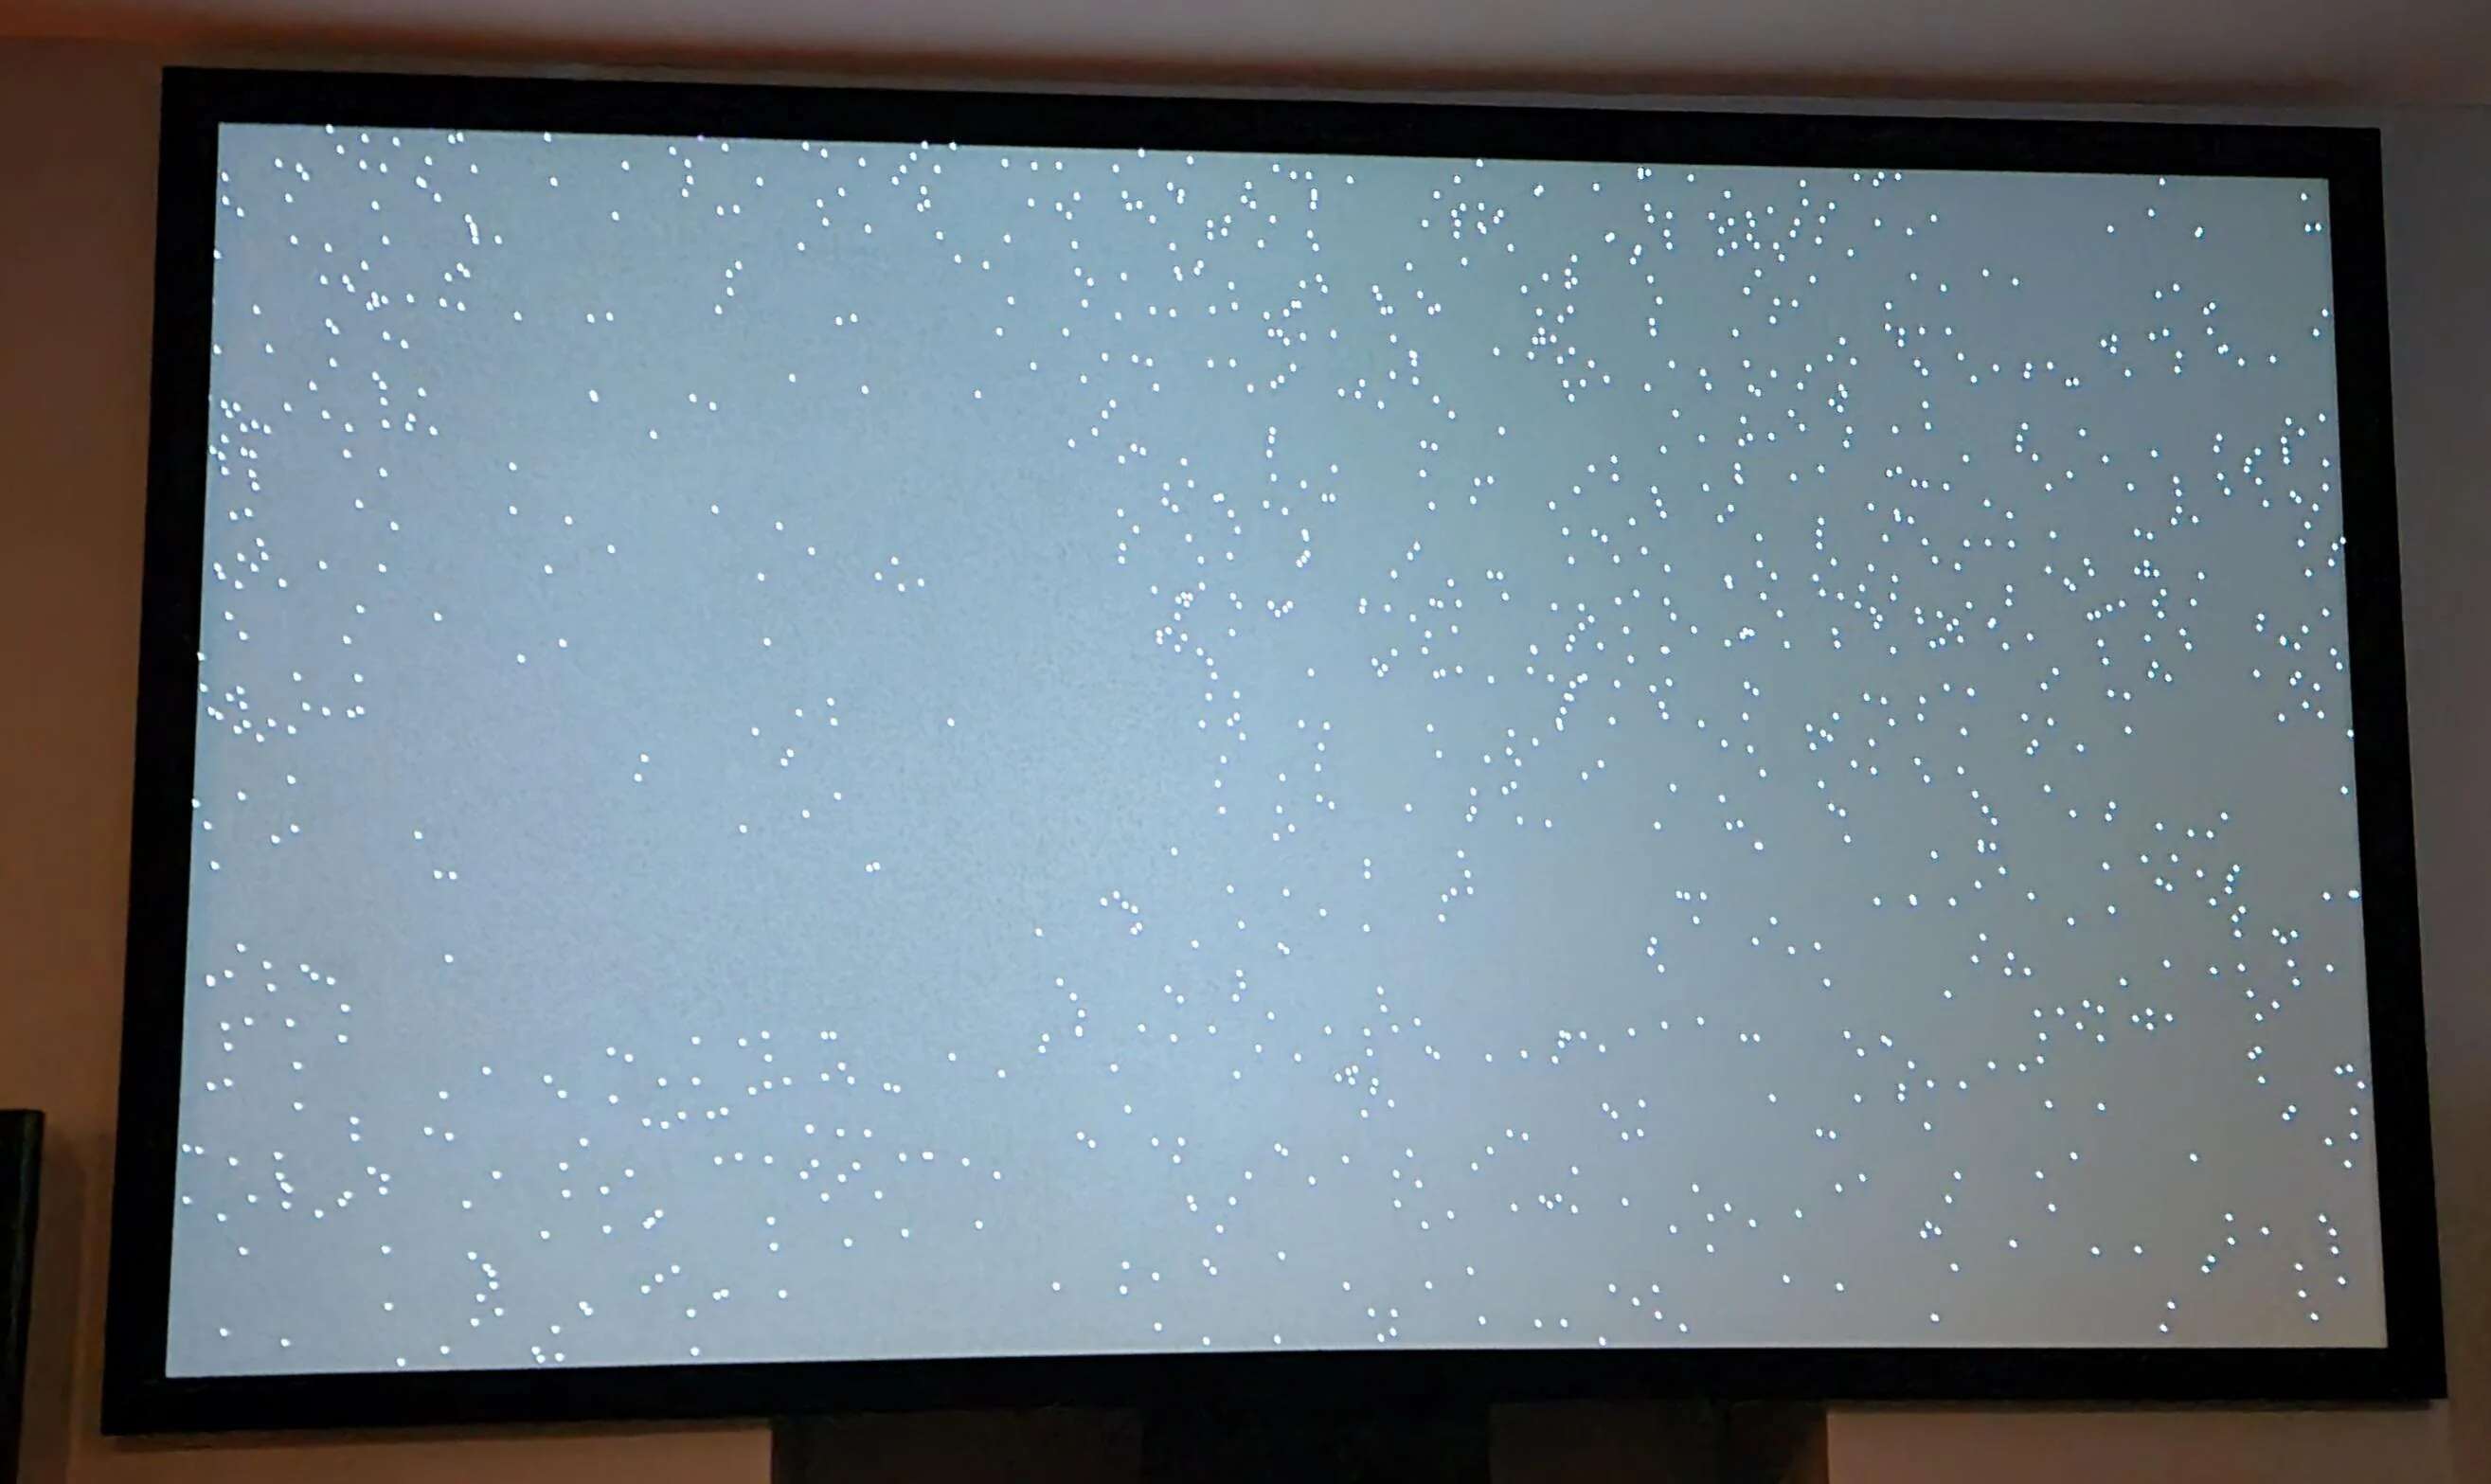
Projector screens are essential for displaying clear and vibrant images, whether it’s for a business presentation or a home theater experience. However, it can be frustrating to encounter white dots or specks on the screen during your projection. These white dots, also known as dead pixels or stuck pixels, can significantly hinder the viewing experience by distracting the audience’s attention from the content.
Understanding the root causes of white dots on a projector screen is crucial in taking the necessary steps to fix the issue. There are several reasons why these white dots may appear, ranging from dirty projector lenses to faulty projector settings. Fortunately, most of these problems can be resolved with a few simple troubleshooting techniques.
In this guide, we will explore the common causes of white dots on a projector screen and provide you with practical solutions to fix them. Whether you are a business professional or a film enthusiast, implementing these steps will help ensure a clear and seamless projection experience.
So, if you’re ready to say goodbye to those pesky white dots on your projector screen, let’s dive in and explore the effective ways to resolve this issue.
What Causes White Dots on a Projector Screen?
White dots on a projector screen can be attributed to various factors. Understanding the root causes will help you identify the specific issue and address it effectively. Here are the common reasons why white dots may appear on your projector screen:
- Dead or Stuck Pixels: Dead pixels are pixels on the projector’s image sensor that no longer function, resulting in a permanent white dot on the screen. Stuck pixels, on the other hand, are pixels that are stuck in one color mode, often displaying as a bright white dot.
- Dirty Projector Lens: Dust, fingerprints, or smudges on the projector lens can cause distorted projections and result in white dots on the screen. It is essential to keep the lens clean for optimal image quality.
- Projector Bulb Issues: A faulty or aging projector bulb can cause irregularities in the projected image, leading to white dots on the screen. These issues can range from hotspots, where the bulb is brighter in certain areas, to black dots or uneven brightness.
- Projector Settings: Incorrect or misconfigured projector settings can also contribute to the appearance of white dots on the screen. This includes settings such as brightness, contrast, gamma, or color balance, which may need adjustment to eliminate the white dots.
- Loose Connections or Cables: Poor connections between the projector, cables, and other equipment can result in signal interference and lead to white dots on the screen. It is crucial to ensure all connections are secure and properly seated.
By identifying the underlying causes of white dots on your projector screen, you can proceed to implement the appropriate solutions. In the next section, we will explore step-by-step methods to fix the white dots and restore the optimal viewing experience.
How to Fix White Dots on a Projector Screen
Dealing with white dots on a projector screen can be frustrating, but fortunately, there are several effective methods to resolve this issue. Here are five steps you can take to fix white dots on your projector screen:
- Clean the projector lens and filters: Start by gently cleaning the projector lens using a microfiber cloth or lens cleaning wipes. Ensure that there are no smudges, fingerprints, or dust particles affecting the projection quality. Additionally, check and clean any air filters to prevent dust from accumulating and causing image distortion.
- Check and replace the projector bulb: If the white dots persist, it is essential to inspect the projector bulb. Check if the bulb is nearing the end of its lifespan or if there are any visible signs of damage. If necessary, replace the bulb according to the manufacturer’s instructions.
- Adjust the projector settings: Incorrect projector settings can contribute to the appearance of white dots. Access the projector’s menu settings and make adjustments to the brightness, contrast, gamma, and color balance. Experiment with these settings until you achieve a clear, dot-free projection.
- Fix any loose connections or cables: Ensure that all cables, including HDMI, VGA, and power cables, are securely connected to the projector and the source device. Check for any damaged or frayed cables that may be causing signal interference. Reconnect or replace any faulty cables as needed.
- Reset the projector to factory settings: If all else fails, you can try resetting the projector to its factory settings. This will revert all settings back to their default configurations. Consult the projector’s manual or manufacturer’s website for instructions on how to perform a factory reset.
By following these steps, you can effectively troubleshoot and fix white dots on your projector screen. However, if the issue persists or worsens, it may be necessary to seek professional assistance or contact the projector manufacturer for further guidance.
Now that you have a clear understanding of how to fix white dots on a projector screen, let’s move on to the concluding section where we wrap up the key points discussed in this guide.
Clean the Projector Lens and Filters
One of the primary causes of white dots on a projector screen is a dirty lens or clogged filters. Dust, fingerprints, or smudges on the projector lens can distort the projected image and result in white dots or specks on the screen. Additionally, if the projector’s air filters are clogged with dust, it can hinder the airflow and lead to poor image quality.
To clean the projector lens, start by turning off the projector and allowing it to cool down. Then, using a microfiber cloth or lens cleaning wipes, gently wipe the lens in a circular motion. Be cautious not to apply excessive pressure, as this can damage the lens. Ensure that all dust particles and smudges are removed to restore optimal image quality.
In addition to the lens, it is crucial to check and clean the projector’s filters. Refer to the projector’s manual or manufacturer’s instructions to locate the filters. Remove them carefully and inspect them for any visible dust or dirt accumulation. Clean the filters by gently blowing compressed air or using a soft brush to remove the debris.
Regularly cleaning the projector lens and filters not only improves the overall image quality but also prevents the formation of white dots on the screen. Incorporate this maintenance task into your projector care routine for consistent and uninterrupted projection experiences.
If cleaning the lens and filters does not resolve the issue, proceed to the next step to identify any further underlying causes of the white dots.
Check and Replace the Projector Bulb, if Necessary
A faulty or aging projector bulb can contribute to the appearance of white dots on the screen. Over time, projector bulbs lose their brightness and may develop irregularities in the projected image, such as hotspots or black dots. It is important to regularly check the condition of the bulb and replace it when needed.
Start by turning off the projector and allowing it to cool down. Locate the bulb compartment, which is typically found on the bottom or side of the projector. Consult the projector’s manual or manufacturer’s instructions for detailed guidance on accessing the bulb.
Once you have access to the bulb, visually inspect it for any visible signs of damage, such as dark spots or cracks. These can indicate that the bulb is reaching the end of its lifespan or has experienced a failure. If there are no visible signs of damage, consider checking the bulb’s usage hours. Most projectors have a built-in lamp hour meter that displays the total operating hours of the bulb.
If the bulb has surpassed its recommended usage hours or shows signs of damage, it is advisable to replace it. Check the model number of the projector bulb and purchase a compatible replacement from a reliable source. Follow the manufacturer’s instructions for safely removing the old bulb and installing the new one.
With a fresh and properly functioning bulb, you can expect improved projection quality and a reduction in white dots on the screen. However, if replacing the bulb does not resolve the issue, continue to the next step to explore further potential solutions.
Adjust the Projector Settings
Incorrect projector settings can often be the culprit behind white dots on a projector screen. Adjusting these settings can help eliminate the white dots and improve the overall image quality. Here are some key settings to consider:
Brightness and Contrast: Start by adjusting the brightness and contrast settings of the projector. If the brightness is too high, it can cause the image to appear washed out, resulting in white dots. Conversely, if the brightness is too low, it can make the image appear dim, making white dots more noticeable. Find the ideal balance that provides a clear and vibrant image without any distracting white dots.
Gamma Settings: Gamma settings control the contrast of the projector image. Adjusting the gamma can significantly impact the appearance of white dots. Experiment with different gamma settings to find the one that best minimizes the white dots without compromising image quality.
Color Balance: Improper color balance can also contribute to the appearance of white dots. Ensure that the red, green, and blue color channels are properly balanced. Adjust the color temperature settings if available to achieve accurate and natural colors without any white dot interference.
Sharpness: Excessive sharpness levels can create artificial edges and enhance white dots in the image. Find the right balance of sharpness to maintain a clear, detailed image without emphasizing the white dots.
Access the projector’s menu settings to make these adjustments. Consult the projector’s manual or manufacturer’s website for specific instructions on accessing and navigating the settings menu.
Remember to make incremental adjustments and carefully observe the changes in image quality with each modification. It may take some trial and error to find the optimal settings that minimize or eliminate the appearance of white dots on the screen.
If adjusting the projector settings does not resolve the issue, proceed to the next step to check for any loose connections or cables.
Fix any Loose Connections or Cables
Poor connections and faulty cables can lead to signal interference and result in white dots on the projector screen. It is important to ensure that all connections are secure and properly seated to maintain a stable and clear image. Here’s what you can do:
Check the connections: Inspect all the connections between the projector, source device (such as a laptop or DVD player), and any other peripherals. This includes HDMI, VGA, and power cables. Ensure that all connections are tight and firmly plugged in. Loose or improperly connected cables can cause signal instability, leading to white dots on the screen.
Replace faulty cables: If you notice any damaged or frayed cables during the inspection, it is crucial to replace them. Faulty cables can result in poor transmission of signals, leading to intermittent white dots or other visual disturbances. Use high-quality cables that are compatible with your equipment to ensure optimal performance.
Reposition cables: In some cases, cables lying too close to power sources or other electrical equipment can cause interference. Try repositioning the cables to minimize the proximity to other cables or electronic devices. This can help reduce signal noise and potential white dot issues.
Test with different cables or devices: If you suspect that a particular cable or device is causing the white dots, try swapping it out with a different one. Testing with alternative cables or devices can help identify if the issue lies with a specific component.
Ensuring that all connections and cables are secure and of good quality will help eliminate signal disruptions that can result in white dots on the projector screen. After addressing any loose connection issues, proceed to the final step to explore resetting the projector to factory settings.
Reset the Projector to Factory Settings
If all previous steps have failed to resolve the issue of white dots on the projector screen, resetting the projector to its factory settings may help. This will restore all settings to their original default configurations. Here’s how you can proceed:
Consult the projector’s manual: Refer to the projector’s manual or manufacturer’s website for instructions on how to perform a factory reset. Different projectors may have different reset procedures, so it’s important to follow the specific guidelines provided by the manufacturer.
Access the settings menu: Turn on the projector and navigate to the settings menu. Look for an option that allows you to restore or reset the projector to its factory settings. This option may be located under a “System” or “Setup” submenu.
Confirm the reset: Once you locate the factory reset option, carefully read any on-screen prompts or warnings. Confirm your decision to perform the reset, understanding that it will erase any custom settings and configurations you may have made.
Execute the factory reset: Follow the on-screen instructions to execute the factory reset. The projector will restart and restore the original default settings. Note that this process may take a few minutes.
Performing a factory reset will eliminate any potential software or configuration issues that could be causing the white dots on the screen. However, keep in mind that this action will also reset any personalized settings you may have had. Therefore, you may need to readjust the settings to your preferred preferences after the reset.
If the factory reset fails to resolve the white dot issue, it may be necessary to seek professional assistance or contact the manufacturer for further guidance. They may be able to provide specific troubleshooting steps or recommend a service center that can help resolve the problem.
Now that you have explored all the possible steps to fix white dots on a projector screen, let’s wrap up the key points discussed in this guide.
Conclusion
Encountering white dots on a projector screen can be frustrating and significantly impact the viewing experience. However, by understanding the common causes and implementing the appropriate solutions, you can successfully eliminate these white dots and restore a clear and vibrant projection.
We explored several steps to fix white dots on a projector screen, including cleaning the projector lens and filters, checking and replacing the projector bulb, adjusting the projector settings, fixing any loose connections or cables, and resetting the projector to factory settings. Each of these steps addresses a specific potential cause of white dots and can contribute to the resolution of the issue.
It’s important to remember that troubleshooting projector issues requires patience and thoroughness. It may take some trial and error to pinpoint the specific cause and solution for the white dot problem. If the issue persists even after following these steps, it is advisable to seek professional assistance or contact the manufacturer for further guidance.
Maintaining regular maintenance, such as cleaning the lens and filters, and replacing the bulb at the recommended intervals, will help prevent the reoccurrence of white dots on your projector screen in the future. Properly handling and storing the projector can also contribute to its longevity and optimal performance.
By taking proactive measures and applying the appropriate solutions, you can enjoy a seamless and uninterrupted projection experience without the distraction of white dots on your screen. Remember to consult the projector’s manual and manufacturer’s instructions for specific guidance related to your device.
We hope that this guide has provided you with the necessary information and guidance to address white dots on your projector screen. Now, go ahead, implement the suggested steps, and enjoy your impeccable projection experience!