What is Elephant Foot in 3D Printing?
When it comes to 3D printing, achieving precise and accurate prints is a top priority. However, one common issue that can occur is known as “elephant foot.” So, what exactly is elephant foot in 3D printing?
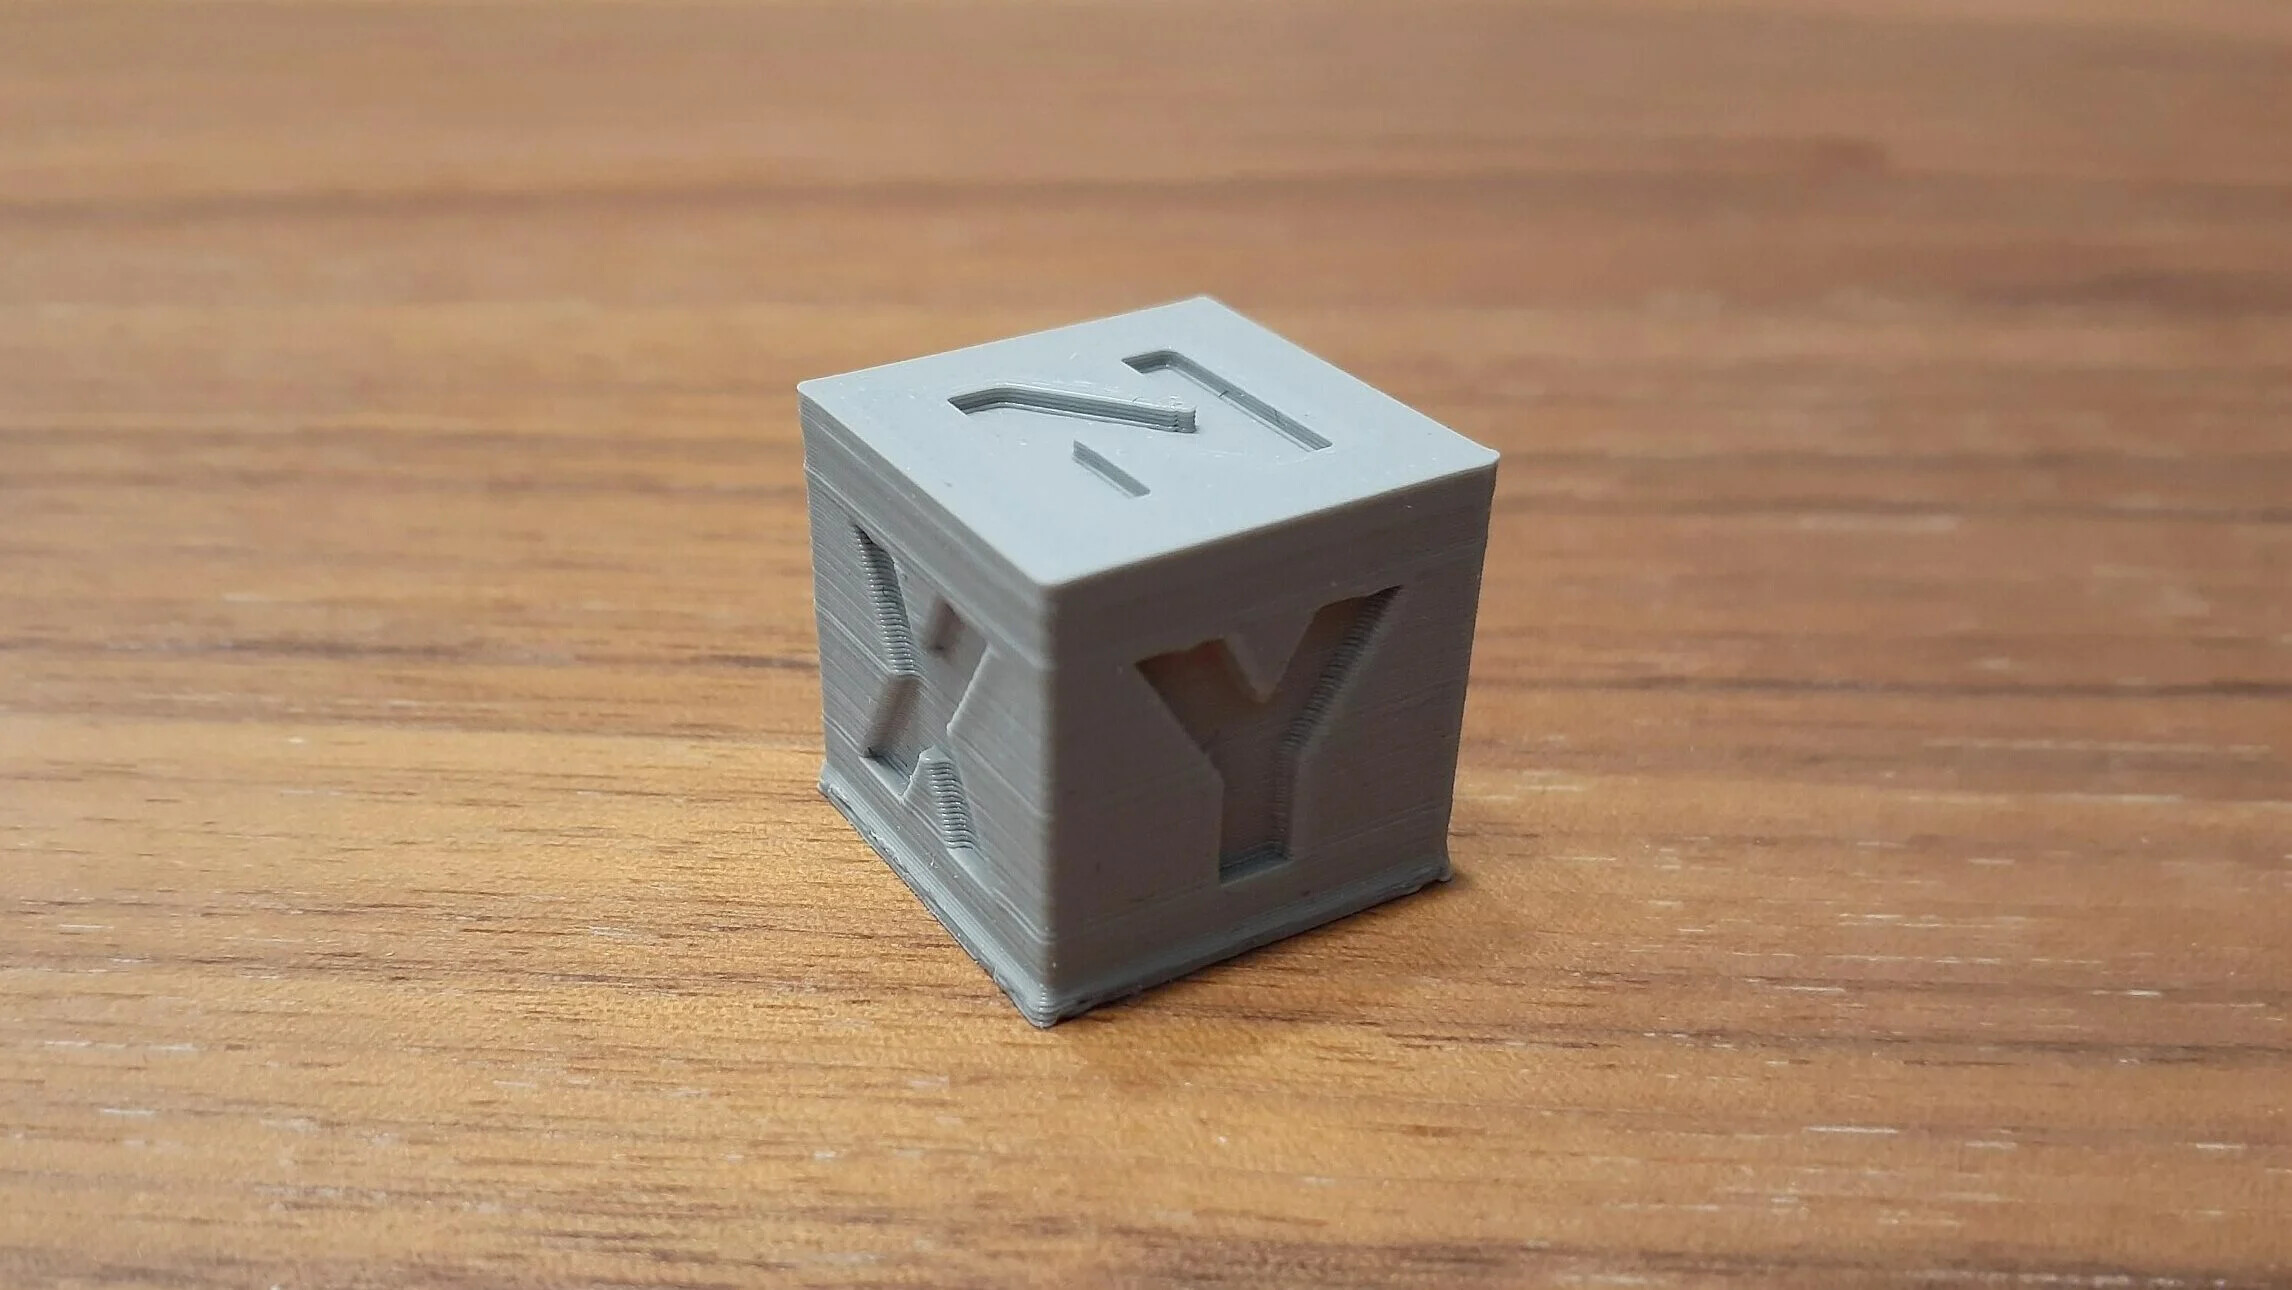
Elephant foot refers to a phenomenon where the bottom layers of a 3D print become compressed, resulting in a wider base than what was originally designed. This distortion can negatively impact the overall quality and functionality of the print.
Imagine you’re trying to print a cylindrical object with straight sides. Due to elephant foot, the base of the cylinder may end up slightly wider, resulting in a shape resembling an elephant’s foot. This can cause difficulties in fitting the printed object into other parts or assemblies, compromising the accuracy of the final product.
Elephant foot is typically more prevalent in prints made from materials like ABS or PLA, which tend to shrink and warp during the cooling process. The excessive heat and pressure at the bottom layer cause the filament to spread out, leading to the undesired effect.
Understanding elephant foot and its causes is crucial for effectively addressing and preventing this issue. In the next section, we will discuss the main causes of elephant foot in 3D printing to help you troubleshoot and fix this problem.
Causes of Elephant Foot in 3D Printing
Several factors contribute to the occurrence of elephant foot in 3D printing. By understanding these causes, you can take the necessary steps to prevent and fix this issue. Here are some common reasons why elephant foot may occur:
- Excessive heat: When the print bed or nozzle temperature is too high, it can lead to excessive heat transfer to the lower layers of the print. This causes the material to melt and spread out, resulting in a wider base.
- Improper cooling: Inadequate cooling during the printing process can contribute to the development of elephant foot. Insufficient cooling time can cause layers to fuse together, resulting in distortion and compression at the bottom of the print.
- Printing too fast: Printing at high speeds can result in increased pressure around the lower layers of the print. This pressure can cause the filament to spread out, leading to elephant foot.
- Too much filament flow: If the flow rate of filament is too high, it can contribute to the compression of lower layers. This excess material flows out and accumulates at the bottom, causing the base to widen.
- Uneven print bed: An unlevel or uneven print bed can affect the accuracy of the first few layers. Uneven pressure distribution can cause parts of the print to compress more than others, resulting in uneven elephant foot.
It’s important to note that different printers and materials may have varying sensitivities to these causes. Therefore, understanding your printer’s specifications and material properties is essential in troubleshooting and resolving elephant foot issues.
Now that we’ve explored the causes of elephant foot, let’s move on to the next section where we will discuss effective methods for preventing this issue from occurring in the first place.
How to Prevent Elephant Foot in 3D Printing
Preventing elephant foot in your 3D prints requires careful attention to various factors throughout the printing process. By implementing the following tips and techniques, you can minimize the chances of encountering this issue:
- Optimize print settings: Ensure that your print settings are properly configured. This includes setting the appropriate nozzle and bed temperatures, as well as adjusting the print speed and flow rate. Fine-tuning these settings can help maintain the integrity of each layer and reduce the likelihood of elephant foot.
- Improve cooling: Enhance the cooling capabilities of your 3D printer by installing additional fans or using an enclosure with proper ventilation. Adequate cooling helps solidify each layer, reducing the chances of compression and distortion.
- Level the print bed: Ensure that your print bed is level and properly calibrated. An uneven print bed can lead to inconsistent layer adhesion and result in elephant foot. Take the time to regularly level the bed and make necessary adjustments.
- Use support structures: When printing overhanging or complex geometries, utilize support structures. Proper supports can prevent parts of the print from sagging or compressing, minimizing the potential for elephant foot.
- Experiment with different materials: Certain materials tend to be more susceptible to elephant foot than others. Consider experimenting with different filament types or brands to find the ones that exhibit less distortion and shrinkage.
- Utilize a raft or brim: Adding a raft or brim to your print can help create a stable foundation and reduce the chances of elephant foot. These additional structures provide support and help manage heat transfer during the printing process.
Implementing these preventive measures can significantly reduce the occurrence of elephant foot in 3D printing. By taking the necessary precautions and adjusting your printing techniques, you can achieve more accurate and high-quality prints.
Next, we will delve into the tools and materials you may need to fix elephant foot issues if they arise during the printing process.
Tools and Materials Needed
If you encounter elephant foot in your 3D prints, there are several tools and materials you can use to address and fix the issue. Gathering these essential items before attempting to fix elephant foot will ensure a smoother troubleshooting process. Here is a list of the tools and materials you may need:
- 3D Printer: Of course, you’ll need a 3D printer to work on your prints. Ensure that your printer is in good condition, properly calibrated, and ready for troubleshooting.
- Heat Gun or Hair Dryer: A heat gun or hair dryer can be used to apply targeted heat to specific areas of the print. This aids in softening the plastic, allowing for adjustments to be made to fix any elephant foot issues.
- Modeling Software: To make modifications to your 3D models, you may require modeling software. This enables you to adjust the design and dimensions of your prints to eliminate or minimize the effects of elephant foot.
- Calipers or Measuring Tools: Accurate measurements are essential when troubleshooting elephant foot. Calipers or other measuring tools will help you identify the extent of the distortion and ensure that your corrections are precise.
- Sanding Tools: In some cases, sanding the affected layers can help to reduce the appearance of elephant foot. Sandpaper or sanding blocks with various grits will be useful for this purpose.
- Adhesion Promoter: An adhesion promoter can enhance the bonding between layers. Applying a thin layer of adhesion promoter, such as a specialized adhesive or adhesive spray, can help minimize distortion and improve print quality.
- Support Removal Tools: If you are using support structures, having the appropriate tools to remove them is important. These tools may include clippers, pliers, or tweezers to carefully remove the supports without damaging the print.
Having these tools and materials readily available will streamline the process of fixing elephant foot in your 3D prints. Now let’s move on to the step-by-step guide in the next section, where we’ll explore the troubleshooting process to address this issue effectively.
Step-by-Step Guide to Fix Elephant Foot
If you have encountered elephant foot in your 3D prints, don’t worry! This section provides a step-by-step guide to help you fix the issue and achieve more accurate prints. Follow these steps carefully:
- Identify the extent of the elephant foot: Measure the width of the base using calipers or other measuring tools to determine the magnitude of the distortion. This will help you make targeted adjustments during the troubleshooting process.
- Adjust print settings: Begin by fine-tuning your print settings. Lower the nozzle temperature slightly to reduce the amount of material spread during the printing process. You can also adjust the print speed and flow rate, experimenting with different settings to find the optimal balance between speed and quality.
- Implement cooling measures: Enhance the cooling of your printer by ensuring adequate airflow around the print and using additional fans if necessary. Keeping the part cool during the printing process helps minimize the chances of distortion and compression.
- Apply targeted heat: Use a heat gun or hair dryer to heat the affected areas of the print. Gently apply heat to soften the plastic, allowing you to make adjustments by carefully shaping or pressing the layers back in place. Be cautious not to overheat the print, as it may lead to further issues.
- Make modeling adjustments: If the elephant foot is persistent, consider adjusting your 3D model. Use modeling software to make modifications such as tapering the bottom layers or providing a chamfered edge to compensate for the compression.
- Sand the affected layers: If the elephant foot is still noticeable, you can lightly sand the affected layers using sandpaper or sanding blocks. This can help smooth out any unevenness and reduce the visible effects of the distortion.
- Apply adhesion promoter: Applying an adhesion promoter, such as adhesive or adhesive spray, can improve layer adhesion and minimize the likelihood of elephant foot. Apply a thin layer to the affected area and allow it to dry before re-printing.
- Test and iterate: After implementing the necessary fixes, test your new print settings and evaluate the results. If the elephant foot persists, repeat the troubleshooting process, making further adjustments until the issue is resolved.
By following these steps, you can effectively address elephant foot in your 3D prints and achieve more precise and accurate results. Remember, patience and experimentation are key in finding the best solution for your specific printing setup and materials.
In the next section, we will provide additional tips and troubleshooting advice to help you overcome any challenges encountered while fixing elephant foot.
Additional Tips and Troubleshooting
Fixing elephant foot in 3D printing can sometimes be a trial-and-error process. Here are some additional tips and troubleshooting advice to help you overcome any challenges you may encounter:
- Experiment with print orientation: Sometimes, simply changing the orientation of your print can make a difference. Adjusting the angle at which the print is positioned on the print bed can help distribute forces more evenly and reduce the chances of elephant foot.
- Check your slicing settings: Double-check your slicing software settings to ensure that the layer height and initial layer settings are appropriate. Incorrectly configured slicing settings can contribute to the occurrence of elephant foot.
- Inspect your printer’s mechanics: Regularly check your printer’s mechanical components, like the belts, pulleys, and rods. Loose or misaligned parts can result in uneven movements, which can contribute to compression and distortion.
- Consider adding a brim or raft: Using a brim or raft can provide extra stability to the print, minimizing the chances of elephant foot. It also helps with bed adhesion and improves the overall print quality.
- Use a heated chamber: If your printer has a heated chamber option, utilizing it can help mitigate the effects of temperature fluctuations during the printing process. This can reduce the occurrence of elephant foot, especially with materials that are prone to warping.
- Inspect filament quality and storage: Poor-quality or moisture-absorbed filament can contribute to printing issues, including elephant foot. Ensure that your filament is of good quality and properly stored in a dry environment to maintain optimal printing conditions.
- Seek support from the 3D printing community: If you are unable to resolve the elephant foot issue on your own, reach out to the 3D printing community for assistance. Online forums and communities often provide valuable insights and solutions to common printing problems.
Remember that each printer and material combination may require specific adjustments and troubleshooting techniques. By experimenting and implementing these tips, you’ll be better equipped to address elephant foot and achieve desirable 3D prints.
Now that we’ve explored various tips and troubleshooting methods, it’s time to wrap up this guide. Let’s conclude with a brief summary of the key points discussed and the importance of addressing elephant foot in 3D printing.
Conclusion
Elephant foot in 3D printing can be a frustrating issue that compromises the accuracy and functionality of your prints. However, with the right knowledge and techniques, it is possible to prevent and fix this problem effectively.
In this guide, we explored what elephant foot is and the causes behind it. Excessive heat, improper cooling, fast printing speeds, high filament flow, and an uneven print bed were identified as common culprits.
To prevent elephant foot, optimizing print settings, improving cooling measures, leveling the print bed, using supports, experimenting with different materials, and utilizing rafts or brims are essential steps.
If you do encounter elephant foot in your prints, following a step-by-step troubleshooting guide can help you fix the issue. Adjusting print settings, applying targeted heat, making modeling adjustments, and sanding affected layers are some of the techniques that can be applied.
Additional tips and troubleshooting advice were provided, including experimentation with print orientation, checking slicing settings, inspecting printer mechanics, and seeking support from the 3D printing community.
Remember that addressing elephant foot requires patience, experimentation, and continuous improvement. With practice, you will develop the skills to prevent and fix this issue, leading to more accurate and high-quality 3D prints.
So, the next time you come across elephant foot in your 3D printing journey, don’t panic. Follow the steps outlined in this guide and utilize the tips provided to overcome this challenge and achieve the best possible results in your prints.