Introduction
Welcome to the guide on how to erase your Apple Watch in order to sell it. If you’re planning to sell your Apple Watch or give it to someone else, it’s important to ensure that all of your personal data is completely removed from the device. This not only protects your privacy but also allows the new owner to set up and customize their own Apple Watch without any interference.
In the following steps, we will walk you through the process of unpairing your Apple Watch from your iPhone, backing up your Apple Watch data, disabling Activation Lock, erasing your Apple Watch, and finally, removing your personal information and resetting it to its factory settings.
By following these steps, you can rest assured that all of your personal information, such as your messages, health data, and settings, will be removed from the Apple Watch. You’ll be able to start fresh with peace of mind, knowing that your data is securely erased.
It’s important to note that these steps assume you have an iPhone paired with your Apple Watch. If you don’t have an iPhone or if your Apple Watch is not paired with one, you may need to follow alternative methods to reset your device. Additionally, make sure you’ve backed up any data you want to keep before proceeding with the following steps.
Now, let’s dive into the detailed instructions on how to erase your Apple Watch to prepare it for sale or transfer it to someone else.
Step 1: Unpairing your Apple Watch from your iPhone
The first step in preparing your Apple Watch for sale is to unpair it from your iPhone. This process ensures that your Apple Watch is no longer connected to your device and allows the new owner to pair it with their own iPhone.
To unpair your Apple Watch, follow these simple steps:
- Make sure your Apple Watch and iPhone are within close proximity and connected via Bluetooth.
- On your iPhone, open the Apple Watch app.
- Select the “My Watch” tab located at the bottom of the screen.
- Tap on your Apple Watch at the top of the screen to access the watch’s settings.
- Tap on the (i) icon next to your Apple Watch’s name.
- From the list of options, tap on “Unpair Apple Watch.
- Confirm your decision to unpair the Apple Watch by selecting “Unpair [Your Apple Watch Name].”
Once the unpairing process is initiated, your Apple Watch will be disconnected from your iPhone. The watch will display a message stating that it is unpairing and erasing all of its contents. This is a normal part of the unpairing process.
It’s important to let the unpairing process complete fully before proceeding to the next steps. Make sure both devices remain in proximity until the unpairing is complete.
Now that your Apple Watch is unpaired from your iPhone, we can move on to the next step, which is backing up your Apple Watch data.
Step 2: Back up your Apple Watch data
Before erasing your Apple Watch, it’s important to back up your data to ensure that you don’t lose any valuable information. By creating a backup, you can easily restore your settings, apps, and data to a new or existing Apple Watch in the future.
Follow these steps to back up your Apple Watch:
- Make sure your Apple Watch is paired with your iPhone.
- Open the Apple Watch app on your iPhone.
- Tap on the “My Watch” tab at the bottom of the screen.
- Scroll down and tap on “General.”
- Tap on “Reset.”
- Choose “Erase Apple Watch Content and Settings.
- You may be prompted to enter your Apple ID password to disable Activation Lock.
- Tap on “Back Up & Unpair” to create a backup of your Apple Watch.
- Wait for the backup process to complete. This may take some time, depending on the amount of data on your watch.
Once the backup is complete, you can proceed with erasing your Apple Watch, knowing that your data is securely backed up. You can now confidently sell your Apple Watch or transfer it to someone else, knowing that your personal data is protected.
Now that you have successfully backed up your Apple Watch, we can move on to the next step, which involves disabling Activation Lock. This step ensures that the new owner can easily activate and set up the Apple Watch without any complications.
Step 3: Disable Activation Lock
To ensure a smooth setup process for the new owner of your Apple Watch, it’s important to disable Activation Lock. Activation Lock is a security feature that prevents unauthorized users from accessing your Apple Watch without your Apple ID and password.
Follow these steps to disable Activation Lock on your Apple Watch:
- Ensure that your Apple Watch is powered on and connected to a Wi-Fi or cellular network.
- On your iPhone, open the Apple Watch app.
- Select the “My Watch” tab located at the bottom of the screen.
- Tap on the watch’s name at the top of the screen to access its settings.
- Tap on the (i) icon next to your watch’s name.
- Scroll down and tap on “Find My” to access the Activation Lock settings.
- Toggle off the “Find My Apple Watch” option.
- Enter your Apple ID password if prompted.
- A confirmation message will appear, indicating that Activation Lock has been disabled.
Disabling Activation Lock ensures that the new owner of the Apple Watch can easily set up and activate the device without any barriers. It’s important to note that disabling Activation Lock is a critical step to ensure a smooth transition of ownership.
With Activation Lock successfully disabled, we can now proceed with erasing your Apple Watch in the next step. This process will remove all of your data and settings from the device, preparing it for the new owner.
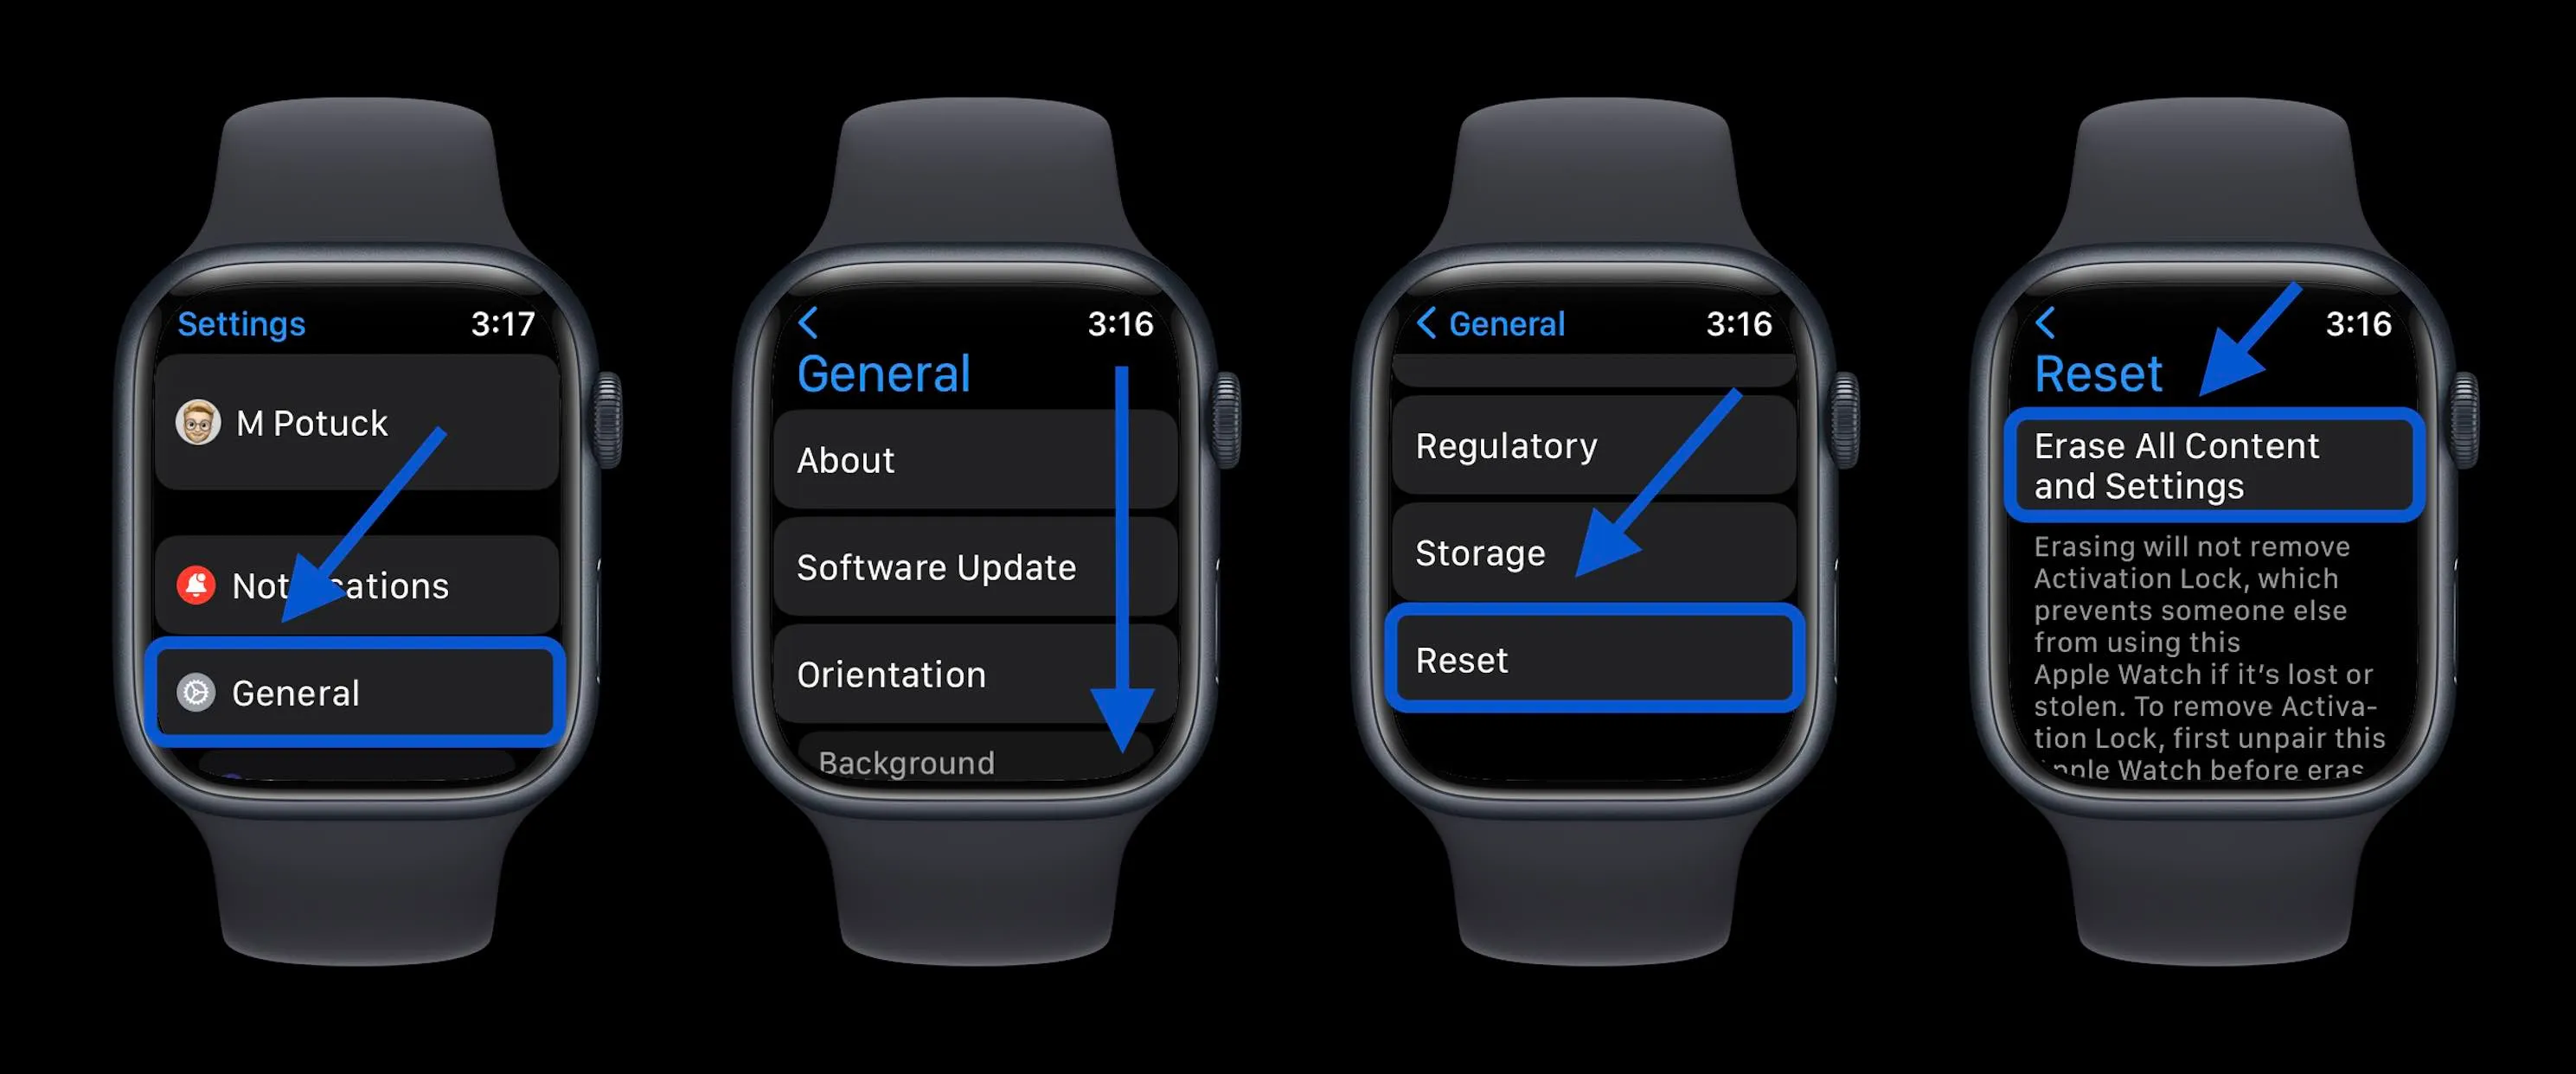
Step 4: Erasing your Apple Watch
Now that you have backed up your data and disabled Activation Lock, it’s time to erase your Apple Watch and restore it to its factory settings. This step ensures that all of your personal information, settings, and apps are removed from the device, leaving a clean slate for the new owner.
Follow these steps to erase your Apple Watch:
- On your Apple Watch, go to the home screen by pressing the Digital Crown.
- Tap on the “Settings” app icon.
- Scroll down and tap on “General.”
- Swipe down and tap on “Reset.”
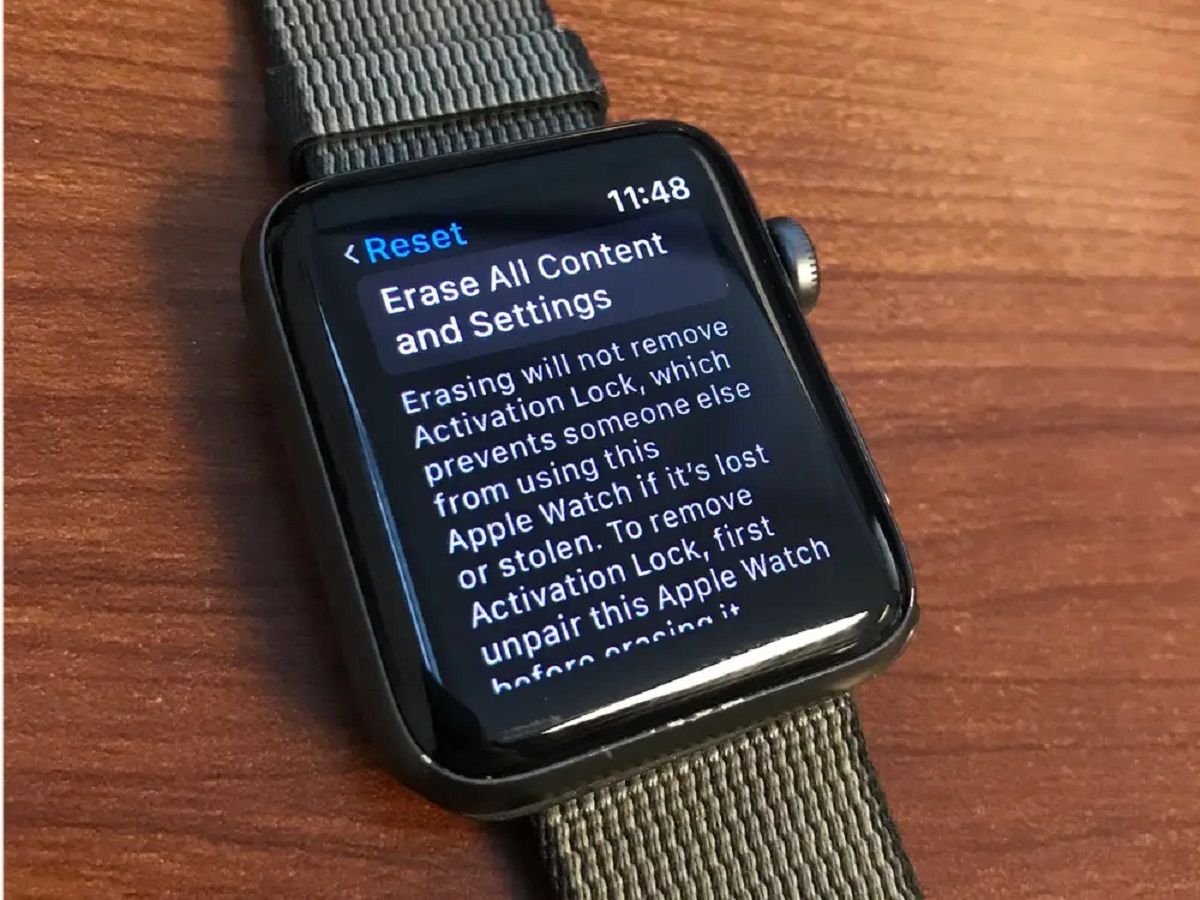
- Tap on “Erase All Content and Settings.”
- If prompted, enter your passcode.
- Confirm your decision by tapping on “Erase All” and entering your Apple ID password if requested.
The erasing process may take several minutes to complete. During this time, make sure your Apple Watch remains charged and stays in close proximity to your iPhone. Once the process is finished, your Apple Watch will be reset to its factory settings, ready for the new owner to set it up as their own.
It’s important to note that once the erasing process is initiated, it cannot be undone. Therefore, double-check that you’ve backed up any important data and that you’re ready to erase all content and settings on your Apple Watch.
Now that your Apple Watch has been successfully erased, we can move on to the final step: removing your personal information and resetting it to its factory settings.
Step 5: Remove personal information and reset to factory settings
After erasing your Apple Watch, it’s important to take the extra step of removing any remaining personal information to ensure that it’s completely ready for the new owner. Here’s how you can remove your personal information and reset the Apple Watch to its factory settings:
- Open the Apple Watch app on your iPhone.
- Select the “My Watch” tab at the bottom of the screen.
- Scroll down and tap on “General.”
- Tap on “Reset.”
- Choose “Erase All Content and Settings.”
- Enter your passcode if prompted.
- Confirm your decision by tapping on “Erase All.”
- Wait for the process to complete.
Once the reset process is finished, your Apple Watch will be restored to its original factory settings, with all your personal information and settings completely removed. It’s now ready for the new owner to set it up as their own.
It’s important to ensure that you’ve completed all the steps in this guide before selling or transferring your Apple Watch. By following these steps, you guarantee that your personal data is securely erased, and the device is ready for the next user.
Remember, before you hand over the Apple Watch to the new owner, it’s a good practice to thoroughly inspect the device to make sure it’s in good condition and fully operational. Additionally, consider providing any original accessories or packaging that came with the Apple Watch to enhance the value for the new owner.
Congratulations! You’ve successfully erased your Apple Watch and prepared it for sale or transfer. Now you can confidently pass it on to its new owner knowing that your personal information remains private and secure.
Conclusion
Congratulations! You have successfully learned how to erase your Apple Watch and prepare it for sale or transfer. Following the steps outlined in this guide ensures that your personal data and settings are securely removed from the device, allowing the new owner to enjoy a fresh start with their Apple Watch.
Remember, before erasing your Apple Watch, it’s crucial to unpair it from your iPhone, back up your data, disable Activation Lock, and then proceed with the erasing process. Taking these precautions ensures a seamless transition and protects your privacy.
By unpairing your Apple Watch from your iPhone, you sever the connection between the two devices, enabling the new owner to pair it with their own iPhone. Backing up your data allows you to easily restore your settings and information to a new or existing Apple Watch in the future if needed.
Disabling Activation Lock ensures that the new owner can activate and set up the Apple Watch without any hindrances. Finally, erasing your Apple Watch removes all personal data and resets it to its factory settings, giving the new owner a clean slate to customize and enjoy.
Don’t forget to take the additional step of removing any remaining personal information and resetting the Apple Watch to its factory settings. This guarantees that your data has been completely removed, leaving no trace of it behind.
Now that you’ve successfully erased your Apple Watch, remember to inspect the device and consider providing any original accessories or packaging to enhance its value for the new owner. With these steps completed, you can confidently sell or transfer your Apple Watch, knowing that your personal information remains private and secure.
Thank you for following this guide, and we hope it has been helpful in your Apple Watch selling or transferring process. Enjoy your new device, and stay tuned for more informative guides!