Introduction
Editing photos on an Android device has never been easier, thanks to the wide range of photo editing apps available on the Google Play Store. Whether you’re a professional photographer or just someone who loves capturing precious moments, being able to enhance and perfect your photos right from your phone is a game-changer.
In this article, we will walk you through the process of editing a photo on your Android device, step by step. From choosing the right photo editing app to mastering techniques like adjusting exposure, cropping, adding filters, and more, you’ll learn everything you need to know to transform your ordinary photos into stunning masterpieces.
With the advancements in technology, today’s photo editing apps offer powerful features and intuitive interfaces that make the editing process a breeze. Whether you want to make a simple adjustment, like cropping or straightening a photo, or you’re looking to apply artistic effects and filters, there’s an app out there that’s perfect for you.
Gone are the days when photo editing was limited to expensive software and complex tools. Now, all you need is your Android device and a reliable photo editing app to start enhancing your pictures. With just a few taps, you can transform the lighting, colors, composition, and overall look of your photos.
The best part is that you don’t need to be a professional photographer to achieve impressive results. With the right app and a little bit of creativity, you can turn an ordinary snapshot into a stunning work of art.
So, whether you want to edit vacation photos, capture the beauty of nature, or create eye-catching images for your social media feed, this article will guide you through the process of editing photos on your Android device, step by step. Get ready to unlock your creativity and transform your photos into visual masterpieces!
Choosing the Right Photo Editing App
The first step in editing a photo on your Android device is to choose the right photo editing app. With countless options available, it can be overwhelming to find the one that suits your needs and preferences. Here are a few factors to consider when selecting a photo editing app:
- Features: Different apps offer various editing tools and effects. Determine which features are important to you, such as filters, exposure adjustments, cropping tools, text overlays, and more. It’s also helpful to find an app that allows you to undo changes and provides advanced editing options if you want to dive deeper into image manipulation.
- User Interface: A user-friendly and intuitive interface is crucial, especially if you’re new to photo editing. Look for an app that organizes its tools and settings in a logical manner, making it easy to navigate and understand. A clean and uncluttered interface will enhance your editing experience.
- Compatibility: Ensure that the app you choose is compatible with your Android device’s operating system version. Some apps may require specific hardware or software capabilities, so it’s important to check the app’s compatibility before downloading.
- Community and Support: Consider apps with a strong user community and support system. These apps often have online tutorials, forums, or social media groups where you can learn new techniques, get inspired by other users’ work, and troubleshoot any issues you may encounter.
- Reviews and Ratings: Before making a final decision, read reviews and check the ratings of the app in the Google Play Store. Pay attention to the overall rating, the number of downloads, and user feedback. This will give you an idea of the app’s reliability and performance.
Popular photo editing apps for Android include Adobe Lightroom, Snapseed, PicsArt, and VSCO. These apps offer a wide range of features, including advanced editing tools, filters, and creative effects. It’s worth exploring multiple apps to see which one aligns with your editing style and desired outcomes.
Remember, finding the right photo editing app is an essential step towards creating visually stunning images. Take your time to research, experiment, and find an app that suits your needs. Once you have the perfect app installed on your Android device, you’ll be ready to dive into the exciting world of photo editing!
Adjusting Exposure and Contrast
One of the fundamental aspects of photo editing is adjusting the exposure and contrast of your image. This step allows you to fine-tune the brightness, shadows, and highlights, resulting in a more balanced and visually appealing photo. Here’s how you can adjust exposure and contrast using a photo editing app on your Android device:
- Open the photo editing app on your Android device and select the photo you want to edit.
- Look for the exposure or brightness adjustment tool. It is usually represented by a sun icon or labeled as “Exposure” or “Brightness.”
- Drag the slider to the right to increase the exposure and make the image brighter or to the left to decrease the exposure and make it darker. Make subtle adjustments until you achieve the desired result.
- Next, locate the contrast adjustment tool, which is typically represented by a symbol denoting contrast or labeled as “Contrast.”
- Move the contrast slider to the right to increase the contrast and make the image more vibrant and defined. Slide it to the left to decrease the contrast for a softer, more muted look.
- Take a moment to evaluate the changes you’ve made and compare them to the original image. If necessary, you can go back and fine-tune the exposure and contrast settings until you achieve the desired outcome.
Adjusting the exposure and contrast of your photos can have a significant impact on the overall look and feel. Increasing the exposure can help bring out details in shadows and brighten dark areas, while decreasing the exposure can add a moody or dramatic effect. Likewise, adjusting the contrast can make colors appear more vibrant and enhance the overall tonal range of your image.
Keep in mind that every photo is unique, and there is no one-size-fits-all approach to adjusting exposure and contrast. Experiment with different settings and let your creativity guide you. Remember to strike a balance between enhancing the details and maintaining a natural, realistic look.
So, whether you’re capturing a scenic landscape, a portrait, or a close-up shot, taking the time to adjust the exposure and contrast will add depth and dimension to your photos, making them truly stand out!
Enhancing Colors
Colors play a vital role in creating visually captivating photos. Enhancing the colors of your images can make them more vibrant, evoke certain moods, and add an extra wow factor to your photos. Here’s how you can enhance the colors using a photo editing app on your Android device:
- Select the photo you want to edit in your chosen photo editing app.
- Look for the color adjustment tool, often represented by a palette icon or labeled as “Color” or “Hue/Saturation.”
- Adjust the saturation slider to the right to make the colors more intense and vibrant. Move it to the left to desaturate the image, giving it a black-and-white or muted look.
- Next, if available, use the temperature or white balance adjustment tool to fine-tune the overall color temperature of the image. Dragging it to the right adds warmth to the photo, while dragging it to the left adds a cooler, bluish tone.
- Experiment with the color balance or tone curve settings to further tweak the individual color channels. This allows you to selectively enhance or tone down specific colors in your photo.
- Take a moment to evaluate the changes you’ve made and compare them to the original image. Make any necessary adjustments until you achieve the desired color balance and vibrancy.
Enhancing the colors of your photos can make a significant difference in the overall impact of the image. Adjusting the saturation can make colors pop and create a more lively and dynamic feel. Fine-tuning the temperature can set the mood and create a specific atmosphere based on the warm or cool tones.
Remember to exercise restraint when enhancing colors. It’s easy to get carried away and end up with an unrealistic or overly saturated image. The key is to find a balance where the colors appear vibrant and visually appealing while still staying true to the original scene.
Whether you’re editing a landscape photo, a portrait, or a still life shot, enhancing the colors will bring your images to life and make them even more captivating. Let your creativity guide you as you play with different color settings and unleash the full potential of your photos!
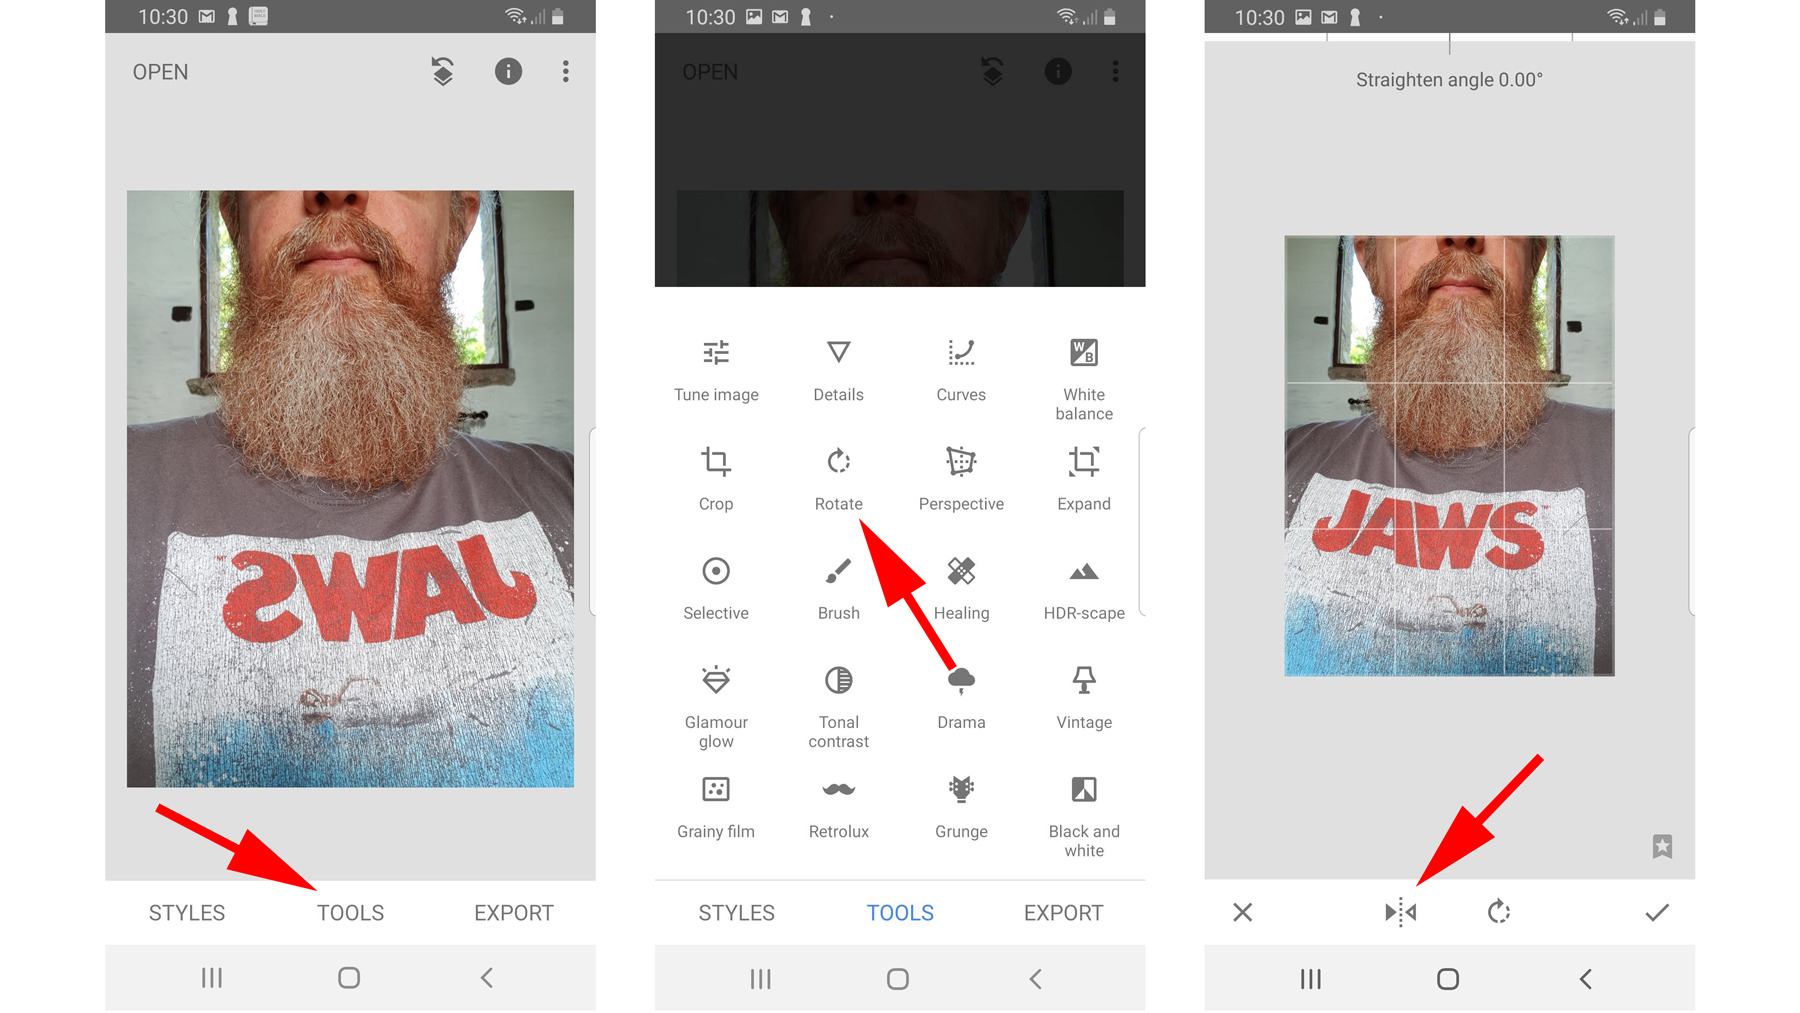
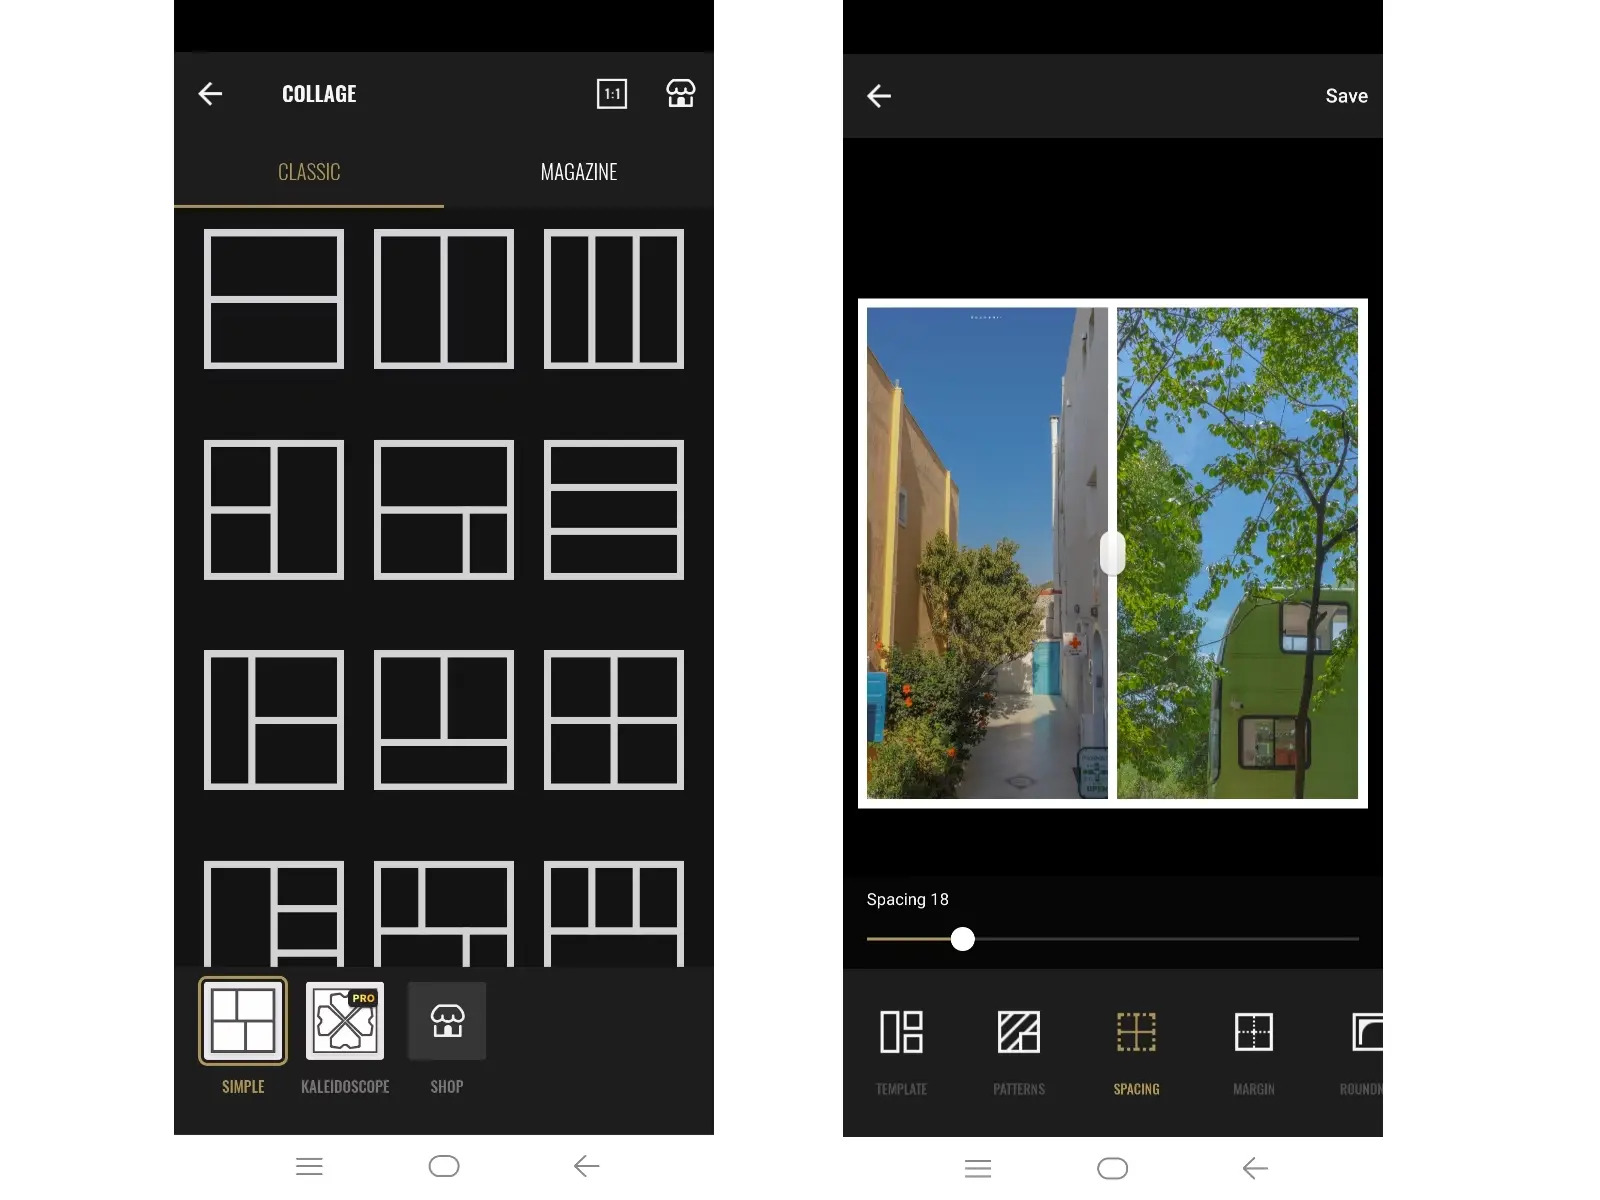
Cropping and Straightening
Cropping and straightening are essential techniques in photo editing that can improve the composition and overall visual appeal of your images. Cropping allows you to remove unwanted elements or unnecessary distractions, while straightening ensures that your horizons and verticals are aligned correctly. Here’s how you can crop and straighten your photos using a photo editing app on your Android device:
- Open the photo editing app and import the image you want to edit.
- Look for the cropping tool, usually represented by a square or rectangle icon or labeled as “Crop.”
- Drag the corners of the crop overlay to define the desired composition. Remove any unnecessary elements by adjusting the edges of the crop.
- Rotate the crop overlay if needed to straighten any tilted horizons or crooked lines.
- Take a moment to reevaluate the composition and make sure it aligns with your vision.
- Once you’re satisfied with the cropping, click on the “Apply” or “Done” button to finalize the changes.
Cropping allows you to improve the composition of your photos by focusing on the subject and eliminating any distractions. It can also help to create a more balanced and aesthetically pleasing image. Whether you’re removing the edges of a photo to create a square crop for social media or adjusting the aspect ratio to fit a specific frame, cropping gives you the flexibility to tailor the image to your needs.
In addition to cropping, straightening is another important step to ensure that your photos appear polished and professional. Crooked horizons or slanted verticals can distract the viewer and diminish the impact of an otherwise great shot. By applying the straightening tool, you can easily align the lines and make sure everything appears level and well-balanced.
Cropping and straightening can significantly enhance the overall composition of your photos, drawing the viewer’s attention to the main subject and creating a visually pleasing image. Experiment with different crops and angles, and don’t be afraid to break the traditional rules of composition for a unique and captivating result!
So, whether you want to remove distractions, resize your image for a specific purpose, or make sure your horizons are straight, use the cropping and straightening tools to create visually appealing and well-composed photos that truly stand out!
Removing Unwanted Objects
Ever captured a stunning photo, only to be disappointed by an unwanted object or distracting element? Don’t worry! With the help of a reliable photo editing app on your Android device, you can easily remove those unwanted objects and create a cleaner, more visually appealing image. Here’s how you can remove unwanted objects using a photo editing app:
- Select the photo you want to edit in your chosen photo editing app.
- Look for the content-aware or clone stamp tool, typically represented by a stamp icon or labeled as “Heal,” “Clone,” or “Repair.”
- Zoom in on the area containing the unwanted object or distraction.
- Using your finger or stylus, carefully draw around the object you want to remove. The app will analyze the surrounding pixels and fill in the area with pixels from the nearby surroundings.
- If necessary, adjust the size and opacity of the brush to match the texture and details of the surrounding area.
- Repeat the process for any additional unwanted objects or distractions in the photo.
- Zoom out and evaluate the edited image. Make any necessary adjustments to ensure a seamless and natural result.
The ability to remove unwanted objects and distractions from your photos opens up a world of possibilities. You can transform busy city streets by eliminating pedestrians or signs, erase blemishes or spots from portraits, or clean up a cluttered background to create a more focused and impactful image.
However, it’s important to exercise caution when using the object removal tool to maintain the integrity of the image. Avoid removing essential or significant elements that contribute to the composition and story of the photo. Additionally, consider the ethical implications of altering the content of a photograph, especially in journalistic or documentary contexts.
By mastering the art of removing unwanted objects, you can take your photo editing skills to the next level and create images that truly capture the essence of the scene without distractions. So, get ready to bid farewell to those unwanted elements and bring your vision to life!
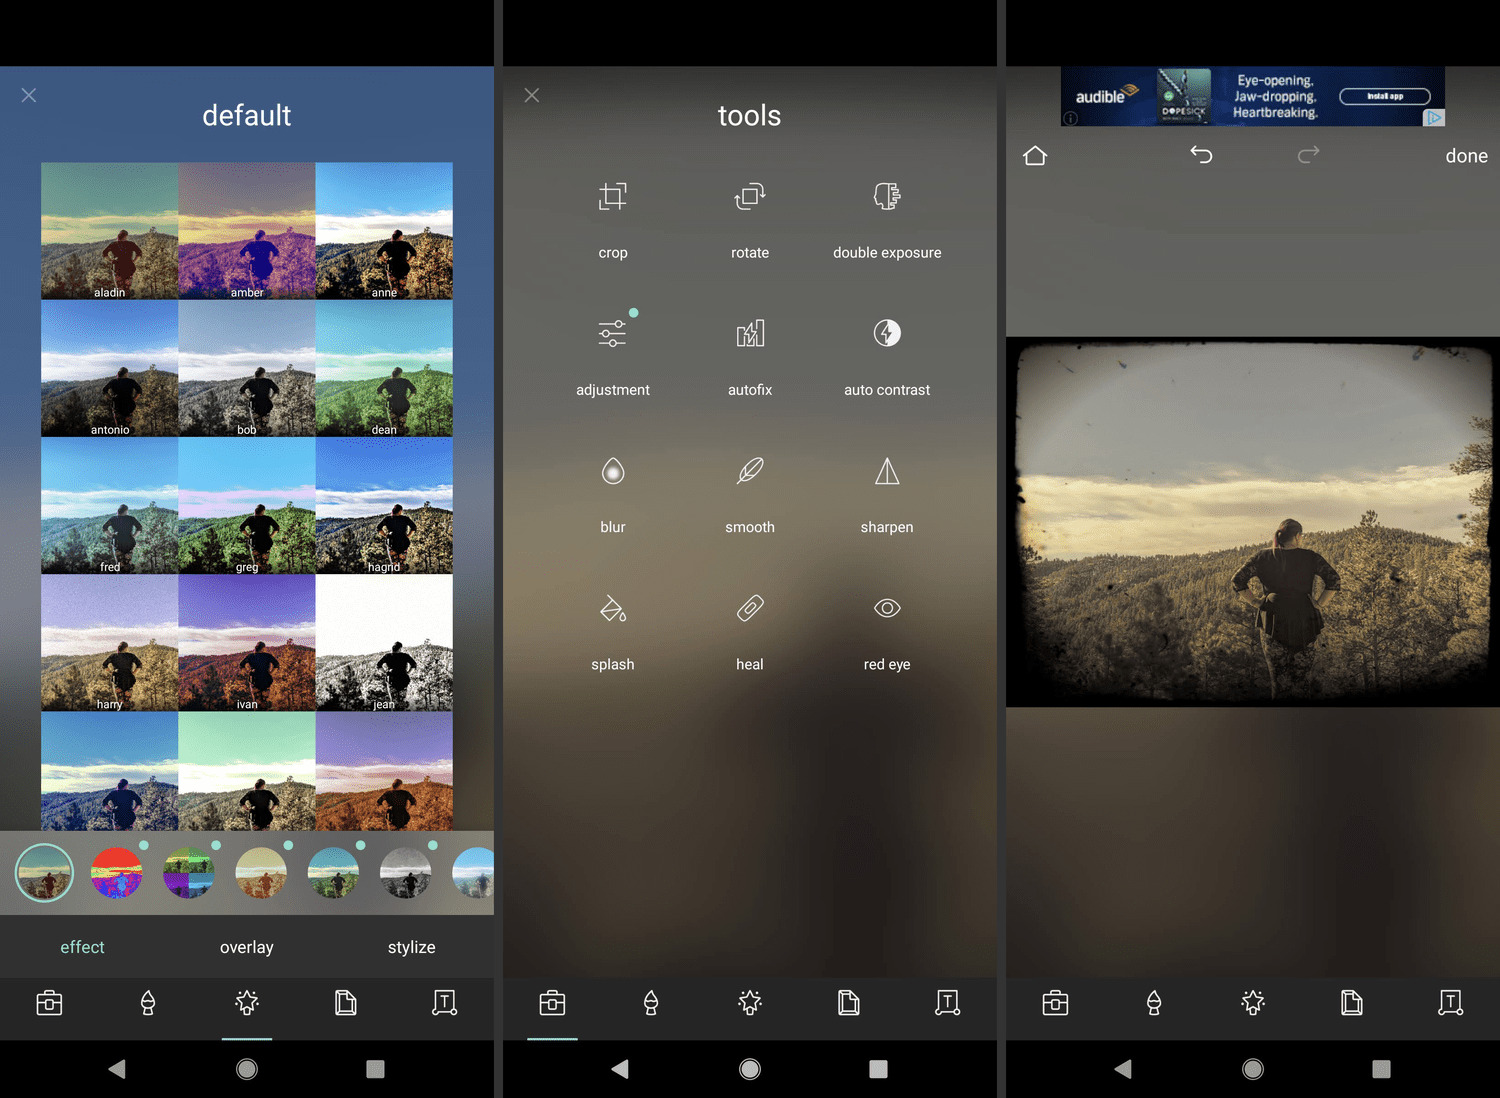
Applying Filters and Effects
Filters and effects are powerful tools in photo editing that can completely transform the mood and style of your images. Whether you want to give your photos a vintage look, add a touch of drama, or enhance the colors, applying filters and effects can elevate your photos to a whole new level. Here’s how you can apply filters and effects using a photo editing app on your Android device:
- Select the photo you want to edit in your chosen photo editing app.
- Look for the filters or effects panel, often represented by overlapping circles or labeled as “Filters,” “Effects,” or “Presets.”
- Browse through the available filters and effects to find the one that suits the mood and style you want to achieve.
- Click on the filter or effect to apply it to your photo. Most apps allow you to adjust the intensity or strength of the filter to control the desired outcome.
- Experiment with different filters and effects to see how they impact your image. Don’t be afraid to mix and match, as some apps enable you to combine multiple filters for a custom look.
- Take a moment to evaluate the edited photo and make any necessary adjustments to maintain a natural and balanced appearance.
Applying filters and effects can help you create a cohesive and unique style across your photos. Filters can add a vintage, retro, or film-like look to your images, while effects like vignetting or blur can add depth and focus to specific areas. With a wide range of options available, you can experiment with different filters and effects to find the perfect aesthetic that suits your creative vision.
However, it is important to use filters and effects judiciously. Avoid overdoing it and losing the essence of the original photo. Remember that the goal is to enhance and accentuate the image, not to completely alter its appearance. Keep the overall mood and story of the photo in mind when choosing and applying filters and effects.
By harnessing the power of filters and effects, you can infuse your photos with personality and style. Whether you’re aiming for a dreamy, moody, or vibrant look, the right filter or effect can help you achieve the desired outcome. So, let your creativity soar, and give your photos that extra visual punch!
Adding Text and Graphics
Adding text and graphics to your photos can enhance their impact, convey a message, or personalize them for specific purposes. Whether you want to add captions, quotes, watermarks, or decorative elements, incorporating text and graphics can take your images to the next level. Here’s how you can add text and graphics using a photo editing app on your Android device:
- Select the photo you want to edit in your chosen photo editing app.
- Look for the text or graphics option, typically represented by a letter or icon.
- Choose the font style, size, and color for the text. Some apps offer a variety of font options to match the mood and style of your photo.
- Type in the desired text or caption and position it on your image using the app’s text editing tools.
- Experiment with different text placements and alignments to find the most visually appealing composition.
- If you want to add graphics or decorative elements, browse through the app’s library of stickers, icons, or shapes. Select the desired graphic and position it on your photo.
- Adjust the size, rotation, and transparency of the graphic to seamlessly blend it into the image.
Adding text and graphics allows you to inject your creativity and personal touch into your photos. You can use this feature to enhance storytelling in your images, share valuable information, or brand your photos with a watermark or logo. The possibilities are endless.
When adding text, choose fonts that complement the style and mood of the photo. Consider the text’s readability and ensure it doesn’t overpower the image itself. You can also play with different colors, sizes, and placements to create an engaging and visually appealing composition.
When incorporating graphics or decorative elements, keep in mind that they should enhance, not distract from the main subject of the photo. Use them strategically to add interest or highlight specific details. Remember to maintain a harmonious balance between the graphics and the photo itself.
By adding text and graphics, you can create photos that are not only visually captivating but also convey a deeper message or personal touch. So, let your creativity shine and transform your images into unique visual stories!
Sharpening and Noise Reduction
Sharpening and reducing noise are important steps in photo editing that can significantly improve the clarity and quality of your images. Sharpening enhances the details and sharpens the edges, while noise reduction reduces the grainy or pixelated appearance caused by low light or high ISO settings. Here’s how you can sharpen and reduce noise using a photo editing app on your Android device:
- Select the photo you want to edit in your chosen photo editing app.
- Look for the sharpening tool, usually represented by a sharpening icon or labeled as “Sharpen.”
- Apply a conservative amount of sharpening to avoid overdoing it and producing an unnatural, halo-like effect. Slide the sharpening slider gradually until the desired level of sharpness is achieved.
- Next, locate the noise reduction tool, typically represented by a noise reduction icon or labeled as “Noise Reduction.”
- Adjust the noise reduction slider to reduce the visible noise in the image. Be careful not to remove too much detail, as excessive noise reduction can result in a loss of fine details in your photo.
- Take a moment to evaluate the changes and ensure that the sharpening and noise reduction levels create a natural and visually pleasing result.
Sharpening helps to bring out the finer details in your photo, such as texture, outlines, or fine lines. It can be especially beneficial for images that appear slightly soft or lacking in definition. However, it’s important to apply sharpening in moderation to maintain a natural appearance and avoid introducing artifacts or excessive grain.
Noise reduction, on the other hand, helps to minimize the unwanted grain or noise that can occur in photos taken in low-light situations or at high ISO settings. By reducing noise, you can create a cleaner and smoother-looking image while preserving important details.
Remember, the optimal sharpening and noise reduction settings depend on the specific photo and your personal preferences. It’s always a good idea to zoom in and inspect the image at 100% to ensure that you’ve achieved the desired level of sharpness without compromising the image quality.
By mastering the techniques of sharpening and noise reduction, you can enhance the overall quality of your photos and make them appear more polished and professional. So, take some time to experiment and find the perfect balance that will make your images truly stand out!
Saving and Sharing Your Edited Photo
After putting in the effort to edit your photo and achieve the desired look, it’s time to save and share your masterpiece with the world. Here’s how you can save and share your edited photo using a photo editing app on your Android device:
- Make the final adjustments to your edited photo, ensuring that you’re satisfied with the overall result.
- Click on the “Save” or “Export” button to save the edited photo to your device’s gallery. Choose a suitable file format, such as JPEG or PNG, for optimal compatibility and image quality. Specify the desired file name and storage location.
- Once saved, you can access the edited photo anytime in your device’s gallery app or photo library.
- When it comes to sharing your edited photo, you have several options. Most photo editing apps provide built-in sharing features that allow you to directly share your photo on various social media platforms like Instagram, Facebook, Twitter, or Snapchat. Choose the platform you prefer and follow the prompts to share your photo.
- If you want to share your edited photo on a different platform or via messaging apps, you can use the “Share” function on your device. This allows you to send the photo through email, messaging apps like WhatsApp or Telegram, or even upload it to a cloud storage service like Google Drive or Dropbox.
- Before sharing your photo, consider applying appropriate privacy settings to ensure that it is shared only with the intended audience. Some social media platforms allow you to adjust the privacy settings for individual posts, while messaging apps provide options to limit who can see and download the photo.
- Lastly, consider adding a caption or description to your photo when sharing it. This can provide context or tell a story to your audience, enhancing their understanding and engagement with your edited photo.
Saving and sharing your edited photo is the final step in the photo editing process, allowing you to showcase your creativity and share your visual storytelling with others. Whether you’re seeking appreciation, feedback, or simply want to share your artistic vision, sharing your edited photo can be a fulfilling experience.
Remember, when sharing your photo on social media or online platforms, it’s essential to respect copyright laws and give appropriate credit to the original photographer if you’re editing someone else’s work. Additionally, be mindful of the platform’s terms of service regarding the content and quality of the photos you share to ensure compliance.
So, save your edited photo, choose the platform that best suits your needs, and share your visual masterpiece with the world!
Conclusion
Editing photos on your Android device is not only convenient but also empowering. With the right photo editing app and a few techniques under your belt, you can transform ordinary photos into extraordinary works of art. From adjusting exposure and contrast to enhancing colors, cropping, removing unwanted objects, applying filters, adding text and graphics, sharpening, noise reduction, and finally saving and sharing your edited photo, each step plays a crucial role in the overall editing process.
Through careful editing, you can bring out the true potential of your photos, capturing the essence of the moment and conveying your unique perspective to viewers. With a plethora of photo editing apps available on the Google Play Store, there are endless possibilities for expressing your creativity and creating visually stunning images right from your Android device.
Remember to approach photo editing with a balance of technical skill, artistic vision, and personal style. While it’s essential to master the various tools and techniques, don’t be afraid to experiment and let your creativity guide you. The best edits often come from a combination of technical know-how and a bold, artistic eye.
So, whether you’re a professional photographer, a social media enthusiast, or simply someone who enjoys capturing and enhancing moments, embrace the power of photo editing on your Android device. Take the time to learn and explore different apps, techniques, and styles. With practice and dedication, you’ll be amazed at how your photos can evolve and leave a lasting impression.
So, get started today and let your creativity shine through the world of Android photo editing!