Introduction
Welcome to the world of Amazon Music, where you can enjoy a vast library of songs, albums, and playlists at your fingertips. With its user-friendly interface and seamless integration with Amazon devices, it’s no wonder why so many music enthusiasts choose Amazon Music as their go-to streaming platform.
While exploring and discovering new music is an exciting part of the Amazon Music experience, it’s inevitable that your tastes may change over time, or you may simply want to declutter your collection. Fortunately, deleting songs from Amazon Music is a straightforward process, and this article will guide you through various methods to help you achieve a clean and organized music library.
Whether you want to remove individual songs, delete entire albums or playlists, or clear out downloaded tracks to free up storage space, we’ve got you covered. Whether you’re using the Amazon Music website or the mobile app, we’ll walk you through the step-by-step process, ensuring that you can efficiently manage your music collection according to your preferences.
It’s important to note that the methods described in this article apply to both Amazon Music Free and Amazon Music Unlimited subscribers. So, no matter which tier you’re in, you’ll be able to follow these steps to delete songs from your Amazon Music account.
So, grab your headphones and get ready to curate your music library. Let’s jump into the various methods available for deleting songs from Amazon Music.
Why Delete Songs from Amazon Music?
There are several reasons why you might want to delete songs from your Amazon Music library. Let’s explore some of the common scenarios:
- Changing Music Preferences: Over time, our musical tastes evolve and change. Songs that once resonated with us may no longer align with our current preferences. Deleting these songs allows us to create a collection that reflects our current musical interests.
- Creating a Personalized Library: By removing songs that we no longer enjoy, we can create a personalized music library that brings us joy and matches our unique taste in music. Deleting songs ensures that we have a collection that truly represents who we are as music lovers.
- Freeing Storage Space: If you have downloaded songs for offline listening, deleting ones that you no longer listen to can help free up valuable storage space on your device. This is especially useful if you’re running low on storage or want to make room for new music.
- Managing Playlists and Libraries: Deleting songs from playlists or libraries allows you to keep your music collection organized. If a song no longer fits the theme or vibe of a playlist, removing it ensures a cohesive listening experience.
- Starting Fresh: Sometimes we just want a clean slate. Deleting songs from Amazon Music allows you to start afresh and rebuild your music library from scratch.
Whatever your reason may be, deleting songs from Amazon Music is a simple and effective way to shape your music collection according to your preferences. With a clutter-free library, you can enjoy a more curated and personalized listening experience.
Now that we understand why it’s beneficial to delete songs from Amazon Music, let’s dive into the step-by-step methods you can use to delete songs from your account.
Steps to Delete Songs from Amazon Music
Deleting songs from Amazon Music is a straightforward process, and there are multiple methods you can use depending on your requirements. Here are the step-by-step instructions:
- Method 1: Deleting Songs Individually: If you want to remove specific songs from your Amazon Music library, follow these steps:
- Open the Amazon Music website or app and sign in to your account.
- Navigate to the song you want to delete.
- Hover over the song and look for the options icon (represented by three dots or a vertical ellipsis).
- Click on the options icon and choose the “Delete” or “Remove from Library” option.
- Confirm the deletion when prompted.
- Method 2: Removing Songs in Bulk: If you have a large number of songs to delete, this method can save you time:
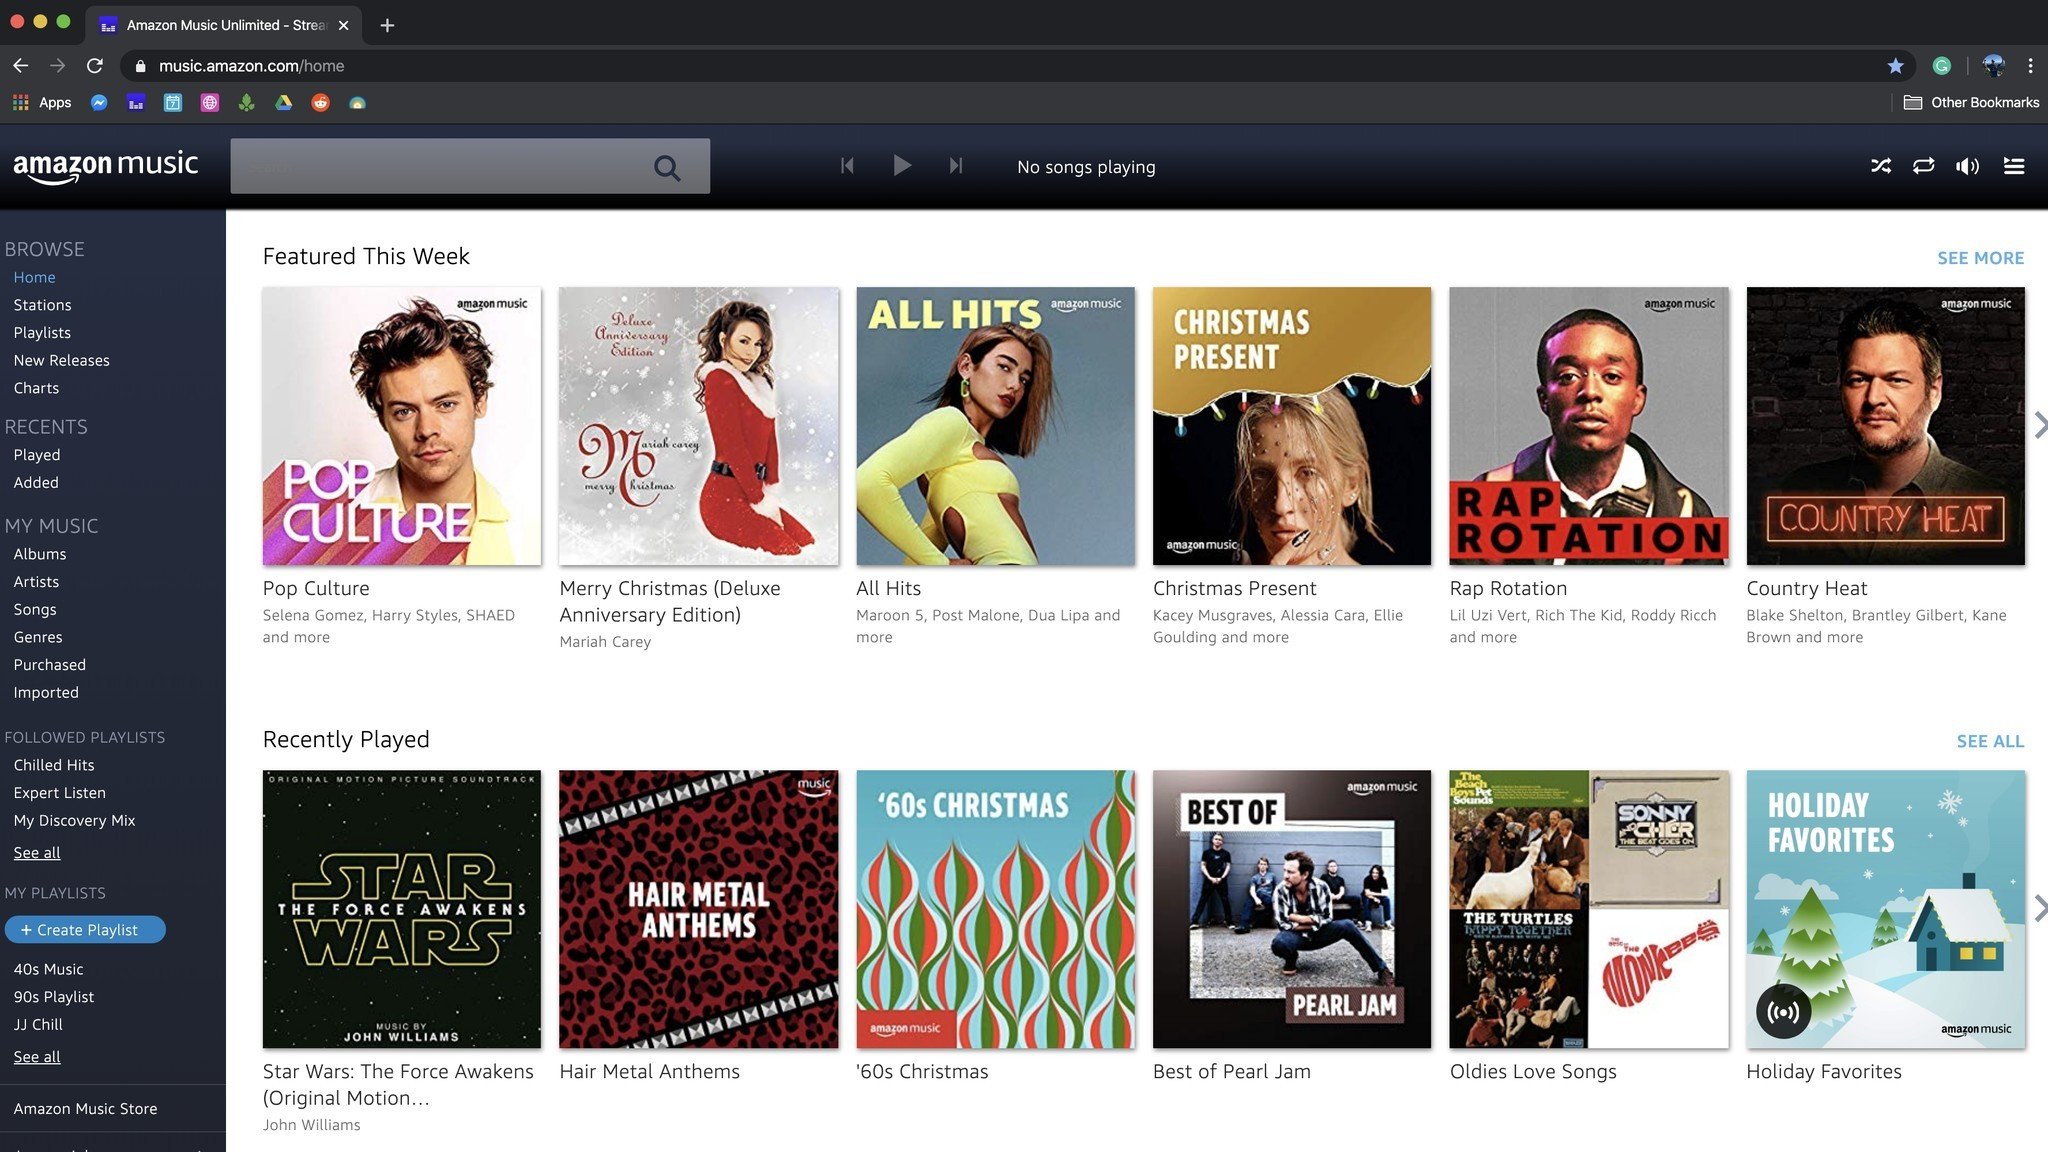
- Open the Amazon Music website and sign in to your account.
- Go to the “Your Library” section and select “Songs” from the left-hand menu.
- Click on the checkbox beside each song you want to delete, or click the checkbox at the top to select all songs.
- Click on the “Delete” button at the top of the list, and confirm the deletion when prompted.
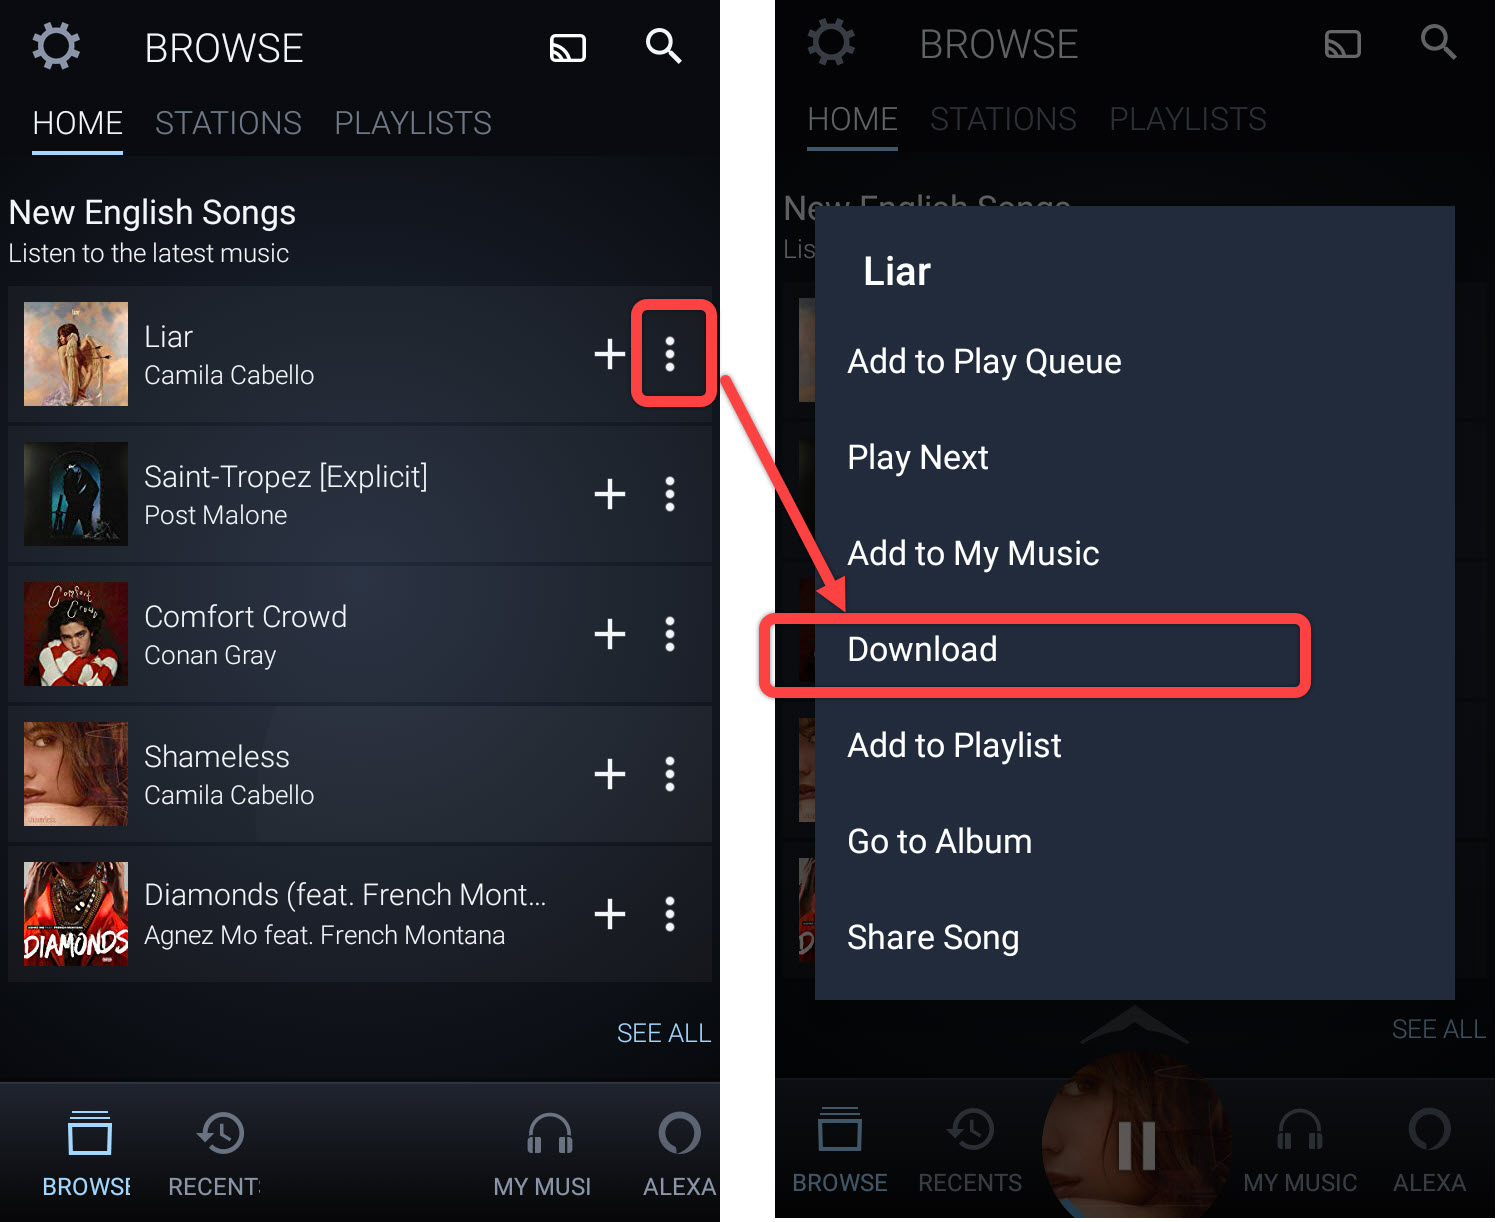
- Method 3: Deleting Songs from the Amazon Music App: If you prefer managing your music collection from the app, follow these steps:
- Open the Amazon Music app on your mobile device and sign in to your account.
- Go to the song you want to delete and swipe left on it.
- Tap on the “More Options” (three dots) icon.
- Select the “Remove from My Music” or “Remove from Library” option.
- Confirm the deletion when prompted.
- Method 4: Deleting Downloaded Songs: If you want to remove songs that you have downloaded for offline listening, use the following steps:
- Open the Amazon Music app on your mobile device.
- Go to the “My Music” or “Library” section.
- Switch to the “Offline Music” or “Downloaded” tab.
- Tap and hold on the song you want to delete.
- Select the “Remove Download” or “Delete from Device” option.
- Confirm the deletion when prompted.
- Method 5: Removing Songs from Playlists and Libraries: If you want to delete songs from a specific playlist or library, follow these steps:
- Open the Amazon Music website or app and sign in to your account.
- Go to the playlist or library from which you want to delete songs.
- Hover over the song you want to remove and click on the options icon (three dots or a vertical ellipsis).
- Choose the “Remove from Playlist” or “Remove from Library” option.
- Confirm the deletion when prompted.
By following these methods, you can delete songs from Amazon Music with ease, allowing you to maintain a well-organized and personalized music collection.
Method 1: Deleting Songs Individually
If you want to remove specific songs from your Amazon Music library, you can follow this method to delete them individually:
- Open the Amazon Music website or app and sign in to your account.
- Navigate to the song you want to delete.
- Hover over the song and look for the options icon, usually represented by three dots or a vertical ellipsis.
- Click on the options icon, and a menu will appear with various options for the song.
- Select the “Delete” or “Remove from Library” option from the menu.
- Confirm the deletion when prompted.
By following these steps, you can easily delete individual songs from your Amazon Music library. This method is useful when you want to selectively remove specific songs that you no longer want in your collection.
Deleting songs individually allows you to have better control over your music library and maintain a collection that truly reflects your current musical taste. Whether you’ve discovered new artists or genres or simply want to declutter your library, this method enables you to curate your collection according to your preferences.
It’s worth noting that deleting a song from your Amazon Music library doesn’t remove it from your purchase history if you have bought the song from Amazon. However, it will remove it from your library, playlists, and downloaded songs, ensuring that you have a clean and organized collection that suits your current listening preferences.
Now that you know how to delete songs individually, let’s move on to the next method that allows you to remove songs in bulk from your Amazon Music library.
Method 2: Removing Songs in Bulk
If you have a large number of songs that you want to delete from your Amazon Music library, you can follow this method to remove them in bulk:
- Open the Amazon Music website and sign in to your account.
- Go to the “Your Library” section and select “Songs” from the left-hand menu.
- Click on the checkbox beside each song you want to delete, or click the checkbox at the top to select all songs.
- Once you have selected the desired songs, a toolbar will appear at the top of the list with various options.
- Click on the “Delete” button in the toolbar.
- A confirmation prompt will appear asking you to confirm the deletion.
- Confirm the deletion, and the selected songs will be removed from your Amazon Music library.
By using this method, you can efficiently delete multiple songs from your Amazon Music library at once. It’s an excellent option if you want to clear out a large number of songs that no longer align with your musical preferences.
Deleting songs in bulk allows you to streamline your music collection and create a more organized library. It saves time and effort compared to deleting songs individually, especially if you have a large collection with numerous songs to remove.
It’s important to note that removing songs in bulk only deletes them from your Amazon Music library. If you have purchased the songs from Amazon, they will still be available in your purchase history. Additionally, deleting songs in bulk will remove them from playlists, libraries, and downloaded songs, ensuring a clean and clutter-free music collection.
Now that you know how to remove songs in bulk, let’s explore another method that allows you to delete songs directly from the Amazon Music app.
Method 3: Deleting Songs from the Amazon Music App
If you prefer managing your music collection on your mobile device, you can use the Amazon Music app to delete songs from your library. Follow the steps below:
- Open the Amazon Music app on your mobile device and sign in to your account.
- Navigate to the song you want to delete.
- Swipe left on the song, and a menu will appear with various options.
- Tap on the “More Options” icon (usually represented by three dots).
- Select the “Remove from My Music” or “Remove from Library” option from the menu.
- A confirmation prompt will appear asking you to confirm the deletion.
- Confirm the deletion, and the song will be removed from your Amazon Music library.
By following these steps, you can easily delete songs from your Amazon Music library using the mobile app. This method is ideal if you primarily use your smartphone or tablet to listen to music and want to manage your library on the go.
Deleting songs from the Amazon Music app offers convenience and flexibility, allowing you to personalize your music collection directly from your mobile device. Whether you want to remove individual songs or organize your library, this method enables you to do so with ease.
When you delete a song from your library using the Amazon Music app, it will be removed from all your devices that are connected to your Amazon account. This ensures consistency across your devices and a streamlined listening experience.
Now that you know how to delete songs from the Amazon Music app, let’s move on to the next method, which focuses on deleting downloaded songs from your device.
Method 4: Deleting Downloaded Songs
If you have downloaded songs from Amazon Music for offline listening, you may want to remove them from your device to free up storage space or update your music collection. Follow these steps to delete downloaded songs:
- Open the Amazon Music app on your mobile device.
- Navigate to the “My Music” or “Library” section.
- Switch to the “Offline Music” or “Downloaded” tab, which displays all the songs that you have downloaded for offline listening.
- Tap and hold on the song you want to delete.
- A menu will appear with various options for the song.
- Select the “Remove Download” or “Delete from Device” option.
- A confirmation prompt will appear asking you to confirm the deletion.
- Confirm the deletion, and the downloaded song will be removed from your device.
By following these steps, you can easily delete downloaded songs from your device using the Amazon Music app. This method is helpful if you have limited storage space or want to refresh your offline music collection.
Deleting downloaded songs not only frees up storage space but also allows you to have better control over your offline music library. It ensures that you have access to the songs you truly want to listen to offline, without cluttering your device with unwanted tracks.
One important thing to note is that deleting downloaded songs from your device does not remove them from your Amazon Music library. You can always re-download them in the future if you wish to listen to them offline again.
Now that you know how to delete downloaded songs from your device, let’s move on to the next method, which focuses on removing songs from playlists and libraries.
Method 5: Removing Songs from Playlists and Libraries
If you want to remove songs from specific playlists or libraries in your Amazon Music account, you can follow this method:
- Open the Amazon Music website or app and sign in to your account.
- Go to the playlist or library from which you want to remove songs.
- Locate the song you want to remove.
- Hover over the song and look for the options icon, usually represented by three dots or a vertical ellipsis.
- Click on the options icon, and a menu will appear with various options for the song.
- Select the “Remove from Playlist” or “Remove from Library” option from the menu.
- A confirmation prompt will appear asking you to confirm the removal.
- Confirm the removal, and the song will be removed from the playlist or library.
By following these steps, you can easily remove songs from playlists and libraries in your Amazon Music account. This method is particularly useful if you want to declutter playlists or customize specific libraries according to your preferences.
Removing songs from playlists and libraries allows you to maintain a well-organized and curated music collection. It ensures that only the songs you truly want to include in specific playlists or libraries are present, providing a cohesive listening experience.
When you remove a song from a playlist or library, it will still remain in your main Amazon Music library. You can easily add it back to the playlist or library if you change your mind in the future.
Now that you know how to remove songs from playlists and libraries, you have the tools to refine and personalize your Amazon Music account to suit your unique musical preferences.
Conclusion
Managing your music library and deleting songs from Amazon Music is a simple process that allows you to maintain a curated collection that reflects your current musical preferences. Whether you want to remove individual songs, delete multiple songs in bulk, delete downloaded songs, or remove songs from playlists and libraries, Amazon Music offers you various methods to customize your library according to your liking.
By deleting songs from your Amazon Music library, you can create a personalized music collection that brings you joy and matches your unique taste. You can declutter your library, free up storage space on your devices, and ensure a curated listening experience.
Remember, whether you are using the Amazon Music website or the mobile app, the methods described in this article can be easily implemented. From deleting songs individually to removing songs in bulk and managing playlists and libraries, these steps provide you with the flexibility and control to shape your music collection to your liking.
So, grab your headphones and dive into the world of Amazon Music. Whether you are rocking to your favorite tunes, exploring new artists and genres, or organizing your library, these methods will help you create a music collection that truly resonates with you.
Enjoy the power to tailor your music listening experience. Delete songs, make room for new discoveries, and ensure that your Amazon Music library is a reflection of your ever-evolving musical journey.