Introduction
Welcome to the world of music streaming on Amazon Music for iPhone! Whether you’re a music aficionado or simply love creating personalized playlists, Amazon Music offers a fantastic platform to curate and enjoy your favorite tunes. In this guide, we’ll walk you through the step-by-step process of creating a playlist on Amazon Music for iPhone.
One of the great advantages of Amazon Music is its vast library, which includes millions of songs from various genres and artists. From chart-topping hits to hidden gems, you’ll have no shortage of options when it comes to crafting the perfect playlist. Whether you want a selection of songs for a workout session or a compilation of feel-good tunes for a road trip, Amazon Music has got you covered.
Creating a playlist on Amazon Music for iPhone is a straightforward and user-friendly process. With just a few taps, you can easily organize your favorite tracks into a customized playlist that will accompany you through all of life’s moments. So, let’s dive in and discover how to make a playlist that truly speaks to your musical taste.
In the following steps, we’ll cover everything from opening the Amazon Music app to adding songs to your playlist and finally hitting play. By the end of this guide, you’ll be well-equipped with the knowledge to create and enjoy your own personalized playlists on Amazon Music for iPhone. So, without further ado, let’s get started!
Step 1: Open the Amazon Music App
The first step to creating a playlist on Amazon Music for iPhone is to open the Amazon Music app. If you haven’t already installed it, you can download it for free from the App Store.
Once the app is installed on your iPhone, locate the Amazon Music icon on your home screen and tap on it to launch the app. It may take a few seconds to load, depending on your device and internet connection.
Upon opening the app, you’ll be greeted with the Amazon Music home screen. This is where you’ll find a curated selection of music, personalized recommendations, and access to your saved playlists and library.
Before proceeding to the next step, make sure you’re signed in to your Amazon account. If you’re not already logged in, tap on the “Sign In” button and enter your Amazon credentials to access your personalized music collection.
Now that you’ve successfully opened the Amazon Music app and signed in to your account, you’re ready to dive into the world of music and start creating your very own playlist.
It’s worth noting that Amazon Music offers different tiers of subscription plans, including Amazon Music Free, Amazon Music Prime, and Amazon Music Unlimited. The features mentioned in this guide are applicable to Amazon Music Prime and Amazon Music Unlimited users. Some features may not be available for Amazon Music Free users.
With your Amazon Music app launched and your account signed in, let’s move on to the next step and explore how to navigate to the “My Music” tab, where your playlists reside.
Step 2: Tap on the “My Music” tab
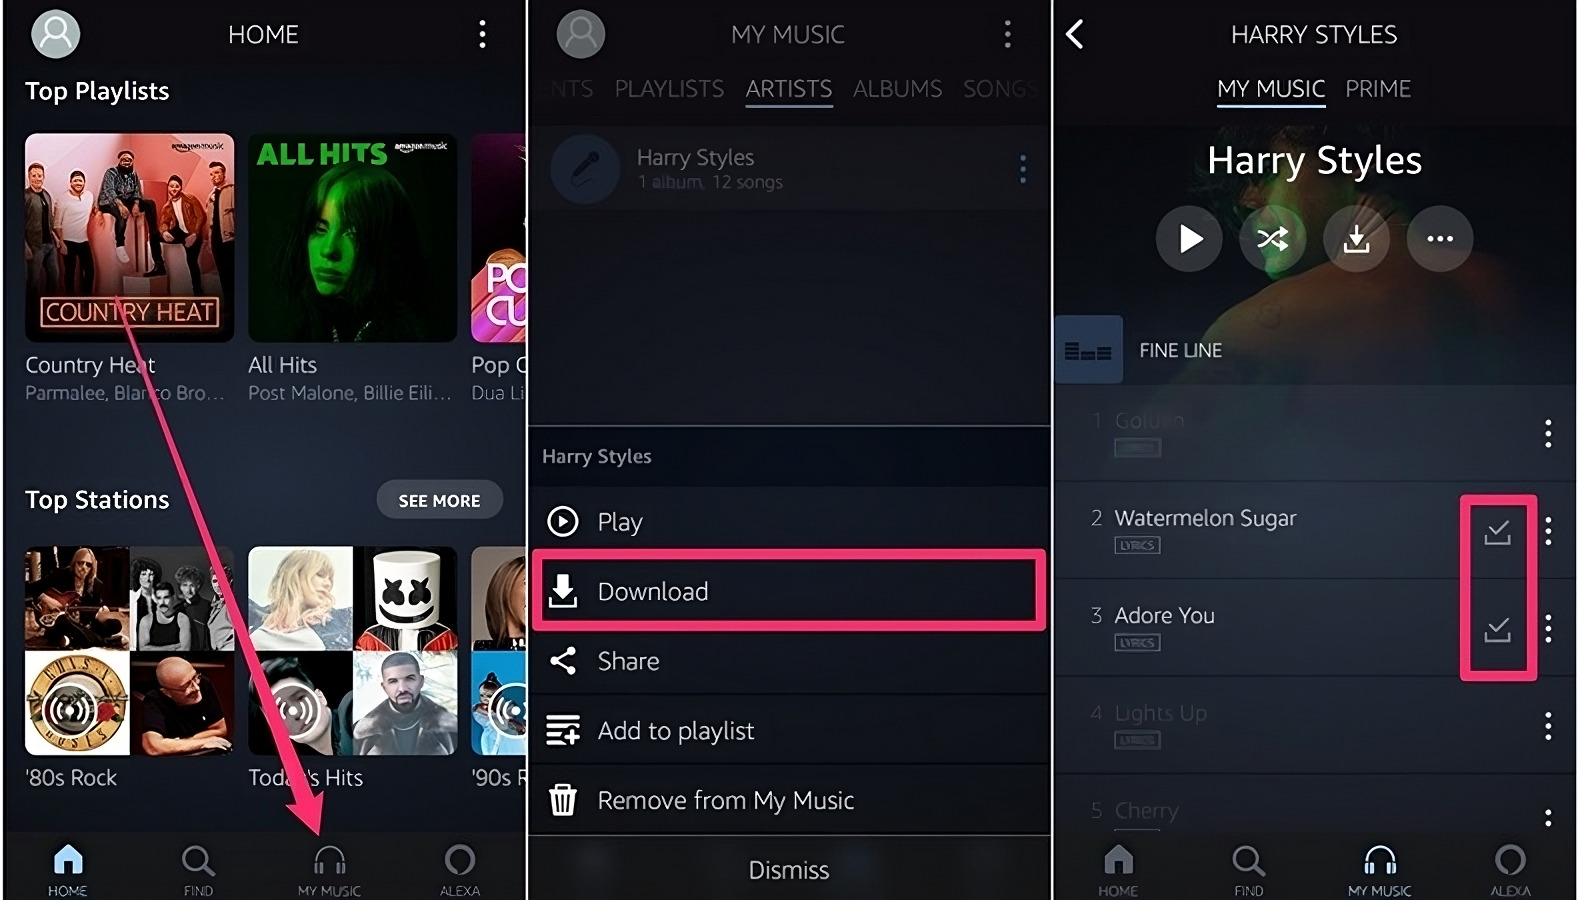
After opening the Amazon Music app and signing in to your account, the next step is to tap on the “My Music” tab. This tab is where you’ll find all your personal music collection, including your playlists, songs, albums, and artists.
To access the “My Music” tab, locate the navigation bar at the bottom of the screen. You’ll see options like “Home,” “Recents,” “Search,” and “My Music.” Tap on the “My Music” tab, which is usually represented by an icon resembling a music note or a library.
Upon tapping on the “My Music” tab, you’ll be taken to a screen that displays various sections, such as “Playlists,” “Songs,” “Albums,” “Artists,” and more. These sections help you organize and navigate through your music collection seamlessly.
For creating a playlist, we’ll be focusing on the “Playlists” section. So, tap on the “Playlists” option to dive into your existing playlists or create a new one.
At this point, you’ll see a list of your previously created playlists, if any. If you’re a new user or haven’t created any playlists yet, this list will be empty. But worry not, we’ll guide you through the process of creating a new playlist in the upcoming steps.
By tapping on the “My Music” tab and navigating to the “Playlists” section, you’ve successfully accessed your personal music library. Now, let’s move on to the next step and explore how to create a new playlist by tapping on the “+” icon.
Step 3: Navigate to “Playlists”
Once you’ve tapped on the “My Music” tab in the Amazon Music app, the next step is to navigate to the “Playlists” section. This is where you’ll find all your existing playlists and have the option to create a new one.
After tapping on the “My Music” tab, you’ll be presented with a screen that displays various sections such as “Playlists,” “Songs,” “Albums,” and “Artists.” To access the “Playlists” section, simply tap on the “Playlists” option.
Upon tapping on the “Playlists” section, you’ll be taken to a screen that lists all your previously created playlists, if any. If you’re new to Amazon Music or haven’t created any playlists yet, this list may be empty. But don’t worry, we’ll guide you through the process of creating a new playlist in the upcoming steps.
If you have existing playlists, you can tap on any of them to view the songs included in each playlist. This screen also provides options to edit, delete, or rearrange the songs within a playlist.
By navigating to the “Playlists” section, you’ve accessed the hub of your personalized playlists. From here, you can manage your existing playlists and easily add new songs to create the perfect musical collection.
Now that you’re in the “Playlists” section, let’s move on to the next step and explore how to create a new playlist by tapping on the “+” icon.
Step 4: Tap on the “+” Icon to Create a New Playlist
Creating a new playlist on Amazon Music for iPhone is as simple as tapping on the “+” icon. This allows you to start building your personalized collection of songs in just a few steps.
Once you’re in the “Playlists” section, look for the “+” icon, usually located at the top right corner of the screen. This icon represents the option to create a new playlist. Tap on it to begin the process.
Upon tapping on the “+” icon, you’ll be prompted to enter a name for your new playlist. This is your opportunity to choose a title that reflects the theme or mood of the songs you plan to include.
Take a moment to think of a meaningful and memorable name for your playlist. It could be something like “Summer Vibes,” “Workout Jams,” or “Chill and Relax.” Get creative and let your imagination guide you!
Once you’ve decided on a name, simply type it into the designated text box and tap on the “Save” button. Congratulations! You’ve successfully created a new playlist on Amazon Music for iPhone.
Now that you have a blank canvas to work with, it’s time to start adding songs to your playlist. In the next step, we’ll guide you through the process of searching for songs and adding them to your newly created playlist.
Remember, the “+” icon is your gateway to creating custom playlists on Amazon Music. With just a tap, you can begin curating a collection of songs that will entertain and inspire you throughout the day.
So, let’s move on to the next step and discover how to search for songs and add them to your playlist.
Step 5: Enter a Name for Your Playlist and Tap “Save”
After tapping on the “+” icon to create a new playlist in the Amazon Music app, the next step is to enter a name for your playlist and save it. This will give your playlist a unique identity and make it easy for you to locate and enjoy your favorite songs.
Upon tapping on the “+” icon, you’ll be presented with a text box where you can enter the name for your playlist. Take a moment to think of a catchy and descriptive name that reflects the mood, theme, or purpose of the songs you plan to include.
Type your chosen name into the text box. As you type, you’ll notice that the app may suggest auto-fill options based on popular playlist names or your listening history. Feel free to choose one of these suggestions or create a unique name of your own.
Once you’re satisfied with the name, tap on the “Save” button to finalize the creation of your playlist. Congratulations! You’ve successfully named and saved your new playlist on Amazon Music for iPhone.
Now that your playlist has a memorable title, you’ll be able to quickly find it whenever you’re in the mood for those specific songs or want to share it with others.
It’s worth mentioning that you can always edit the name of your playlist later if you change your mind or want to give it a new title. Simply locate your playlist in the “Playlists” section, tap on the ellipsis (…) or the edit icon, and select the “Rename” option.
With your playlist name chosen and saved, it’s time to start adding songs to your newly created playlist. In the next step, we’ll guide you through the process of searching for songs and adding them to your playlist.
So, let’s move on to the next step and discover how to search for songs and begin building your personalized playlist.
Step 6: Search for Songs to Add to Your Playlist
Now that you have named and saved your new playlist on Amazon Music for iPhone, it’s time to start adding songs to it. Amazon Music provides a vast library of songs to choose from, making it easy to find the perfect tracks for your playlist.
To search for songs, tap on the search icon usually located at the bottom of the screen. It’s commonly represented by a magnifying glass or a search bar. This will open the search function within the Amazon Music app.
In the search bar, type in the name of an artist, song, album, or genre that you want to add to your playlist. As you type, the app will suggest auto-fill options based on popular searches or your listening history.
Alternatively, you can browse through the pre-compiled playlists or curated categories available on Amazon Music. These playlists range from mood-based collections to genre-specific compilations, making it easier for you to discover new songs to add to your playlist.
Once you’ve found a song or collection of songs that you want to include in your playlist, tap on them to view more details. This will show you information about the artist, album, and other relevant suggestions based on your selection.
If you’re happy with your choice, tap on the “Add to Playlist” button or an equivalent option available within the song’s information page. This will give you the option to select the playlist you want to add the song to.
Locate your newly created playlist from the list of available playlists and tap on it. The song will now be added to your playlist, and you can repeat these steps to add more songs to create a complete collection.
Keep in mind that you can add songs from various artists, albums, and genres to your playlist, allowing you to create a diverse and personalized music experience.
With the ability to search for songs and add them to your playlist, you have the power to curate a collection of songs that truly resonate with your musical preferences. Now, let’s move on to the next step and learn how to rearrange the songs in your playlist.
Step 7: Tap on the Song You Want to Add and Select “Add to Playlist”
Now that you have searched for songs and found the perfect track to add to your playlist on Amazon Music for iPhone, it’s time to take the next step. By tapping on the song you want to add, you can easily select the “Add to Playlist” option and include it in your curated collection.
After conducting a search or browsing through the available playlists and categories, locate the song that you wish to add. Tap on the song to view more details about it, including the artist, album, and duration.
Within the song’s information page, you’ll find the “Add to Playlist” button or a comparable option. Tap on it to proceed with adding the song to your playlist.
Upon tapping on the “Add to Playlist” button, a list of your available playlists will appear. This includes the one you created earlier and any other playlists you may have. Choose the desired playlist by tapping on it.
Once you’ve selected the playlist, the song you chose will be added to the playlist, making it a part of your curated collection.
If you want to add more songs to the same playlist, simply repeat the previous steps for each additional song. This way, you can create a diverse and engaging playlist tailored to your musical taste.
Remember, you have the freedom to add songs from a variety of artists, albums, and genres, ensuring that your playlist is a reflection of your personal preferences and mood.
With the ability to tap on the song you want to add and easily select the “Add to Playlist” option, creating your personalized collection has never been simpler.
In the upcoming steps, we’ll explore how to rearrange the songs in your playlist, delete songs if desired, and finally, start enjoying the curated collection you’ve created.
So, let’s move on to the next step and learn how to rearrange the songs in your playlist to achieve the desired order or flow.
Step 8: Choose the Playlist You Want to Add the Song To
Once you’ve selected a song that you want to add to your playlist on Amazon Music for iPhone, the next step is to choose the specific playlist you want to add the song to. This allows you to organize your songs and create a cohesive listening experience.
After tapping on the song you wish to add, you’ll be presented with options to customize your selection. One of these options is to select the playlist where you want the song to be added.
Tap on the “Choose playlist” or a similar option, and a list of your available playlists will appear. Take a moment to browse through the list and locate the playlist that you want to add the song to.
Whether it’s the playlist you created earlier or an existing playlist, tap on your chosen playlist to proceed. This will designate that playlist as the destination for the selected song.
By selecting the playlist, you’re effectively adding the song to that specific collection, building a personalized archive of tracks that complement your mood or theme.
If you want to add the song to multiple playlists, you can repeat these steps for each playlist. This allows you to create different combinations while ensuring that the song fits well within your desired playlists.
With the ability to choose the playlist you want to add the song to, you have full control over the organization and arrangement of your curated music collection.
In the next step, we’ll explore how to add more songs to your playlist and continue crafting a collection that speaks to your musical taste and preferences.
So, let’s move on to the next step and repeat the process of searching for songs and adding them to your chosen playlist.
Step 9: Repeat Steps 6-8 to Add More Songs to Your Playlist
Now that you’ve successfully added a song to your playlist on Amazon Music for iPhone, it’s time to continue expanding your curated collection. To do so, you can repeat steps 6 through 8 to add more songs to your playlist.
First, conduct a search by using the search bar or explore the pre-compiled playlists and categories available on Amazon Music. Look for songs, artists, albums, or genres that resonate with your musical preferences.
When you find a song that you want to include in your playlist, tap on it to view more details. From the song’s information page, select the “Add to Playlist” button or a comparable option.
Next, choose the playlist where you want to add the song. This can be the same playlist you created earlier or a different playlist if you wish to separate your collection into distinct themes or genres.
Repeat these steps for each song you want to add to your playlist. Each time you add a new song, it will be incorporated into your curated collection, growing the diversity and appeal of your playlist.
As you continue adding more songs, take the time to arrange them in an order that flows well and creates a seamless listening experience. You can rearrange the songs within a playlist by tapping and holding on a song, then dragging it to the desired position.
Remember, the flexibility and customization options of Amazon Music allow you to create playlists that perfectly suit your mood and preferences.
By repeating steps 6 through 8, you can build a well-rounded playlist that represents your musical taste and provides a joyful listening experience.
In the next steps, we’ll explore optional features such as rearranging and deleting songs in your playlist. These allow you to further fine-tune your collection and ensure it represents your unique musical journey.
So let’s move on to the next step and discover how to rearrange the songs in your playlist.
Step 10: Rearrange the Songs in Your Playlist (Optional)
One of the great features of creating a playlist on Amazon Music for iPhone is the ability to rearrange the songs within your playlist. This allows you to customize the order and flow of your music, enhancing your listening experience.
If you want to rearrange the songs in your playlist, follow these simple steps:
- Open the Amazon Music app on your iPhone and navigate to the “My Music” tab.
- Tap on the “Playlists” section to access your playlists.
- Locate the specific playlist you want to rearrange songs in and tap on it to open it.
- Once inside the playlist, you’ll see a list of songs in the order they are currently arranged.
- To rearrange a song, tap and hold on it until it becomes draggable.
- While still holding down on the song, drag it to the desired position in the playlist.
- Release your finger to drop the song into its new position.
- Repeat this process for each song you want to rearrange in the playlist.
By rearranging the songs, you have the freedom to create a playlist that flows seamlessly from one track to another. You can create a dynamic arrangement that suits your mood, theme, or simply your personal preference.
Take the time to experiment with different orders and find the arrangement that resonates best with you. You can create a playlist that builds in intensity, tells a story, or simply provides a joyful listening experience.
Remember, rearranging the songs in your playlist is entirely optional. If you’re happy with the default order or prefer to keep your songs in the order you added them, you can skip this step and move on to the final steps of enjoying your playlist.
In the next step, we’ll explore how to delete songs from your playlist, providing you with further flexibility and control over your curated collection.
So, let’s move on to the next step and discover how to remove songs from your playlist if desired.
Step 11: Delete Songs from Your Playlist (Optional)
If you feel the need to remove a specific song from your playlist on Amazon Music for iPhone, you can easily delete it with just a few taps. Deleting songs allows you to refine and curate your playlist to include only the tracks that you truly enjoy.
To delete a song from your playlist, follow these steps:
- Open the Amazon Music app on your iPhone and navigate to the “My Music” tab.
- Tap on the “Playlists” section to access your playlists.
- Locate the specific playlist from which you want to remove a song and tap on it to open it.
- Within the playlist, you’ll see a list of songs in the current order.
- Swipe left on the song you want to delete. This will reveal a set of options.
- Tap on the “Delete” or trash bin icon to remove the song from the playlist.
By deleting a song, you can refine and tailor your playlist to suit your preferences. Whether it’s a song that no longer resonates with you or doesn’t fit the overall theme of your playlist, removing it allows you to create a more cohesive listening experience.
Feel free to delete one or multiple songs from your playlist as you see fit. This will help you maintain a high-quality collection of tracks that truly represent your musical taste.
It’s important to note that deleting a song from a playlist will not remove it from your library completely. You can still find and play the song individually through search or in your library if you decide to add it to another playlist in the future.
The option to delete songs from your playlist is entirely optional. If you’re satisfied with the songs in your playlist and don’t feel the need to remove any, you can skip this step and move on to the final step of enjoying your curated collection.
In the next step, we’ll explore how to start playing your playlist and enjoy the handpicked selection of songs you’ve created.
So, let’s move on to the next step and discover how to start playing your playlist on Amazon Music for iPhone.
Step 12: Start Playing Your Playlist
After creating and fine-tuning your playlist on Amazon Music for iPhone, it’s time to sit back, relax, and enjoy the handpicked selection of songs you’ve curated. Starting to play your playlist is as simple as a few taps on your device.
To begin playing your playlist, follow these steps:
- Open the Amazon Music app on your iPhone.
- Navigate to the “My Music” tab.
- Tap on the “Playlists” section to access your playlists.
- Locate and tap on the specific playlist you want to play.
- Within the playlist, you’ll see a list of songs in the desired order.
- Tap on the play button, usually represented by a triangle or a play icon, to start playing your playlist.
Once you tap the play button, the songs in your playlist will begin playing one after another, creating a continuous and seamless musical experience.
Now you can immerse yourself in the carefully curated selection of songs that reflect your musical taste, mood, or purpose. Whether you’re looking to relax, energize, or vibe to a specific genre, your playlist is tailored to provide the perfect soundtrack.
While playing your playlist, you’ll have various options to control your listening experience. You can pause, skip, or repeat songs using the playback controls within the Amazon Music app.
Additionally, Amazon Music offers features like shuffle and repeat modes that allow you to customize how the songs are played. Shuffle mode randomizes the order of your playlist, offering a fresh listening experience each time, while repeat mode lets you loop your playlist continuously if desired.
Enjoy the music, sing along, and let the curated collection of songs on your playlist enrich your day.
Congratulations! You’ve successfully created, refined, and started playing your playlist on Amazon Music for iPhone. Now, it’s time to sit back, relax, and enjoy the music.
If you ever want to make changes to your playlist, such as adding new songs, rearranging them, or deleting tracks, feel free to revisit the steps we’ve covered to continue customizing your collection.
Thank you for following this step-by-step guide. Happy listening!
Conclusion
Congratulations on successfully creating your own playlist on Amazon Music for iPhone! You’ve learned how to navigate the app, search for songs, add them to your playlist, and even rearrange or delete songs as desired. Now, you have a personalized collection of handpicked tracks that truly reflect your musical taste and preferences.
Creating a playlist on Amazon Music is not only a fun and creative process but also a great way to enhance your music streaming experience. With millions of songs at your fingertips, you can explore different genres, discover new artists, and curate playlists for any occasion or mood.
Remember to give your playlist a catchy or meaningful name to make it easily identifiable, and take advantage of the ability to rearrange songs to create a seamless listening journey. Deleting songs that no longer resonate with you or do not fit the overall theme of your playlist can further refine your collection.
Whether you’re using Amazon Music Free, Amazon Music Prime, or Amazon Music Unlimited, the steps outlined in this guide apply to all users. Take advantage of the features and options available to you to tailor your playlist and create a personalized music library.
Now it’s time to sit back, relax, and enjoy the music you’ve curated. Start playing your playlist and let the handpicked selection of songs transport you to your own musical world.
Don’t forget that you can always revisit your playlist, add new songs, and make changes as your musical preferences evolve. Amazon Music offers a dynamic and ever-expanding library, ensuring that your playlist will remain fresh and exciting.
Thank you for following this guide, and may your playlist bring you joy, inspiration, and unforgettable musical moments. Happy listening!