Introduction
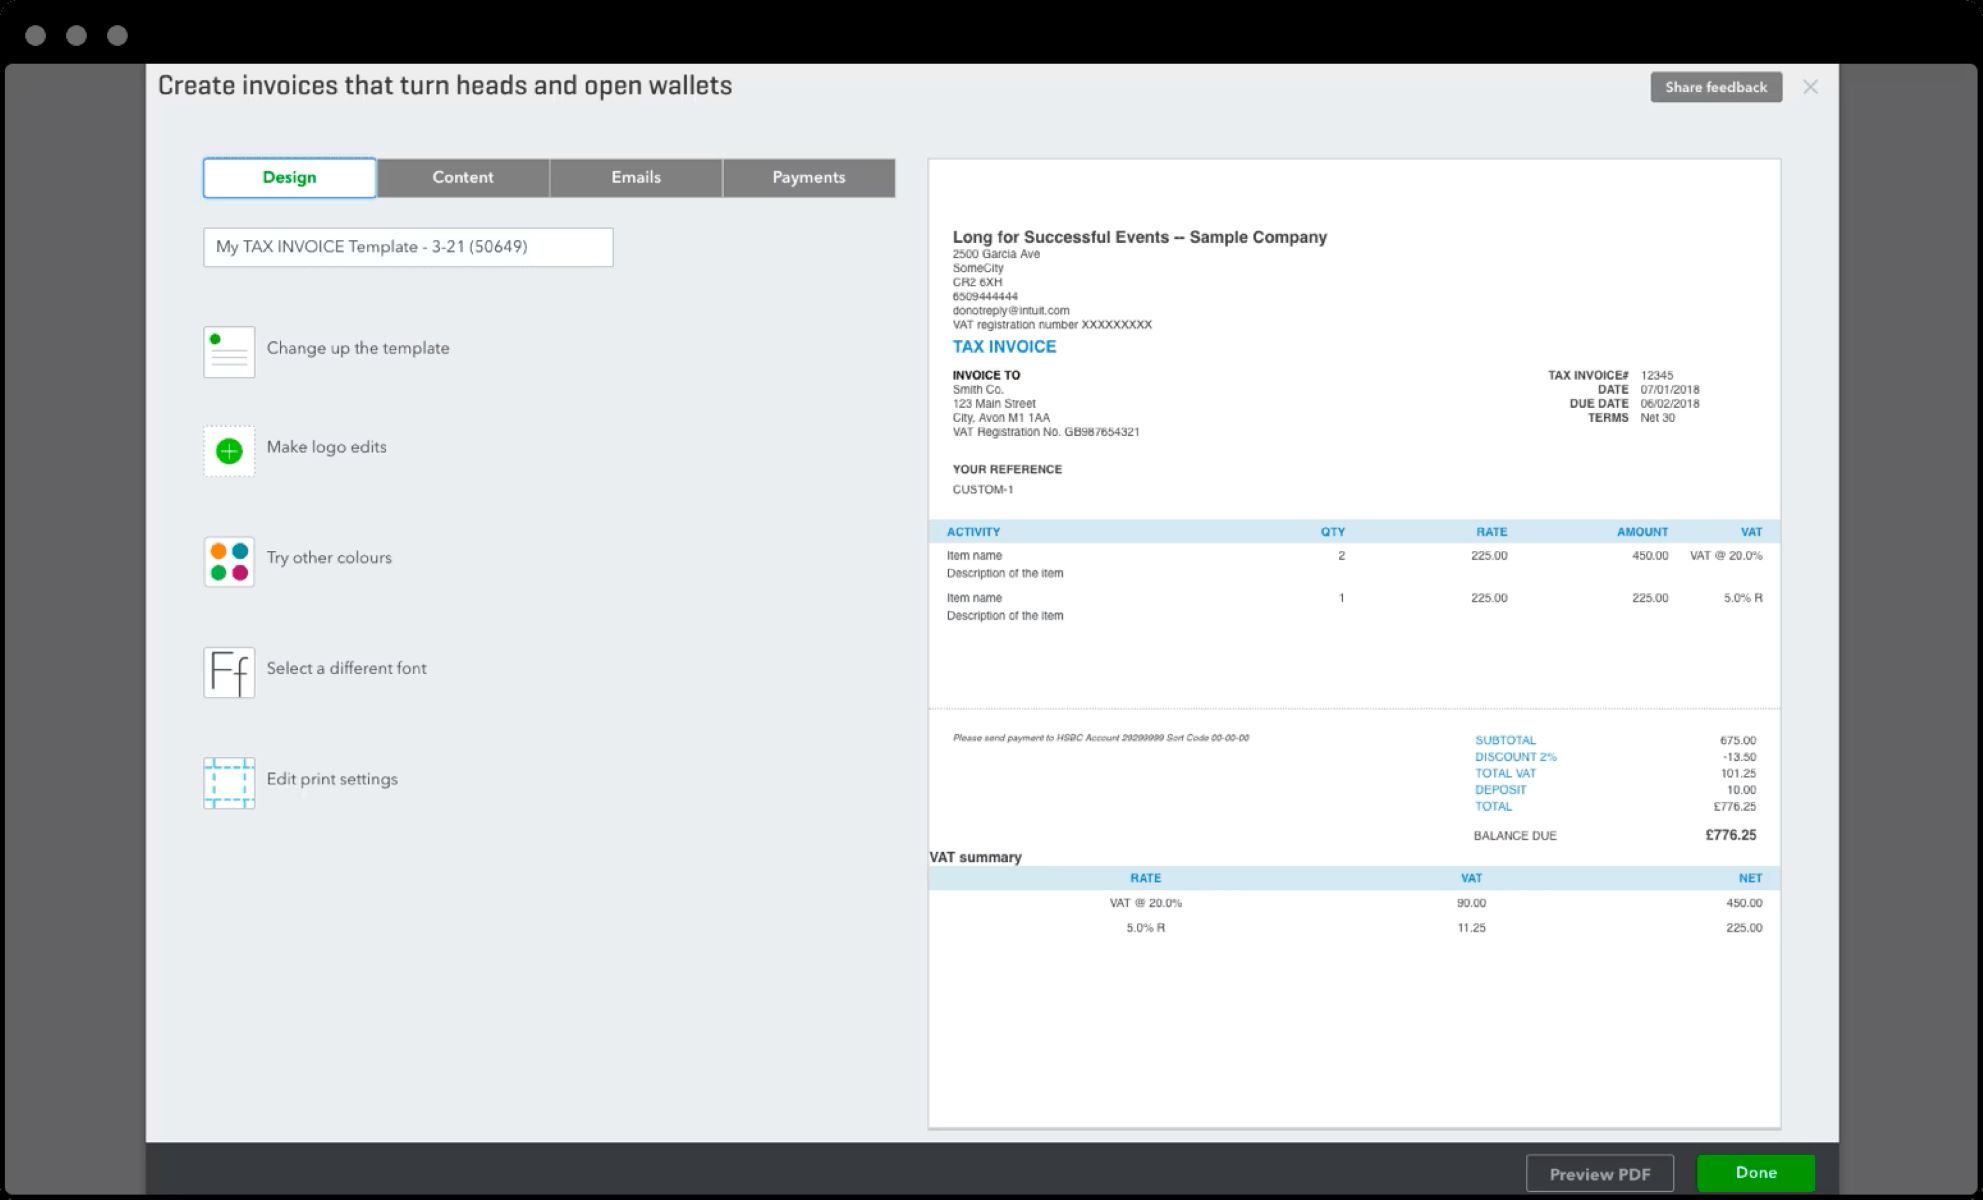
QuickBooks Desktop is a powerful accounting software that offers a wide range of customizable features to meet the unique needs of businesses. One such feature is the ability to customize invoices. By personalizing your invoices with your company’s branding, fonts, and styles, you can create a professional and cohesive look for your business documents.
In this article, we will explore the step-by-step process of customizing invoices in QuickBooks Desktop. Whether you want to add your company logo, modify the invoice layout, or adjust the payment terms, you can easily tailor your invoices to reflect your brand and enhance the overall customer experience.
An invoice is a formal document issued by a seller to a buyer, detailing the products or services provided, their quantities, prices, and terms of payment. It serves as a crucial financial record for both parties and facilitates transparent transactions in business. Customizing invoices in QuickBooks Desktop not only allows you to create a professional appearance but also enables you to provide clear and concise information to your clients. From modifying the header and footer sections to adding or removing fields and columns, you have full control over the content and layout of your invoices.
Additionally, QuickBooks Desktop provides the flexibility to customize multiple invoice templates, allowing you to cater to various types of clients or business scenarios. Whether you need specific invoice numbering, unique payment terms, or different designs for different customers, QuickBooks Desktop has you covered.
So, get ready to take your invoicing to the next level with QuickBooks Desktop’s customization capabilities. In the following sections, we will walk you through the process of accessing the customize invoices menu, making modifications to your templates, and applying your customizations to your invoices. Let’s dive in!
Accessing the Customize Invoices Menu
To begin customizing your invoices in QuickBooks Desktop, you first need to access the Customize Invoices menu. Follow these steps to get started:
- Open QuickBooks Desktop and log in to your company file.
- From the top menu bar, click on “Lists” and then select “Templates”.
- A list of available invoice templates will appear. Choose the template you want to customize and click on it to open the template editor.
Once you have accessed the Customize Invoices menu, you will be able to make a wide range of modifications to your invoice template. This includes changing the company information, adjusting the layout and design, adding or removing fields, and more.
It is important to note that QuickBooks Desktop provides a default invoice template that you can start customizing. However, if you prefer to create a new template from scratch, you can do so by clicking on the “Templates” button in the top right corner of the template editor and selecting “New” from the dropdown menu.
Overall, accessing the Customize Invoices menu is the first step towards tailoring your invoice templates to suit your business needs. By having the ability to modify various elements of the template, you can create professional and branded invoices that leave a lasting impression on your clients.
Modifying Company Information
When customizing your invoices in QuickBooks Desktop, it is important to ensure that your company information is accurate and up-to-date. This includes your company name, address, phone number, email, and website. Follow the steps below to modify your company information:
- Open the template editor by accessing the Customize Invoices menu, as explained in the previous section.
- Click on the “Header” tab in the template editor to display the company information section.
- Edit the existing company information or add new information in the designated fields.
In addition to the basic company details, you can also customize the appearance of your company information by adjusting the font, size, and color. This allows you to maintain a consistent branding throughout your invoices.
It’s worth mentioning that if you have multiple company files in QuickBooks Desktop, each with its own unique company information, you can easily switch between templates and update the company information accordingly. This makes it convenient for businesses that operate under different entities or have multiple divisions.
Once you have made the necessary modifications to your company information, you can preview the changes in real-time by clicking on the “Preview” button in the template editor. This allows you to see how the updated company information will appear on your invoices before finalizing the customization process.
By taking the time to modify and personalize your company information, you can create a professional impression when your invoices are received by clients. It also ensures that the necessary contact details are clearly visible, making it easier for clients to get in touch with you for any queries or concerns.
Customizing Invoice Templates
Once you have accessed the Customize Invoices menu and modified your company information, it’s time to delve deeper into customizing the overall appearance of your invoice templates. QuickBooks Desktop provides a range of options to help you create professional and visually appealing invoices. Here’s how you can customize your invoice templates:
- Open the template editor by accessing the Customize Invoices menu as explained earlier.
- Explore the various customization options available in the template editor, such as font styles, colors, and layout settings.
- Make adjustments to the invoice design by selecting different fonts, font sizes, and font colors to match your company branding.
- Customize the layout of your invoice templates by rearranging the position of fields and sections within the template editor. You can also resize and align fields to create a well-organized and structured invoice.
- Add your company logo to the invoice template to enhance brand recognition. To do this, click on the “Header” tab in the template editor and upload your logo in the designated field. You can further customize the logo’s size and position.
- If you want to make your invoices more visually appealing, you can consider adding a background image. Simply click on the “Format” tab in the template editor and select the “Background” option. From there, you can choose an image from your computer to set as the background of your invoice.
QuickBooks Desktop also allows you to apply pre-designed templates or create your own custom templates from scratch. By utilizing customization options like these, you can tailor your invoice templates to suit your business’s unique branding and style preferences.
Keep in mind that as you make changes to your invoice templates, you can constantly preview the updates in real-time. This helps ensure that the customized templates meet your expectations before you proceed with issuing invoices to your clients.
With the ability to fully customize your invoice templates, you can create professional and visually appealing documents that reflect your business’s branding, making a positive impression on your clients and improving your overall professionalism.
Editing Header and Footer Sections
The header and footer sections of your invoice templates provide additional customization opportunities and allow you to include important information or messages. Here’s how you can edit the header and footer sections in QuickBooks Desktop:
- Open the template editor by accessing the Customize Invoices menu, as mentioned earlier.
- Click on the “Header” or “Footer” tab in the template editor to display the respective section.
- Edit the existing content or add new text in the designated fields. You can include your business slogan, payment instructions, or any other relevant information.
- Format the text in the header and footer sections by selecting different fonts, font sizes, and font colors. You can also align the text to the left, center, or right for better visual organization.
- If you want to include important information like payment terms, due dates, or contact details, consider using the merge field feature. This allows you to automatically populate the information based on your invoice settings.
The header and footer sections are excellent places to highlight your business’s unique value proposition or to provide additional instructions to your clients. You can use these sections to strengthen your brand positioning or to communicate essential details related to payment terms and policies.
It’s important to strike a balance between adding necessary information and keeping the header and footer sections uncluttered. Remember, a well-designed and concise invoice provides a professional impression to your clients.
By customizing the header and footer sections, you can tailor your invoices to align with your business’s branding and messaging. This allows you to create a consistent and cohesive experience for your clients, conveying professionalism and attention to detail.
Adjusting Fonts and Styles
The fonts and styles used in your invoice templates play a significant role in conveying your brand’s personality and professionalism. QuickBooks Desktop allows you to customize these aspects to create a consistent and visually appealing design. Here’s how you can adjust fonts and styles in your invoice templates:
- Open the template editor by accessing the Customize Invoices menu, as explained earlier.
- Navigate to the section where you want to modify the font and style settings, such as the body of the invoice or specific field labels.
- Click on the field or section you want to customize, and a formatting toolbar will appear.
- In the formatting toolbar, you can select different fonts, font sizes, font colors, and font styles (bold, italic, underline) to match your brand’s visual identity.
- Experiment with different font combinations and styles to achieve the desired look and feel. Keep in mind that using too many different fonts can create visual clutter, so try to find a balance between readability and design.
- Apply the font and style changes to the entire template or specific sections as needed by selecting the relevant text and modifying its formatting.
The fonts and styles you choose for your invoice templates should be consistent with your overall branding strategy. If you already have specific fonts and styles associated with your business, it’s a good idea to use them in your invoices to create a cohesive brand experience.
Remember that readability is key. While it may be tempting to experiment with decorative or elaborate fonts, make sure that the text remains easy to read. Your clients should be able to quickly understand the information presented on the invoice without any confusion.
By adjusting fonts and styles in your invoice templates, you can create a consistent and visually appealing design that aligns with your brand. This attention to detail enhances your professionalism and ensures that your invoices are well-received by your clients.
Adding/Removing Fields and Columns
QuickBooks Desktop provides flexibility when it comes to adding or removing fields and columns in your invoice templates. This allows you to include the necessary information and present it in a way that meets your business requirements. Here’s how you can customize the fields and columns in your invoice templates:
- Open the template editor by accessing the Customize Invoices menu, as mentioned earlier.
- Click on the section where you want to add or remove fields and columns, typically the body of the invoice.
- To add a new field or column, click on the “Add” button in the template editor and select the type of field or column you want to include. You can choose from options like item, description, quantity, rate, and more.
- To remove a field or column, simply click on the field or column you want to delete and click the “Delete” button. Confirm the deletion and the field or column will be removed from the template.
- You can also rearrange the order of fields and columns by clicking and dragging them to the desired position within the template editor. This allows you to customize the layout of your invoice to better suit your business needs.
- Additionally, you can modify the properties of fields and columns by right-clicking on them and selecting “Properties”. From there, you can adjust settings such as the width of the field, alignment, or other display options.
The ability to add or remove fields and columns in your invoice templates provides you with the flexibility to include all the necessary information for your clients while maintaining a clean and organized design. You can customize the layout and content to streamline the invoice creation process and make it more efficient for both you and your clients.
It’s important to strike a balance between providing sufficient information and keeping the invoice concise. Including too many fields or columns may overwhelm your clients and make it harder for them to understand the invoice. Ensure that the fields and columns you choose are relevant to your business and the specific needs of your clients.
By adding or removing fields and columns in your invoice templates, you can customize the layout and content to align with your business’s requirements. This customization allows for efficient invoice generation and improves the clarity and readability of the invoices for your clients.
Including Logo and Background Image
Adding your company logo and a background image to your invoice templates can significantly enhance their visual appeal and reinforce your brand identity. QuickBooks Desktop allows you to include these elements, making your invoices more professional and personalized. Here’s how you can incorporate a logo and a background image into your invoice templates:
- Open the template editor by accessing the Customize Invoices menu, as explained earlier.
- To add your company logo, click on the “Header” tab in the template editor. Look for the option to insert a logo or image, and click on it. Choose the file containing your logo from your computer and upload it to the designated field. You can resize, reposition, or customize the appearance of the logo as needed.
- If you wish to include a background image, click on the “Format” tab in the template editor. Find the option to set a background image and select it. Choose an image file from your computer that aligns with your brand’s aesthetics. You can adjust the opacity or positioning of the background image to suit your preferences.
Including your company logo in your invoice templates helps to create brand awareness and adds a professional touch to your invoices. It also reinforces your brand identity and creates a sense of trust and familiarity with your clients.
The background image, on the other hand, can complement your brand’s visual style and create a visually engaging backdrop for your invoices. However, it’s important to ensure that the background image does not interfere with the readability of the invoice or distract from the essential information.
Remember to use high-quality images for both the logo and the background to maintain a professional appearance. If your logo contains transparent elements, ensure that they appear correctly when uploaded to the invoice template.
By including your company logo and a carefully selected background image in your invoice templates, you can elevate the visual appeal of your invoices and leave a lasting impression on your clients. These elements help to reinforce your brand identity and make your invoices more professional and personalized.
Adjusting Columns and Rows
QuickBooks Desktop allows you to customize the columns and rows in your invoice templates to present information in a clear and organized manner. By adjusting the layout and arrangement of these elements, you can create customized invoices that cater to your specific business needs. Here’s how you can adjust columns and rows in your invoice templates:
- Open the template editor by accessing the Customize Invoices menu, as mentioned earlier.
- Click on the section where you want to adjust the columns and rows, typically the body of the invoice.
- To add a new column, click on the “Add column” option in the template editor. You can choose from multiple column types, such as item, description, quantity, rate, and more. Repeat this step to add additional columns as needed.
- To adjust the width of columns, simply click and drag the column border to the desired size within the template editor. This allows you to resize columns according to the amount of information you need to display in each column.
- If you want to customize the appearance of rows, you can select a row and modify its properties in the template editor. For example, you can change the background color, font size, or alignment of specific rows to highlight important information or create a visually appealing layout.
- You also have the option to merge cells within a row to create a more compact and streamlined look. This can be useful when grouping related information or creating sub-sections within your invoice template.
Adjusting columns and rows in your invoice templates allows you to organize and present information in a way that is both visually appealing and easy to understand for your clients. By customizing columns and rows, you can create a structured layout that efficiently showcases important details and facilitates clear communication.
Remember to strike a balance between providing sufficient information in each column and keeping the invoice uncluttered. Ensure that columns are wide enough to display the content without it being cut off or overlapping with other columns and rows.
By adjusting columns and rows in your invoice templates, you can create a well-structured and organized layout that effectively presents information to your clients. This customization ensures that your invoices are clear, professional, and easy to understand, enhancing the overall customer experience.
Customizing Invoice Numbers and Labels
Customizing invoice numbers and labels in QuickBooks Desktop allows you to establish a systematic and organized approach to your invoicing process. By customizing these elements, you can create a consistent numbering system and use labels that align with your business’s terminology. Here’s how you can customize invoice numbers and labels in QuickBooks Desktop:
- Open the template editor by accessing the Customize Invoices menu.
- Click on the “Header” or “Footer” tab in the template editor, depending on where you want to customize the invoice number and label.
- Locate the field that displays the invoice number or label and click on it to edit its properties.
- In the properties settings, you can customize the format of the invoice number or label. You can use a combination of letters, numbers, or symbols to create a unique format that suits your preference.
- If you want to include additional information within the invoice number or label, such as the year or a specific prefix, you can utilize the available placeholder fields or merge fields to automatically populate the relevant data.
- Ensure that the chosen format for invoice numbers and labels aligns with your business’s invoicing policies and any legal requirements. It’s also important to maintain consistency to avoid confusion or duplication in invoice numbering.
Customizing invoice numbers and labels allows you to have greater control over the identification and categorization of your invoices. It enables you to create a system that works best for your business and makes it easier to track and manage invoices efficiently.
Consistency in invoice numbering and labeling is key. Establishing a clear and logical numbering convention helps both you and your clients identify and reference invoices accurately. It also adds a professional touch to your invoicing process, improving your brand’s professionalism and credibility.
By customizing invoice numbers and labels in QuickBooks Desktop, you can streamline your invoicing process and create a standardized system that supports accurate financial record-keeping. This customization allows for better organization and easier identification of invoices, benefiting both your business and your clients.
Setting Payment Terms and Due Dates
Setting clear payment terms and due dates in your invoice templates is crucial for ensuring timely and efficient payments from your clients. By customizing these elements in QuickBooks Desktop, you can establish transparent expectations and streamline your payment processes. Here’s how you can set payment terms and due dates in your invoice templates:
- Open the template editor by accessing the Customize Invoices menu, as explained earlier.
- Click on the section where you want to include payment terms and due dates, typically the “Footer” or “Notes” section.
- Insert text fields for payment terms and due dates in the designated area.
- Customize the payment terms by specifying the preferred payment method and the payment period, whether it’s “Net 30,” “Due upon receipt,” or any other arrangement that aligns with your business policies.
- Set the due date by utilizing merge fields or placeholder fields that automatically calculate the due date based on the invoice date. This allows you to ensure consistency and accuracy in your invoicing process.
- It’s important to keep in mind any legal or contractual obligations when setting payment terms and due dates. Ensure that they comply with local regulations and any agreements you have with your clients.
Customizing payment terms and due dates in your invoice templates provides clarity and helps manage client expectations. It establishes a formal agreement between you and your clients regarding payment obligations, reducing the likelihood of disputes or delays in payment.
Additionally, by clearly stating the payment terms and due dates, you empower your clients to plan their cash flow and allocate resources accordingly. This fosters a more efficient payment process and improves the overall client experience.
By setting payment terms and due dates in your invoice templates, you create a structure that promotes prompt and hassle-free payments. This customization ensures that both you and your clients have clear expectations, minimizing potential payment-related issues and contributing to a positive business relationship.
Applying Customizations to Multiple Templates
If you have multiple invoice templates in QuickBooks Desktop and want to apply the same customizations to all of them, you can do so efficiently. QuickBooks Desktop allows you to copy customizations from one template to others, saving you time and effort. Here’s how you can apply customizations to multiple templates:
- Open the template editor by accessing the Customize Invoices menu.
- Select the template that you have customized and want to apply the customizations from.
- Click on the “Templates” button in the top right corner of the template editor and choose “Copy to” from the dropdown menu.
- In the “Copy Template” dialog box, select the templates you want to copy the customizations to. You can choose multiple templates at once for a streamlined process.
- Click “OK” to apply the customizations to the selected templates.
- Review each template to ensure that the customizations are accurately applied. Make any necessary adjustments or modifications as needed.
Applying customizations to multiple invoice templates allows you to maintain consistency across your invoices, even when using different templates for specific clients or business scenarios. This ensures that your branding, layout, and content remain consistent, leading to a more professional and coherent invoicing process.
With this feature, you can easily implement changes or updates to all relevant templates in a few simple steps. This saves you time from individually customizing each template and guarantees that all your invoices reflect your desired changes.
By efficiently applying customizations to multiple templates in QuickBooks Desktop, you can streamline your invoicing process and maintain a consistent brand image across all your client interactions. It also allows you to adapt your templates to different business requirements without sacrificing design consistency or wasting valuable time on manual adjustments.
Previewing and Printing Customized Invoices
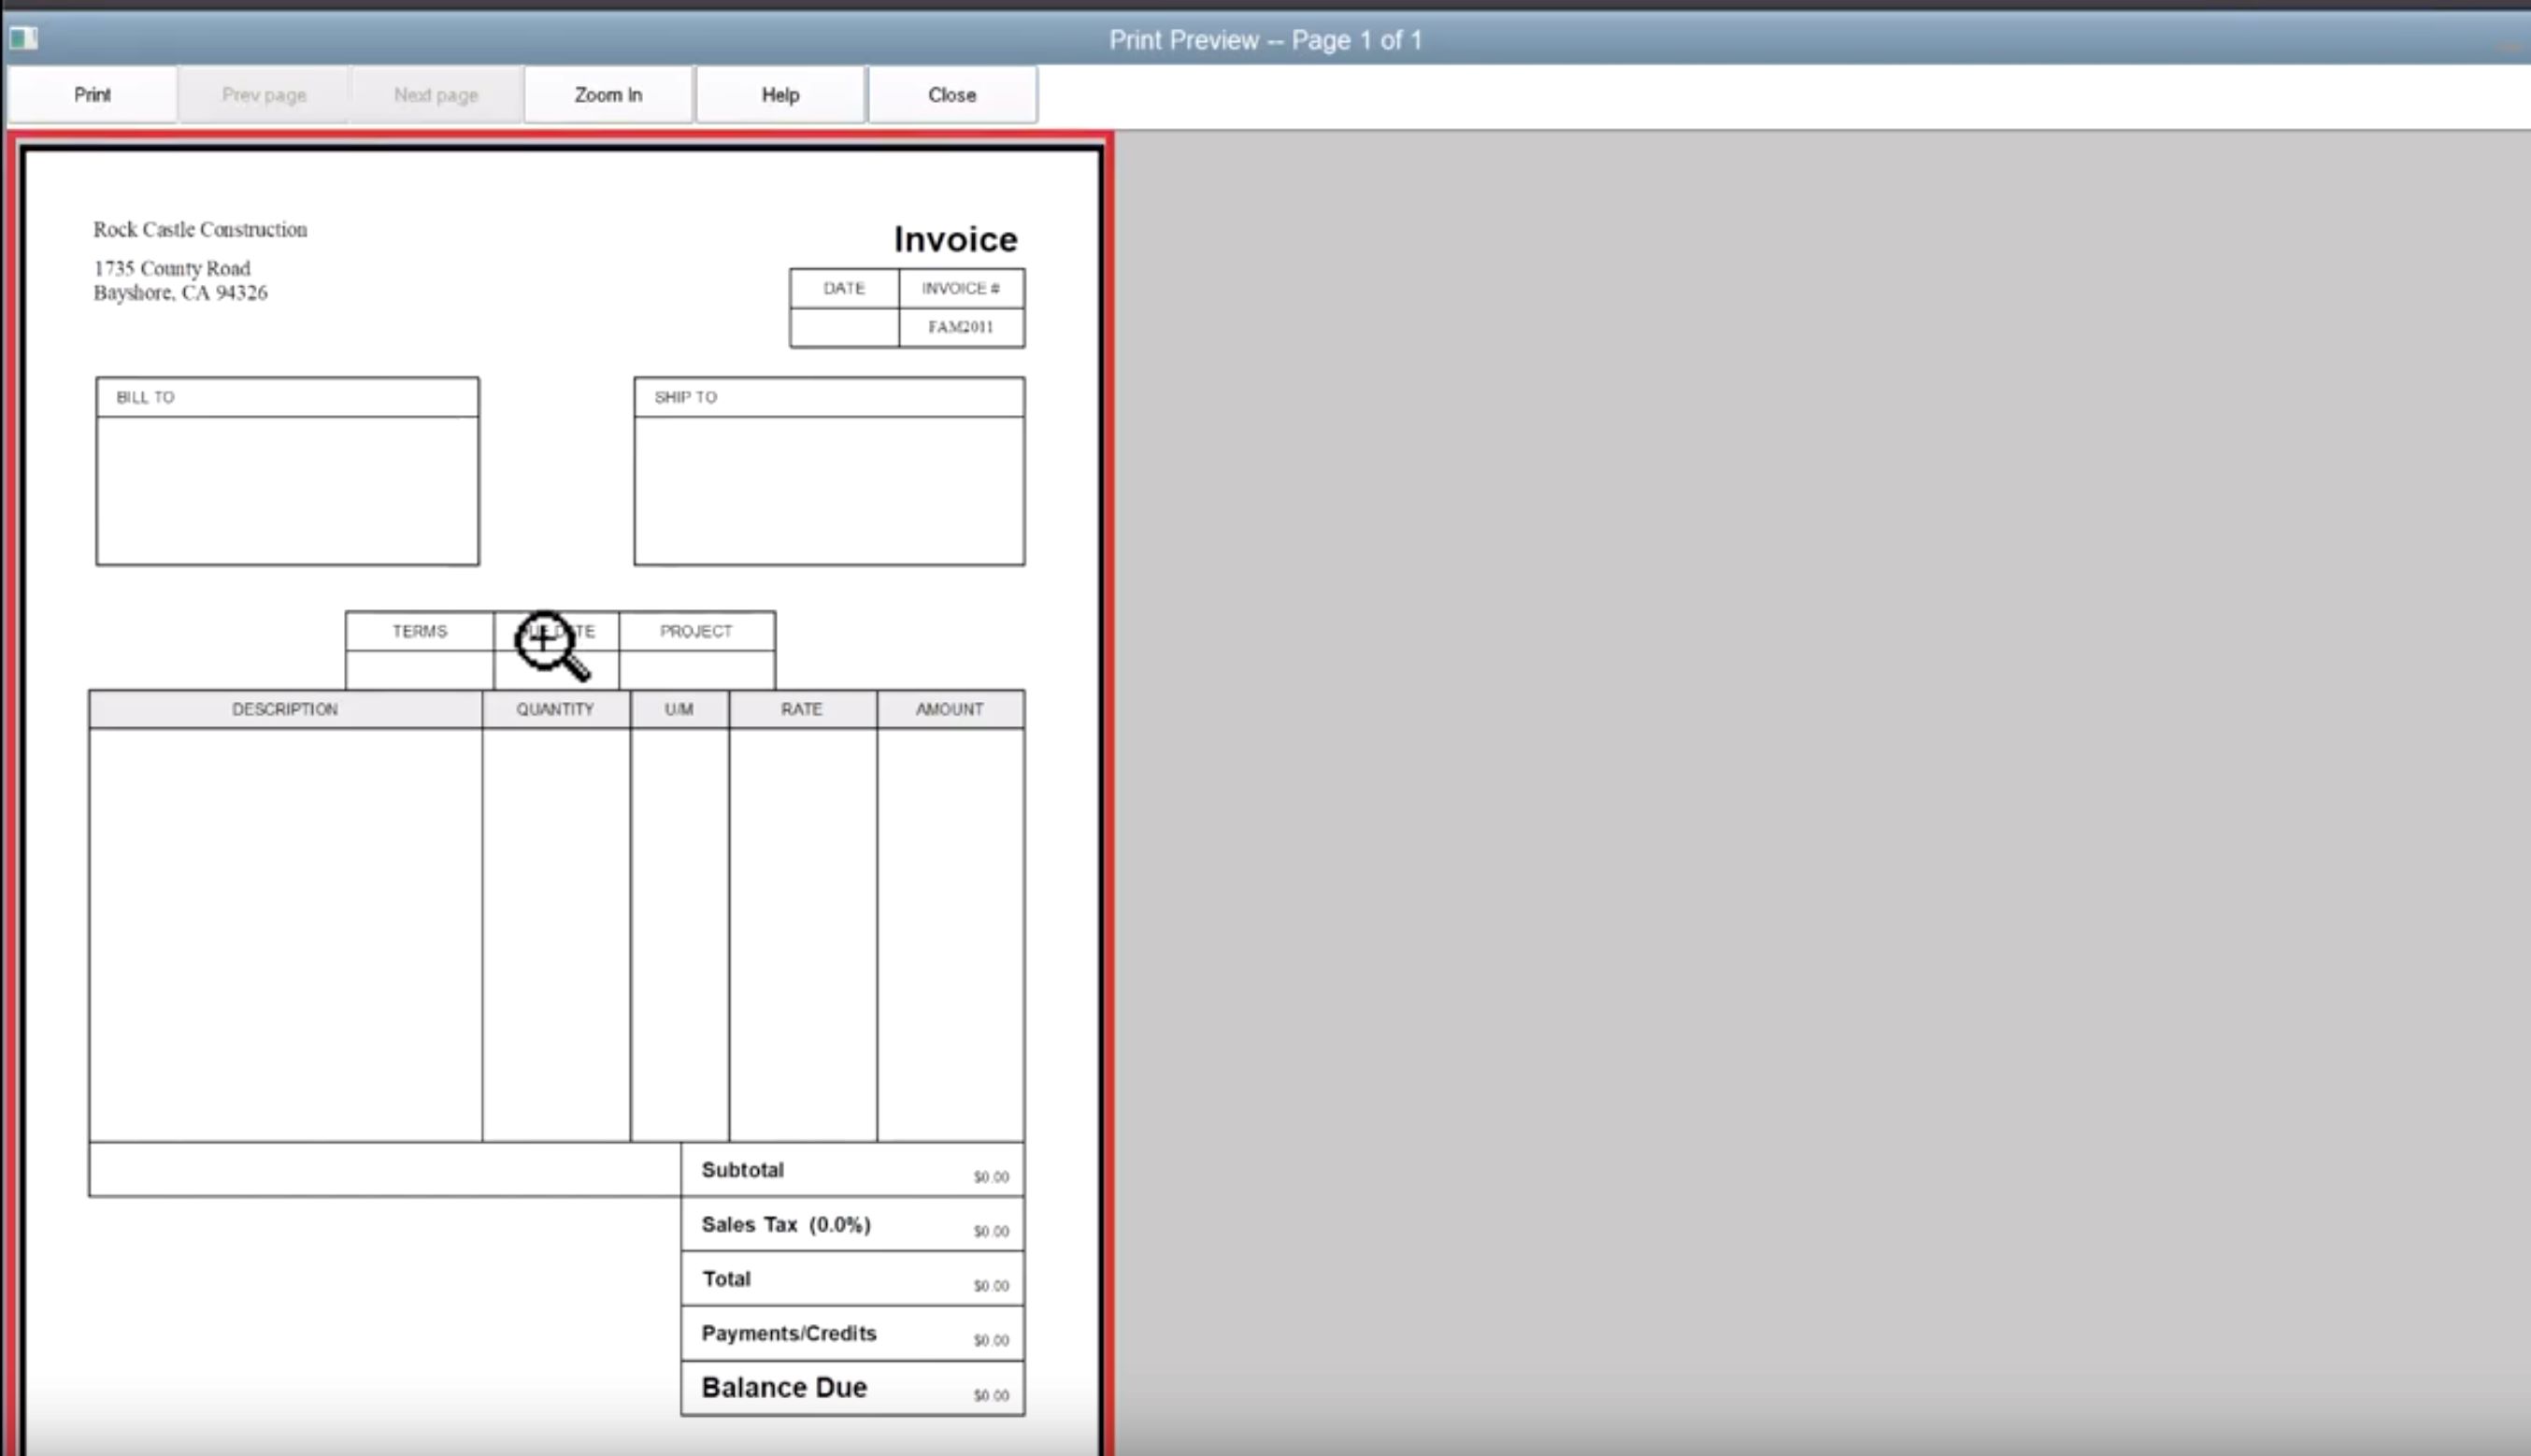
Once you have customized your invoice templates in QuickBooks Desktop, it’s important to preview and print them to ensure that they meet your expectations before sending them to your clients. The preview and printing features allow you to see how your customized invoices will appear in their final printed form. Here’s how you can preview and print your customized invoices:
- Open the template editor by accessing the Customize Invoices menu and select the template you want to preview and print.
- Click on the “Preview” button in the template editor to see a preview of how the invoice will look. This gives you an opportunity to review the layout, design, and information included in the invoice.
- Navigate through different pages of the preview to ensure that all the content fits correctly and that there are no formatting issues or missing information.
- If you are satisfied with the preview and want to print the invoice, click on the “Print” button. Select your printer and adjust any print settings, such as the number of copies or page orientation, as needed. Finally, click “Print” to generate a hard copy of the invoice.
- Before finalizing the printing, double-check the print preview to ensure that all the information is correctly displayed and that there are no errors or omissions.
Previewing and printing customized invoices is a crucial step in the invoicing process. It allows you to spot any mistakes or formatting issues, ensuring that your invoices are accurate and professional-looking before sending them to your clients.
Additionally, previewing and printing your invoices enables you to assess how they will appear on paper, making it easier to spot any readability or design issues that may not be apparent on a digital screen. This attention to detail helps you maintain a high level of professionalism and communicate effectively with your clients through well-designed and error-free invoices.
By utilizing the preview and print features in QuickBooks Desktop, you can ensure that your customized invoices meet your expectations and adhere to your business’s branding and formatting guidelines. This step enhances the overall quality of your invoices and increases the chances of prompt payment from your clients.
Saving and Sharing Customized Templates
After customizing your invoice templates in QuickBooks Desktop, it’s important to save and share them to ensure consistent and efficient invoicing across your business. Saving and sharing your customized templates allows you to easily access them for future use and collaborate with team members if necessary. Here’s how you can save and share your customized templates:
- Open the template editor by accessing the Customize Invoices menu and select the template you want to save and share.
- Click on the “Templates” button in the top right corner of the template editor and select “Save Template” from the dropdown menu.
- Choose a name for the template to easily identify it in your template list.
- Select the appropriate option for saving the template. You can choose to save it as a “Custom template” that you can apply to future invoices or as an “Invoice form” that replaces the current template for all new invoices going forward.
- To share the customized template with team members or colleagues, you can export it from QuickBooks Desktop. Go to the “Templates” menu, select the template you want to export, and choose “Export”. Save the template file to a location accessible to the intended recipients.
- Other team members or colleagues can import the shared template into their QuickBooks Desktop by going to the “Templates” menu, selecting “Import”, and choosing the template file from the saved location. This allows everyone to use the same customized templates for consistent branding and design.
Saving and sharing customized templates in QuickBooks Desktop provides convenience and consistency in your invoicing process. It allows you to avoid duplicating efforts by reusing customized templates and ensures that your entire team is using the same branding and formatting guidelines.
Sharing your customized templates also simplifies collaboration, as team members can easily access and import the templates into their own QuickBooks Desktop installation. This fosters effective teamwork and contributes to a unified brand image across all invoicing activities.
By saving and sharing your customized templates, you can streamline your invoicing process, promote consistency in your branding and design, and facilitate collaboration among your team members. This step ensures that everyone is on the same page, resulting in professional and standardized invoices for your clients.
Conclusion
Customizing your invoices in QuickBooks Desktop is a powerful way to create professional and personalized documents that reflect your business’s branding and meet your specific needs. By following the steps outlined in this article, you can access the Customize Invoices menu, modify company information, customize invoice templates, edit header and footer sections, adjust fonts and styles, add or remove fields and columns, include your logo and background image, set payment terms and due dates, and preview and print your customized invoices.
Through the customization process, you can tailor your invoices to align with your brand identity, create a consistent design, and improve the overall customer experience. Customizing invoice numbers and labels helps establish a systematic approach to invoicing, while adjusting columns and rows allows for a clear organization of information. Furthermore, saving and sharing customized templates ensures consistency and collaboration among team members.
It is crucial to strike a balance between adding customized elements and maintaining readability and professionalism. Carefully consider the placement of information, the use of fonts, and the amount of detail to include in your invoices to ensure they are clear and easy to understand.
By taking advantage of the customization features in QuickBooks Desktop, you can create invoices that not only accurately reflect your business but also enhance your brand image and streamline your invoicing process. This attention to detail sets a professional tone, builds trust with your clients, and contributes to the success of your business.
Harness the power of customization in QuickBooks Desktop to make your invoices stand out, leave a lasting impression, and ensure effective communication with your clients. Embrace the opportunity to showcase your brand identity and create invoices that are not only functional but also visually appealing. With customizable invoice templates, you can take your invoicing process to the next level and make a positive impact on your business’s professionalism and client relationships.


