Introduction
Welcome to our guide on how to connect a mouse to a Chromebook. Chromebooks are widely popular for their sleek design, portability, and user-friendly interface. While the touchpad on a Chromebook provides basic functionality, many users prefer the precision and ease of use that comes with using a mouse. Whether you’re using a Chromebook for work or leisure, connecting a mouse can greatly enhance your productivity and overall experience.
One of the advantages of Chrome OS is its compatibility with various mouse models, both wired and wireless. In this guide, we will walk you through the simple steps required to connect a mouse to your Chromebook. We will cover the compatibility check, connecting via USB, connecting wirelessly via Bluetooth, and troubleshooting common issues that may arise during the process.
Before we dive into the step-by-step instructions, it’s important to note that Chromebooks have different models and manufacturers, so the exact steps may vary slightly. However, the general process remains the same. So, let’s get started!
Step 1: Check for Compatibility
Before connecting a mouse to your Chromebook, it’s important to ensure compatibility between the two devices. Chrome OS is designed to work seamlessly with a wide range of mouse models, but it’s always a good idea to double-check to avoid any potential issues.
Most mice are compatible with Chromebooks, including both wired and wireless options. However, there are a few things to keep in mind:
- USB mice: Chromebooks typically have USB-A ports, so make sure your mouse uses a USB-A connector. If your mouse uses a USB-C connector, you may need an adapter to connect it to your Chromebook.
- Wireless mice: Chromebooks support Bluetooth connectivity, so you can easily connect a wireless mouse without the need for any additional adapters. Just make sure your mouse is Bluetooth-enabled and follow the manufacturer’s instructions for pairing.
If you have a specific mouse model in mind, you can check the manufacturer’s website or the packaging for compatibility information. Additionally, you can refer to the Chromebook’s user manual or visit the official Chromebook support website for a list of compatible peripherals.
Once you have confirmed compatibility, you’re ready to move on to the next step: connecting your mouse to your Chromebook. Whether you’re using a USB or wireless mouse, the process is straightforward and can be completed in just a few simple steps. So, let’s proceed to Step 2!
Step 2: Connect via USB
If you have a USB mouse, connecting it to your Chromebook is a breeze. Follow these steps:
- Locate the USB-A port on your Chromebook. It is usually located on the sides or back of the device.
- Insert the USB connector of your mouse into the USB-A port. Ensure that it is firmly connected.
- Wait for your Chromebook to recognize the mouse. It should automatically detect the new peripheral and install any necessary drivers.
- You can now start using your USB mouse on your Chromebook. The cursor on the screen should respond to the movements of your mouse.
If your mouse is not working properly or not being recognized, try the following troubleshooting steps:
- Disconnect the mouse and reconnect it to the USB port. Sometimes, a loose connection can cause the issue.
- Restart your Chromebook. Occasionally, a simple restart can fix any temporary software glitches.
- Check for software updates. Keeping your Chromebook updated ensures compatibility with various peripherals.
- If the problem persists, try using a different USB port or a different USB mouse to narrow down the issue.
That’s it! You have successfully connected your USB mouse to your Chromebook. If you prefer a wireless connection, let’s move on to Step 3, where we will discuss how to connect your mouse via Bluetooth.
Step 3: Connect Wirelessly via Bluetooth
If you have a wireless mouse that supports Bluetooth connectivity, you can easily connect it to your Chromebook. Here’s how:
- Ensure that your wireless mouse is turned on and in pairing mode. Refer to the manufacturer’s instructions to enable the pairing mode if needed.
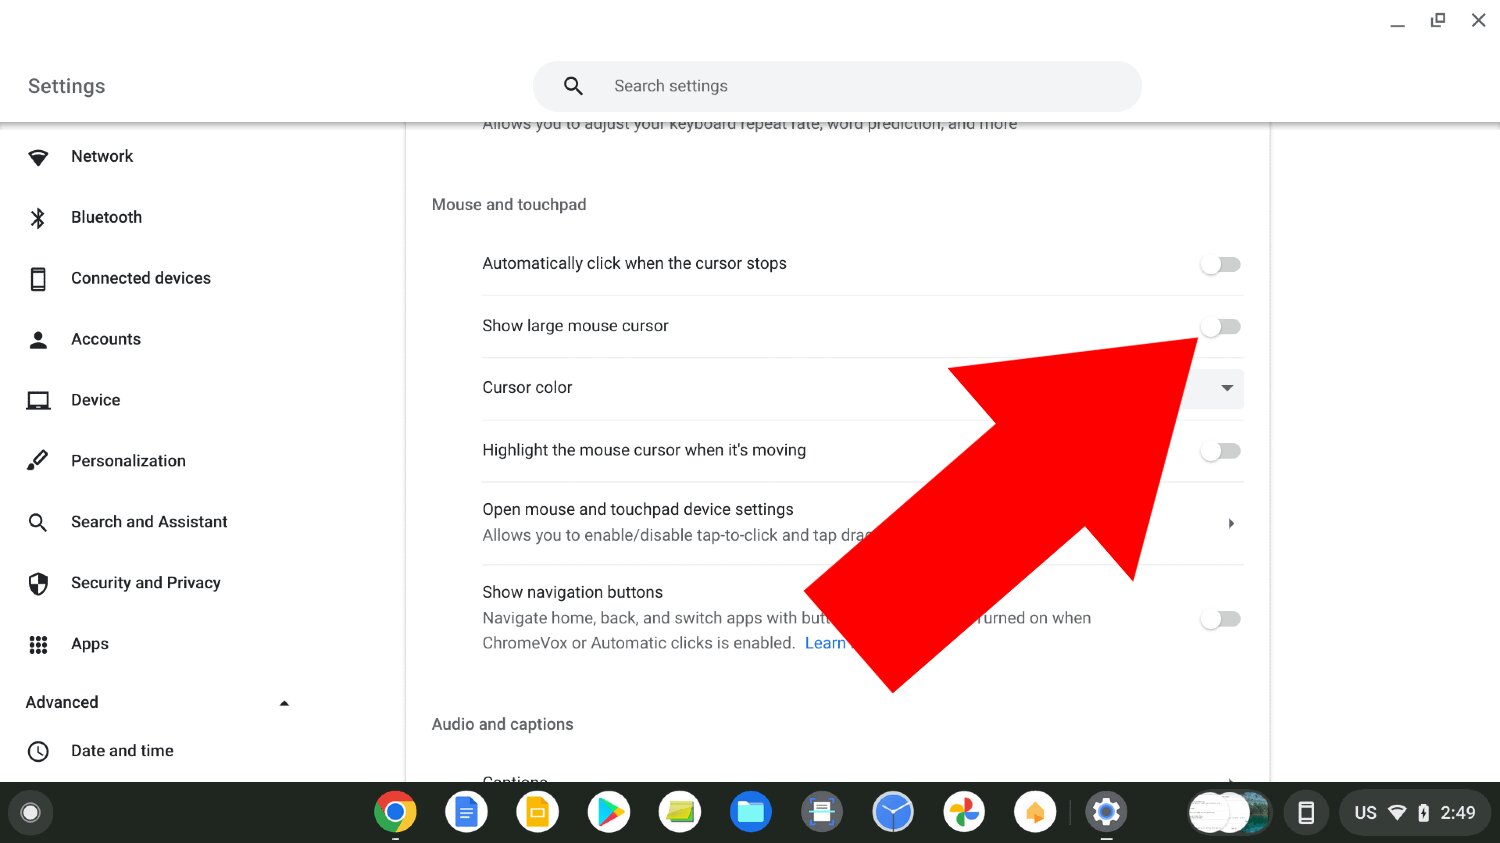
- On your Chromebook, click on the time in the bottom-right corner of the screen to open the system tray.
- Click on the gear-shaped “Settings” icon to open the Chromebook settings menu.
- In the settings menu, click on “Bluetooth” in the left-hand sidebar.
- Make sure that the Bluetooth switch is turned on. Your Chromebook will start searching for nearby Bluetooth devices.
- Once your wireless mouse appears in the list of available devices, click on it to begin the pairing process.
- Follow any on-screen instructions, if prompted, to complete the pairing process. This may include entering a passcode or confirming a pairing request.
- Once the pairing is successful, your wireless mouse will be connected to your Chromebook, and you can start using it right away.
If your wireless mouse is not showing up in the list of available devices, or if the pairing process fails, here are a few troubleshooting steps to try:
- Make sure that your wireless mouse has sufficient battery power.
- Move your Chromebook closer to the mouse to ensure a strong Bluetooth connection.
- Restart your Chromebook and try the pairing process again.
- If the problem persists, consult the user manual or contact the manufacturer for further assistance.
That’s it! You have successfully connected your wireless mouse to your Chromebook via Bluetooth. Now you can enjoy the freedom of a wire-free experience. If you encounter any issues or have further questions, don’t worry. In the next step, we will cover common troubleshooting tips for both wired and wireless mouse connections.
Step 4: Troubleshooting Common Issues
While connecting a mouse to your Chromebook is a relatively simple process, you may encounter some common issues along the way. Here are a few troubleshooting tips to help you resolve them:
Issue: Mouse is not working
- Check the connections: If you’re using a USB mouse, ensure that it is securely connected to the USB port. For wireless mice, double-check the battery level and Bluetooth connection.
- Restart your Chromebook: Sometimes, a simple restart can resolve minor software glitches.
- Update Chrome OS: Keeping your Chromebook up to date ensures compatibility with peripherals. Check for any pending software updates and install them.
- Try a different port or mouse: If the issue persists, try connecting the mouse to a different USB port or test a different mouse to rule out a hardware problem.
Issue: Cursor is skipping or lagging
- Check the surface: Ensure that you’re using the mouse on a smooth and clean surface. Using a mousepad can also help improve tracking.
- Move closer to the Chromebook: If you’re using a wireless mouse, bring it closer to the Chromebook to ensure a strong Bluetooth connection.
- Replace batteries (if applicable): If your wireless mouse requires batteries, try replacing them to rule out a low power issue.
- Reduce interference: If you have other electronic devices nearby, they may interfere with the Bluetooth signal. Try moving your Chromebook and mouse away from such devices.
Issue: Mouse buttons not working
- Check mouse settings: Open the Chromebook settings, go to the “Devices” section, and make sure the mouse button settings are configured correctly.
- Try a different mouse: If the issue persists, try connecting a different mouse to determine whether it’s a hardware or software problem.
- Clean the mouse: Over time, debris and dust can accumulate on the buttons, causing them to stick. Clean the mouse buttons with a soft cloth and isopropyl alcohol if necessary.
These are some common troubleshooting steps to resolve issues you may encounter when connecting a mouse to your Chromebook. If the problem persists or if you have any other concerns, consult the Chromebook’s user manual or contact the manufacturer’s support for further assistance.
Conclusion
Connecting a mouse to your Chromebook is a simple process that can greatly enhance your productivity and ease of use. Whether you prefer a wired USB mouse or a wireless Bluetooth mouse, Chromebooks offer excellent compatibility options.
In this guide, we covered the step-by-step process of connecting a mouse to your Chromebook. We started by checking for compatibility, ensuring that your mouse is compatible with your Chromebook’s ports and Bluetooth capabilities. We then discussed how to connect a USB mouse, where you simply need to plug it into the USB-A port and let the Chromebook recognize it. For those opting for a wireless connection, we provided instructions on connecting a mouse via Bluetooth.
Lastly, we addressed common troubleshooting steps for resolving issues that may arise during the connection process. Whether your mouse isn’t working, the cursor is skipping, or the mouse buttons are unresponsive, we provided tips to help you troubleshoot and resolve these problems.
Remember, the exact steps may vary slightly depending on your specific Chromebook model and mouse manufacturer. Always refer to the user manual or contact customer support for detailed instructions tailored to your device.
We hope this guide has been helpful in successfully connecting a mouse to your Chromebook. Enjoy the added functionality and precision that a mouse brings to your computing experience. Happy browsing and working with your Chromebook!