Overview
Connecting a laptop to a TV without HDMI can be a challenge, especially if you want to enjoy your favorite movies, videos, or presentations on a larger screen. However, there are various alternatives to HDMI that can help you achieve the desired connection. Whether you have an older laptop or a modern one without an HDMI port, there are several options available to connect your laptop to a TV and enjoy a multimedia experience.
In this article, we will explore five different methods for connecting a laptop to a TV without HDMI. These methods include using VGA, DVI, DisplayPort, USB-C, or a suitable adapter. Each method might have specific requirements and compatibility limitations, so it’s essential to check your laptop’s video output and your TV’s inputs before attempting to establish the connection.
While HDMI is the most common and convenient way to connect devices, using alternative connections is often necessary due to older laptop models or the unavailability of HDMI ports on some TVs. By utilizing the available options and understanding the capabilities of your laptop and TV, you can easily connect them and enjoy a seamless multimedia experience.
It’s important to note that the quality of the connection may vary depending on the method used, and some options might not support high-definition video or audio transfer. Nevertheless, these alternative methods can still offer a satisfactory viewing experience, allowing you to enjoy your favorite content on a larger screen.
In the following sections, we will discuss each method in detail, including the necessary cables, adapters, and steps required to establish the connection. Let’s explore the different options available for connecting a laptop to a TV without HDMI.
Option 1: Using VGA
If your laptop and TV both have VGA ports, connecting them using a VGA cable is a straightforward option. VGA (Video Graphics Array) is a commonly used analog video signal that can transmit video signals from your laptop to the TV.
To connect your laptop to the TV using VGA, follow these steps:
- Check if both your laptop and TV have VGA ports. The VGA port on your laptop may be labeled as “VGA,” “RGB,” or “PC.”
- Get a VGA cable that matches the ports on your laptop and TV. VGA cables are widely available and relatively inexpensive.
- Power off both your laptop and TV before making any connections.
- Connect one end of the VGA cable to the VGA port on your laptop and the other end to the VGA port on your TV.
- Power on your laptop and TV.
- Set your TV to the correct input source. Use the TV remote to navigate to the VGA input source or look for a button labeled “Input,” “Source,” or “AV” on the remote to cycle through the available inputs.
- On your laptop, right-click on the desktop and select “Display settings” or “Graphics properties” from the context menu.
- In the display settings, select the TV as the primary or secondary display, depending on your preference.
- Adjust the screen resolution to match the optimal settings for your TV. This can typically be done in the display settings of your laptop.
- Once the settings are adjusted, you should see your laptop screen mirrored on the TV.
Using a VGA connection may have some limitations, such as lower video quality compared to HDMI. VGA only supports analog signals, which can result in a slightly less crisp and vibrant display. However, it is still a viable option for connecting your laptop to a TV without HDMI, especially if both devices have VGA ports.
Remember that VGA cables only transmit video signals, so you will need a separate audio solution if you want to transfer audio from your laptop to the TV. This can be accomplished by using an auxiliary cable connected from the laptop’s headphone jack to the audio input on the TV.
Now that we have explored the VGA option, let’s move on to the next method: using DVI.
Option 2: Using DVI
If your laptop has a DVI (Digital Visual Interface) output and your TV has a DVI input, you can connect them using a DVI cable. DVI is a digital video signal that provides high-quality video transmission.
To connect your laptop to the TV using DVI, follow these steps:
- Check if your laptop has a DVI output port. It is typically a rectangular port with several pins, labeled as “DVI-I” or “DVI-D.”
- Ensure that your TV has a DVI input. It is also a rectangular port that matches the DVI cable connector.
- Obtain a DVI cable that matches the ports on your laptop and TV. DVI cables come in different types, such as DVI-D, DVI-I, or DVI-A. Make sure to choose the correct cable type based on the ports available.
- Turn off your laptop and TV before making any connections.
- Connect one end of the DVI cable to the DVI output port on your laptop and the other end to the DVI input port on your TV.
- Power on your laptop and TV.
- On your TV remote, select the appropriate input source or use the “Input,” “Source,” or “AV” button to cycle through the available inputs until you find the DVI input.
- On your laptop, right-click on the desktop and select “Display settings” or “Graphics properties” from the context menu.
- In the display settings, choose the TV as the primary or secondary display, depending on your preference.
- Adjust the screen resolution to match the optimal settings for your TV. This can typically be done in the display settings of your laptop.
- Once the settings are adjusted, your laptop screen should be mirrored on the TV.
Using a DVI connection provides a digital video signal, which generally results in a higher-quality display compared to VGA. However, DVI does not carry audio signals, so you will need a separate audio solution, such as using an auxiliary cable or another audio connection, to transfer audio from your laptop to the TV.
Now that you are familiar with connecting a laptop to a TV using DVI, let’s move on to the next option: using DisplayPort.
Option 3: Using DisplayPort
If your laptop and TV both support DisplayPort, you can take advantage of this digital interface to connect your laptop to the TV. DisplayPort offers high-quality video and audio transmission, making it an excellent choice for multimedia connectivity.
To connect your laptop to the TV using DisplayPort, follow these steps:
- Ensure that both your laptop and TV have DisplayPort ports. The DisplayPort on your laptop might be labeled as “DP” or “Mini DisplayPort,” while the port on your TV is typically labeled as “DisplayPort.”
- Get a DisplayPort cable that matches the ports on your laptop and TV. There are different types of DisplayPort connectors, so choose the appropriate cable accordingly.
- Turn off your laptop and TV before making any connections.
- Connect one end of the DisplayPort cable to the DisplayPort port on your laptop and the other end to the DisplayPort port on your TV.
- Power on your laptop and TV.
- Use your TV remote to select the corresponding input source for the DisplayPort connection. You can look for an “Input,” “Source,” or “AV” button on the remote and use it to navigate to the DisplayPort input.
- On your laptop, right-click on the desktop and select “Display settings” or “Graphics properties” from the context menu.
- In the display settings, designate the TV as the primary or secondary display, depending on your preference.
- Ensure that the screen resolution is set to the optimal settings for your TV. Adjust the resolution if necessary in the display settings of your laptop.
- After adjusting the settings, your laptop screen should now be mirrored on the TV via the DisplayPort connection.
Using DisplayPort offers a reliable and high-quality connection between your laptop and TV. It supports both video and audio transmission, eliminating the need for additional audio cables. DisplayPort also allows for higher resolutions and refresh rates compared to VGA or DVI connections, providing a superior visual experience.
If your laptop has a USB-C port, you can also use a USB-C to DisplayPort adapter or cable to establish the connection. Ensure that the adapter or cable is compatible with both your laptop’s USB-C port and your TV’s DisplayPort input.
Now that you have learned about connecting a laptop to a TV using DisplayPort, let’s explore the next option: using USB-C.
Option 4: Using USB-C
If your laptop features a USB-C port and your TV has a compatible input, you can leverage the versatility of USB-C to connect your laptop to the TV. USB-C is a multipurpose connector that supports various signals, including video and audio transmission.
To connect your laptop to the TV using USB-C, follow these steps:
- Check if your laptop has a USB-C port. It is a small, oval-shaped port with versatile capabilities.
- Determine if your TV has a USB-C input. Some newer TVs come equipped with USB-C ports.
- Obtain a USB-C to HDMI or USB-C to DisplayPort cable. The type of cable you need will depend on the input ports available on your TV. Ensure that the cable is compatible with your laptop’s USB-C port and your TV’s input.
- Power off your laptop and TV.
- Connect one end of the USB-C cable to the USB-C port on your laptop and the other end to the HDMI or DisplayPort input on your TV.
- Power on your laptop and TV.
- Using your TV remote, switch to the appropriate input source for the USB-C connection. Look for an “Input,” “Source,” or “AV” button on the remote to access the USB-C input.
- On your laptop, right-click on the desktop and select “Display settings” or “Graphics properties” from the context menu.
- In the display settings, designate the TV as the primary or secondary display, based on your preference.
- Adjust the screen resolution to match the optimal settings for your TV. You can typically modify the resolution in the display settings of your laptop.
- After adjusting the settings, your laptop screen should now be mirrored on the TV through the USB-C connection.
Using USB-C provides numerous advantages, such as the ability to transmit both video and audio signals in a single cable. With compatible devices, USB-C can support high-resolution displays and deliver excellent audio quality. Additionally, USB-C is known for its reversible design and power delivery capabilities, making it a versatile option for connecting your laptop to a TV.
If your laptop doesn’t have a USB-C port, you may still be able to utilize USB to HDMI adapters or other USB video adapters that can convert the USB signal to HDMI or another compatible format.
Now that we have explored connecting a laptop to a TV using USB-C, let’s move on to the next option: using an adapter.
Option 5: Using an Adapter
If your laptop and TV have different types of video ports that are not directly compatible, using an adapter can bridge the gap and allow for a successful connection. Adapters can convert the video signal from your laptop to a format that is compatible with the input ports on your TV.
To connect your laptop to the TV using an adapter, follow these steps:
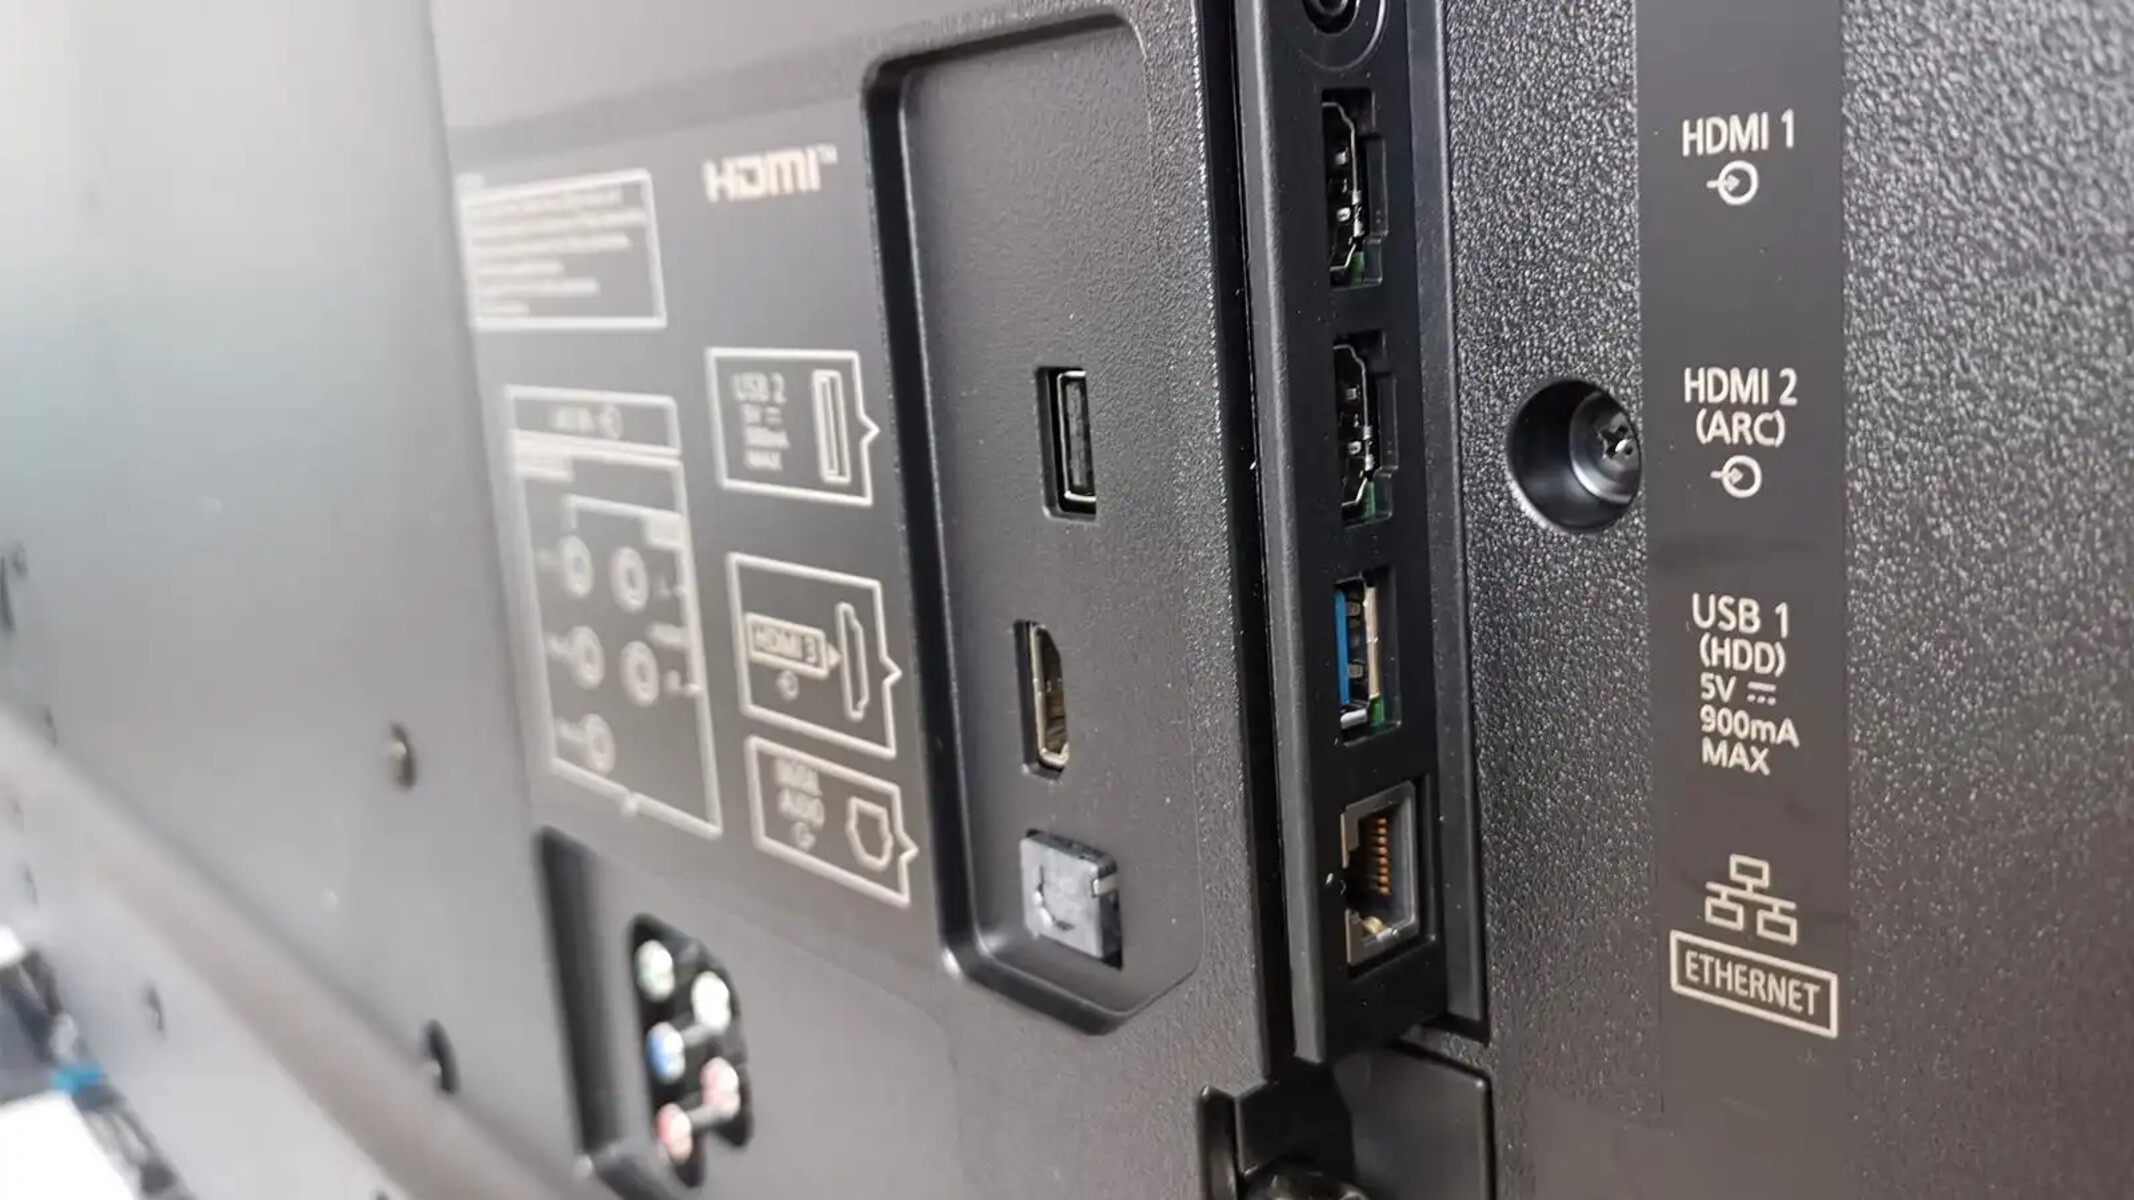
- Determine the video output port on your laptop and the corresponding input port on your TV. Common video output ports include HDMI, VGA, DVI, and DisplayPort.
- Research and purchase an appropriate adapter that matches the video output port on your laptop and the input port on your TV. For example, if your laptop has a VGA output port and your TV has an HDMI input, you will need a VGA to HDMI adapter.
- Ensure that the adapter is compatible with both your laptop and TV. Some adapters may require additional cables or power sources.
- Turn off your laptop and TV before making any connections.
- Connect one end of the adapter to the video output port on your laptop.
- Connect the other end of the adapter to the corresponding input port on your TV.
- Power on your laptop and TV.
- Using your TV remote, select the appropriate input source for the adapter connection. Refer to your TV’s manual for guidance on accessing the correct input source.
- On your laptop, right-click on the desktop and choose “Display settings” or “Graphics properties” from the context menu.
- In the display settings, select the TV as the primary or secondary display based on your preference.
- Adjust the screen resolution to match the optimal settings for your TV. You can typically modify the resolution in the display settings of your laptop.
- Once the settings are adjusted, your laptop screen should be mirrored on the TV through the adapter connection.
Using an adapter allows you to overcome compatibility limitations between different types of video ports. However, keep in mind that the quality of the connection may vary depending on the adapter’s capabilities and the specific ports being used. Some adapters may not support audio transfer, so you may need a separate audio solution, such as using an auxiliary cable.
Adapters come in various types and designs to cater to specific connection requirements. It’s crucial to research and choose the right adapter that meets the needs of your laptop and TV.
Now that we have explored the option of using an adapter, let’s summarize the different methods for connecting a laptop to a TV without HDMI.
Conclusion
Connecting a laptop to a TV without HDMI may seem like a daunting task, but with the right knowledge and equipment, it can be easily achieved. By exploring the various options we discussed, you can find the best method for your specific laptop and TV setup.
Using VGA, DVI, DisplayPort, USB-C, or an adapter, you can bridge the gap between different video ports and establish a connection that allows you to enjoy your favorite content on a larger screen. Each method has its own advantages and limitations, so it’s important to consider factors such as video quality, audio compatibility, and resolution support.
If your laptop and TV both have VGA ports, using a VGA cable is a straightforward option. VGA provides an analog video signal, though separate audio transfer will be required. If your laptop has a DVI output, you can connect it to a TV with a DVI input using a DVI cable. Keep in mind that DVI only transmits video signals, so audio will need a separate solution.
If both your laptop and TV support DisplayPort, this digital interface offers high-quality video and audio transmission without the need for additional cables. USB-C is another versatile option that allows for both video and audio transmission. USB-C ports are becoming increasingly common on laptops, making it a convenient option if your TV has a compatible input.
If you have different types of video ports on your laptop and TV, using an adapter can serve as a bridge to establish the connection. Adapters convert the video signal from your laptop to match the input ports on your TV, allowing for compatibility between different port types.
Remember to research and choose the right cables, adapters, or converters based on the specific requirements of your laptop and TV. As technology advances, new connection options may emerge, so it’s always useful to stay informed about the latest developments.
With the range of options available, you can easily connect your laptop to a TV without HDMI and enjoy a satisfying multimedia experience on a larger screen. So go ahead, choose the method that suits your needs, and unlock a whole new world of entertainment and productivity.