Introduction
Welcome to our comprehensive guide on how to clone your HDD (Hard Disk Drive) to a Solid State Drive (SSD). If you’re looking to upgrade your computer’s storage, switching from an HDD to an SSD can bring significant performance improvements. SSDs are faster, more reliable, and offer better energy efficiency. By cloning your HDD to an SSD, you can seamlessly migrate your operating system, applications, and files, without the hassle of reinstalling everything from scratch.
Cloning an HDD to an SSD involves creating an exact copy of the contents of your existing drive and transferring it to the new SSD. This not only saves time but also ensures that all your settings, applications, and files are preserved in the transition. Once the cloning process is complete, you can simply swap out your old HDD for the new SSD and enjoy the increased speed and performance.
In this guide, we will provide you with a step-by-step approach to clone your HDD to an SSD. We will cover the necessary prerequisites, recommended tools, and the cloning process itself. Whether you’re a tech-savvy enthusiast or a novice with limited computer knowledge, this guide will assist you in successfully completing the cloning process.
It’s important to note that cloning an HDD to an SSD may vary depending on the specific software and hardware you’re using. We will provide general guidelines that can be applied to most scenarios, but it’s always a good idea to consult the user manual or support documentation for your SSD and cloning software for any specific instructions.
Now that we have a general understanding of what cloning an HDD to an SSD entails, let’s dive into the benefits of making this upgrade and the prerequisites you’ll need to consider before starting the cloning process.
Benefits of Cloning HDD to SSD
Upgrading from an HDD to an SSD offers numerous benefits that can greatly enhance your computing experience. Here are some of the key advantages of cloning your HDD to an SSD:
- Improved Performance: SSDs are significantly faster than traditional HDDs. They provide quicker boot times, faster application launches, and smoother overall system performance. By cloning your HDD to an SSD, you’ll experience a noticeable boost in speed and responsiveness.
- Better Reliability: Unlike HDDs, SSDs do not have any moving parts. This makes them more durable and less prone to mechanical failures. You’ll enjoy improved data integrity and a longer lifespan for your storage drive.
- Increased Energy Efficiency: SSDs consume less power compared to HDDs. As a result, your laptop or desktop will run cooler, and you’ll enjoy extended battery life on portable devices.
- Noisy-free Operation: HDDs can produce noise due to the spinning platters and moving components. In contrast, SSDs operate silently, eliminating any distractions or annoyance caused by the constant whirring noise.
- Reduced File Access Time: With an SSD, accessing files becomes almost instantaneous. The lack of physical read/write heads means there are no delays in seeking and retrieving data. This leads to smoother multitasking and faster file transfers.
- Compact and Lightweight: SSDs are smaller and lighter than HDDs, making them ideal for portable devices such as laptops or ultrabooks. The compact form factor allows for more design flexibility and easier installation in slim devices.
- Improved Gaming Experience: Gamers can benefit greatly from cloning their HDD to an SSD. Games will load faster, and loading screens will become a thing of the past. The reduced load times and improved data transfer rates result in a smoother and more immersive gaming experience.
By cloning your HDD to an SSD, you’ll unlock these advantages and transform your computer into a faster, more efficient, and reliable machine. Now that we’ve explored the benefits of upgrading, let’s move on to the prerequisites you should consider before starting the cloning process.
Prerequisites for Cloning
Before you begin the process of cloning your HDD to an SSD, there are a few prerequisites you need to fulfill to ensure a successful and seamless transition. Make sure you have the following:
- Compatible SSD: Ensure that the SSD you plan to clone your HDD to is compatible with your computer. Check the specifications and interface types supported by your computer’s motherboard and compare them to the SSD’s requirements. Most modern computers support SATA SSDs, but if you have an older system, you may need to check for compatibility with older interfaces like IDE or mSATA.
- Sufficient Storage Capacity: The SSD you choose should have sufficient storage capacity to accommodate the data from your HDD. Ensure that the SSD has enough space to store not only your operating system and applications but also all your files and data. It’s recommended to choose an SSD with equal or larger capacity than your existing HDD.
- Cloning Software: You will need cloning software to copy the data from your HDD to the SSD. There are several options available, both free and paid, such as Clonezilla, Acronis True Image, Macrium Reflect, and Samsung Data Migration. Choose a reliable and user-friendly software that suits your needs.
- Backup Storage: Before initiating the cloning process, it’s crucial to back up all your important data from the HDD. This ensures that your files are protected in case of any unforeseen issues during the cloning process. Back up your data to an external hard drive, cloud storage, or another reliable storage medium.
- Empty SSD: Ensure that the SSD you plan to use for cloning is empty or does not contain any important data. If there are any files or partitions on the SSD that you wish to keep, make sure to back them up before proceeding.
- Connection Interface: Check the connectors and cables required to connect the SSD to your computer. Most SSDs use SATA connectors, similar to HDDs, but some newer SSDs may require an M.2 slot or a PCIe connection. Confirm that your computer has the necessary ports or adapters to connect the SSD.
By fulfilling these prerequisites, you will have everything you need to proceed with the cloning process. Once you have your compatible SSD, necessary cloning software, backup of your data, and a clear understanding of the connection requirements, you’re ready to begin cloning your HDD to an SSD. In the next section, we will walk you through the step-by-step process for a successful cloning operation.
Step-by-step guide to Clone HDD to SSD
Cloning your HDD to an SSD may seem like a complex process, but with the right tools and guidance, it can be a straightforward task. Follow these step-by-step instructions to successfully clone your HDD to an SSD:
- Step 1: Backup your data: Before you begin the cloning process, it’s crucial to back up all your important data from the HDD. This ensures that your files are protected in case of any unforeseen issues during the cloning process. Backup your data to an external hard drive, cloud storage, or another reliable storage medium.
- Step 2: Prepare your SSD: Make sure your SSD is properly formatted and ready to receive the cloned data. If the SSD is new and empty, proceed to the next step. If the SSD already contains data, back it up before formatting the drive to ensure a clean slate for cloning.
- Step 3: Connect the SSD to your computer: Connect the SSD to your computer using the appropriate cables or connectors. Ensure that the SSD is recognized by your computer and accessible in the file explorer.
- Step 4: Clone the HDD using cloning software: Launch the cloning software of your choice and select the option to clone your HDD. Follow the software’s instructions to initiate the cloning process. This may include selecting the source HDD and the target SSD, as well as adjusting any cloning settings or partition layouts.
- Step 5: Verify the cloned data: Once the cloning process is complete, verify that the data on the SSD is an exact copy of the HDD. Check that all partitions, files, and settings have been successfully transferred. Some cloning software may provide a verification or comparison option to ensure the integrity of the cloned data.
- Step 6: Swap the HDD with the SSD: After confirming the successful cloning and data transfer, power down your computer and disconnect the HDD. Replace it with the newly cloned SSD, ensuring it is securely connected to the appropriate slot or port. Power on your computer and ensure that the system recognizes the SSD as the primary storage device.
By following these steps, you will successfully clone your HDD to an SSD. Remember to double-check the cloning software’s instructions and consult any user guides or support documentation specific to your SSD or computer if you encounter any issues.
Step 1: Backup your data
Before you embark on the process of cloning your HDD to an SSD, it is crucial to back up all your important data. This step ensures that your files remain safe and secure in the event of any unforeseen issues during the cloning process. Follow these steps to backup your data:
- Identify crucial data: Take some time to identify the critical files and folders you want to backup. This may include important documents, photos, videos, and any other data that you cannot afford to lose.
- Choose a backup method: Select the backup method that best suits your needs and preferences. You can choose between using an external hard drive, cloud storage service, or another reliable storage medium. Each method has its advantages and considerations, so make sure to choose the one that works best for you.
- External hard drive backup: Purchase an external hard drive that offers ample storage capacity to accommodate your data. Connect the external hard drive to your computer using the appropriate cables or connectors. Use file explorer or backup software to transfer the identified files and folders to the external hard drive. Make sure to verify that the data is successfully copied to the external drive.
- Cloud backup: If you prefer a cloud-based backup solution, consider signing up for a reliable cloud storage service like Google Drive, Dropbox, or Microsoft OneDrive. Install the respective software or application on your computer and follow the instructions to set up a backup folder. Drag and drop the identified files and folders into the backup folder and let the software sync the data to the cloud. Ensure that the cloud storage service has successfully uploaded all the files before proceeding.
- Verify the backup: Once the backup process is complete, take the time to verify the backed-up data. Cross-check individual files and folders on the external hard drive or verify the files in the cloud storage service to ensure that all important data has been successfully backed up.
By following these steps, you will have successfully backed up all your crucial data from the HDD. This precautionary measure ensures that your files are protected and accessible in case of any unexpected issues during the cloning process. Now that you have backed up your data, you can proceed confidently to the next steps of cloning your HDD to an SSD.
Step 2: Prepare your SSD
Once you have successfully backed up your data, the next step in the process of cloning your HDD to an SSD is to prepare the SSD for the cloning operation. Follow these steps to ensure your SSD is ready:
- Formatting: If your SSD is brand new and unformatted, you will need to format it before starting the cloning process. Formatting ensures that the SSD is ready to receive the cloned data. To format your SSD, connect it to your computer and open the Disk Management utility (Windows) or Disk Utility (Mac). Locate the SSD in the list of drives, right-click (Windows) or Control-click (Mac) on the SSD, and select the format option. Choose the appropriate file system format (e.g., NTFS for Windows or APFS for Mac) and complete the formatting process.
- Secure Erase (optional): If your SSD previously contained data that you no longer need or want to ensure a clean slate for the cloning process, you may consider performing a secure erase. A secure erase removes all data from the SSD and reverts it to its factory state. This can be done using specialized software provided by the SSD manufacturer or through the SSD’s firmware interface. Keep in mind that a secure erase process is irreversible and permanently deletes all data, so ensure you have a backup of any important information before proceeding.
- Partitioning (optional): If you prefer a specific partition layout on your SSD, you can create the desired partitions during this preparation stage. Use the Disk Management utility (Windows) or Disk Utility (Mac) to partition the SSD according to your requirements. Keep in mind that if you’re not familiar with partitioning, it’s generally recommended to let the cloning software handle the partition layout based on the cloned data.
- Verify empty state: Before proceeding with the cloning process, verify that the SSD is empty and does not contain any important data or partitions that you wish to keep. If necessary, back up any important files or partitions from the SSD to an external medium before proceeding with the cloning process.
By following these steps, you will have properly prepared your SSD for the cloning process. Formatting the SSD, performing a secure erase (if desired), and verifying that the SSD is empty ensures a clean and optimized space for the cloning operation. Now that your SSD is ready, you can proceed to the next step of connecting the SSD to your computer.
Step 3: Connect the SSD to your computer
Once you have prepared your SSD, the next step in cloning your HDD to an SSD is to connect the SSD to your computer. Follow these steps to securely connect the SSD:
- Identify the appropriate connection type: Determine the type of connection required for your SSD and ensure that your computer has the necessary ports or adapters. Most SSDs use a standard SATA connector, similar to HDDs, but some newer SSDs may require an M.2 slot or a PCIe connection. Check the specifications of your SSD and computer to ensure compatibility.
- Gather the necessary cables or adapters: Depending on the connection type, gather the appropriate cables or adapters required to connect the SSD to your computer. SATA SSDs typically use SATA data and power cables, whereas M.2 SSDs may require an M.2 slot on the motherboard or an M.2 to PCIe adapter. Check the documentation of your SSD and computer to determine the required accessories.
- Power off your computer: Before connecting the SSD, make sure to power off your computer completely. This will prevent any potential damage to the SSD or interference with the cloning process.
- Open your computer: Depending on the design of your computer, you may need to remove the side panel or access a specific compartment to access the internal components. Refer to your computer’s user manual or documentation to locate and open the appropriate section.
- Locate the SATA ports: Identify the SATA ports on your computer’s motherboard. These ports are typically labeled and are where the HDD and other storage devices are connected. Ensure that you have an available SATA port to connect the SSD.
- Connect the SSD: Connect the SATA data cable to the SATA port on the motherboard and the corresponding port on the SSD. Ensure a secure connection by firmly pushing the connectors into place. Next, connect the SATA power cable to the SSD, supplying power for the drive.
- Secure the SSD: Once the SSD is connected, carefully secure it in the appropriate location inside your computer’s case. Use screws or brackets provided by your computer’s manufacturer to secure the SSD in place, ensuring it doesn’t move or disconnect during operation.
- Close your computer: After ensuring the SSD is securely connected and mounted, close your computer’s case or replace the side panel. Ensure that all screws or latches are tightened properly to maintain a secure and stable environment.
By following these steps, you will have successfully connected the SSD to your computer in preparation for the cloning process. Ensure that the SSD is firmly connected, as any loose connections can cause data transfer issues. Now that the SSD is properly connected, you can proceed to the next step of cloning your HDD using specialized cloning software.
Step 4: Clone the HDD using cloning software
Once you have connected the SSD to your computer, it’s time to clone your HDD to the SSD using specialized cloning software. Follow these steps to initiate and complete the cloning process:
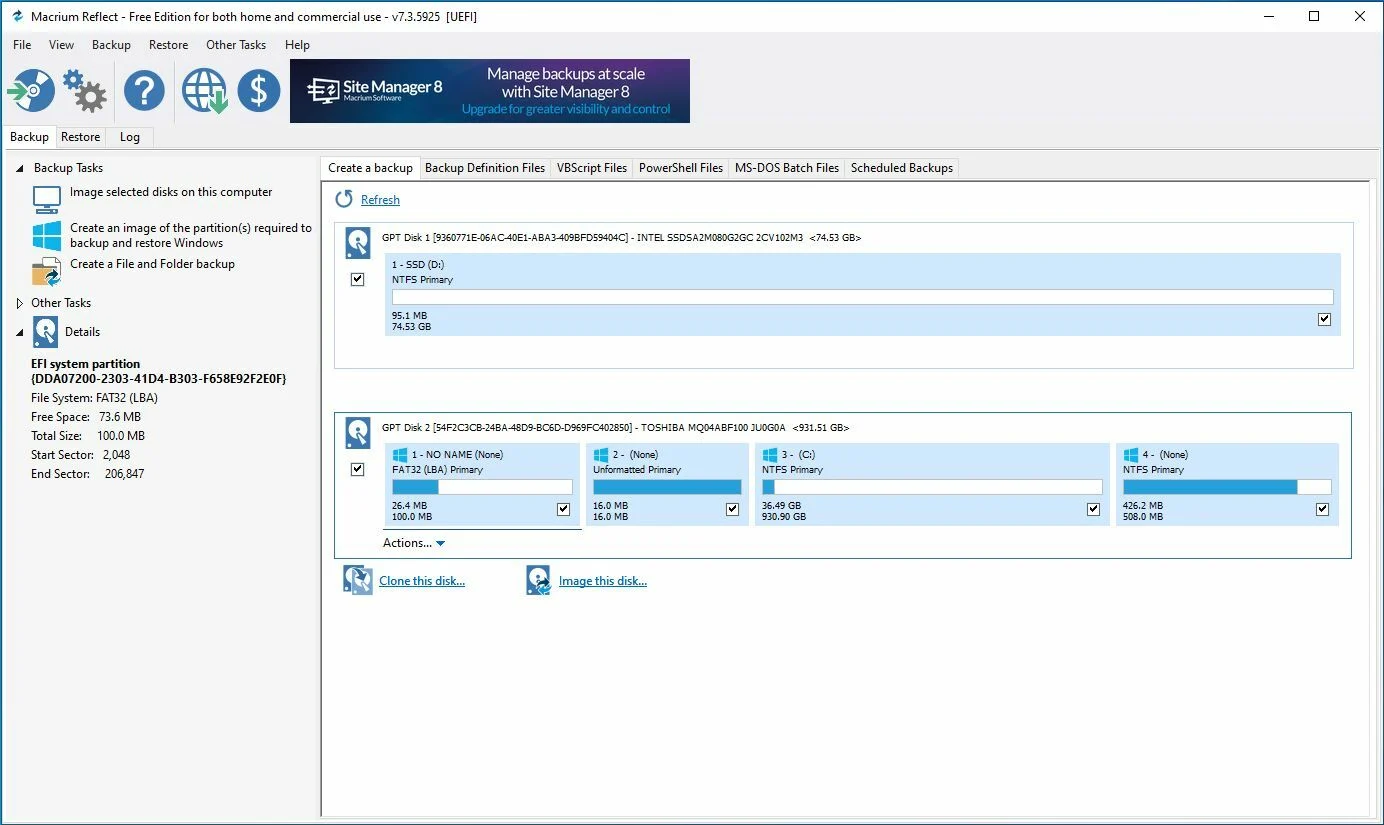
- Select the appropriate cloning software: There are several cloning software options available, both free and paid. Choose a reliable and user-friendly software that suits your needs. Some popular choices include Clonezilla, Acronis True Image, Macrium Reflect, and Samsung Data Migration.
- Launch the cloning software: Open the cloning software on your computer. Ensure that the software recognizes both the source HDD and the target SSD. In most cases, the source HDD will be automatically detected, but you may need to select the target SSD manually.
- Configure cloning settings: Depending on the software, you may have the option to adjust various cloning settings. These settings can include choosing specific partitions to clone, resizing partitions to fit the target SSD, and adjusting other cloning preferences. Review the software’s instructions or user guide for guidance on configuring the appropriate settings.
- Start the cloning process: Once you have reviewed and adjusted the cloning settings, initiate the cloning process. This may involve clicking a “Start” button or selecting a specific menu option to begin the cloning operation.
- Monitor the progress: The cloning software will provide a progress indicator or status bar to show the progress of the cloning process. Depending on the size of the HDD and the amount of data being cloned, the process can take some time. Be patient and refrain from interrupting the process to ensure a successful and accurate clone.
- Review the cloning results: After the cloning process is complete, carefully review the cloning results. Check that all partitions, files, and settings from the HDD have been successfully transferred to the SSD. Some cloning software may provide a verification or comparison option to ensure the integrity of the cloned data.
By following these steps, you will have successfully cloned your HDD to the SSD using the selected software. Ensure that you follow the instructions provided by the software and refer to any user guides or support documentation specific to your SSD or computer if you encounter any issues. With the cloning process complete, you can proceed to the next step of verifying the cloned data before swapping the HDD with the SSD.
Step 5: Verify the cloned data
After successfully cloning your HDD to your SSD, it’s crucial to verify the cloned data to ensure that all the contents have been accurately transferred. Follow these steps to verify the integrity and completeness of the cloned data:
- Inspect the partitions: Open the file explorer on your computer and navigate to the SSD. Check if all the partitions from the original HDD are present on the SSD. Review the partition sizes and ensure they match the original HDD.
- Check files and folders: Explore the SSD’s contents and compare them to the original HDD. Open various files and folders to ensure that everything has been transferred successfully. Pay close attention to critical files, such as documents, photos, and important software installations.
- Compare file sizes: Select a few random files from the HDD and compare their sizes to the corresponding files on the SSD. Ensure that the sizes match or are very close, indicating a successful cloning process. Differences in file sizes may suggest data corruption or incomplete transfers.
- Verify bootability: Restart your computer and ensure that it boots properly from the SSD. Check that the operating system loads without any errors or issues. Test the functionality of installed applications to confirm that they are working as expected.
- Perform a test run: Use your computer for a while, performing various tasks and operations. Pay attention to any unusual behavior, errors, or missing files. This will help identify any potential issues that may have arisen during the cloning process.
- Compare checksums (optional): In some cases, you may have access to checksum values for specific files or the entire HDD. Generate checksums for the original files on the HDD and compare them to the checksums of the respective files on the SSD. If the checksums match, it provides further confirmation of a successful cloning process.
By following these steps, you can effectively verify the cloned data and ensure its accuracy. If any issues or discrepancies are identified, it may be necessary to reevaluate the cloning process and repeat the steps as needed. Once you have confirmed the successful cloning and verification of the data, you can proceed to the final step of swapping the HDD with the SSD.
Step 6: Swap the HDD with the SSD
After verifying the cloned data and ensuring its accuracy, it’s time to swap the HDD with the SSD. This final step will make the SSD the primary storage device for your computer. Follow these steps to successfully complete the swap:
- Power off your computer: Before swapping the drives, ensure that your computer is completely powered off. This will prevent any potential damage to the drives or interference with the swap process.
- Open your computer: Depending on your computer’s design, remove the side panel or access the compartment that houses the HDD and SSD. Refer to your computer’s user manual or documentation for guidance on accessing and opening the appropriate section.
- Disconnect the HDD: Carefully disconnect the cables connected to the HDD. Start by unplugging the power cable from the back of the HDD, followed by disconnecting the SATA data cable. Note the position and orientation of the cables to ensure proper reconnection later if required in the future.
- Connect the SSD: Take the SSD that you had cloned the HDD onto and connect it in the same manner as the HDD. Plug in the SATA data cable first, followed by the power cable. Ensure that the connections are secure but avoid using excessive force.
- Secure the SSD: Once the SSD is connected, carefully secure it in the same location where the HDD was previously located. Use screws or brackets provided by your computer’s manufacturer to secure the SSD in place, ensuring it doesn’t move or disconnect during operation.
- Close your computer: After ensuring that the SSD is properly connected and secured, close your computer’s case or replace the side panel. Ensure that all screws or latches are tightened properly to maintain a secure and stable environment.
- Power on your computer: Power on your computer and wait for it to boot up. If the operating system doesn’t load automatically, you may need to access the BIOS or UEFI settings to change the boot priority. Set the SSD as the primary boot device, save the changes, and restart your computer.
- Verify the SSD operation: Once your computer boots up, verify that the SSD operates correctly. Check that the operating system loads without any issues and that all installed applications function properly. Test file access speeds and overall system performance to experience the benefits of the SSD.
By following these steps, you will have successfully swapped the HDD with the SSD, making the SSD the primary storage device for your computer. Enjoy the improved speed, reliability, and performance of the SSD as you continue to use your computer for various tasks and operations.
Conclusion
Congratulations! You have successfully completed the process of cloning your HDD to an SSD. By following the step-by-step guide and fulfilling the prerequisites, you have upgraded your computer’s storage and can now enjoy the benefits of improved speed, reliability, and performance.
Cloning your HDD to an SSD offers significant advantages, including faster boot times, quicker application launches, and smoother overall system performance. Additionally, SSDs are more durable, energy-efficient, and operate silently, enhancing your computing experience. By cloning your HDD, you have seamlessly migrated your operating system, applications, and files to the new SSD, avoiding the need for a time-consuming reinstallation process.
Remember to follow the steps carefully and consult any specific instructions provided by your SSD or cloning software manufacturer. Keep in mind that the process may vary depending on your hardware and software setup, but the general principles outlined in this guide will help you navigate the cloning process more confidently.
If you encounter any issues during the cloning process or have questions about the specific software or hardware you are using, don’t hesitate to seek support from the manufacturer’s documentation, online forums, or technical support channels.
Now that you have successfully completed the cloning process, take some time to explore the improved performance of your computer. Experience faster load times, smoother multitasking, and overall enhanced productivity. Enjoy the benefits of your upgraded SSD and the seamless transition of your data.
Remember to keep your old HDD as a backup or for additional storage if you have sufficient space in your computer. And, as always, it’s important to regularly back up your data to ensure its safety and security.
Thank you for following this guide, and we hope that your newly cloned SSD provides you with an enhanced computing experience for years to come.