Introduction
Welcome to the ultimate guide on how to clear up RAM cache! If you’ve been experiencing sluggish performance on your computer or notice that it’s not running as smoothly as it used to, chances are that clearing up the RAM cache can help resolve these issues.
So, you may be wondering, what exactly is RAM cache? RAM cache, or Random Access Memory cache, is a temporary storage area in your computer’s memory that stores data that is frequently accessed by applications or processes. This allows for quicker access to information and speeds up your computer’s performance.
While having a cache can be beneficial, over time, it can become cluttered with unnecessary data, which can lead to reduced performance and sluggishness. Clearing up the RAM cache is a simple yet effective way to free up memory space and improve the overall speed and responsiveness of your computer.
In this guide, we will explore various methods to clear up RAM cache on both Windows and Mac operating systems. Whether you’re a seasoned computer user or a tech novice, rest assured that there’s a method suitable for your computer proficiency level.
It’s important to note that clearing up RAM cache is not a one-size-fits-all solution for all performance issues. However, it’s often a good place to start when you notice your computer is running slower than usual or experiencing frequent freezes and crashes.
In the following sections, we will walk you through step-by-step instructions on different methods to clear up RAM cache. Whether you prefer to restart your computer, use built-in task managers or activity monitors, or employ terminal commands, we’ve got you covered.
By the end of this guide, you’ll have a clear understanding of how to effectively clear up RAM cache and improve the performance of your computer. So, without further ado, let’s dive in and get your computer running faster and smoother!
What is RAM Cache?
RAM cache, or Random Access Memory cache, is a component of your computer’s memory that stores frequently accessed data for quick retrieval. It acts as a temporary storage area, allowing for faster access to information and improving overall system performance.
When you open an application or access a file, the data is loaded into RAM so that it can be readily available to the CPU. However, reading data from the RAM is much faster than fetching it from the hard drive or SSD. This is where the RAM cache comes into play.
The RAM cache stores copies of recently accessed data, such as program instructions and data files. By doing so, it eliminates the need to repeatedly fetch the same data from the slower storage devices, significantly speeding up the computer’s response time.
Think of RAM cache as a temporary workspace where the most frequently used data is stored for quick access. It acts as a bridge between the slower storage devices and the CPU, providing a faster pathway for data retrieval.
When an application needs to access data, it first checks the RAM cache. If the data is present, it can be quickly retrieved. However, if the data is not in the cache, the system needs to read it from the slower storage devices, which takes more time.
The size of the RAM cache varies depending on your computer’s specifications and operating system. Modern computers typically have several gigabytes of RAM, allowing for a sizable cache. However, it’s important to note that the cache is a finite resource and can become overwhelmed if too many applications or processes are running concurrently.
While the RAM cache provides a performance boost, it can also cause issues if it becomes cluttered with unnecessary data. Over time, as you open and close programs or browse the web, the cache can accumulate data that is no longer needed. This can lead to decreased performance, as the system needs to sift through unnecessary information to find the relevant data.
Clearing up the RAM cache is a method to optimize the system’s memory usage and improve performance. By removing stale data and freeing up space in the cache, the computer can allocate resources more efficiently, resulting in smoother and faster operation.
In the next sections, we will explore various methods to clear up RAM cache on both Windows and Mac operating systems. So, let’s move on and learn how to effectively manage your computer’s RAM cache!
Why Clear up RAM Cache?
Clearing up the RAM cache is an essential maintenance task that can significantly improve the performance of your computer. Here are several reasons why you should consider clearing up RAM cache:
1. Boost System Performance: Over time, the RAM cache can become congested with unnecessary data, reducing the available memory for active processes. By clearing up the cache, you free up memory space, allowing the system to allocate resources more efficiently and improve overall performance.
2. Resolve Sluggishness and Freezes: If you’ve noticed that your computer is running slower than usual, experiencing frequent freezes or delays, clearing up the RAM cache can help alleviate these issues. By eliminating the clutter in the cache, the system can respond more quickly, resulting in a smoother and more responsive user experience.
3. Optimize Resource Allocation: When the RAM cache is filled with outdated or unnecessary data, the system may struggle to prioritize the allocation of resources. By clearing up the cache, you give the computer a fresh start and help it allocate resources more effectively, improving multitasking capabilities and reducing system lag.
4. Improve Application Performance: Many applications rely heavily on RAM to store temporary data and facilitate their operations. If the RAM cache is overwhelmed, these applications may experience performance issues, such as slow loading times or unresponsive behavior. Clearing up the cache can help ensure that the applications have sufficient memory to operate smoothly.
5. Enhance Web Browsing Experience: Web browsers utilize the RAM cache to store website data, including images, scripts, and stylesheets. However, an overloaded cache can lead to slower page loading times and unresponsiveness while browsing the internet. Clearing up the cache can improve the browser’s performance and provide a smoother web browsing experience.
6. Identify Memory Leaks: In some cases, certain programs or processes may have memory leaks, causing them to consume excessive amounts of RAM. By clearing the cache, you can identify any abnormal memory usage patterns, allowing you to troubleshoot and address memory leaks to prevent further performance issues.
7. Maximize Available Memory: RAM is a precious resource, and clearing up the cache ensures that available memory is utilized optimally. By freeing up memory space from unnecessary cache data, you provide more room for active applications and processes, allowing them to operate more smoothly and efficiently.
Clearing up the RAM cache is a simple and effective way to improve the performance and responsiveness of your computer. In the following sections, we will explore different methods to clear up RAM cache on both Windows and Mac operating systems. Let’s proceed and unlock the full potential of your computer!
Restarting Your Computer
One of the simplest and most effective ways to clear up the RAM cache is by restarting your computer. When you restart your computer, all the data stored in the RAM cache is cleared, giving your system a fresh start. Here’s how to restart your computer on both Windows and Mac operating systems:
Windows:
- Click on the “Start” button or press the Windows key.
- Select the power icon, usually located at the bottom left corner of the start menu.
- Click on “Restart” from the drop-down menu.
- Wait for your computer to shut down and start up again.
Mac:
- Click on the Apple menu in the top left corner of the screen.
- Select “Restart” from the drop-down menu.
- Click “Restart” in the pop-up confirmation window.
- Wait for your Mac to shut down and start up again.
Once your computer has restarted, the RAM cache will be cleared, and you should notice improved performance. Restarting your computer also allows the operating system to release any locked or hidden memory resources, which can further optimize system performance.
It’s a good practice to restart your computer regularly, especially if you’ve been experiencing slow performance or if you’ve been running memory-intensive applications or processes for an extended period. Restarting not only clears the RAM cache but also helps to refresh the overall system state and resolve any temporary software glitches.
Keep in mind that while restarting your computer clears the RAM cache, it won’t address underlying performance issues caused by other factors such as hardware limitations or software conflicts. If you find that you need to frequently restart your computer to maintain performance, it may be worth exploring other optimization methods or troubleshooting potential underlying issues.
Now that you know how to clear up the RAM cache by restarting your computer, let’s move on to explore other methods that can further optimize the performance of your computer’s RAM cache.
Using Task Manager (Windows)
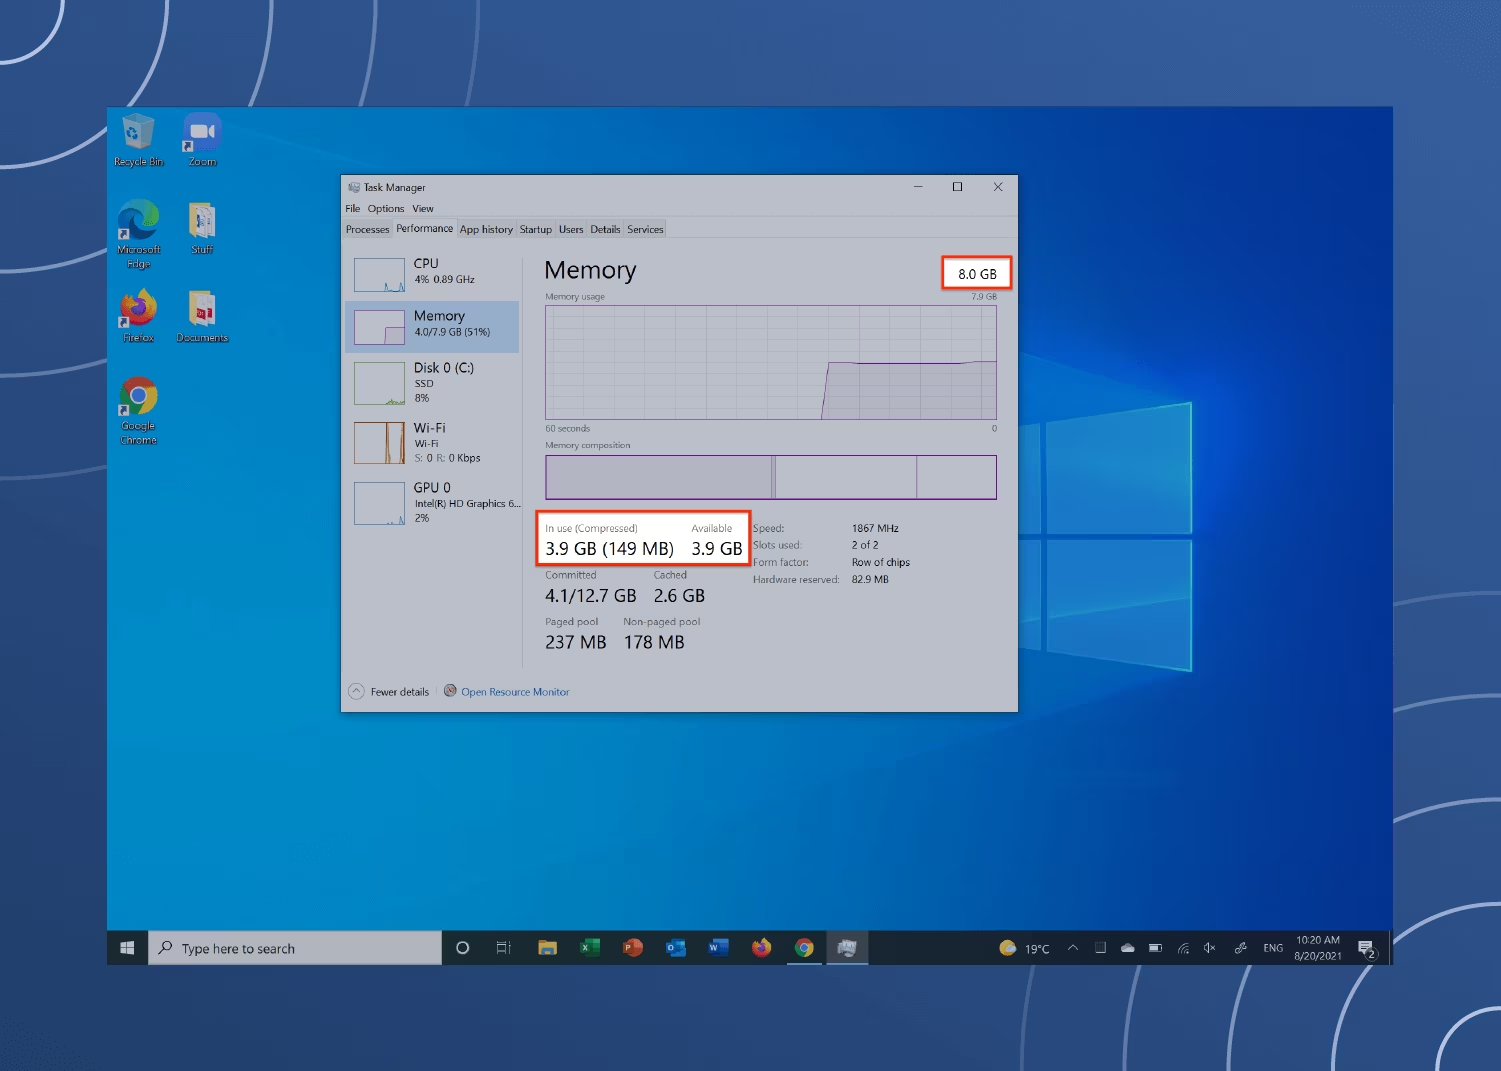
Task Manager is a built-in system utility in Windows that provides an overview of the processes and applications running on your computer. It also allows you to manage and optimize the resources, including the RAM cache. Here’s how you can use Task Manager to clear up the RAM cache:
- Open Task Manager by pressing Ctrl + Shift + Esc on your keyboard, or by right-clicking on the taskbar and selecting “Task Manager” from the context menu.
- When Task Manager opens, click on the “More Details” button at the bottom left to expand the window and display more options.
- In the “Processes” tab, you will see a list of running processes and applications. You can sort the list by memory usage by clicking on the “Memory” column header.
- Identify processes or applications that are using a significant amount of memory. These could be resource-intensive programs or background processes.
- To free up memory, select the processes or applications that you want to close by clicking on them. You can select multiple items by holding down the Ctrl key while clicking.
- Once you’ve selected the desired processes, click on the “End Task” button at the bottom right to terminate them.
- Confirm any prompts or warnings that may appear regarding ending the selected tasks.
By ending resource-intensive processes or applications, you not only free up memory but also clear their associated data from the RAM cache. This can help improve performance and responsiveness, especially if you’re experiencing slowdowns due to memory-intensive tasks.
It’s important to exercise caution when using Task Manager to end processes. Make sure to only terminate processes that you’re familiar with or those that you know won’t negatively impact the system or cause data loss. Ending critical system processes or applications can lead to system instability or unexpected behavior.
If you find that certain applications or processes are consistently causing high memory usage, it may be worth investigating further to identify any underlying issues. Updating the application or seeking support from the software provider can sometimes resolve such problems.
Now that you know how to clear up the RAM cache using Task Manager in Windows, let’s explore another method specifically for Mac users – using Activity Monitor.
Using Activity Monitor (Mac)
Activity Monitor is a built-in system utility on Mac that provides detailed information about the processes and resource usage on your computer. It’s a powerful tool that can help you manage and optimize the performance of your Mac, including clearing up the RAM cache. Here’s how you can use Activity Monitor to clear up the RAM cache:
- Open Activity Monitor by going to the Applications folder, then the Utilities folder, and selecting Activity Monitor.
- When Activity Monitor opens, you’ll see a list of processes and applications currently running on your Mac.
- Click on the Memory tab at the top of the Activity Monitor window. This will display the memory usage for each process.
- Sort the processes by memory usage by clicking on the Memory column header. This will help you identify the processes that are consuming the most memory.
- Look for processes or applications that are using a significant amount of memory. These could be resource-heavy programs or background processes.
- To free up memory, select the processes or applications that you want to quit by clicking on them. You can select multiple items by holding down the Command key while clicking.
- Click on the X button in the top-left corner of the Activity Monitor window, or right-click on the selected processes and choose Quit.
- Confirm any prompts or warnings that may appear regarding quitting the selected processes.
When you quit a process using Activity Monitor, it not only frees up the memory it was using but also clears its associated data from the RAM cache. This helps optimize memory usage and can lead to improved performance on your Mac.
Be cautious when quitting processes using Activity Monitor, and only terminate processes that you’re familiar with or those that you know won’t negatively impact system stability or cause data loss.
If you notice that certain applications or processes consistently use a significant amount of memory, it’s worth investigating further. Updating the application or seeking support from the software provider can help address memory-related performance issues.
Now that you know how to use Activity Monitor to clear up the RAM cache on your Mac let’s move on to another method that involves using Terminal commands specifically for Mac users.
Using Terminal Command (Mac)
If you’re comfortable using the Terminal on your Mac, you can utilize some command-line instructions to clear up the RAM cache. The Terminal provides direct access to the underlying system and allows for more advanced control over various processes. Here’s how you can clear up the RAM cache using Terminal commands:
- Open the Terminal by going to Applications, then Utilities, and selecting Terminal.
- In the Terminal window, type the following command:
sudo purge
Press Enter and enter your administrator password when prompted. Note that when typing your password, you won’t see any characters or visual feedback. - Wait for the command to execute. The Terminal will indicate the progress, and you might notice your Mac becoming momentarily unresponsive.
- Once the command has completed, the RAM cache will be cleared, and your Mac should experience a performance boost as a result.
The “sudo purge” command forces your Mac to flush the disk cache, freeing up memory and clearing the RAM cache. This can help improve overall system performance, especially if you’ve been running memory-intensive tasks or notice laggy behavior.
It’s important to note that while it’s generally safe to use the “sudo purge” command, it’s recommended to be cautious when working with Terminal commands, as they have the potential to affect the system if used improperly.
Using Terminal commands to clear up the RAM cache is a more advanced method and should be used by those familiar and comfortable with terminal operations. If you’re unsure or uncomfortable using the Terminal, it’s best to explore other methods or seek assistance from a knowledgeable individual.
Now that you know how to clear up the RAM cache using Terminal commands on your Mac, let’s explore some additional steps you can take to optimize your computer’s performance.
Closing Unnecessary Applications
One of the simplest and most effective ways to clear up the RAM cache and improve your computer’s performance is by closing unnecessary applications. Running multiple applications simultaneously can consume valuable system resources, including memory. By closing applications that are not actively being used, you can free up memory and optimize resource allocation. Here’s how you can close unnecessary applications:
- Examine the applications currently running on your computer. Look for any applications that you’re not actively using or that are running in the background.
- To close an application, click on its window to bring it into focus.
- Once the application’s window is active, go to the File or Menu option in the top menu bar.
- From the drop-down menu, select Quit or Exit to close the application.
- Repeat this process for other unnecessary applications running on your computer.
Closing unnecessary applications not only frees up memory but also reduces the strain on your computer’s CPU and other system resources. This can result in improved performance, faster response times, and smoother multitasking.
It’s a good practice to regularly assess the applications running on your computer and close those that you don’t need. By minimizing the number of active applications, you can ensure that your computer has ample resources available for the tasks you intend to focus on.
In addition to closing unnecessary applications, consider disabling or quitting any background processes or utilities that you don’t use regularly. These processes can consume resources without your knowledge and contribute to memory usage and cache clutter.
By closing unnecessary applications and limiting background processes, you can maximize the efficiency of your computer’s resources and ensure that the RAM cache remains optimized for active tasks.
Now that you know how to close unnecessary applications, let’s explore another step you can take to optimize your computer’s performance – updating or removing outdated apps.
Updating or Removing Apps
Keeping your applications up to date is crucial not only for security reasons but also for optimizing your computer’s performance. Outdated apps can have compatibility issues, consume unnecessary memory, and contribute to a cluttered RAM cache. By updating or removing outdated apps, you can ensure that your computer runs smoothly and efficiently. Here’s how you can update or remove apps:
Updating Apps:
- Launch the app store or software update utility on your operating system.
- Check for available updates for the installed apps.
- If updates are available, follow the prompts or instructions to download and install them.
- Restart your computer if required after the updates are installed.
Updating your apps ensures that you have the latest features, bug fixes, and performance enhancements. This can help optimize memory usage and prevent compatibility issues that may contribute to poor performance or crashes.
Removing Apps:
- Open the Applications folder on your computer.
- Browse through the list of installed applications.
- Identify apps that you no longer use or need.
- Drag the unwanted app to the Trash or right-click on the app and select Move to Trash.
- Empty the Trash to permanently remove the unwanted app from your computer.
Removing outdated or unused apps not only frees up storage space but also reduces the load on your computer’s resources. This can include the RAM cache, as these apps may leave behind unnecessary files and processes that clutter the cache.
Regularly updating your apps and removing outdated or unused ones is a proactive measure to optimize your computer’s performance. It can help streamline resource allocation and ensure that your computer operates at its best.
If you’re unsure whether to update or remove a specific app, consider researching its compatibility with your operating system and checking for user reviews or recommendations. It’s also worth noting that some apps may have built-in settings or preferences that allow you to adjust their resource usage, including caching options.
Now that you know how to update or remove apps to optimize your computer’s performance, let’s explore another step you can take – adjusting your browser settings to clear the cache.
Adjusting Your Browser Settings
Your web browser, such as Google Chrome, Mozilla Firefox, or Safari, stores various data in its cache to enhance your browsing experience. However, an overloaded cache can slow down your browsing speed and impact overall performance. By adjusting your browser settings and clearing the cache periodically, you can optimize your browser’s performance and free up valuable system resources. Here’s how you can do it:
Google Chrome:
- Open Google Chrome and click on the three-dot menu icon in the top-right corner of the browser window.
- From the drop-down menu, select Settings.
- Scroll down and click on Privacy and security in the left-hand sidebar.
- Under the Privacy and security section, click on Clear browsing data.
- Select the types of data you want to clear, such as cached images and files.
- Choose a time range, and then click Clear data.
Mozilla Firefox:
- Open Mozilla Firefox and click on the three-line menu icon in the top-right corner of the browser window.
- From the drop-down menu, select Options.
- In the left-hand sidebar, click on Privacy & Security.
- Scroll down to the Cookies and Site Data section and click on Clear Data.
- Select the types of data you want to clear, such as cache.
- Click on Clear.
Safari (Mac):
- Open Safari and click on Safari in the top menu bar.
- Select Preferences from the drop-down menu.
- In the Preferences window, go to the Advanced tab.
- Enable the option to Show Develop menu in menu bar.
- Click on the Develop menu in the top menu bar.
- Select Empty Caches to clear the browser cache.
By adjusting your browser settings to regularly clear the cache, you can reduce the amount of data stored locally and ensure that your browser operates efficiently. This helps improve browsing speed, reduces the risk of loading outdated or incompatible web content, and keeps your system resources available for other tasks.
It’s worth noting that clearing the browser cache will remove stored passwords, auto-fill form data, and website preferences. So, be sure to consider any saved information that you may need before clearing the cache.
Now that you know how to adjust your browser settings to clear the cache, let’s summarize the steps covered so far and conclude our guide on clearing up the RAM cache.
Conclusion
Congratulations! You now have a comprehensive understanding of how to clear up the RAM cache and optimize the performance of your computer. We covered various methods, including restarting your computer, using Task Manager (Windows), Activity Monitor (Mac), Terminal commands (Mac), closing unnecessary applications, updating or removing apps, and adjusting browser settings.
Clearing up the RAM cache is a simple yet effective way to free up memory space and improve system performance. By removing unnecessary data from the cache, you allow your computer to allocate resources more efficiently, resulting in faster and smoother operation.
Remember to restart your computer regularly to clear the RAM cache and allow the operating system to refresh. Additionally, using Task Manager in Windows or Activity Monitor on Mac can help you identify and close resource-intensive processes to optimize memory usage.
For advanced users comfortable with terminal commands, you can use Terminal on Mac to clear the RAM cache with the ‘sudo purge’ command. However, exercise caution to prevent unintended consequences.
Closing unnecessary applications, updating or removing outdated apps, and adjusting browser settings to clear the cache are additional steps you can take to further optimize your computer’s performance.
By following these methods, you can keep your computer running smoothly and efficiently, ensuring that it performs at its best, whether you’re working, browsing, or enjoying multimedia content.
Remember, the key is to strike a balance between clearing the RAM cache to optimize performance and keeping essential data readily available for quick access.
Thank you for reading this guide, and we hope that it has been helpful in improving your computer’s performance. Here’s to a faster and smoother computing experience!