Introduction
Welcome to our guide on how to clear the RAM cache on Windows. If you have noticed your computer running slower than usual or experiencing performance issues, the RAM cache could be a contributing factor. Understanding what RAM cache is and how to clear it can help improve your computer’s speed and overall performance.
RAM cache, also known as a disk cache, is a component of the computer’s memory management system. When you open files or programs, Windows automatically stores data in the RAM cache for quicker access in the future. The cache helps reduce load times and improves system responsiveness, as accessing data from the RAM cache is significantly faster than retrieving it from the hard drive.
While the RAM cache serves an important purpose, over time, it can become overloaded with unnecessary data. This can lead to decreased performance and sluggishness in your computer’s operations. Clearing the RAM cache periodically can free up valuable memory and improve your system’s performance.
In this guide, we will explore different methods to clear the RAM cache on Windows. Whether you are a novice computer user or an experienced technician, you will find step-by-step instructions and tools to help you accomplish this task. Let’s dive into the various methods available to clear the RAM cache and optimize your computer’s performance.
What is RAM cache?
In order to fully understand how to clear the RAM cache on Windows, it is important to first grasp what the RAM cache actually is. RAM cache, short for Random Access Memory cache, is a component of a computer’s memory management system that stores frequently accessed data for quick retrieval. When you open files or launch programs, Windows automatically stores relevant data in the RAM cache, allowing for faster access in the future.
The RAM cache works by utilizing the random-access memory (RAM) of your computer, which is much faster than the traditional hard drive or solid-state drive (SSD). By storing commonly accessed data in the RAM cache, your computer can quickly retrieve this information without having to access the slower storage devices. This results in improved system performance and reduced load times.
This caching mechanism is especially beneficial when dealing with repetitive tasks or applications. For example, if you frequently use a particular program or open files from a specific folder, the RAM cache will store the relevant data so that subsequent access will be significantly faster. This is why you might notice improved performance when accessing the same files or applications multiple times during a single session.
By utilizing the RAM cache, your system can efficiently manage and deliver data, enhancing the overall user experience. However, as you continue to use your computer, the RAM cache can become filled with unnecessary or outdated data, potentially leading to a decrease in performance. In such cases, it becomes necessary to clear the RAM cache to free up valuable memory resources and optimize your computer’s operations.
Clearing the RAM cache allows the system to start fresh, emptying out all the data that is no longer necessary. This helps ensure that the RAM cache is being used efficiently, allowing for the storage of new, relevant data for faster retrieval. The process of clearing the RAM cache can vary depending on the version of Windows you are using, but rest assured, we will guide you through the various methods available to clear the RAM cache on Windows.
Why clear RAM cache?
Clearing the RAM cache on your Windows computer is an important step in optimizing its performance and ensuring smooth operations. While the RAM cache is designed to enhance speed and efficiency, there are several reasons why you may want to clear it periodically:
1. Free up memory: Over time, the RAM cache can accumulate a significant amount of data that is no longer needed. Clearing the cache frees up valuable memory, allowing your computer to operate with more available resources. This can result in faster performance and improved multitasking capabilities.
2. Resolve performance issues: If you are experiencing slow load times, application crashes, or overall sluggishness, the RAM cache could be a contributing factor. Clearing the cache can remove any corrupted or outdated data that may be causing performance issues, allowing your system to run more smoothly.
3. Reduce memory leaks: Memory leaks occur when a program or process does not release the memory it has allocated, leading to a gradual loss of available memory. Clearing the RAM cache can help mitigate memory leaks and prevent them from impacting your system’s performance.
4. Optimize virtual memory: The RAM cache is closely related to the management of virtual memory, which refers to the use of a portion of your hard drive as additional memory when the physical RAM is fully utilized. Clearing the cache allows the system to better manage virtual memory, ensuring an efficient allocation of resources.
5. Reset system state: When you clear the RAM cache, it essentially resets the system state by removing all cached data. This can be particularly useful if you are troubleshooting software-related issues or encountering persistent errors.
6. Improve responsiveness: By clearing the RAM cache, you can improve the responsiveness of your computer. This is especially beneficial when running memory-intensive applications, such as video editing software or virtual machines, which require a significant amount of available memory to function optimally.
Overall, regularly clearing the RAM cache is a proactive step to maintain and enhance your computer’s performance. By freeing up memory and removing unnecessary data, you can ensure that your system operates efficiently and experiences fewer performance-related issues.
Method 1: Restart your computer
One simple and effective way to clear the RAM cache on your Windows computer is to restart it. Restarting your computer shuts down all processes and programs running in the background, including any cached data in the RAM. When the computer starts up again, the RAM cache will be cleared, providing a fresh start for your system.
To restart your computer, follow these steps:
- Save any important work and close all open applications.
- Click on the Start button in the lower left corner of the screen.
- Click on the Power option.
- Select Restart from the drop-down menu.
Your computer will then begin the restart process. It may take a few moments for the system to shut down completely and start up again. Once the restart is complete, the RAM cache will be cleared, and you should notice an improvement in your computer’s performance.
The restart method is quick and easy to perform, making it a convenient solution for clearing the RAM cache. However, keep in mind that this method is temporary, as the RAM cache will gradually fill up again as you continue using your computer. For a more long-term solution, you may need to explore other methods, which we will cover in the following sections.
Method 2: Use the Windows task manager
Another method to clear the RAM cache on your Windows computer is by using the built-in Windows Task Manager. The Task Manager allows you to monitor and manage processes, performance, and various system resources, including the memory usage.
Here’s how you can use the Windows Task Manager to clear the RAM cache:
- Press Ctrl + Shift + Esc on your keyboard simultaneously to open the Task Manager. Alternatively, you can right-click on the taskbar and select Task Manager from the context menu.
- Once the Task Manager opens, click on the More details button at the bottom-left corner to expand the Task Manager window and view advanced options.
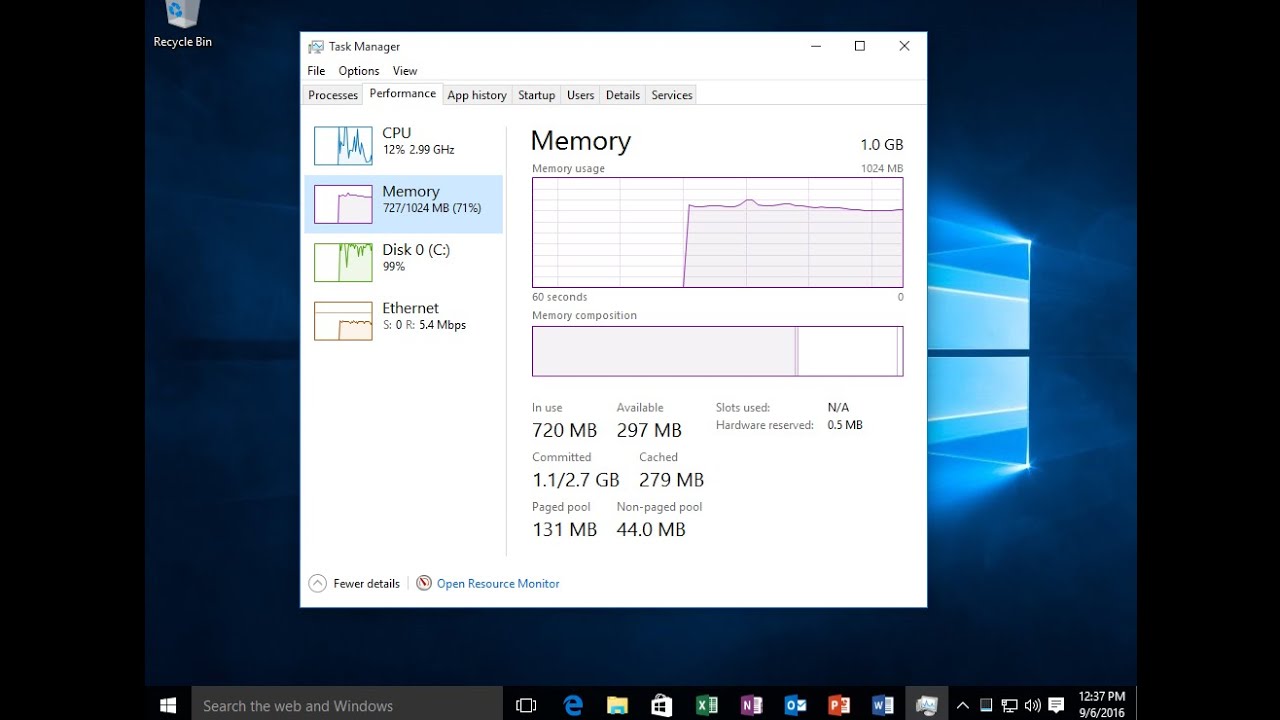
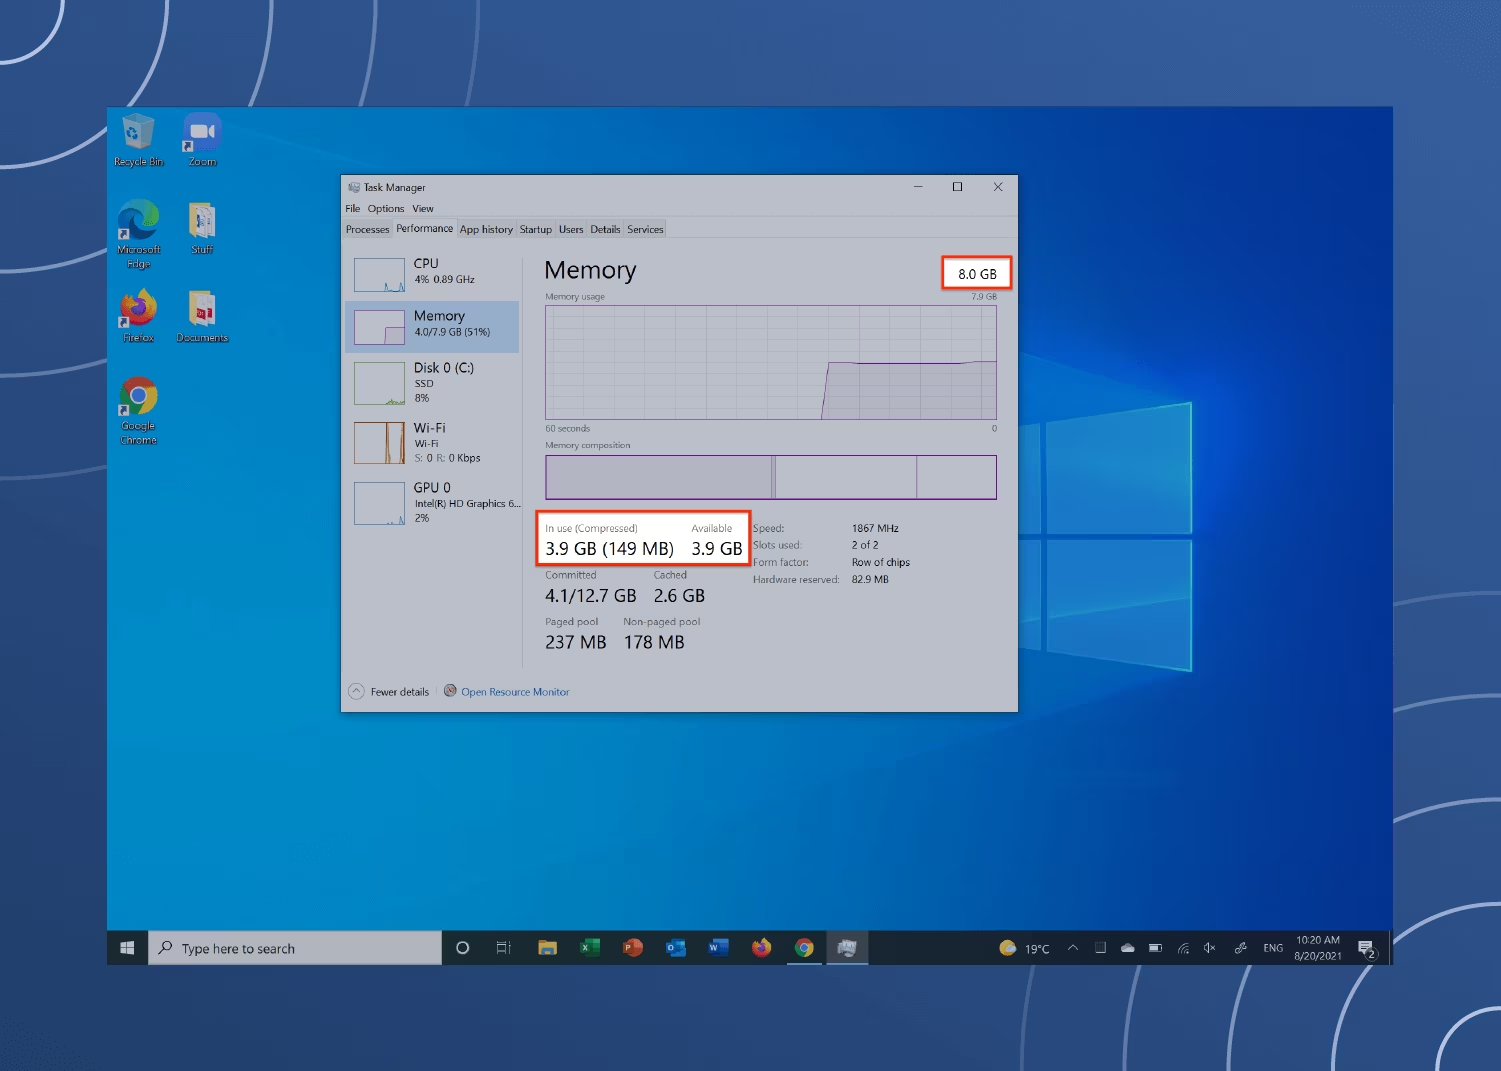
- In the Task Manager window, click on the Performance tab.
- Under the Performance tab, click on the Memory option in the left sidebar to view the memory usage details.
- Now, you will see a list of running processes and their corresponding memory usage. To clear the RAM cache, click on the Memory column to sort the processes by memory usage.
- Identify any processes that are using an unusually high amount of memory. You can determine this by looking at the Memory column, which displays the amount of memory being used by each process.
- Right-click on any processes that you wish to clear from the RAM cache and select End Task. This will terminate the process and clear the associated memory cache.
After you have ended the selected processes, the RAM cache associated with those processes will be cleared, freeing up memory on your computer. You may notice an improvement in performance, particularly if the terminated processes were utilizing a significant amount of memory.
It’s important to exercise caution when ending processes in the Task Manager. Be sure to only terminate processes that you are familiar with, as ending critical system processes can cause instability or crashes. If you are unsure about a specific process, it’s best to leave it untouched or perform some research before ending it.
The Task Manager method provides a more targeted approach to clearing the RAM cache by terminating specific processes. However, keep in mind that this method focuses on individual processes rather than clearing the entire cache. For more comprehensive cache clearing, you may need to explore other methods discussed in the upcoming sections.
Method 3: Utilize the Windows Memory Diagnostic Tool
If you suspect that issues with your computer’s RAM may be causing performance problems, you can utilize the built-in Windows Memory Diagnostic Tool to clear the RAM cache and identify any potential memory-related errors. This tool is specifically designed to run tests on your computer’s RAM and help diagnose memory issues that could be affecting system performance.
Follow these steps to use the Windows Memory Diagnostic Tool:
- Press the Windows key + R on your keyboard to open the Run dialog box.
- Type “mdsched.exe” (without the quotes) into the Run box and press Enter. This will open the Windows Memory Diagnostic Tool.
- In the Windows Memory Diagnostic Tool window, you will be presented with two options: Restart now and check for problems (recommended) or Check for problems the next time I start my computer. Select the option that best suits your needs.
- If you choose to restart your computer, make sure you save any unsaved work before proceeding. The system will restart, and the Windows Memory Diagnostic Tool will automatically start the memory diagnostic process.
- During the diagnostic process, the tool will perform multiple tests to check the integrity and functionality of your computer’s RAM.
- Wait for the tool to complete the tests. This may take some time, depending on the size and speed of your RAM.
- Once the tests are finished, your computer will automatically restart.
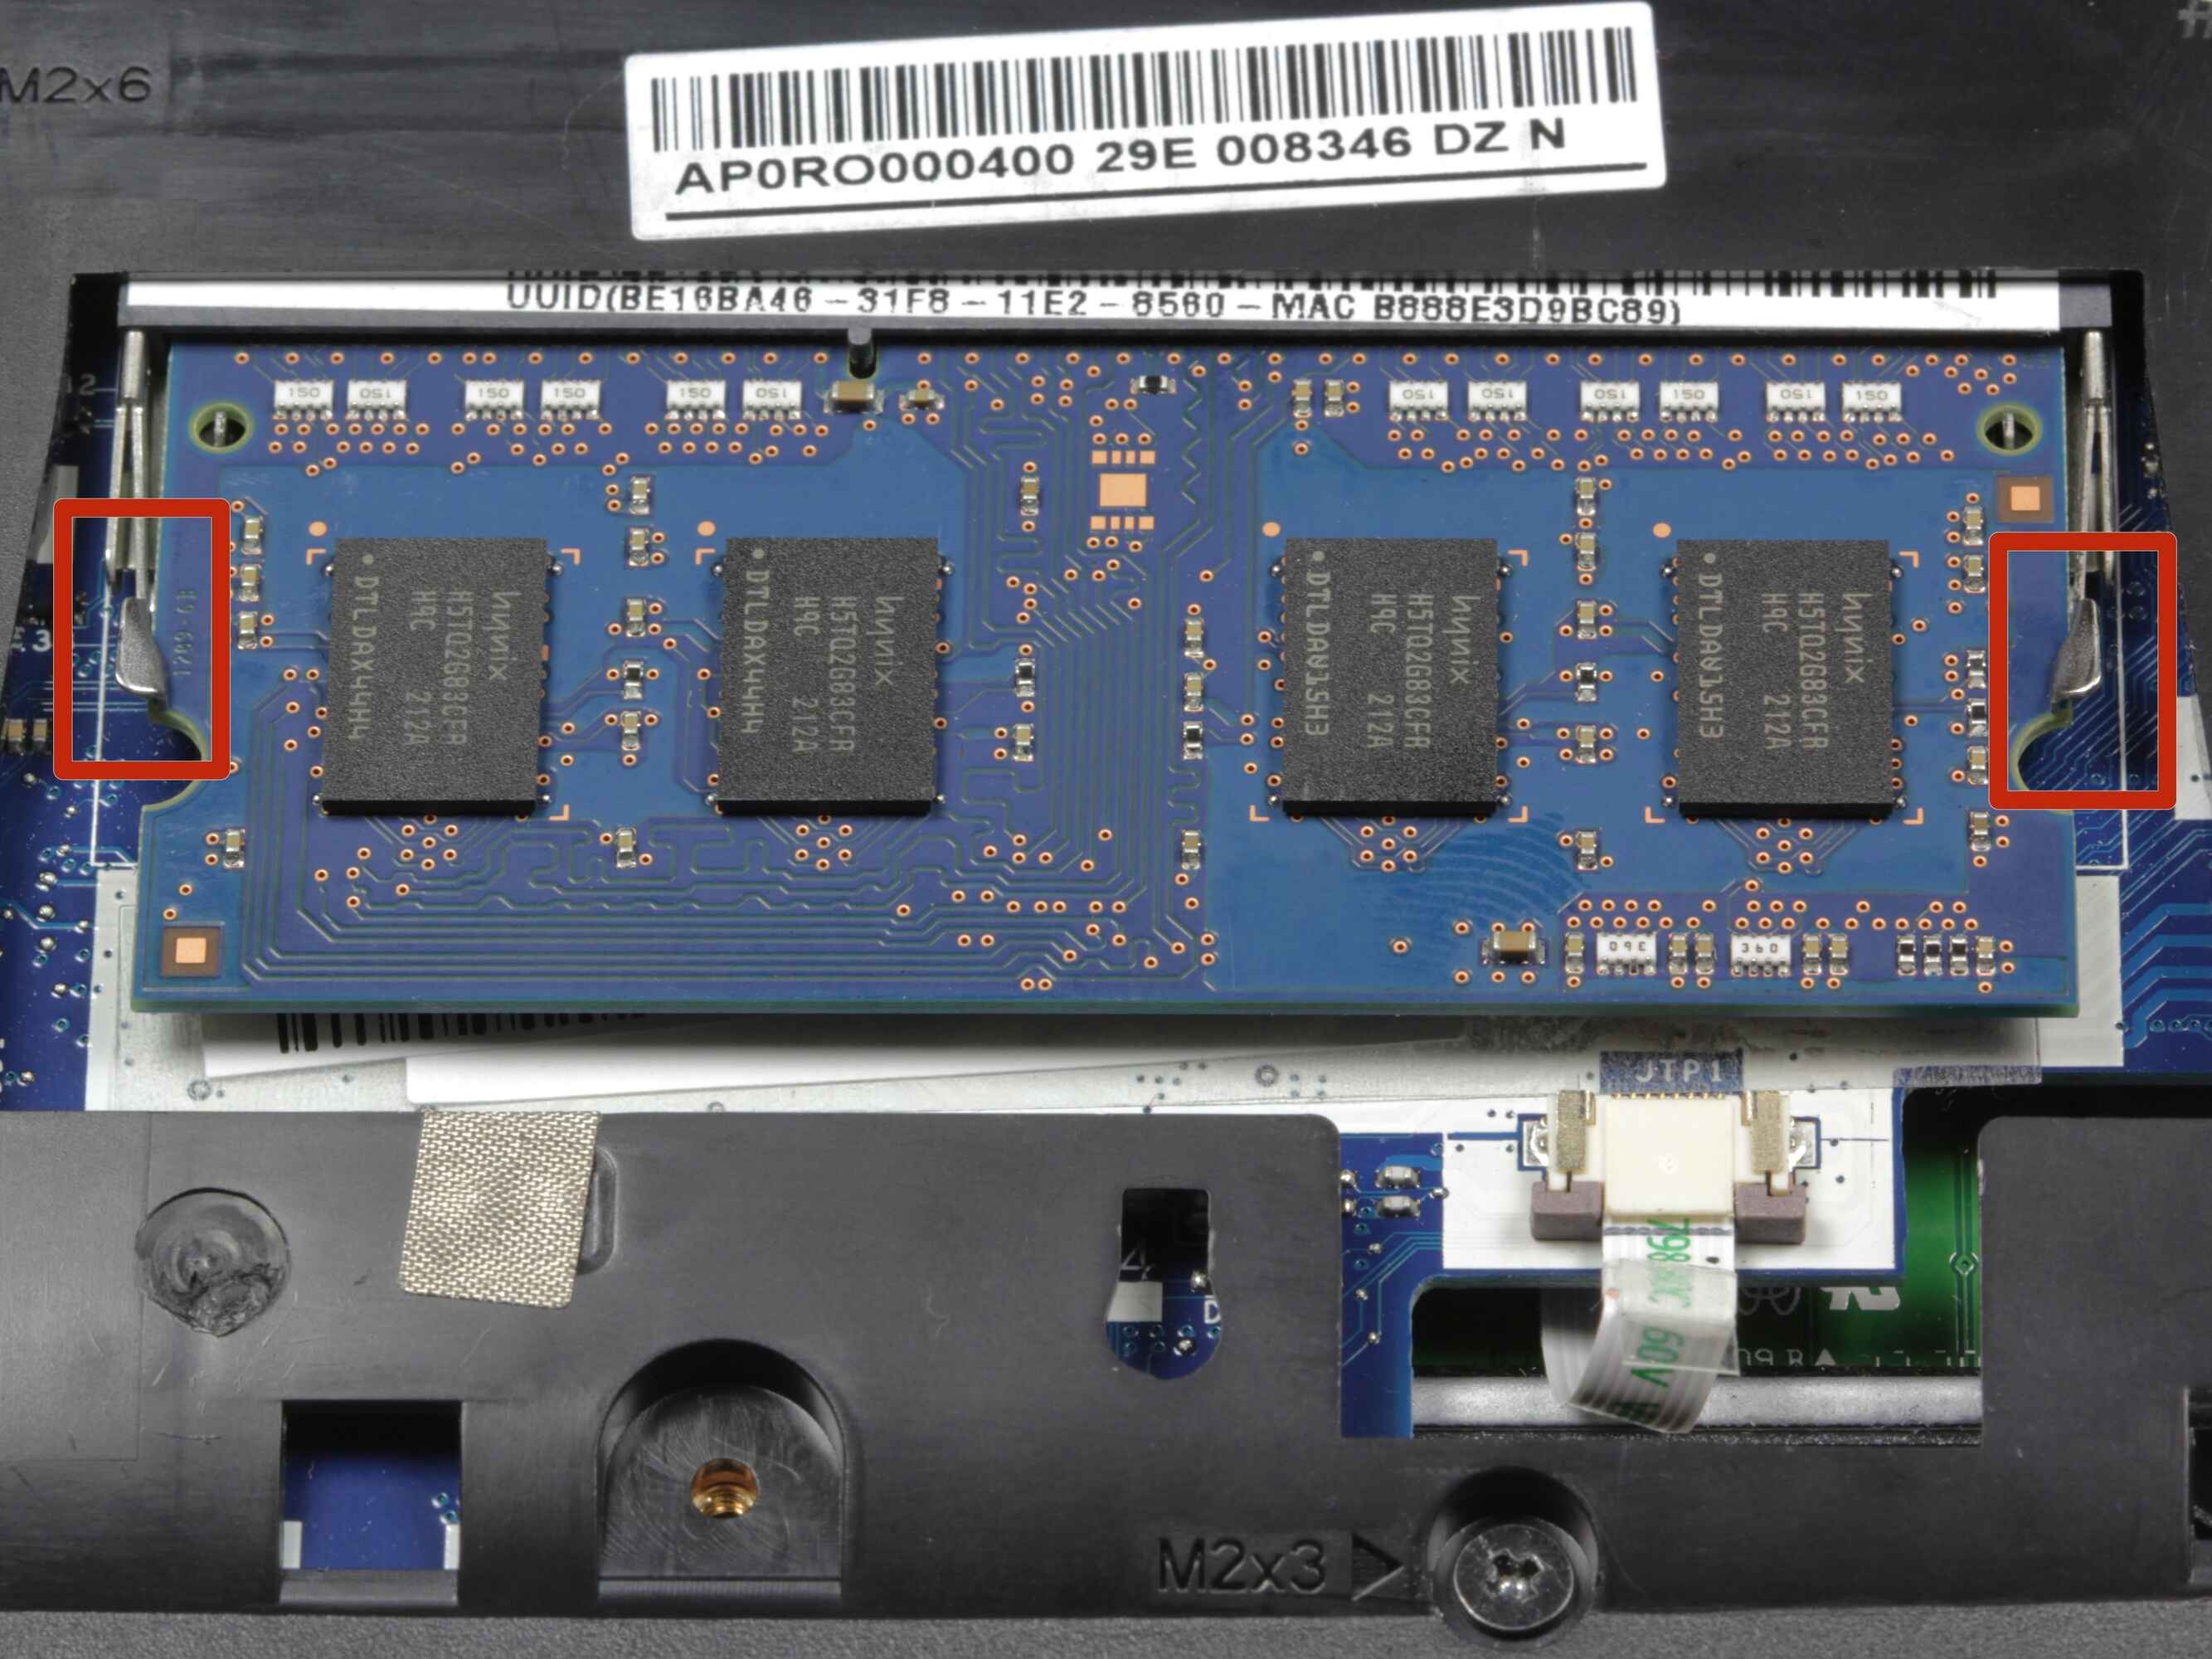
After the restart, the Windows Memory Diagnostic Tool will display the test results, indicating whether any memory issues were detected. If the tool identifies any errors, you may need to replace or repair your RAM modules to resolve the issues.
Running the Windows Memory Diagnostic Tool not only helps identify potential memory problems but also clears the RAM cache in the process. By resetting the RAM during the diagnostic tests, the tool effectively clears out any cached data, providing a clean slate for your computer’s memory operations.
Keep in mind that this method is primarily focused on diagnosing and potentially resolving memory-related issues, rather than solely clearing the RAM cache. If you only want to clear the cache without running the diagnostic tests, you may need to explore other methods discussed in the upcoming sections.
Method 4: Adjust your virtual memory settings
Adjusting your virtual memory settings can help clear the RAM cache and optimize your computer’s memory usage. Virtual memory is a feature in Windows that allows your computer to use part of your hard drive as additional RAM when the physical RAM is fully utilized. By adjusting these settings, you can effectively manage virtual memory and improve your system’s performance.
Follow these steps to adjust your virtual memory settings:
- Right-click on the Start button, then click on System to open the System settings.
- In the System window, click on the Advanced system settings link located on the left side.
- This will open the System Properties window. In the System Properties window, click on the Settings button under the Performance section.
- Next, click on the Advanced tab in the Performance Options window.
- Under the Virtual Memory section, click on the Change button.
- In the Virtual Memory window, you will see the current virtual memory settings. Uncheck the “Automatically manage paging file size for all drives” checkbox.
- Select the “Custom size” option.
- Enter the initial and maximum size for the virtual memory, in megabytes. You can use the recommended values or set a custom size based on your specific needs. It is generally recommended to set the initial size to be the same as the amount of physical RAM installed on your computer.
- Click Set and then OK to save the changes.
- Restart your computer to apply the new virtual memory settings.
By adjusting the virtual memory settings, you are effectively managing the page file size, which is the storage area used for virtual memory. The new settings will clear the existing RAM cache and allow the system to optimize the use of virtual memory, resulting in improved performance. However, keep in mind that virtual memory should not be set excessively high, as it could lead to decreased performance due to increased hard drive usage.
It’s important to note that adjusting virtual memory settings is a system-wide change and will affect all programs and processes running on your computer.
If you experience any stability issues after adjusting the virtual memory settings, you can revert back to the default settings or try different custom sizes until you find the optimal configuration for your system.
Method 5: Clearing RAM cache with third-party software
If you prefer a more automated and comprehensive approach to clearing the RAM cache, you can utilize third-party software specifically designed for this purpose. These software solutions offer advanced features and options for clearing out the RAM cache, optimizing memory usage, and improving system performance.
Here are a few examples of popular third-party software that can help clear the RAM cache:
- CCleaner: CCleaner is a well-known system optimization tool that offers a wide range of features, including the ability to clean the RAM cache. With CCleaner, you can easily clear the RAM cache, as well as perform other maintenance tasks such as removing temporary files and cleaning the Windows registry.
- Wise Memory Optimizer: Wise Memory Optimizer is a lightweight and user-friendly tool that allows you to optimize and free up memory on your computer. It can automatically defragment the RAM and clear the RAM cache, helping improve system performance.
- MemReduct: MemReduct is a simple yet effective tool that monitors and optimizes your system’s memory usage. It can clear the RAM cache and reduce memory fragmentation, resulting in improved performance and responsiveness.
When using third-party software to clear the RAM cache, it’s important to choose a reputable and trusted tool. Research and read user reviews to ensure the software is reliable and safe to use. Additionally, be cautious of any bundled software during the installation process, as some tools may include additional programs that you may not want or need.
Once you have selected and installed the desired third-party software, follow the instructions provided by the software developer to clear the RAM cache. Typically, these tools offer a simple interface with options to scan and clean the cache with just a few clicks.
Keep in mind that different third-party software may have varying features and options. Some tools may offer additional functionalities beyond clearing the RAM cache, such as memory optimization and system monitoring. Explore the software’s documentation or settings to get the most out of its capabilities and optimize your computer’s performance.
Using third-party software can be a convenient and efficient way to clear the RAM cache, especially for users who prefer a more automated approach. However, it’s important to exercise caution when downloading and installing software from external sources. Ensure that you download the software from reliable sources and keep it up to date to benefit from the latest features and security patches.
Conclusion
Clearing the RAM cache on your Windows computer is an essential step in optimizing system performance and ensuring smooth operations. By removing unnecessary data from the cache, you can free up valuable memory resources and improve the responsiveness of your computer.
In this guide, we have explored five different methods to clear the RAM cache on Windows. From the simple act of restarting your computer to utilizing the Windows Task Manager, adjusting virtual memory settings, and leveraging third-party software, there are several approaches you can take to effectively clear the cache and improve your computer’s performance.
Restarting your computer is a quick and easy method to clear the cache, providing a fresh start for your system. Using the Windows Task Manager allows you to terminate specific processes and their associated cache, targeting potential performance issues. The Windows Memory Diagnostic Tool helps diagnose memory-related problems and clears the cache during the diagnostic tests. Adjusting virtual memory settings helps optimize memory usage and clear the cache by managing the allocation of virtual memory. Lastly, third-party software offers advanced features and automation to clear the cache and optimize memory usage.
When choosing a method to clear the RAM cache, consider your specific needs and level of technical expertise. Ensure that you follow the instructions carefully and exercise caution when making changes to your system configuration.
Regularly clearing the RAM cache is a proactive step to maintain optimal system performance. By monitoring and managing your computer’s memory usage, you can prevent performance issues and improve the overall user experience.
Remember, maintaining a well-optimized computer goes beyond just clearing the RAM cache. Regularly performing system maintenance, such as updating drivers, removing unnecessary applications, and keeping your system updated, will contribute to a smoother and more efficient computing experience.
We hope this guide has provided you with valuable information and options to clear the RAM cache on your Windows computer. By implementing these methods, you can enjoy improved performance and a more responsive system.