Introduction
Welcome to the era of portable devices, where tablets have become an essential part of our daily lives. These handy gadgets allow us to do everything from browsing the internet to watching movies and playing games. However, as we use our tablets more and more, we may start to encounter a common problem – limited storage space.
Running out of space on your tablet can be frustrating, especially when you want to download new apps or save important files. But don’t worry, there are steps you can take to clear space on your tablet and optimize its storage capacity.
In this article, we will guide you through the process of freeing up space on your tablet. Whether you own an Android or iOS device, these tips and tricks will help you reclaim valuable storage and ensure your tablet is running smoothly.
From uninstalling unnecessary apps to clearing cache and temporary files, we will cover all the essential methods to clear space on your tablet. Additionally, we’ll explore how to utilize cloud storage or external devices to store your files and remove unused media files that are taking up valuable space.
By following the steps outlined in this guide, you’ll be able to optimize your tablet’s storage and enjoy using it without constantly dealing with low storage warnings. So, let’s get started and learn how to clear space on your tablet!
Why is it important to clear space on your tablet?
Clearing space on your tablet is crucial for several reasons. Let’s explore why it’s important to keep your tablet’s storage clean and optimized:
- Improved Performance: As you use your tablet, it accumulates various files, temporary data, and folders from apps, downloads, and browsing activities. This can eventually lead to a decrease in performance and sluggishness. By clearing space and removing unnecessary files, you can improve the overall speed and responsiveness of your tablet.
- More Storage: Tablets often come with limited storage capacity, and every app, photo, or video you add takes up valuable space. Clearing space allows you to free up storage for new apps, games, and media without constantly worrying about running out of space.
- Smooth Functionality: When your tablet’s storage is full, it can hinder the smooth functioning of apps and features. Some apps may crash or freeze, affecting your user experience. By clearing space, you can ensure that apps and features operate seamlessly, without any interruptions or slowdowns.
- Backup and Security: Keeping your tablet’s storage organized and clutter-free is essential for proper backup and security measures. When you have ample storage, you can regularly back up your important files, photos, and documents without any issues. Additionally, removing unnecessary files reduces the risk of clutter and potential security vulnerabilities.
- Easier Navigation: A cluttered tablet with limited storage can make it difficult to find and access the files and apps you need. By clearing space and organizing your tablet’s storage, you can easily locate and navigate your apps, files, and media, saving you time and frustration.
In summary, clearing space on your tablet is essential for improved performance, more storage capacity, smooth functionality, backup and security, and easier navigation. By following the steps to clear space on your tablet, you can optimize its performance and enjoy a seamless user experience.
Step 1: Uninstall unnecessary apps
The first step to clearing space on your tablet is to uninstall any unnecessary apps. Over time, we tend to accumulate a collection of apps that we no longer use or need. These unused apps can consume a significant amount of storage space. By removing them, you can free up valuable storage for other purposes.
To uninstall apps on your tablet, follow these simple steps:
- Go to the Settings menu on your tablet.
- Scroll down and find the “Apps” or “Applications” option. Tap on it.
- You will see a list of all the apps installed on your tablet. Look for the apps that you no longer use or need.
- Tap on the app you want to uninstall.
- You will be presented with the app’s information page. Look for the “Uninstall” button and tap on it.
- Confirm your action when prompted to uninstall the app.
- Repeat these steps for any other unnecessary apps you want to remove.
By uninstalling unnecessary apps, you can free up a significant amount of storage space on your tablet. It’s worth taking the time to go through your app collection and remove any apps that you haven’t used in a while or no longer serve a purpose.
Keep in mind that some pre-installed apps on your tablet may be necessary for the proper functioning of the device. It’s best to check their functionality and importance before uninstalling them.
Once you have uninstalled unnecessary apps, you will notice an immediate increase in available storage space on your tablet. This will allow you to download new apps or store important files without worrying about running out of space.
Remember, clearing space by uninstalling unnecessary apps is just the first step in optimizing your tablet’s storage. Let’s move on to the next step and clear even more space for a smoother tablet experience.
Step 2: Delete old downloads and files
As you use your tablet, you may accumulate a large number of downloads and files that you no longer need. These could be old documents, images, videos, or audio files that are taking up valuable storage space. Deleting these files can help clear space and optimize your tablet’s storage.
Follow these steps to delete old downloads and files:
- Open your file manager or file explorer app on your tablet. If you don’t have one installed, you can download one from the app store.
- Navigate to the “Downloads” folder or any other folder where you store your files.
- Review the files in the folder and identify the ones you no longer need.
- Tap and hold on a file to select it, then look for a “Delete” or “Trash” option.
- Select the files you want to delete and tap on the “Delete” or “Trash” button.
- Confirm your action when prompted to delete the files.
It’s important to be cautious when deleting files, as once they are deleted, they cannot be easily recovered. Make sure to review the files carefully before deleting them to avoid accidentally deleting important files.
In addition to the “Downloads” folder, check other folders on your tablet, such as “Documents,” “Pictures,” and “Videos.” Delete any old or unwanted files from these folders as well.
If you are unsure about deleting certain files, you can consider transferring them to an external storage device or backing them up to the cloud before deleting them from your tablet. This way, you can access them later if needed.
By deleting old downloads and files, you can free up a significant amount of storage space on your tablet. This will not only allow you to store new files but also improve the overall performance and speed of your tablet. Let’s move on to the next step and learn how to clear cache and temporary files.
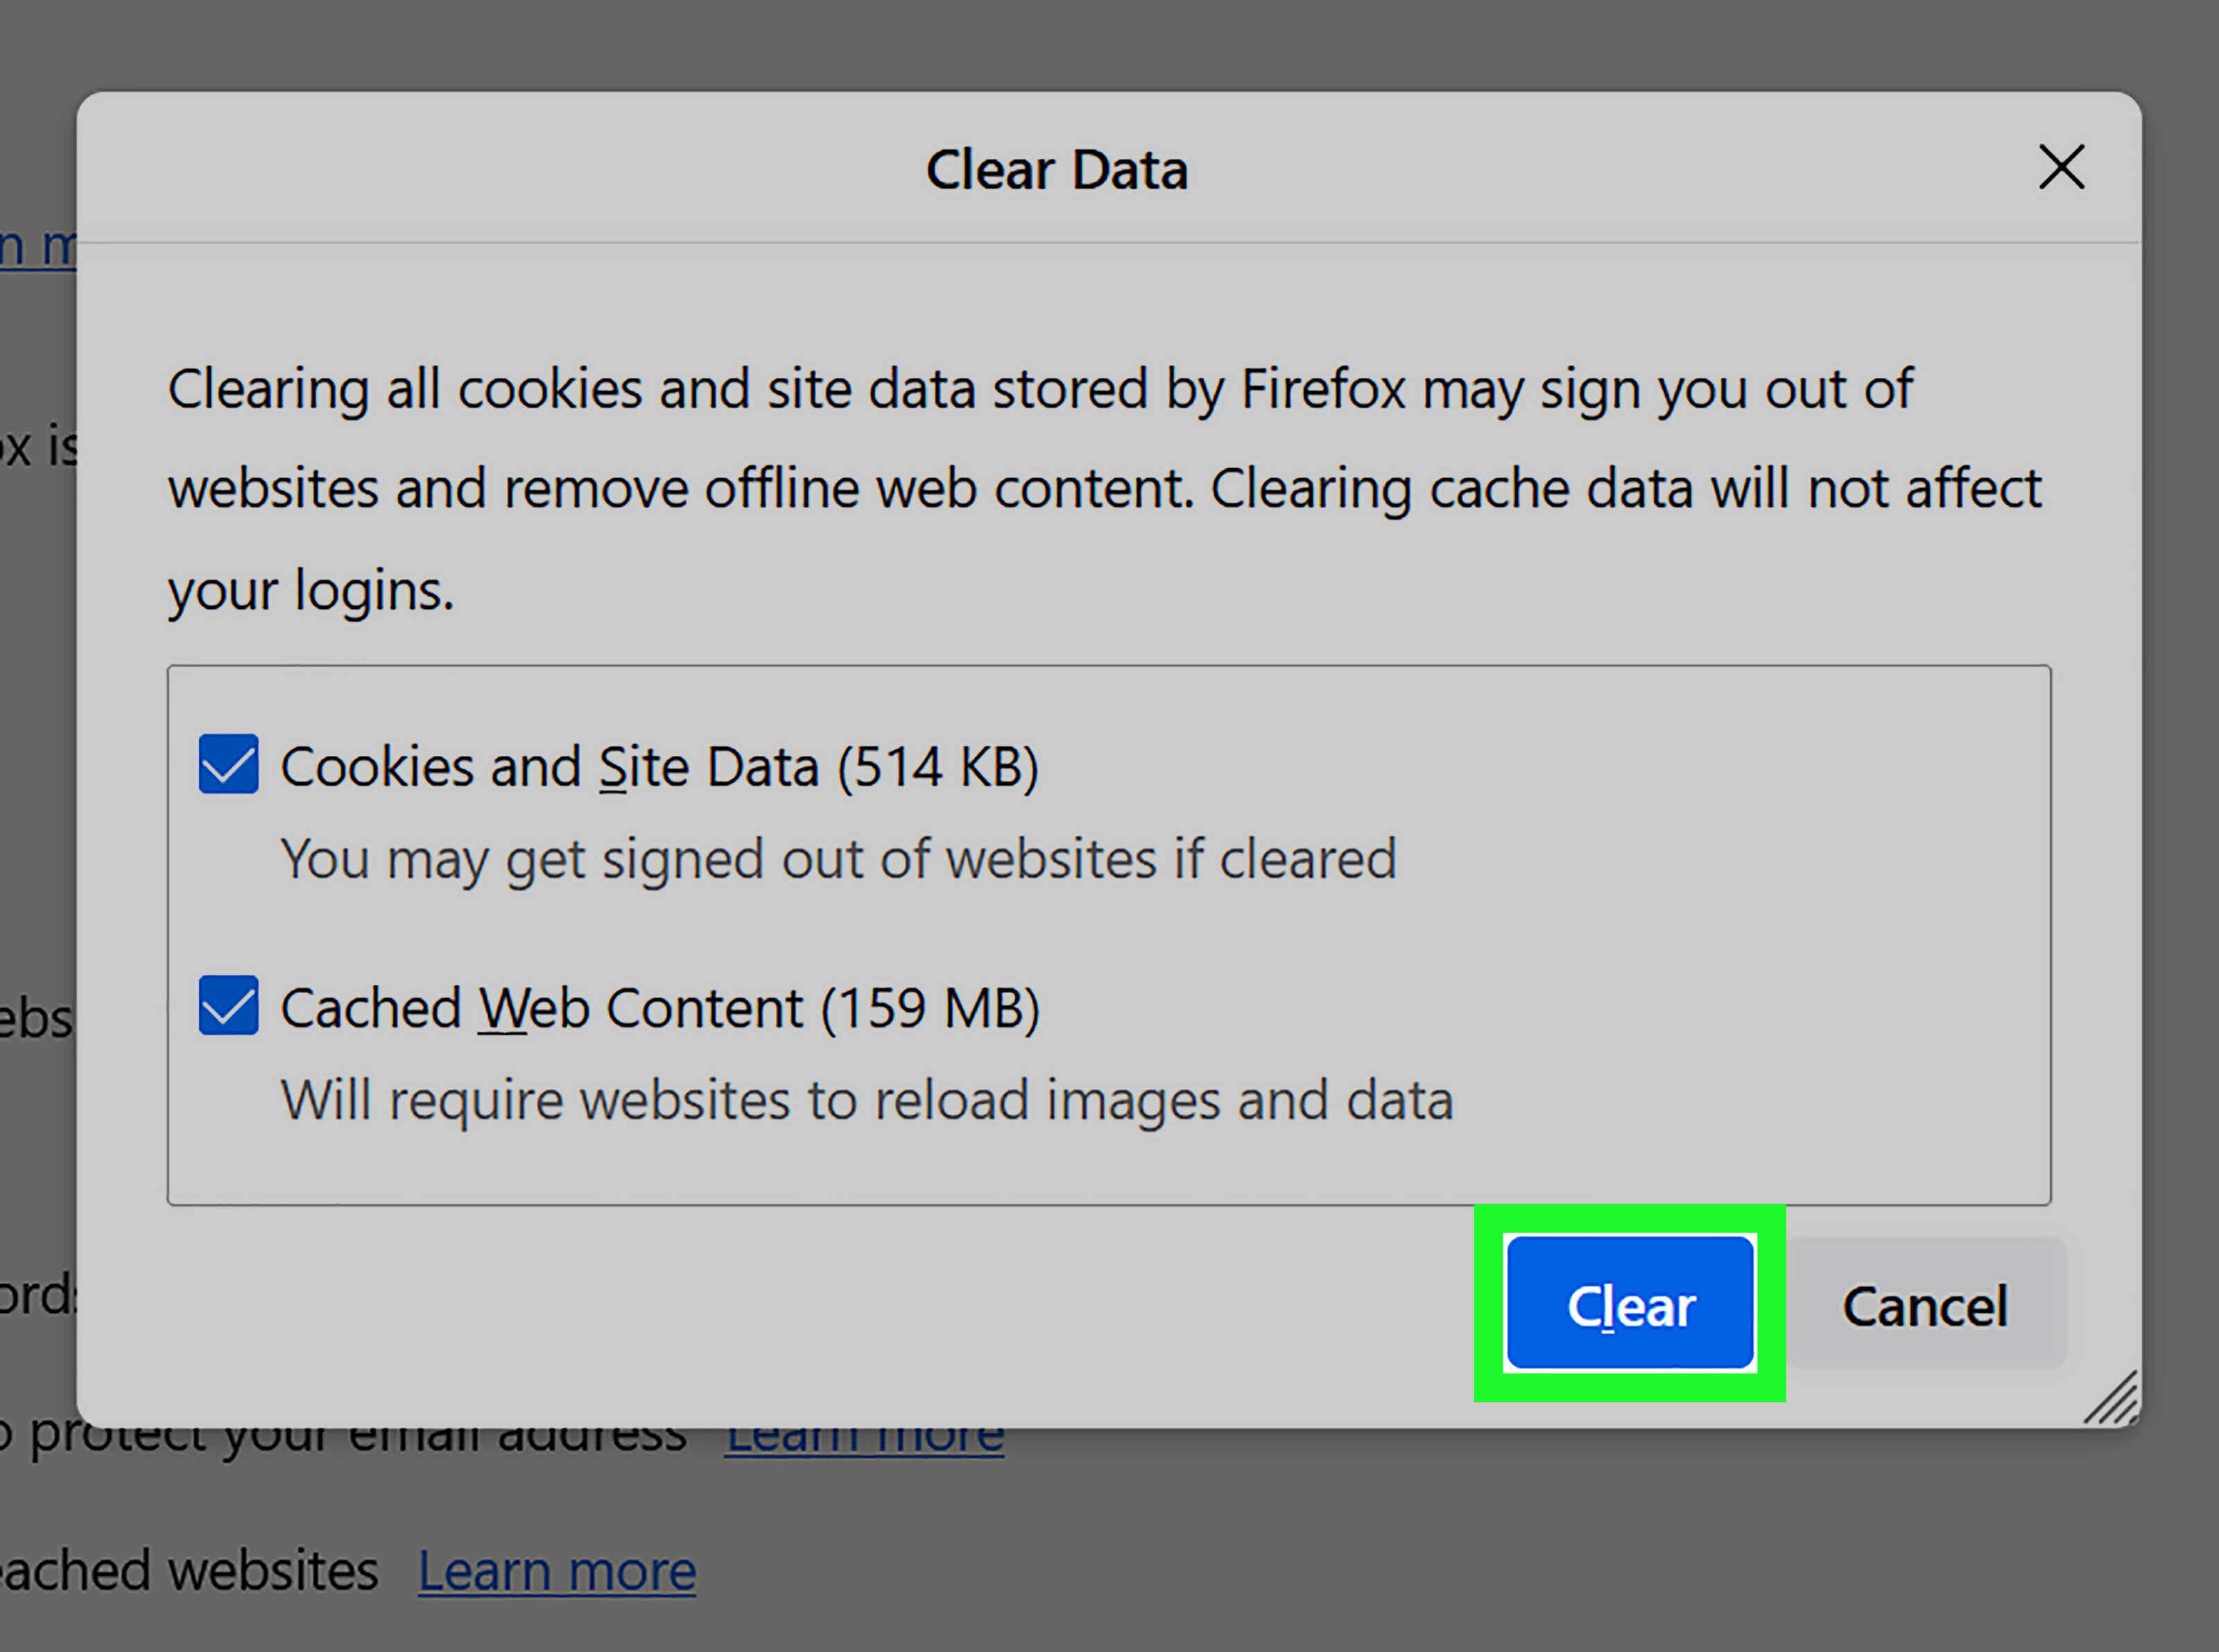
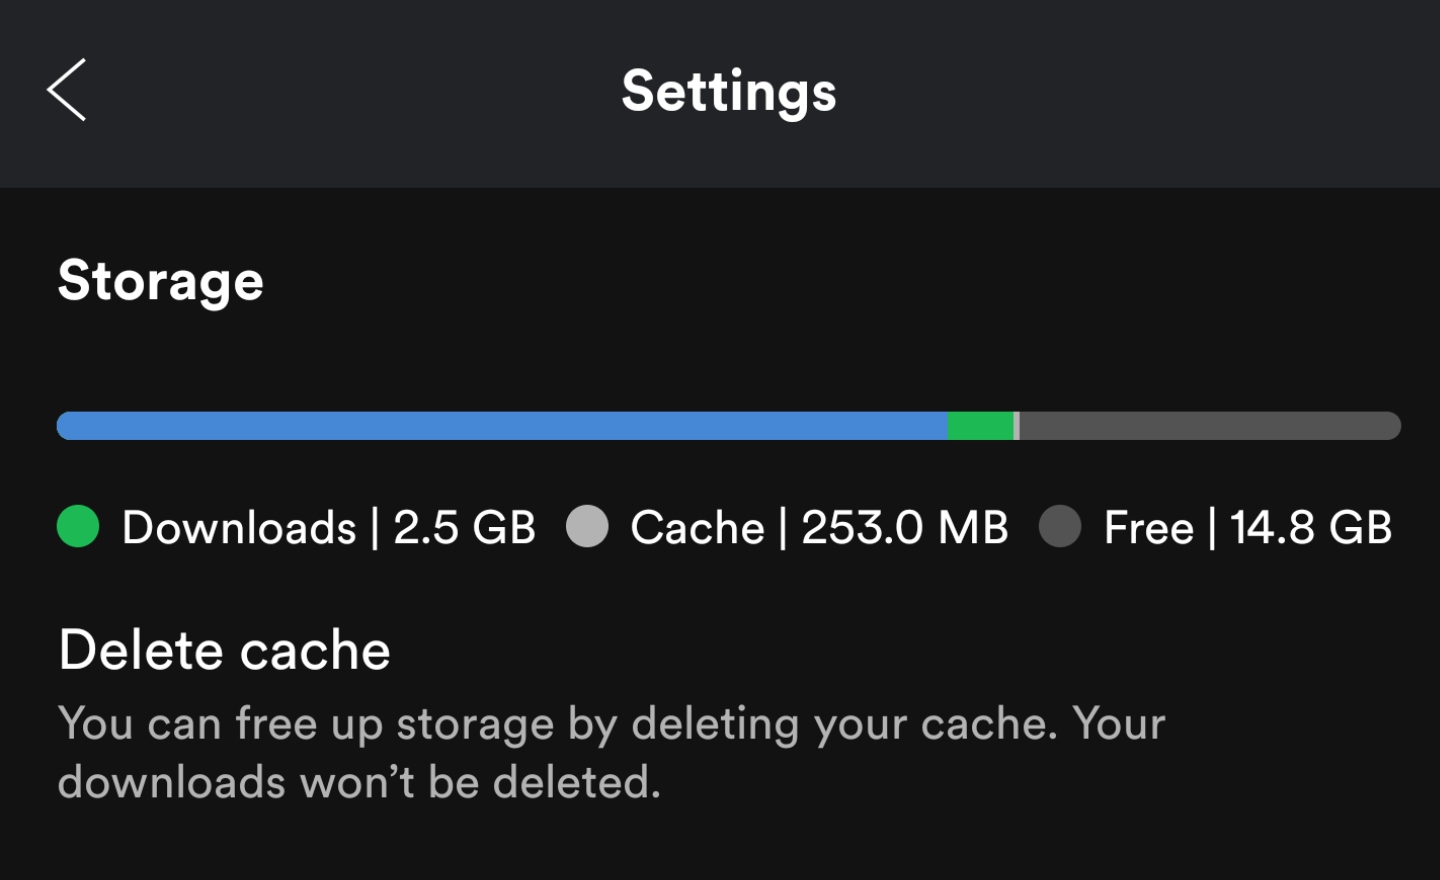
Step 3: Clear cache and temporary files
Cache and temporary files are generated by apps and websites to improve their performance and load times. However, over time, these files can accumulate and take up a significant amount of storage space on your tablet. Clearing the cache and temporary files can help free up storage and optimize your tablet’s performance.
Follow these steps to clear the cache and temporary files on your tablet:
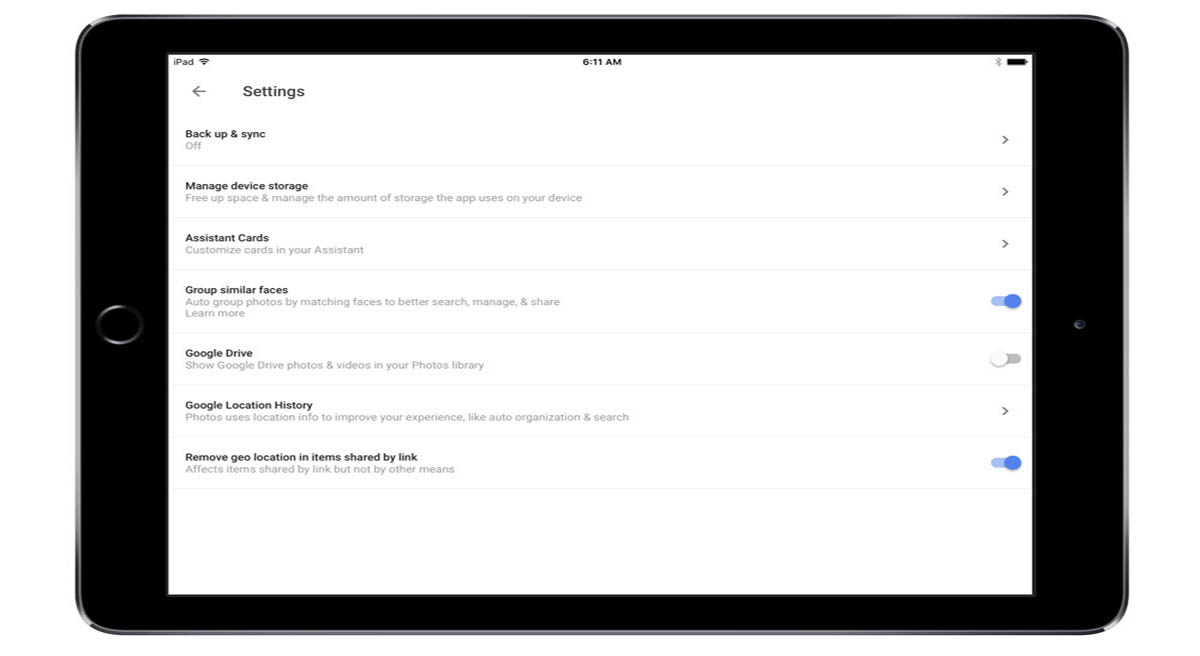
- Go to the Settings menu on your tablet.
- Scroll down and find the “Storage” or “Storage & USB” option. Tap on it.
- You will see a list of storage options. Look for the “Cached data” or “Cached files” option.
- Tap on the “Cached data” or “Cached files” option.
- You will be prompted to confirm the action. Tap on “OK” or “Clear” to proceed.
Clearing the cache and temporary files may take a few moments, depending on the amount of data stored. Once the process is complete, you will notice a significant increase in available storage space on your tablet.
In addition to clearing the system-level cache, some apps have their cache that can be cleared individually. To clear app cache, follow these steps:
- Go to the Settings menu on your tablet.
- Scroll down and find the “Apps” or “Applications” option. Tap on it.
- Look for the app you want to clear the cache for and tap on it.
- Inside the app’s information page, you will find a “Storage” or “Cache” option.
- Tap on the “Storage” or “Clear cache” option.
Repeat these steps for other apps, especially those that occupy a large amount of storage space.
Clearing the cache and temporary files not only helps in freeing up storage space but also improves the performance of apps and reduces load times. However, keep in mind that clearing the cache may reset some app settings or require you to log back into certain apps.
Now that you have cleared cache and temporary files, let’s move on to the next step and explore how to move files to the cloud or an external storage device for additional space.
Step 4: Move files to the cloud or an external storage device
If you have files on your tablet that you don’t frequently access but still want to keep, moving them to the cloud or an external storage device is a great solution. This frees up valuable storage space on your tablet while still allowing you to access your files when needed.
Here are the steps to move files to the cloud or an external storage device:
- Cloud Storage:
- Sign up for a cloud storage service such as Google Drive, Dropbox, or OneDrive, if you haven’t already.
- Install the corresponding app for the cloud storage service on your tablet.
- Open the app and sign in using your credentials.
- Create a new folder or select an existing folder to store your files.
- Navigate to the files or folders you want to move.
- Tap and hold on a file or folder to select it, then search for the “Move” or “Move to” option.
- Select the cloud storage folder you want to move the files to.
- Repeat these steps for any other files or folders you want to move.
- External Storage Device:
- If your tablet supports external storage devices, such as a microSD card or a USB OTG (On-The-Go) cable, insert or connect the storage device to your tablet.
- Open your file manager or file explorer app on your tablet.
- Navigate to the files or folders you want to move.
- Tap and hold on a file or folder to select it, then search for the “Move” or “Move to” option.
- Select the external storage device as the destination folder.
- Repeat these steps for any other files or folders you want to move.
Moving files to the cloud or an external storage device not only frees up storage space on your tablet but also provides a convenient way to access your files from other devices or locations.
Before moving files, make sure to organize and categorize them to easily locate them when needed. You can create different folders and subfolders to keep your files organized.
Now that you have successfully moved files to the cloud or an external storage device, you’ve created more space on your tablet. Let’s move on to the next step and consider removing unused or duplicate media files.
Step 5: Remove unused or duplicate media files
Media files such as photos, videos, and music can quickly consume a significant amount of storage space on your tablet. It’s common to have unused or duplicate media files that take up unnecessary storage. Removing these files will not only save space but also help you organize your media collection more effectively.
Follow these steps to remove unused or duplicate media files from your tablet:
- Open your file manager or gallery app on your tablet.
- Navigate to the folder where your media files are stored, such as “Photos” or “Music”.
- Review your media files and identify the ones you no longer need or want.
- Tap and hold on a file to select it, then look for a “Delete” or “Trash” option.
- Select the files you want to remove and tap on the “Delete” or “Trash” button.
- Confirm your action when prompted to delete the files.
When removing duplicate media files, you can use specialized apps or software that automatically detect and delete duplicate files based on various criteria, including file name, size, and content. These tools can help you quickly identify and remove duplicate media files, saving you time and effort.
Before deleting any media files, make sure to back them up if you haven’t already. This ensures that you have a copy of your important files in case you accidentally delete something you need.
By removing unused or duplicate media files, you can significantly free up storage space on your tablet. This allows you to keep only the media files that you truly want and need, making it easier to manage and enjoy your media collection.
Now that you have removed unused or duplicate media files, you have successfully cleared even more space on your tablet. Let’s move on to the next step and consider disabling or removing unused pre-installed apps.
Step 6: Disable or remove unused pre-installed apps
When you purchase a new tablet, it often comes with a variety of pre-installed apps that you may never use. These apps can take up valuable storage space, even if you never open or interact with them. Disabling or removing unused pre-installed apps can help free up storage and declutter your tablet’s interface.
Here’s how you can disable or remove unused pre-installed apps:
- Go to the Settings menu on your tablet.
- Scroll down and find the “Apps” or “Applications” option. Tap on it.
- You will see a list of all the apps installed on your tablet, including pre-installed apps.
- Scroll through the list and identify the pre-installed apps that you want to disable or remove.
- Tapping on an app will open its information page. Look for the “Disable” or “Uninstall” option.
- Disable: Disabling an app will remove it from your app drawer and prevent it from running in the background. However, the app’s data and file will still occupy some storage space.
- Uninstall: Uninstalling an app will completely remove it from your tablet, freeing up both storage space and system resources.
- If the option is available, tap on “Disable” or “Uninstall” to remove the app from your tablet.
- If necessary, confirm your action when prompted.
- Repeat these steps for any other unused pre-installed apps you want to disable or remove.
It’s important to note that some pre-installed apps are required for the proper functioning of your tablet, and removing them may cause issues. Exercise caution and only disable or remove apps that you are confident you won’t need.
Disabling or removing unused pre-installed apps not only frees up storage space but also simplifies your tablet’s interface by removing clutter. You’ll have a cleaner app drawer and screen, making it easier to find and navigate the apps you actually use.
With unused pre-installed apps out of the way, let’s move on to the next step and explore the use of storage management tools for efficient space management.
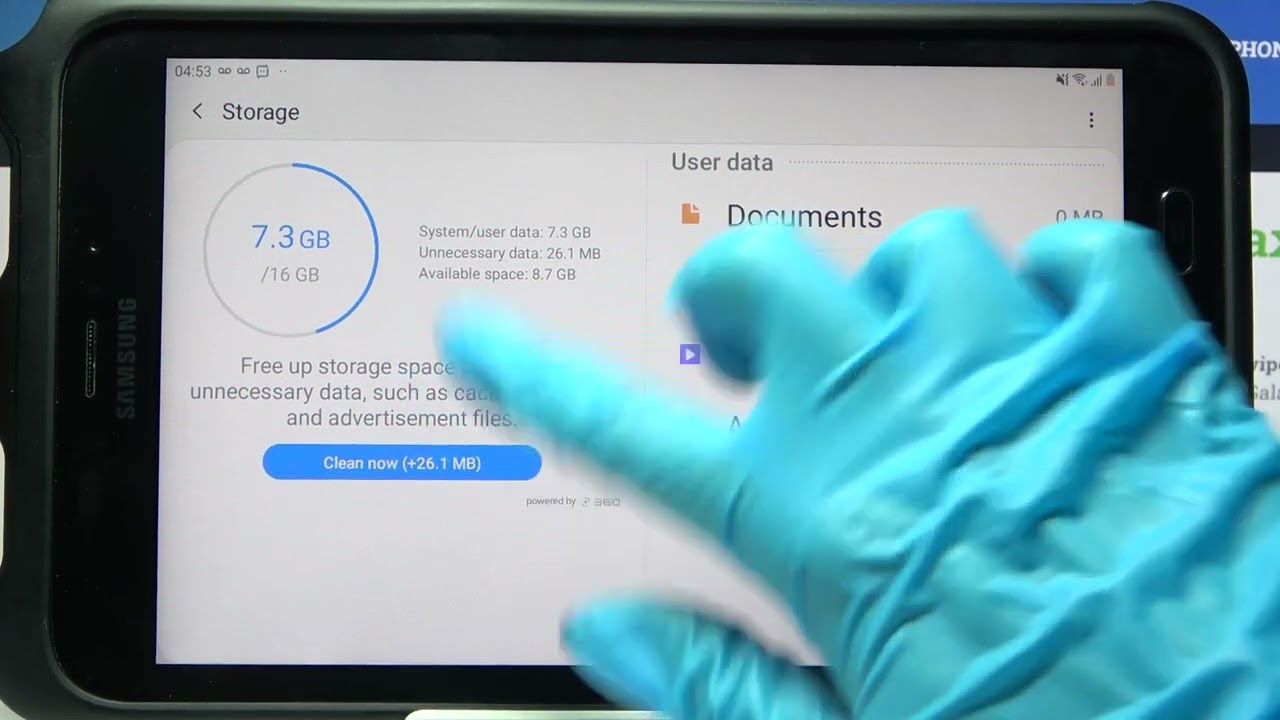
Step 7: Use storage management tools
Storage management tools can be incredibly useful in optimizing the available storage on your tablet. These tools provide insights into your storage usage, identify large files or apps, and offer recommendations to clear space more efficiently. By using storage management tools, you can easily identify and manage storage-hogging elements on your tablet.
Here’s how you can use storage management tools on your tablet:
- Access the Settings menu on your tablet.
- Look for the “Storage” or “Storage & USB” option and tap on it.
- Find and select the “Storage settings” or “Manage storage” option.
- You’ll be presented with a breakdown of your storage usage, including the amount of used and available space.
- Explore the different sections of the storage settings to obtain more detailed information, such as app usage, media files, documents, and system files.
- Identify any large files or apps that are using a significant amount of storage space.
- Tap on a specific category or app to view more details.
- Depending on your device, you may have options to clear cache or delete unnecessary data directly from the storage management settings.
Additionally, you can consider downloading third-party storage management apps from the app store. These apps often provide more advanced features, such as file cleanup, duplicate file detection, and file organization options.
Regularly using storage management tools allows you to stay on top of your tablet’s storage usage and take necessary actions to optimize it. By identifying and deleting unnecessary files or apps, you can free up valuable space and ensure smooth functionality.
Now that you are familiar with storage management tools, you have all the necessary steps to clear space on your tablet. By following these steps, you can optimize your tablet’s storage, improve performance, and enjoy a clutter-free experience.
Conclusion
Clearing space on your tablet is essential for maintaining optimal performance and maximizing storage capacity. By following the steps outlined in this guide, you can efficiently free up space, organize your files, and ensure a smoother tablet experience.
Starting with uninstalling unnecessary apps, you can reclaim storage space and declutter your app collection. Deleting old downloads and files helps remove unnecessary data and create room for new files and applications. Clearing cache and temporary files improves performance and frees up space taken by temporary data.
By moving files to the cloud or an external storage device, you can reduce the load on your tablet’s internal storage and access files from multiple devices. Removing unused or duplicate media files not only saves space but also helps in organizing your media collection effectively.
Disabling or removing unused pre-installed apps eliminates unwanted bloatware and simplifies your tablet’s interface. Finally, by using storage management tools, you can gain insights into storage usage and efficiently manage storage-hogging elements.
Remember, maintaining a clutter-free tablet not only improves performance but also enhances your overall user experience. It allows you to have more available storage for new apps, files, and media, and ensures smoother functionality.
Regularly revisiting these steps and implementing them as needed will help you maintain an optimized tablet storage system. Enjoy your tablet’s improved performance and make the most of its functionalities!