Why You May Need to Clear Out RAM on Mac
RAM, or Random Access Memory, is a crucial component of your Mac computer. It serves as temporary storage for the data and programs that your computer is actively using. Over time, as you open and close applications, browse the web, and perform various tasks, your RAM can become filled with unnecessary data, causing your Mac to slow down. This can result in sluggish performance, frequent application crashes, and overall frustration.
Clearing out your RAM can help improve the speed and performance of your Mac. By doing so, you free up valuable memory space, allowing your computer to run smoothly and efficiently. It’s a bit like tidying up your workspace – when things are organized and clutter-free, you can work more effectively.
There are several situations where clearing out RAM on your Mac may be necessary:
- Insufficient memory: If you frequently run memory-intensive applications or experience slowdowns when multitasking, it may indicate that your Mac has insufficient RAM. Clearing out RAM can help alleviate this issue temporarily until you can upgrade your hardware.
- Unresponsive applications: If certain applications on your Mac freeze or become unresponsive, it could be due to excessive RAM usage. By clearing out RAM, you can potentially fix these issues and make the applications run smoothly again.
- Slow performance: If your Mac is overall sluggish and takes a long time to perform even basic tasks, it could be a sign of excessive RAM usage. Clearing out RAM can help speed up your computer and improve its performance.
- Memory leaks: Sometimes, applications may have memory leaks, which occur when they fail to release memory after use. This can lead to a gradual decrease in available RAM and cause performance issues. Clearing out RAM can help address memory leaks and prevent them from impacting your Mac’s performance.
Now that you understand why it may be necessary to clear out RAM on your Mac, let’s move on to the various methods you can use to accomplish this task.
Step 1: Check Your RAM Usage
Before you start clearing out your RAM on your Mac, it’s essential to check how much memory is currently being used. This step will help you determine if your Mac’s RAM is indeed the cause of any performance issues you may be experiencing.
To check your RAM usage on a Mac, follow these steps:
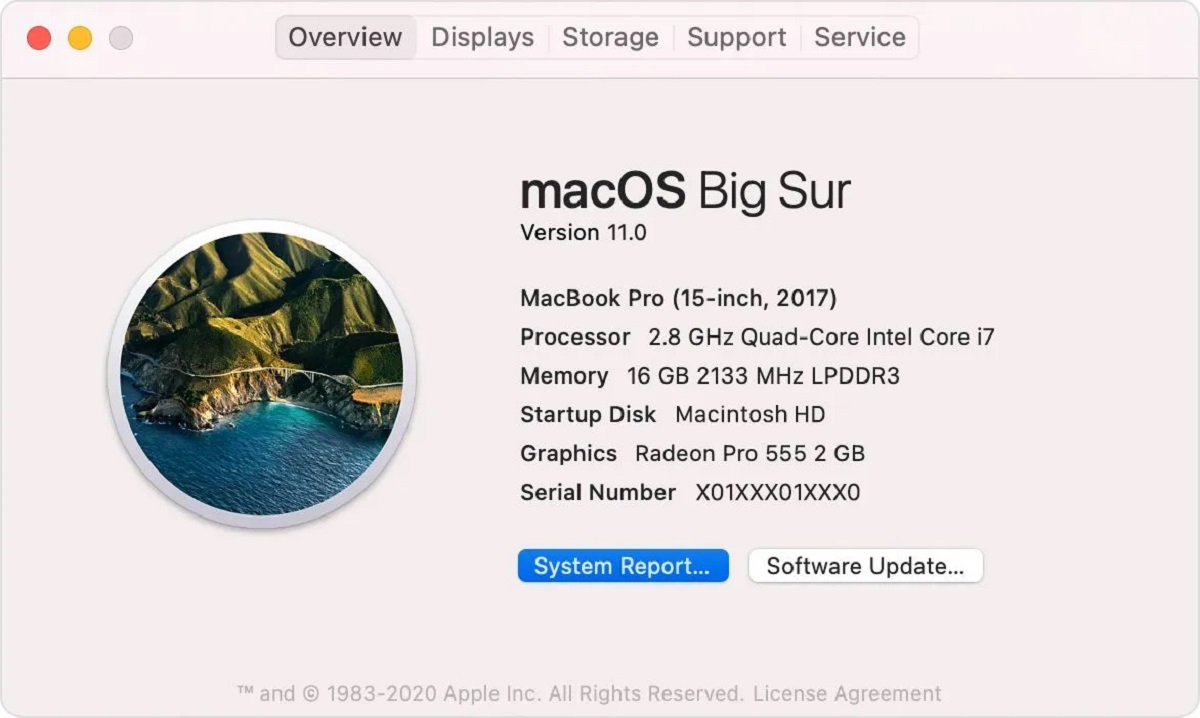
- Click on the Apple logo in the top-left corner of your screen and select “About This Mac.”
- In the pop-up window, click on the “Overview” tab.
- Here, you’ll see an overview of your Mac’s specifications, including the amount of installed memory (RAM).
- To get a more detailed view of your RAM usage, click on the “Memory” tab.
- In the Memory tab, you’ll be able to see how much memory is currently being used, the amount of memory used by each application, and the amount of memory available.
Keep in mind that the amount of memory used will vary depending on the applications and processes running at a given time. However, if a significant portion of your RAM is consistently being used, it may be worth clearing out your RAM to improve performance.
Monitoring your RAM usage regularly can also help you identify patterns and determine if there are specific applications or processes consuming excessive memory. This knowledge will be valuable when it comes to prioritizing which applications to close or force quit, as we’ll explore in the next steps.
Once you have a clear understanding of your Mac’s RAM usage, you can proceed to the next steps to clear out unnecessary memory and optimize your system’s performance.
Step 2: Close Unnecessary Applications
One of the most straightforward ways to clear out RAM on your Mac is by closing any unnecessary applications that are currently running. Having multiple applications open at the same time can consume a significant amount of memory, contributing to slower performance. By closing these applications, you free up valuable RAM and improve your Mac’s efficiency.
To close unnecessary applications on a Mac, follow these steps:
- Click on the application you want to close to bring it into focus.
- Go to the application’s menu bar at the top of your screen.
- Click on the application name next to the Apple logo.
- In the drop-down menu, select “Quit [application name].”
- The application will close, and its memory usage will be freed up.
Repeat these steps for any other unnecessary applications that are currently running on your Mac. Remember to prioritize closing applications that are resource-intensive or that you’re not actively using.
If you’re unsure which applications are consuming the most memory, you can refer back to the Memory tab in the “About This Mac” window we discussed in Step 1. Look for applications with high memory usage and consider closing them to free up RAM.
Closing unnecessary applications not only helps clear out RAM but also reduces the strain on your Mac’s processor, ultimately improving overall performance. So, make it a habit to close applications that you’re not actively using to keep your Mac running smoothly.
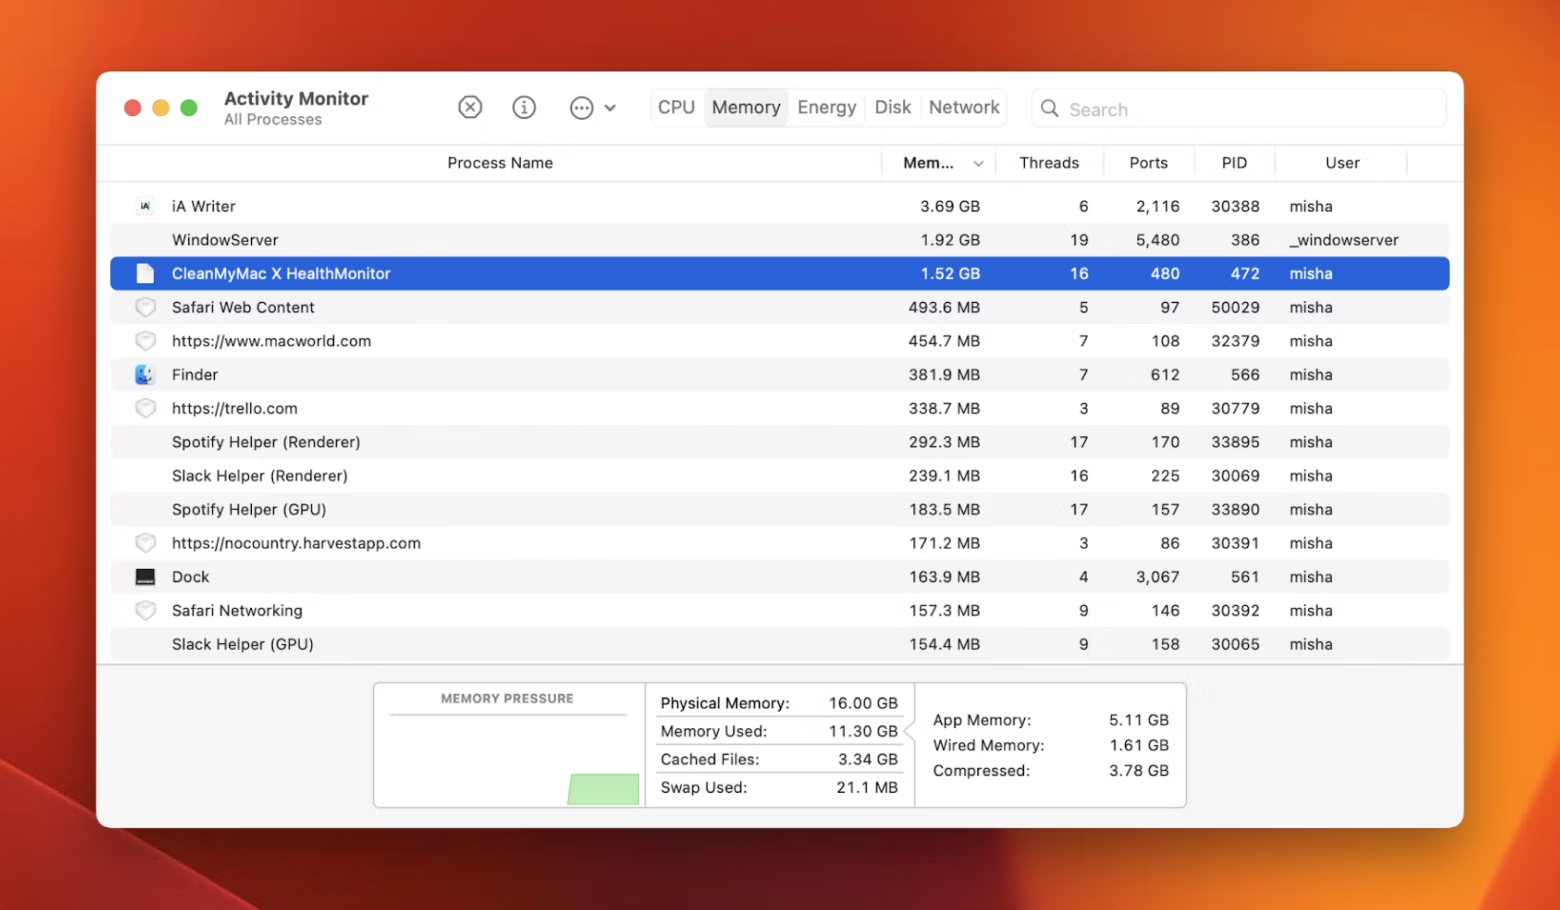
Step 3: Use Activity Monitor to Identify Resource-Hungry Processes
If you’re experiencing performance issues on your Mac and suspect that specific applications or processes are consuming excessive resources, using the Activity Monitor can help you identify and manage those resource-hungry processes.
The Activity Monitor is a built-in utility on macOS that provides detailed information about the processes and resources being used by various applications and processes on your Mac. It allows you to monitor CPU usage, memory usage, energy impact, disk activity, and much more.
To use Activity Monitor to identify resource-hungry processes, follow these steps:
- Open the Activity Monitor by going to Applications > Utilities > Activity Monitor, or by using the Spotlight search (Command + Space) and typing “Activity Monitor.”
- In the Activity Monitor window, you’ll see a list of all the processes currently running on your Mac.
- Click on the “Memory” tab to sort the processes by memory usage, with the highest at the top.
- Take note of the applications or processes that are using a significant amount of memory.
- You can also click on the “CPU” tab to sort processes by CPU usage if you suspect high CPU usage is causing performance issues.
Identifying resource-hungry processes can help you determine which applications or processes are consuming the most memory and affecting your Mac’s performance. From there, you can decide whether to close or force quit these processes to free up memory.
In addition to identifying resource-hungry processes, Activity Monitor also allows you to force quit unresponsive applications or processes. Simply select the process, click on the “X” button in the toolbar, and confirm the action when prompted. This can help clear out RAM and reduce memory usage.
Using Activity Monitor as a diagnostic tool can give you valuable insights into the performance of your Mac and help you optimize its memory usage.
Step 4: Force Quit Problematic Applications
If you’re experiencing slowdowns or unresponsiveness caused by specific applications on your Mac, force quitting them can help free up memory and improve overall performance. Force quitting an application forcibly stops it, releasing the memory it was using and potentially resolving any issues it may have been causing.
To force quit problematic applications on a Mac, follow these steps:
- Click on the Apple logo in the top-left corner of the screen and select “Force Quit [application name].” If the application is unresponsive and you cannot access the Apple menu, you can also use the keyboard shortcut Command + Option + Esc to bring up the Force Quit Applications window.
- In the Force Quit Applications window, you’ll see a list of currently running applications.
- Select the application you want to force quit by clicking on its name.
- Click on the “Force Quit” button.
- Confirm the action when prompted.
Once you force quit an application, it will close immediately, and the memory it was using will be freed up. This can help alleviate memory pressure and improve the overall performance of your Mac.
It’s important to note that force quitting an application should be used as a last resort when the application is unresponsive or causing significant issues. In most cases, it’s best to try regular quitting first to ensure that any unsaved work is saved properly. However, if an application is continuously freezing or causing system slowdowns, force quitting may be necessary.
If you frequently encounter unresponsive or problematic applications, it may be worth investigating further to identify the root cause of the issue. Checking for application updates, disabling unnecessary extensions or plugins, or seeking assistance from the application’s support resources can help resolve persistent issues and prevent future performance problems.
Step 5: Restart Your Mac
If you’ve tried the previous steps and are still experiencing performance issues or excessive RAM usage on your Mac, a simple yet effective solution is to restart your computer. Restarting your Mac can help clear out temporary files, refresh system resources, and resolve any lingering issues that may be impacting performance.
To restart your Mac, follow these steps:
- Click on the Apple logo in the top-left corner of the screen.
- In the drop-down menu, select “Restart.”
- Your Mac will begin the restart process, closing all applications and services before rebooting.
- Wait for your Mac to completely shut down and then turn back on.
Once your Mac has restarted, it will have a fresh start with refreshed system resources. This can significantly improve performance and clear out any memory-related issues that were affecting your computer.
Restarting your Mac also allows it to install any pending system updates, which can further enhance performance and stability. Keeping your operating system up to date is crucial for optimal performance, so it’s a good practice to regularly check for and install any available updates.
Remember to save any unsaved data and close any important applications before restarting your Mac. Additionally, if you have any ongoing tasks, such as downloads or file transfers, it’s best to complete or pause them to avoid any potential data loss or interruptions during the restart process.
Restarting your Mac is a simple yet powerful step that can help resolve various performance issues and clear out RAM, providing a fresh start for your system.
Step 6: Clearing RAM Using Terminal Commands
If you’re comfortable using Terminal, you can use specific commands to clear out RAM on your Mac. These commands can help free up memory by purging cached data, inactive memory, and other temporary files.
Here are the steps to clear RAM using Terminal commands:
- Open Terminal by navigating to Applications > Utilities > Terminal.
- In the Terminal window, type the following command and press Enter:
sudo purge - You will be prompted to enter your user password. Type your password (you won’t see it as you type) and press Enter.
- The purge command will initiate the process of clearing out RAM by flushing the disk cache. This action may take a few moments.
- Once the process is complete, you will see a message indicating that the purge was successful.
Note that the purge command clears out the disk cache, which can help free up RAM. However, it may not provide a significant performance boost in all cases, especially if your Mac’s RAM usage is primarily due to active applications and processes.
Using Terminal commands to clear RAM can be helpful if you notice a buildup of cached data or if you want to quickly release any inactive memory. However, it’s important to use caution when using Terminal and only execute commands if you understand their functionality.
Additionally, keep in mind that clearing out RAM via Terminal is a temporary solution. As you continue using your Mac, memory will naturally be allocated to active processes. Therefore, this step may be most effective when combined with other methods, such as closing unnecessary applications and optimizing system resources.
Proceed to the next step to explore another Terminal command that can help optimize memory usage on your Mac.
Step 7: Utilize ‘Purge’ Command to Free Up RAM
In addition to clearing out RAM using Terminal commands, you can utilize the ‘purge’ command to free up memory and optimize performance on your Mac. The ‘purge’ command specifically targets inactive memory, allowing you to reclaim valuable RAM resources.
Follow these steps to utilize the ‘purge’ command:
- Open Terminal by navigating to Applications > Utilities > Terminal.
- In the Terminal window, type the following command and press Enter:
purge - The ‘purge’ command will start running, and your Mac will start freeing up the inactive memory.
- After a few moments, the ‘purge’ process will be complete, and you’ll see a message indicating the successful reclaiming of memory.
Sometimes, when your Mac’s RAM is filled with inactive memory, it can slow down overall performance and responsiveness. By utilizing the ‘purge’ command, you can clear out this inactive memory and make it available for use by active processes, improving the efficiency of your Mac.
It’s important to note that the ‘purge’ command may take a few moments to complete, and during this time, you may experience a temporary slowdown as memory is cleared and reallocated. However, once the process is finished, you should notice an improvement in overall system performance.
Remember that utilizing the ‘purge’ command is a temporary solution, as inactive memory will gradually accumulate again as you use your Mac. To ensure optimal performance, it’s recommended to combine this step with other strategies, such as closing unnecessary applications and managing system resources efficiently.
Proceed to the next step to learn how to clear up storage space on your Mac, which can indirectly help improve RAM utilization.
Step 8: Clear Up Storage Space on Your Mac
Clearing up storage space on your Mac can indirectly help improve RAM utilization and overall system performance. When your Mac’s storage is close to full, it can put a strain on resources, including RAM. By removing unnecessary files and optimizing your storage, you can create more breathing room for your Mac to operate smoothly.
Here are some steps you can take to clear up storage space on your Mac:
- Uninstall unused applications: Go through your applications and remove any that you no longer use. Unused applications not only take up valuable storage space, but they may also consume RAM when they run in the background.
- Delete unnecessary files: Sort through your files and delete any that are no longer needed. This includes old documents, downloads, and media files that are taking up space.
- Empty the Trash: After deleting files, make sure to empty your Trash to free up the storage space they were occupying.
- Offload large files: Identify large files that you rarely access and consider moving them to an external storage device or cloud storage to free up space on your Mac.
- Use built-in storage management tools: macOS offers tools like Optimized Storage and Storage Management that can help you identify and remove unnecessary files, including system junk, old backups, and large files.
- Optimize storage settings: Enable features like iCloud Drive, which can store your files in the cloud and free up local storage space. Also, consider enabling Optimized Storage to automatically remove downloaded TV shows and movies you’ve already watched.
By clearing up storage space on your Mac, you’re not only creating more room for your files but also reducing the strain on system resources, which includes RAM. This can lead to improved overall performance and smoother multitasking.
Regularly managing your storage and keeping it optimized is a good practice to maintain a healthy and efficient Mac. This step, combined with the previous ones, can help maximize your Mac’s performance and ensure that resources, including RAM, are utilized effectively.
Step 9: Use Third-Party Applications to Optimize Memory Usage
In addition to the built-in tools and methods mentioned earlier, you can also use third-party applications to optimize memory usage on your Mac. These applications offer more advanced features and settings to help you manage and optimize your Mac’s RAM utilization.
Here are some third-party applications that can help you optimize memory usage:
- CleanMyMac: CleanMyMac is a popular utility that offers various optimization features, including a memory cleaner. It can help you identify and close resource-intensive applications, clear out cached files, and manage your Mac’s memory usage effectively.
- Memory Cleaner: Memory Cleaner is a dedicated application that focuses on optimizing your Mac’s memory. It can automatically free up memory by identifying and closing unused background applications and processes.
- MacPaw Gemini: MacPaw Gemini is primarily a duplicate file finder, but it also includes a memory optimization feature. It scans your Mac for duplicate files, which can contribute to unnecessary storage usage and memory consumption.
- AppCleaner: AppCleaner is a lightweight application that allows you to easily uninstall applications and remove associated files. By removing unused applications, you free up valuable storage space and potentially improve memory usage.
When using third-party applications to optimize memory usage, it’s essential to choose reputable and trusted applications from reliable developers. Additionally, be mindful of the settings and features these applications offer, as some may require manual adjustments or periodic scans to optimize memory usage effectively.
Before using any third-party application, it’s essential to research and read reviews to ensure that it aligns with your specific needs and preferences. Remember that these applications can complement your existing optimization efforts but should not be solely relied upon to maintain optimal performance.
By using third-party applications that specialize in memory optimization, you can have more control and flexibility in managing your Mac’s RAM usage, leading to improved overall performance and responsiveness.
Conclusion
Keeping your Mac’s RAM optimized is crucial for maintaining smooth and efficient performance. By following the steps outlined in this guide, you can clear out RAM and improve overall system responsiveness, whether it’s by closing unnecessary applications, using Activity Monitor to identify resource-hungry processes, force quitting problematic applications, restarting your Mac, utilizing Terminal commands, clearing up storage space, or using third-party applications to optimize memory usage.
Remember that optimizing your Mac’s RAM is just one aspect of ensuring optimal performance. It’s also important to regularly update your operating system, maintain adequate storage space, and practice overall system maintenance to keep your Mac running in top condition.
By adopting these practices and making them a part of your regular maintenance routine, you can optimize your Mac’s RAM usage and ensure a smooth and efficient computing experience.
So, take the time to implement these steps and enjoy the benefits of a faster, more responsive Mac.