Introduction
Welcome to this guide on how to clear RAM memory on your Mac. If you notice that your Mac is running slower than usual or experiencing lagging performance, it may be due to the limited availability of Random Access Memory (RAM). RAM is a crucial component of your computer’s system that stores data temporarily to provide quick access to programs and processes.
Over time, as you use your Mac and open various applications, your RAM can become crowded with unnecessary data, leading to a decrease in performance. Clearing your RAM memory can help optimize your Mac’s speed and overall functionality.
In this article, we will explore several methods to free up RAM on your Mac and improve its performance. These methods range from closing unnecessary programs and processes to utilizing built-in tools and commands. By following these steps, you should be able to reclaim valuable RAM space and enhance the efficiency of your Mac.
It’s important to note that clearing your RAM is a temporary solution and the freed-up memory will gradually be filled again as you use your computer. However, performing regular RAM clearing can help prevent excessive memory usage and keep your Mac running smoothly.
Now, let’s dive into the step-by-step process of clearing RAM memory on your Mac and boost its performance!
Step 1: Close Unnecessary Programs and Processes
One of the basic methods to free up RAM on your Mac is to close any unnecessary programs and processes that are running in the background. Having multiple applications open simultaneously can consume a significant amount of RAM, leaving less available for other tasks.
To close programs, you can use a couple of different methods. First, you can simply navigate to the program’s window and click on the close button, typically found in the upper left corner of the window. This will quit the program and release its associated RAM usage.
Alternatively, you can use the built-in “Force Quit” feature on your Mac. To access this, press the Option + Command + Escape key combination, or go to the Apple menu in the top-left corner of the screen and select “Force Quit.” You will see a list of open applications, allowing you to select and force quit any programs that are unresponsive or using excessive system resources.
In addition to closing applications, it’s also beneficial to examine and close any unnecessary background processes that may be running. These processes can consume RAM without your knowledge, affecting system performance. To view and stop these processes, follow these steps:
- Open the “Activity Monitor” application. You can find it in the Utilities folder within the Applications folder, or you can simply search for it using Spotlight (press Command + Space and type “Activity Monitor”).
- Once open, click on the “Memory” tab to sort the processes by their memory usage. This will help you identify the ones using the most RAM.
- Select any processes that are unnecessary or using a large amount of memory.
- Click on the “X” button in the toolbar, or right-click on the selected process and choose “Quit” to terminate it.
By following these steps and closing unnecessary programs and processes, you can free up valuable RAM resources and improve the performance of your Mac.
Step 2: Use Activity Monitor
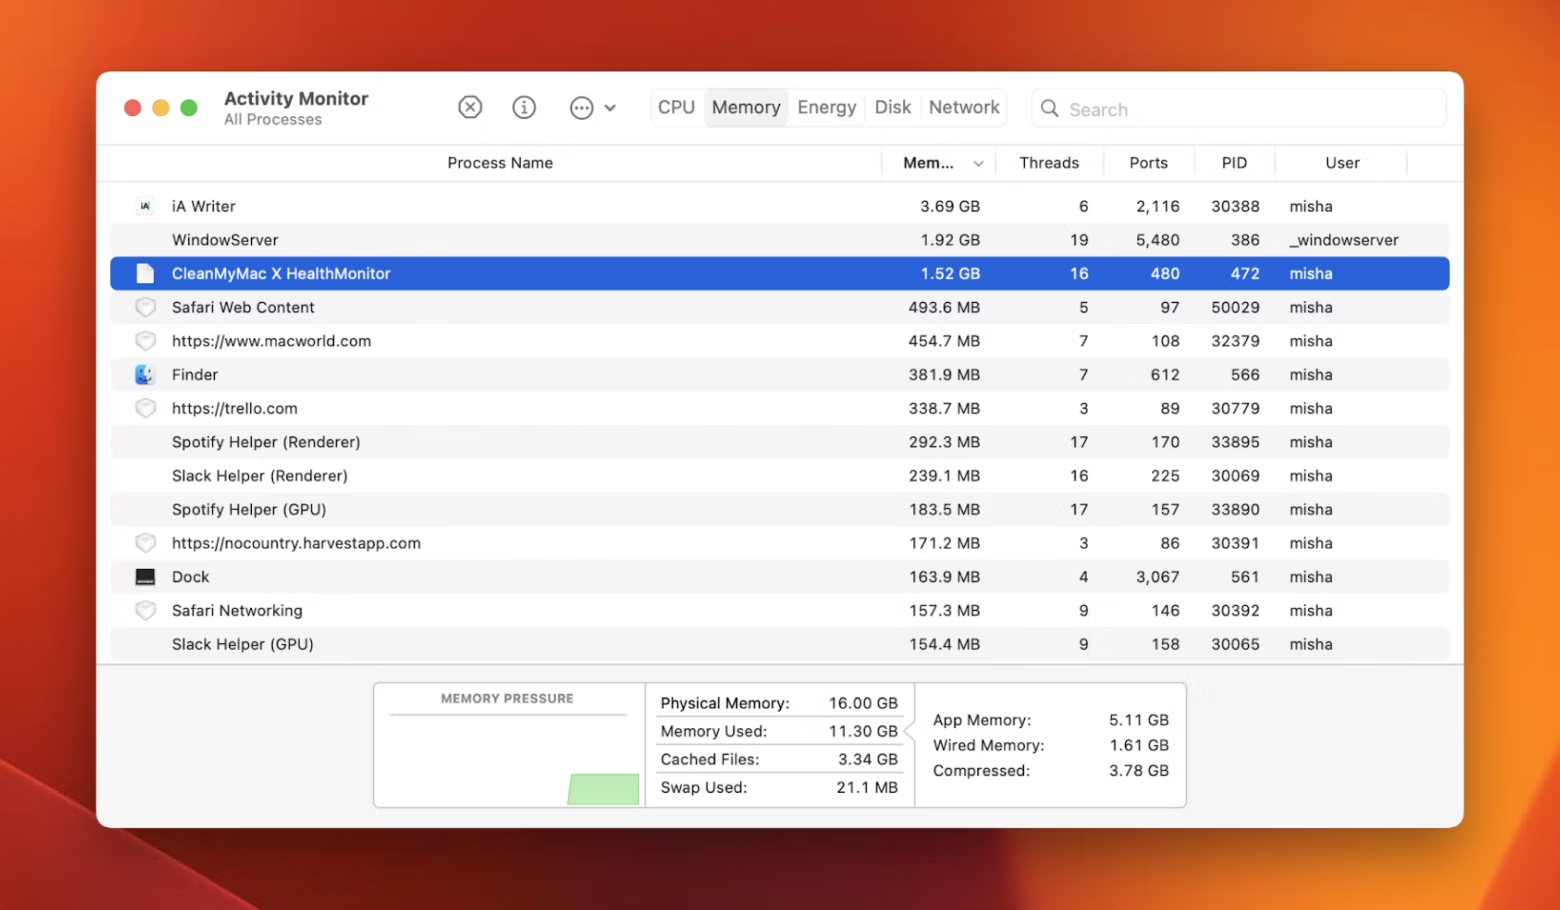
Activity Monitor is a powerful tool built into macOS that allows you to monitor the performance of your Mac and identify resource-intensive processes. By utilizing Activity Monitor, you can gain insights into how your RAM is being utilized and take necessary steps to optimize its usage.
Here’s how you can use Activity Monitor to clear RAM memory on your Mac:
- Launch Activity Monitor by navigating to the Utilities folder in the Applications folder or searching for it using Spotlight.
- Once open, you will see a list of active processes. By default, they are sorted by CPU usage, but you can click on the “Memory” tab to sort them by RAM usage.
- Take note of any processes that are using a large amount of memory. These processes may be the main culprits behind your Mac’s sluggish performance.
- Select the resource-intensive process and click on the “X” button in the toolbar, or right-click on the process and choose “Quit” to terminate it.
Additionally, Activity Monitor provides you with valuable information about memory pressure. Memory pressure indicates how constrained your Mac’s memory resources are. You can find a visual representation of memory pressure in the form of colored bars in the bottom section of the Activity Monitor window. If the bars are in the yellow or red range, it suggests that your Mac is experiencing significant memory pressure, and you may need to take further action to free up RAM.
Besides monitoring, Activity Monitor also allows you to manage various system-related tasks. For instance, you can use it to find and force quit unresponsive programs, track energy usage, monitor network activity, and more. Exploring the different tabs and features of Activity Monitor can help you identify other ways to optimize your Mac’s performance and clear up RAM memory.
Using Activity Monitor as a diagnostic and management tool, you can effectively identify resource-intensive processes, terminate them, and ensure optimal RAM utilization for an improved Mac experience.
Step 3: Restart Your Mac
When you notice sluggish performance or encountering memory-related issues on your Mac, a simple but effective solution is to restart your computer. Restarting your Mac can help refresh its system resources, including the RAM, and resolve any underlying memory leaks or conflicts.
Here’s how you can restart your Mac:
- Click on the Apple menu in the top-left corner of the screen.
- From the drop-down menu, select “Restart”.
- Alternatively, you can press the Control + Command + Power button combination (or Control + Command + Eject button on older Macs) to initiate a restart.
Once your Mac restarts, it will load a fresh system environment, which can help alleviate any performance issues caused by excessive memory usage or software conflicts. As a result, your Mac’s RAM will be cleared, and you should experience improved performance and responsiveness.
It’s worth noting that restarting your Mac is different from putting it to sleep or using the “Sleep” or “Shutdown” functions. While sleep mode allows your Mac to conserve power and resume quickly, it doesn’t fully clear the RAM or resolve memory-related issues. Therefore, a restart is recommended when you specifically want to clear the RAM and optimize performance.
Remember to save any unsaved work before restarting your Mac, as the process will close all currently open applications and documents. Once your Mac is back up and running, you can proceed with your tasks and enjoy a smoother computing experience.
Step 4: Check for Memory Hogs
Identifying memory-hogging applications and processes is crucial in optimizing your Mac’s performance and clearing up RAM memory. By pinpointing and addressing these memory hogs, you can free up valuable resources and enhance your Mac’s overall efficiency.
Here’s how you can check for memory-hogging applications and processes on your Mac:
- Launch the “Activity Monitor” application. You can find it in the Utilities folder within the Applications folder, or you can search for it using Spotlight by pressing Command + Space and typing “Activity Monitor”.
- Click on the “Memory” tab to sort the processes by their memory usage, with the highest consuming processes appearing at the top.
- Pay attention to processes that are using a significantly large amount of memory. These are the potential memory hogs that may be impacting your Mac’s performance.
- If you identify any memory-hogging applications, consider quitting them to free up RAM. To do this, select the process and click on the “X” button in the toolbar, or right-click on the process and choose “Quit”.
It’s important to note that not all memory-hogging applications are unnecessary or harmful. Some applications, especially resource-demanding ones like video editing software or virtual machines, naturally require a significant amount of RAM to function optimally. However, if you’re experiencing performance issues and notice other applications struggling due to a lack of available memory, it may be worth closing or limiting the usage of these memory-intensive applications.
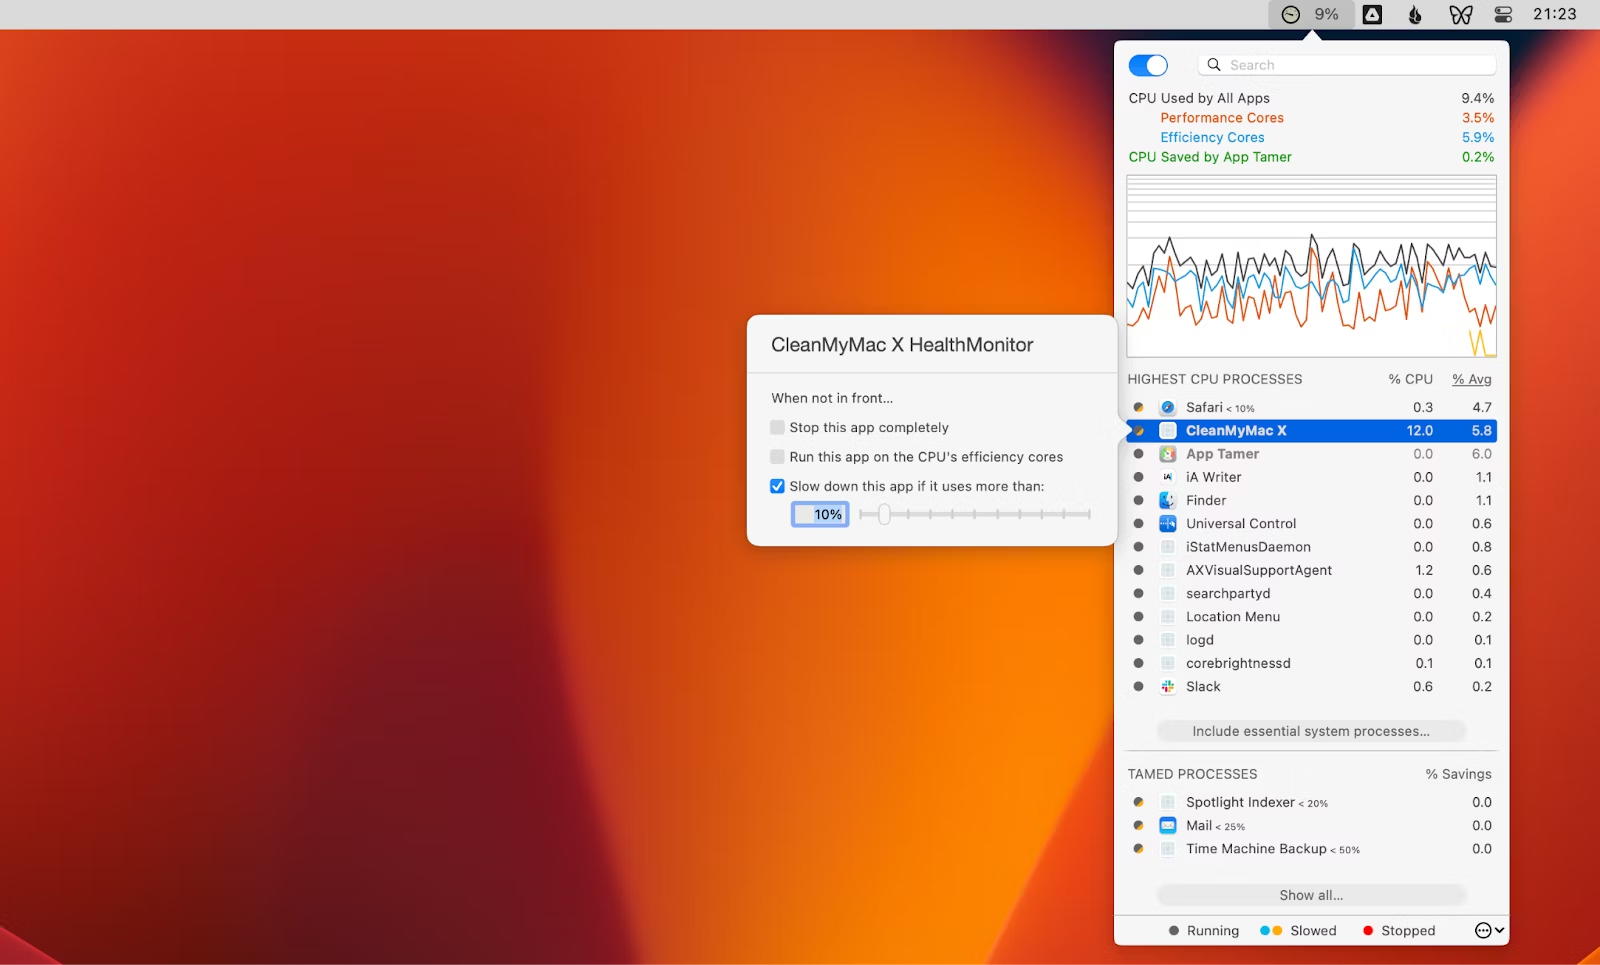
In addition to using Activity Monitor, you can also make use of third-party applications that provide more advanced insights into memory usage. These applications can help you identify memory-hogging applications and even provide recommendations on optimizing your system’s memory usage.
By regularly checking for memory hogs and taking appropriate actions, you can ensure that your Mac’s RAM is efficiently utilized, leading to improved system performance and a smoother computing experience.
Step 5: Clear Cache Files
Cache files are temporary data stored by applications to enhance their performance and speed up load times. While cache files can be beneficial, they can also accumulate over time, taking up valuable space in your Mac’s RAM. Clearing these cache files regularly can help free up memory and improve your Mac’s performance.
Here’s how you can clear cache files on your Mac:
- Open the Finder application by clicking on the smiley face icon in the Dock.
- In the top menu bar, click on “Go” and select “Go to Folder”.
- Type “~/Library/Caches” (without the quotes) in the text box and press Enter.
- You will be taken to the “Caches” folder, where you will find various subfolders corresponding to different applications.
- Select the cache folders of applications that you no longer use or those that are known to accumulate large amounts of data. Examples include web browsers like Safari or Chrome.
- Move the selected cache folders to the Trash by either dragging them there or right-clicking and choosing “Move to Trash”.
- Empty the Trash by right-clicking on the Trash icon in the Dock and selecting “Empty Trash”. Confirm the action if prompted.
In addition to clearing the cache files from individual applications, you can also utilize the “CleanMyMac” or “Onyx” applications, which offer easy cache clearing options for system and application caches.
By regularly clearing cache files, you can free up valuable storage space, improve your Mac’s performance, and ensure that your RAM is utilized more efficiently.
Step 6: Use the Terminal to Purge Memory
If you’re comfortable using the command line interface, you can utilize the Terminal on your Mac to purge the memory and reclaim any inactive memory that is not currently being used. This can help optimize your Mac’s performance by freeing up additional RAM.
Follow these steps to use the Terminal to purge memory:
- Open the Terminal application. You can find it in the Utilities folder within the Applications folder, or you can search for it using Spotlight.
- Once the Terminal window is open, type in the command:
sudo purgeand press Enter. - You will be prompted to enter your user password. Type your password (note: you won’t see any characters as you type) and press Enter again.
- The Terminal will then initiate the memory purge process. This may take a few moments, and during this time, your Mac might appear unresponsive.
- Once the memory purge is complete, you will see a message indicating that the purge was successful.
By using the Terminal to purge memory, you force your Mac to clear out any inactive data from RAM and make it available for other processes. This can provide a temporary boost in performance, especially if your Mac was running low on free memory.
While the memory purge can be helpful in specific situations, it’s important to note that it’s not a permanent solution. As you continue to use your Mac, the RAM will fill up again. However, periodically purging memory can help optimize your Mac’s performance and ensure that available RAM is used efficiently.
Remember to save any ongoing work before initiating the memory purge, as it may temporarily disrupt running processes.
Proceed with caution when using the Terminal, and follow the steps carefully to avoid unintended consequences or making changes to critical system settings.
Step 7: Disable Login Items
When you start up your Mac, certain applications and processes may automatically launch and run in the background. These are known as login items and can consume valuable system resources, including RAM. Disabling unnecessary login items can help free up memory and improve your Mac’s overall performance.
Here’s how you can disable login items on your Mac:
- Click on the Apple menu in the top-left corner of the screen and select “System Preferences”.
- In the System Preferences window, click on “Users & Groups”.
- Ensure that your user account is selected on the left-hand side.
- Switch to the “Login Items” tab. Here, you will see a list of applications and processes that launch automatically when you log in.
- Select any unnecessary login items that you want to disable. To do this, click on the “-” (minus) button below the list.
- Alternatively, you can prevent an application or process from launching by unchecking the box next to its name.
- Repeat the above steps for all the login items that you want to disable.
Disabling unnecessary login items helps reduce the number of applications and processes running in the background, thereby conserving system resources, including RAM. By doing so, you can optimize your Mac’s performance and ensure that more memory is available for the tasks you are actively working on.
Keep in mind that some login items may be necessary for specific features or applications that you rely on. Be cautious when disabling login items and only remove those that you know to be unnecessary or no longer need.
Regularly reviewing and disabling unnecessary login items can help keep your Mac running smoothly and prevent excessive memory usage.
Conclusion
Clearing RAM memory on your Mac is essential for maintaining optimal performance and efficiency. By following the steps outlined in this guide, you can effectively free up valuable RAM resources and optimize your Mac’s speed and responsiveness.
Throughout the guide, we covered several methods, including closing unnecessary programs and processes, using Activity Monitor, restarting your Mac, checking for memory hogs, clearing cache files, using the Terminal to purge memory, and disabling login items. Each of these steps plays a significant role in clearing RAM and enhancing your Mac’s overall performance.
Remember that clearing RAM is a temporary solution, as the memory will gradually fill up again as you use your Mac. Regularly performing the suggested steps can prevent excessive memory usage and ensure that available RAM is utilized efficiently.
It’s important to strike a balance between maintaining enough free RAM and having the necessary applications and processes running. Disabling essential programs or processes can negatively impact your Mac’s functionality. Therefore, exercise caution when identifying unnecessary items to clear or disable.
By implementing these techniques, you can enhance your Mac’s performance, improve multitasking capabilities, and ensure a smoother computing experience.
Stay proactive in your approach to managing memory on your Mac, and periodically perform these steps to maintain optimal performance. With a little maintenance and attention, your Mac will continue to provide you with a seamless and efficient computing experience.