Why is my Mac using so much RAM?
As a Mac user, you may have noticed that your system’s RAM usage tends to be quite high. This can lead to sluggish performance, slowdowns, and even system crashes. But why is your Mac using so much RAM? Understanding the reasons behind this issue is crucial for finding effective solutions.
One common cause of high RAM usage is the nature of modern applications. As technology advances, applications become more feature-rich and resource-intensive. This means that they require more RAM to function smoothly. Additionally, having multiple applications running simultaneously can also contribute to increased RAM usage.
Another factor that can contribute to excessive RAM usage is memory leaks. These occur when an application fails to free up memory properly, causing RAM usage to gradually increase over time. Memory leaks are especially common in poorly optimized or outdated software.
Operating system processes and background services also have an impact on RAM usage. Mac OS X is designed to utilize RAM efficiently by preloading frequently used system components and applications. However, this can lead to higher RAM usage, especially when these processes continue to run in the background even when not actively used.
Furthermore, certain applications, such as resource-demanding games or multimedia editing software, are known to use a significant amount of RAM to deliver a smooth user experience. If you frequently use such applications, it’s expected that your Mac will utilize more RAM.
Lastly, having a limited amount of physical RAM installed on your Mac can contribute to high RAM usage. When your system runs out of available physical RAM, it has to rely on the slower virtual memory, which is stored on your hard drive. This can significantly impact performance and lead to increased RAM usage.
Now that you have a better understanding of why your Mac is using so much RAM, it’s time to explore methods for reducing RAM usage. By implementing the right strategies, you can optimize your Mac’s performance and ensure a smooth user experience.
Check your currently running applications
One of the first steps in reducing your Mac’s RAM usage is to check the currently running applications. This will help you identify which apps are consuming a significant amount of memory and causing the issue. Here’s how to do it:
1. Open the Activity Monitor: Go to “Applications” > “Utilities” > “Activity Monitor.”
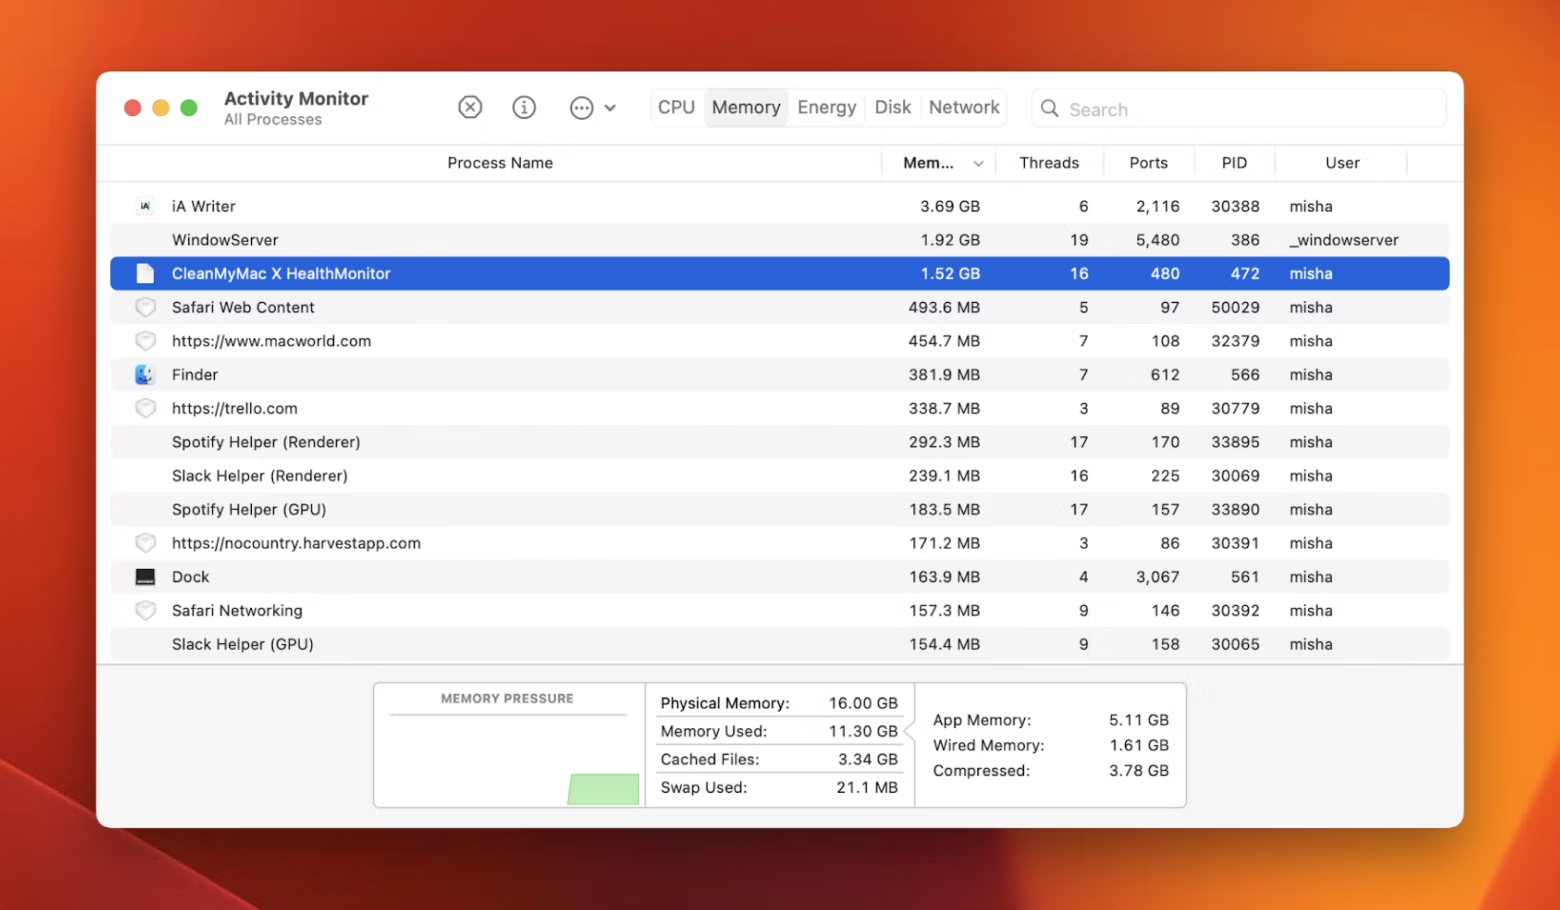
2. Sort by memory usage: Click on the “Memory” tab in the Activity Monitor window to sort the list of processes by memory usage. This will allow you to see which applications are using the most RAM.
3. Identify memory-hogging applications: Look for applications that have a high “Memory” value in the list. These are the ones that are consuming the most RAM.
4. Investigate resource usage: Click on the memory-hogging application to get more information about its resource usage. This will help you determine if the high RAM usage is justified based on the app’s functionality.
5. Decide on action: Once you have identified the memory-intensive applications, you can decide whether to close them or keep them running based on your needs.
It’s important to note that some applications, like web browsers or complex editing software, naturally require more RAM to function effectively. In such cases, it might be necessary to prioritize which applications you need to run simultaneously.
Remember to save any work or close applications properly before shutting them down. Force quitting applications should be a last resort and should only be done if an application becomes unresponsive.
By regularly checking your currently running applications and managing them efficiently, you can optimize your Mac’s RAM usage and ensure smoother performance.
Identify memory-hogging applications
Identifying the memory-hogging applications on your Mac is crucial for reducing RAM usage and optimizing performance. By determining the specific applications that are consuming a significant amount of memory, you can take appropriate actions to address the issue. Here are some steps to help you identify memory-hogging applications:
1. Use the Activity Monitor: Open the “Activity Monitor” by going to “Applications” > “Utilities” > “Activity Monitor.”
2. Sort by memory usage: In the Activity Monitor window, click on the “Memory” tab to sort the list of processes by memory usage. This will show you which applications are utilizing the most RAM.
3. Look for high memory values: Scan the list for applications with high memory values. These are the applications that are consuming a significant amount of memory on your Mac.
4. Check the memory column: The “Memory” column in the Activity Monitor shows how much memory each application is using. Take note of applications that consistently have a large memory footprint.
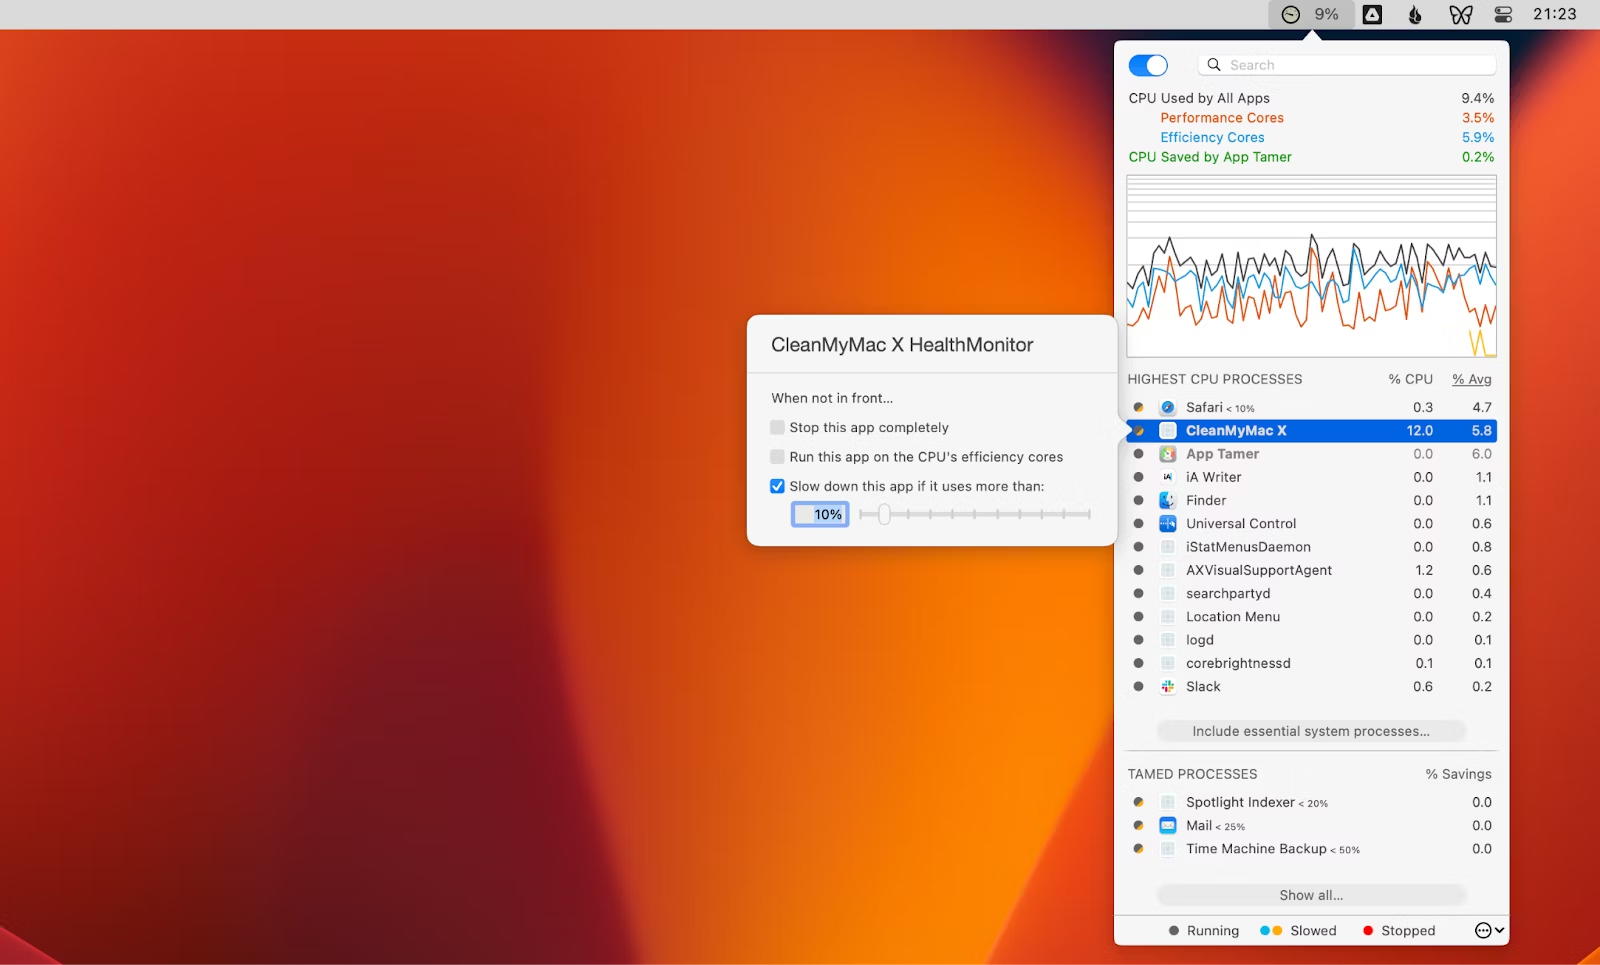
5. Observe CPU usage: In addition to memory usage, keep an eye on the CPU column in the Activity Monitor. Some applications may consume excessive CPU resources, which can indirectly impact RAM usage.
6. Investigate resource usage: Click on a memory-hogging application to view additional details about its resource usage. This will help you determine if the high RAM usage is justified based on the application’s functionality and your usage requirements.
By identifying memory-hogging applications, you can make informed decisions about whether to keep them running or consider alternatives with lower resource demands. Additionally, you may discover applications that are no longer needed or can be replaced by more lightweight alternatives, freeing up valuable memory on your Mac.
Remember that some applications, particularly resource-intensive ones like video editing software or virtual machines, are expected to use a significant amount of RAM. However, if you notice an application consistently using an excessive amount of RAM without reason, it may be worthwhile to investigate further or seek support from the application’s developer.
Through this process of identification, you can take proactive steps to manage memory-hogging applications and optimize your Mac’s RAM usage.
Close unnecessary applications
One effective way to reduce RAM usage on your Mac is to close unnecessary applications that are running in the background. By shutting down applications that you’re not actively using, you can free up valuable memory and improve overall system performance. Here’s how to close unnecessary applications:
1. Identify idle applications: Take a look at the applications in your dock and menu bar and evaluate which ones you don’t need at the moment. Consider closing applications like instant messengers, music players, or any other apps that don’t require your immediate attention.
2. Use the Quit command: For applications that have a window open, click on the app’s name in the menu bar and select “Quit [App Name].” Alternatively, you can press Command + Q on your keyboard to quickly quit the active application.
3. Utilize the Force Quit option: If an application becomes unresponsive or refuses to close through the regular Quit command, you can use the Force Quit option. To do this, go to the Apple menu and select “Force Quit” or press Command + Option + Escape. Choose the unresponsive application from the list and click “Force Quit.”
4. Prevent unnecessary apps from launching at startup: Some applications automatically launch when you start your Mac, contributing to higher RAM usage. To prevent unnecessary apps from running at startup, go to “System Preferences” > “Users & Groups” > “Login Items.” Select the application you want to stop from launching and click the “-” button to remove it from the list.
By closing unnecessary applications, you can free up RAM for the applications you actively use, allowing for smoother multitasking and improved overall Mac performance. This is especially beneficial if you have limited RAM installed on your system.
Keep in mind that closing applications may cause unsaved work to be lost. It’s important to save your progress or data before closing any application. Additionally, remember to regularly check your taskbar and menu bar for any new applications that may have started running and close them if they are not needed.
By practicing the habit of closing unnecessary applications, you can optimize your Mac’s RAM usage, enhance productivity, and ensure a more responsive computing experience.
Manage start-up items
Managing start-up items on your Mac is an effective way to reduce RAM usage and improve your system’s performance. By controlling which applications launch automatically when you start your Mac, you can minimize the memory footprint and ensure that only essential apps are loading in the background. Here’s how to manage start-up items:
1. Access Login Items: Go to “System Preferences” and click on “Users & Groups.”
2. Select your account: In the left sidebar, select your user account.
3. Open Login Items: Click on the “Login Items” tab located at the top of the window.
4. Review the list: You will see a list of applications that launch at startup. Evaluate each item to determine if it is necessary for your workflow.
5. Remove unwanted items: To remove an application from the login items list, select it and click on the “-” button at the bottom. This will prevent it from launching automatically when you start your Mac.
6. Consider resource usage: As you review the list, pay attention to the memory and CPU usage of each application. Applications that consume a significant amount of resources may be candidates for removal from the startup items list.
7. Add desired items: If there are specific applications that you want to launch at startup, click on the “+” button at the bottom and select the application from the dialog box. This allows you to prioritize your most-used and important applications.
By managing start-up items, you can prevent unnecessary applications from consuming valuable system resources and RAM right from the moment you start your Mac. This helps to optimize performance and ensures that your Mac is ready for your intended tasks without unnecessary delays.
It’s important to note that certain applications or services may need to run at start-up for essential functions such as antivirus software or cloud synchronization. Be mindful of the impact of removing these items and ensure that they are necessary. Regularly review your start-up items and make adjustments as needed to maximize your Mac’s available resources.
By taking control of which applications launch at start-up, you can significantly reduce RAM usage on your Mac, leading to improved performance and a more responsive computing experience.
Reduce the number of open browser tabs
Having numerous open browser tabs is a common practice, but it can significantly impact your Mac’s RAM usage. Each tab consumes memory, especially if they contain active web pages or multimedia elements. By reducing the number of open tabs, you can free up valuable RAM and improve overall system performance. Here are some tips to help you manage your browser tabs:
1. Evaluate your open tabs: Take a moment to assess the tabs you have open in your web browser. Determine which ones are actively being used and which can be closed for later reference.
2. Close unnecessary tabs: For tabs that are not immediately needed, simply click on the “X” or use the keyboard shortcut (Command + W for Mac) to close them. This will free up memory associated with those tabs.
3. Use bookmarks or tabs management extensions: If you have a habit of leaving tabs open for future reference, consider using bookmarks or tabs management extensions. These tools allow you to save tabs and organize them for easy access, reducing the need to keep them open indefinitely.
4. Utilize tab groups or sessions: Some browsers offer features such as tab groups or sessions that allow you to save and organize groups of related tabs. You can create different groups for different tasks or projects, making it easier to navigate and reduce clutter.
5. Enable tab discarding or hibernation: Certain web browsers have built-in features or extensions that automatically discard or put inactive tabs into a hibernation mode, reducing their memory footprint. These features can be helpful if you tend to keep many tabs open but only actively use a few at a time.
6. Use browser extensions to manage memory: There are browser extensions available that can help optimize memory usage by automatically suspending or unloading inactive tabs after a certain period of inactivity. These extensions can help save RAM and improve overall browser performance.
By reducing the number of open browser tabs, you can allocate more available RAM to the applications and processes that require it the most, resulting in improved speed and responsiveness on your Mac.
Remember to periodically review your open tabs, close those that are no longer needed, and utilize bookmarks or other organizational tools to keep track of important pages for later reference. By adopting these practices, you can efficiently manage your browser tabs and optimize your Mac’s RAM usage.
Clear up disk space
Clearing up disk space is a crucial step in reducing RAM usage on your Mac. When your disk space is limited, your Mac may rely on virtual memory, which is stored on the hard drive, to make up for the shortage of physical RAM. This can slow down your system and increase RAM usage. By optimizing your disk space, you can free up memory and improve your Mac’s overall performance. Here’s what you can do:
1. Delete unnecessary files: Take the time to go through your files and delete any that are no longer needed. This includes old documents, downloaded files, and unnecessary duplicates. Emptying the trash afterwards will permanently remove these files from your system.
2. Uninstall unnecessary applications: Evaluate the applications installed on your Mac and remove any that you no longer use. This not only frees up disk space but also reduces background processes, potentially lowering RAM usage.
3. Use built-in tools: Mac OS X offers built-in tools for disk cleanup. The “Storage” tab in the “About This Mac” window provides an overview of the space used by different categories of files. You can use the “Manage” button to optimize storage, delete large files, or review and remove unnecessary items like system backups or email attachments.
4. Clear cache and temporary files: Web browsers, as well as other applications, often store temporary files and cache data on your Mac. Clearing these files regularly can help free up disk space and improve overall performance. Most browsers have options to clear cache and browsing history in their settings.
5. Transfer files to external storage: If you have files that you don’t frequently access, consider transferring them to an external storage device like an external hard drive or cloud storage. This can help free up disk space on your Mac while still keeping your important files accessible when needed.
6. Optimize storage settings: In the “About This Mac” window, go to the “Storage” tab and click on “Manage.” From there, you can enable options like optimizing storage, storing files in iCloud Drive, and automatically emptying the trash to efficiently manage your disk space.
By clearing up disk space, you not only make room for your Mac to operate more efficiently, but you also help reduce the load on your RAM. This can result in improved performance, faster application launches, and smoother multitasking on your Mac.
Regularly maintaining and optimizing your disk space will ensure that your Mac runs smoothly and efficiently, providing you with a better computing experience overall.
Disable visual effects
Visual effects on your Mac, such as animations, transparency, and dynamic wallpapers, can be visually appealing but also consume considerable amounts of RAM and system resources. Disabling these effects can help reduce RAM usage and improve overall performance, especially on Macs with limited memory. Here’s how to disable visual effects:
1. Access System Preferences: Click on the Apple menu and select “System Preferences.”
2. Open the Accessibility settings: In the System Preferences window, click on “Accessibility.”
3. Navigate to the Display settings: Under the “Display” section in the left sidebar, click on “Display” or “Display Preferences.”
4. Reduce transparency: In the “Accessibility” window, check the box next to “Reduce transparency.” This will disable the transparency effect used in various aspects of macOS like the menu bar and windows.
5. Minimize motion: To minimize motion effects, click on the “Display” tab and check the box next to “Reduce motion.” This will reduce animations and motion effects, such as window animations and parallax scrolling.
6. Choose a static wallpaper: Dynamic wallpapers can use more system resources. To optimize performance, select a static wallpaper rather than a dynamic one in the “Desktop & Screen Saver” settings.
7. Disable unnecessary visual effects in Mission Control and Dock: In the System Preferences window, click on “Mission Control” or “Dock,” and uncheck any unnecessary visual effects like “Animate opening applications” or “Magnification” in the Dock settings.
By disabling visual effects, you can significantly reduce the strain on your Mac’s RAM and improve its ability to handle other tasks more efficiently. This is particularly helpful if you notice lag or slow performance when using graphic-intensive applications.
It’s important to note that disabling visual effects may result in a less visually engaging user interface. However, the trade-off can often be worth it when it comes to increasing system responsiveness and freeing up valuable memory.
By selectively disabling visual effects that are not essential to your workflow, you can optimize your Mac’s RAM usage and create a smoother and more efficient computing experience.
Adjust virtual memory settings
Virtual memory, also known as the swap file, is a space on your hard drive that your Mac uses as a supplement to physical RAM. By adjusting the virtual memory settings, you can optimize the allocation of this space and potentially reduce the strain on your RAM. Here’s how to adjust the virtual memory settings:
1. Access the System Preferences: Click on the Apple menu and select “System Preferences.”
2. Open the Memory settings: In the System Preferences window, click on “Memory” or “Memory Management.”
3. Navigate to the Virtual Memory settings: Look for an option related to virtual memory, typically labeled “Virtual Memory,” “Swap File,” or “Page File.”
4. Adjust the virtual memory size: By default, Mac OS X manages the virtual memory automatically. However, you can manually adjust the size if necessary. Increase the virtual memory size if you’re experiencing frequent slowdowns or system crashes due to lack of RAM.
5. Set a custom size: To set a custom virtual memory size, deselect the automatic management option and enter your desired minimum and maximum sizes. It’s generally recommended to set the minimum size to the same value as your physical RAM and allow the maximum size to be adjusted dynamically as needed.
6. Apply the changes: Once you’ve adjusted the virtual memory settings, click on “Apply” or “OK” to save the changes.
Remember, increasing the virtual memory size can help alleviate the RAM usage issue, but it may result in slower performance due to the reliance on the slower hard drive for virtual memory. Setting an excessively high virtual memory size or using it as a long-term substitute for physical RAM is not recommended.
Keep in mind that adjusting virtual memory settings requires an understanding of the potential impact on system performance. If you are unsure or unfamiliar with these settings, it’s a good idea to consult Apple support or a knowledgeable professional for guidance.
By adjusting the virtual memory settings, you can optimize the allocation of resources in your Mac, potentially reducing the strain on physical RAM and improving overall system performance.
Restart your Mac regularly
A simple yet effective way to reduce RAM usage and improve overall performance on your Mac is to restart it regularly. Restarting your Mac helps clear temporary files, refresh system processes, and free up memory that might have been held by inactive or background processes. Here’s why restarting your Mac is beneficial:
1. Clearing caches and temporary files: Restarting your Mac clears temporary files and resets system caches. Caches are used by applications and the operating system to store data for faster retrieval. Over time, these caches can accumulate and occupy a significant amount of RAM. Restarting clears these caches and frees up memory, allowing your Mac to operate more efficiently.
2. Stopping unnecessary background processes: Some applications and processes continue to run in the background even when you’re not actively using them. Restarting your Mac shuts down these processes, freeing up valuable memory that can be allocated to the tasks you’re currently working on. This can result in improved performance and responsiveness.
3. Restoring system resources: After prolonged usage, system resources can become fragmented or exhausted. Restarting your Mac restores these resources to their default state, allowing for a clean slate and better allocation of memory and CPU power. This can prevent memory leaks and reduce the likelihood of crashes or slowdowns caused by resource depletion.
4. Resolving minor software issues: Over time, you may encounter minor software issues that can impact performance. Restarting your Mac helps to resolve these issues by closing any problematic processes and initiating a fresh, stable system state. It can also help with troubleshooting if you’re experiencing specific problems related to RAM usage or performance.
By incorporating regular restarts into your Mac usage routine, you can ensure that your system operates optimally and efficiently. It’s generally a good practice to restart your Mac at least once a week or more frequently if you notice any performance issues.
Remember to save your work and close all applications before restarting your Mac. This ensures that you don’t lose any unsaved data and allows applications to close properly, freeing up memory and resources.
Restarting your Mac regularly is a simple but effective way to reduce RAM usage, clear temporary files, and maintain optimal performance. Make it a habit to restart your Mac at appropriate intervals to keep your system running smoothly.
Upgrade your RAM if needed
If you find that your Mac is consistently struggling with high RAM usage and experiencing slowdowns, it may be time to consider upgrading your RAM. Upgrading your RAM can provide a significant boost in performance and allow your Mac to handle more memory-intensive tasks. Here’s what you need to know about upgrading your RAM:
1. Determine the compatible RAM type: Before purchasing new RAM, you need to know the type and specifications that are compatible with your Mac. Visit Apple’s support website or use third-party tools to identify the specific RAM requirements for your Mac model.
2. Check the capacity and slots available: Find out the maximum RAM capacity supported by your Mac and how many RAM slots are available. This information will help you determine the maximum amount of RAM you can install in your Mac.
3. Purchase and install compatible RAM modules: Once you have determined the compatible RAM type and capacity, purchase the necessary RAM modules from trusted sources or directly from the manufacturer. Follow the manufacturer’s instructions or consult Apple’s support documentation to correctly install the RAM modules in your Mac.
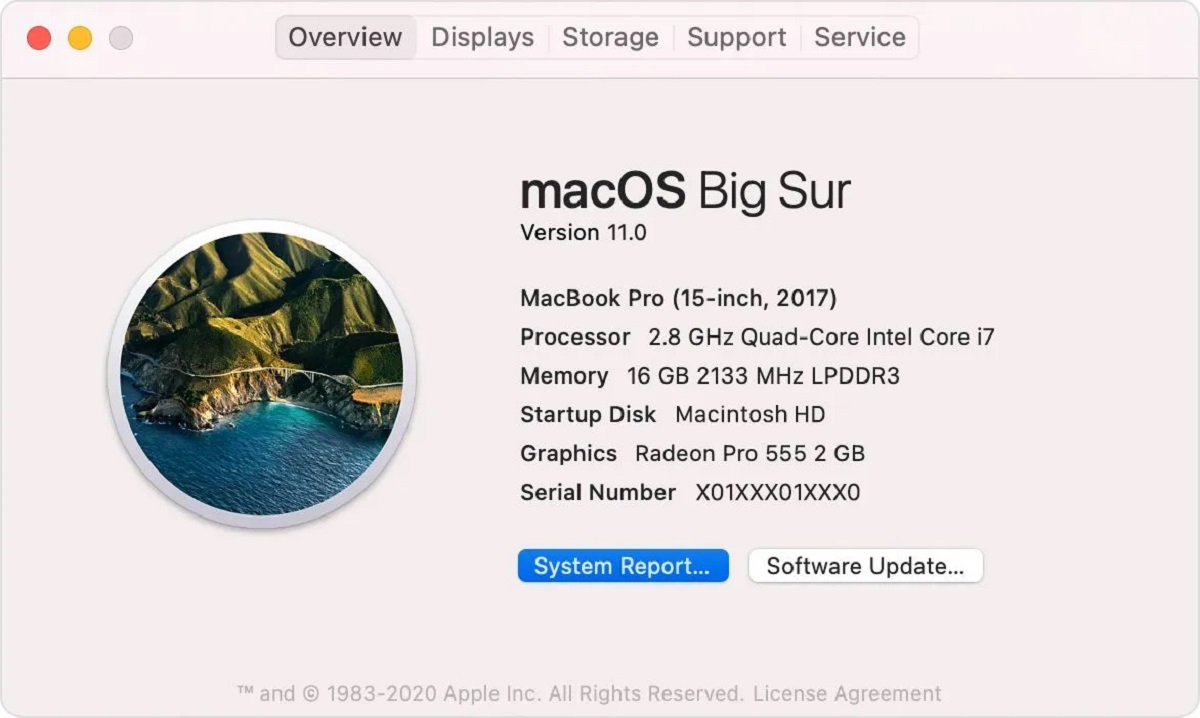
4. Verify the RAM upgrade: After installing the new RAM, restart your Mac and check if the system recognizes the upgraded RAM. You can verify this by going to the Apple menu, selecting “About This Mac,” and checking the “Memory” section to see the updated RAM capacity.
Upgrading your RAM can provide various benefits such as smoother multitasking, faster application launches, and improved overall system performance. It allows your Mac to handle more demanding tasks, install and run memory-intensive applications, and reduces the likelihood of excessive RAM usage and virtual memory reliance.
However, upgrading RAM is not always necessary for every Mac user. Before deciding to upgrade, consider factors such as your typical workload, the applications you use, and your budget. If you primarily use your Mac for basic tasks like web browsing, emailing, and word processing, you may not need a RAM upgrade. But if you frequently engage in activities that require substantial memory resources, such as high-resolution video editing or running virtual machines, upgrading your RAM can significantly enhance your Mac’s performance.
Keep in mind that upgrading your RAM may require a certain level of technical knowledge and expertise. If you’re unsure about the upgrade process, consult Apple support or seek assistance from a professional technician to avoid any potential issues or damage to your Mac.
By upgrading your RAM to meet your specific needs, you can provide your Mac with the necessary resources to handle demanding tasks comfortably and ensure a smooth and efficient user experience.
Conclusion
Managing RAM usage on your Mac is essential for ensuring optimal performance and a smooth computing experience. By implementing the strategies outlined in this article, you can effectively reduce RAM usage and improve your Mac’s overall efficiency. Here is a summary of the key points discussed:
- Understanding why your Mac is using so much RAM can help you tackle the issue more effectively. Factors such as modern applications, memory leaks, background processes, and resource-demanding applications can contribute to high RAM usage.
- Checking your currently running applications allows you to identify memory-hogging apps and close unnecessary ones, freeing up valuable RAM.
- Managing start-up items helps you control which applications launch automatically at startup, minimizing RAM usage from the get-go.
- Reducing the number of open browser tabs can significantly alleviate RAM usage, as each tab consumes memory, especially when containing active web pages or multimedia elements.
- Clearing up disk space by deleting unnecessary files, uninstalling unused applications, and utilizing storage optimization tools helps free up RAM and improves system performance.
- Disabling visual effects, such as transparency and animations, helps reduce RAM usage by minimizing the strain on system resources.
- Adjusting virtual memory settings allows you to optimize the allocation of virtual memory on your hard drive, supporting your Mac’s RAM and enhancing overall performance.
- Restarting your Mac regularly clears temporary files, stops unnecessary background processes, and restores system resources, contributing to lower RAM usage and a fresh start.
- If necessary, upgrading your RAM can provide a significant performance boost, enabling your Mac to handle more memory-intensive tasks and reducing the likelihood of high RAM usage.
By implementing these strategies and customizing them to suit your specific needs, you can effectively manage and reduce RAM usage on your Mac, leading to improved performance and a more efficient computing experience.