Introduction
Welcome to this step-by-step guide on how to change the time on a Chromebook. Whether you need to update your Chromebook’s time to reflect daylight saving time, adjust it while traveling, or simply want to keep it accurate, this article will walk you through the process. Changing the time on your Chromebook is a straightforward task that can be done in just a few simple steps.
Chromebooks are known for their user-friendly interface and intuitive settings menu, which makes adjusting the time a breeze. Whether you’re using a Chromebook for work, school, or personal use, having the correct time is essential for scheduling, staying organized, and ensuring that your Chromebook functions seamlessly.
In this guide, we will cover how to access the settings menu, open the date and time settings, adjust the time zone, change the date and time, and enable or disable the automatic time zone feature. By the end of this article, you’ll be equipped with the knowledge to effortlessly change the time on your Chromebook whenever needed.
So, without further ado, let’s jump into the step-by-step instructions and get your Chromebook’s time up to date!
Step 1: Access Settings
To begin changing the time on your Chromebook, the first step is to access the settings menu. Fortunately, accessing the settings on a Chromebook is a simple and straightforward process. Follow the steps below to get started:
- Click on the time in the bottom right corner of the screen. This will open the quick settings menu.
- Click on the gear-shaped icon, which represents the settings menu.
- A new tab will open, displaying the Chromebook settings menu.
Alternatively, you can access the settings menu by clicking on your profile picture in the bottom right corner and selecting “Settings” from the dropdown menu. Both methods will take you to the same settings menu where you can make the necessary changes to the date and time settings.
Once you have successfully accessed the settings menu, you are now ready to move on to the next step and open the date and time settings. If you encounter any issues accessing the settings menu, make sure you are signed in to your Chromebook with the correct account and try again.
Step 2: Open Date and Time Settings
Now that you have accessed the settings menu on your Chromebook, it’s time to open the date and time settings. These settings allow you to change the time, time zone, and even enable automatic time zone updates. Follow the steps below to open the date and time settings:
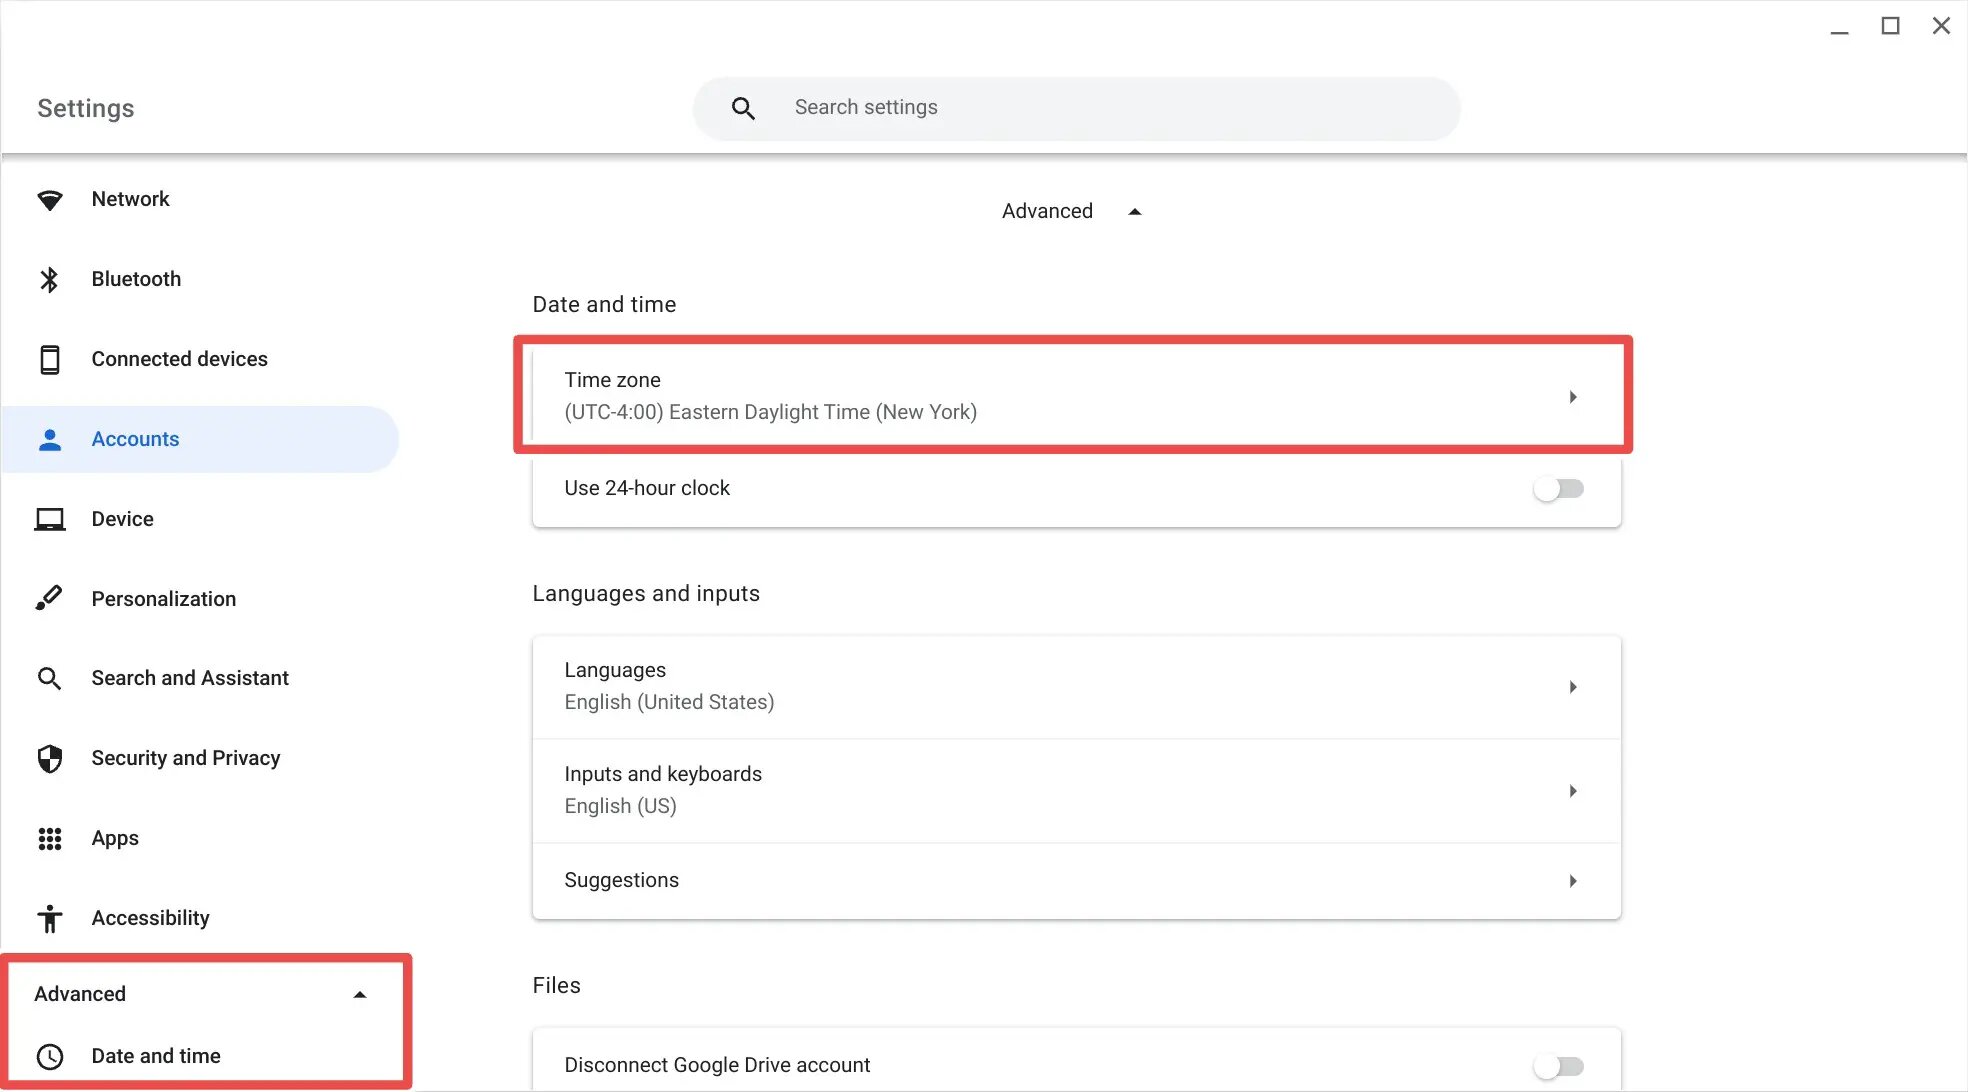
- In the settings menu, click on the “Advanced” option at the bottom of the left-hand menu.
- Scroll down until you find the “Date and time” section.
- Click on the “Date and time” option.
Once you have clicked on the “Date and time” option, the date and time settings will open, allowing you to make adjustments to the time and time zone. You will also see the option to enable or disable automatic time zone updates, which can be handy when traveling between different time zones.
If you’re having trouble finding the date and time settings, you can also use the search bar at the top of the settings menu. Simply type “date and time” in the search bar, and the relevant settings will appear, allowing you to access them with ease.
Now that you have successfully opened the date and time settings, it’s time to move on to the next step and adjust the time zone. Follow along to ensure that your Chromebook’s time is accurate and matches your location.
Step 3: Adjust the Time Zone
Adjusting the time zone on your Chromebook is essential for ensuring that the displayed time corresponds to your current location. Whether you’ve recently traveled to a different time zone or need to update the time zone for any other reason, follow the steps below to make the necessary adjustments:
- In the date and time settings, locate the “Time zone” section.
- Click on the dropdown menu next to “Time zone” to view the available options.
- Select the appropriate time zone for your current location.
Your Chromebook provides a wide range of time zone options to choose from, making it easy to find and select the correct one. Whether you’re in a major city or a smaller town, you should be able to find the specific time zone that matches your location.
Once you have selected the appropriate time zone, your Chromebook will automatically adjust the displayed time to reflect the current time in that time zone. This is particularly useful for travelers or individuals who frequently switch between different locations.
It’s worth noting that if you have enabled the “Set time zone automatically” option, your Chromebook will automatically update the time zone based on your current location. This can be convenient for those who frequently travel and don’t want to manually adjust the time zone each time.
Now that you have successfully adjusted the time zone on your Chromebook, it’s time to move on to the next step and change the date and time. Follow the upcoming steps to ensure that your Chromebook’s time is accurately set.
Step 4: Change the Date and Time
Changing the date and time on your Chromebook is a straightforward process that allows you to ensure the accuracy of your device’s timekeeping. Whether you need to update the date or manually set the time, follow the simple steps below:
- In the date and time settings, locate the “Set date and time” section.
- Click on the dropdown menu next to “Time” to select the desired hour and minute.
- Click on the dropdown menus next to “Month” and “Day” to select the desired date.
By adjusting the dropdown menus for the time, month, and day, you can easily set the date and time on your Chromebook to the specific values you desire. This is especially useful if you’re in a location where automatic time zone updates are not available or if you simply prefer manually setting the date and time.
Additionally, if your Chromebook is connected to the internet, it will automatically synchronize the date and time with the time servers, ensuring that you have the most accurate time information available.
Once you have selected the desired date and time, your Chromebook will update accordingly, displaying the newly set values on the taskbar and other relevant places. It’s important to note that changing the date and time may require administrator access, so make sure you have the necessary permissions before making any adjustments.
Now that you have successfully changed the date and time on your Chromebook, it’s time to move on to the final step and explore the option to enable or disable automatic time zone updates. Continue to the next section for more information.
Step 5: Enable or Disable Automatic Time Zone
Enabling or disabling automatic time zone updates on your Chromebook can be useful for individuals who frequently travel between different time zones. By enabling this feature, your Chromebook will automatically adjust the time zone based on your current location, ensuring that the displayed time remains accurate. Follow the steps below to enable or disable automatic time zone updates:
- In the date and time settings, locate the “Set time zone automatically” option.
- Toggle the switch to the “On” position to enable automatic time zone updates, or to the “Off” position to disable it.
Enabling automatic time zone updates can be convenient, especially if you frequently move between time zones. When enabled, your Chromebook will use your device’s location services to determine your current location and adjust the time zone accordingly.
On the other hand, if you prefer to manually set your Chromebook’s time zone and have greater control over the displayed time, you can choose to disable automatic time zone updates. With this option off, your Chromebook will rely on the time zone you have manually set in the previous steps.
It’s important to note that enabling or disabling automatic time zone updates may require administrator access or specific permissions. Make sure you have the necessary rights before making any changes to this setting.
By enabling or disabling automatic time zone updates based on your preferences and travel needs, you can ensure that your Chromebook displays the correct time at all times, regardless of your location.
With this final step completed, you have successfully learned how to change the time on your Chromebook. Whether you needed to adjust the time zone, update the date and time, or enable automatic time zone updates, you now have the knowledge to keep your Chromebook’s time accurate and synchronized.
Conclusion
Changing the time on your Chromebook is a simple and essential task to ensure that your device stays in sync with the correct date and time. Whether you need to adjust the time zone, update the date and time, or enable automatic time zone updates, this guide has provided you with a comprehensive step-by-step process.
By accessing the settings menu, opening the date and time settings, adjusting the time zone, changing the date and time, and enabling or disabling automatic time zone updates, you now have the tools to keep your Chromebook’s time accurate and aligned with your location.
Remember that having the correct time on your Chromebook is crucial for scheduling appointments, staying organized, and ensuring seamless functionality across various applications and tasks. Whether you’re a student, professional, or casual user, having accurate time information can greatly enhance your overall productivity and user experience.
We hope that this guide has been helpful in assisting you with changing the time on your Chromebook. If you encounter any issues or have further questions, don’t hesitate to consult the official Chromebook support resources or reach out to their customer support team for further assistance.
Now that you’re equipped with the knowledge to change the time on your Chromebook, feel free to adjust it as needed and enjoy the optimal user experience with your device.