Introduction
Changing the color of your mouse cursor on a Chromebook can add a personal touch and make it easier to locate on your screen. Whether you prefer a vibrant color or a subtle shade, Chromebook allows you to customize your mouse color to suit your preferences. This simple customization not only enhances the visual appeal but also improves your overall user experience. In this guide, we will take you through the step-by-step process of changing your mouse color on a Chromebook.
Chromebooks have gained popularity for their sleek design, ease of use, and compatibility with various applications. With its user-friendly interface and intuitive settings, personalizing your Chromebook has become effortless. While some customization options may be limited, changing the mouse color is a feature that allows you to have a unique Chromebook experience.
Whether you use your Chromebook for work, school, or leisure, having a different mouse color can make a noticeable difference. It can help you quickly locate your cursor, minimize eye strain, and create a more enjoyable computing experience overall. So, let’s dive in and explore how you can change your mouse color on a Chromebook.
Step 1: Accessing the Settings
To change your mouse color on a Chromebook, the first step is to access the settings menu. You can do this by following these simple instructions:
- Click on the clock located in the bottom-right corner of the screen. This will open the system tray.
- From the system tray, click on the gear-shaped icon, which represents the settings menu. Alternatively, you can press the “Shift” key and the “Alt” key simultaneously, then press the “S” key to open the settings menu.
- Once you click on the gear icon or use the keyboard shortcut, the settings menu will appear on your screen.
The settings menu is where you can customize various aspects of your Chromebook, including display settings, accessibility options, and more. It is the control center for all the customization options available.
By following these simple steps, you are now ready to navigate to the accessibility menu, where you will find the option to change your mouse color. Let’s move on to the next step.
Step 2: Navigating to the Accessibility Menu
Once you have accessed the settings menu, the next step is to navigate to the accessibility menu. This is where you will find the option to change your mouse color. Follow these straightforward instructions:
- In the settings menu, scroll down until you find the “Advanced” option. Click on it to expand the advanced settings.
- Within the advanced settings, you will see the “Accessibility” section. Click on it to access the accessibility options.
The accessibility menu provides a variety of features designed to make your Chromebook more user-friendly and adaptable to individual needs, including options for visual enhancements and input devices.
By navigating to the accessibility menu, you are one step closer to customizing the color of your mouse cursor. So, let’s move on to the next step where you will learn how to enable the high contrast setting.
Step 3: Enabling the High Contrast Setting
Enabling the high contrast setting is a crucial step in changing your mouse color on a Chromebook. The high contrast setting allows you to modify the appearance of elements on your screen, including the mouse cursor. Follow these steps to enable the high contrast setting:
- In the accessibility menu, scroll down until you find the “Display” section. Click on it to expand the display options.
- In the display options, you will see the “High Contrast Mode” toggle switch. Click on the switch to enable the high contrast setting. This will enhance the visibility and customization options for various elements on your Chromebook, including the mouse cursor.
Enabling the high contrast setting not only provides better visibility but also allows you to customize your mouse cursor color to your preference. Now that the high contrast setting is enabled, let’s move on to the next step to learn how to customize the color of your mouse cursor.
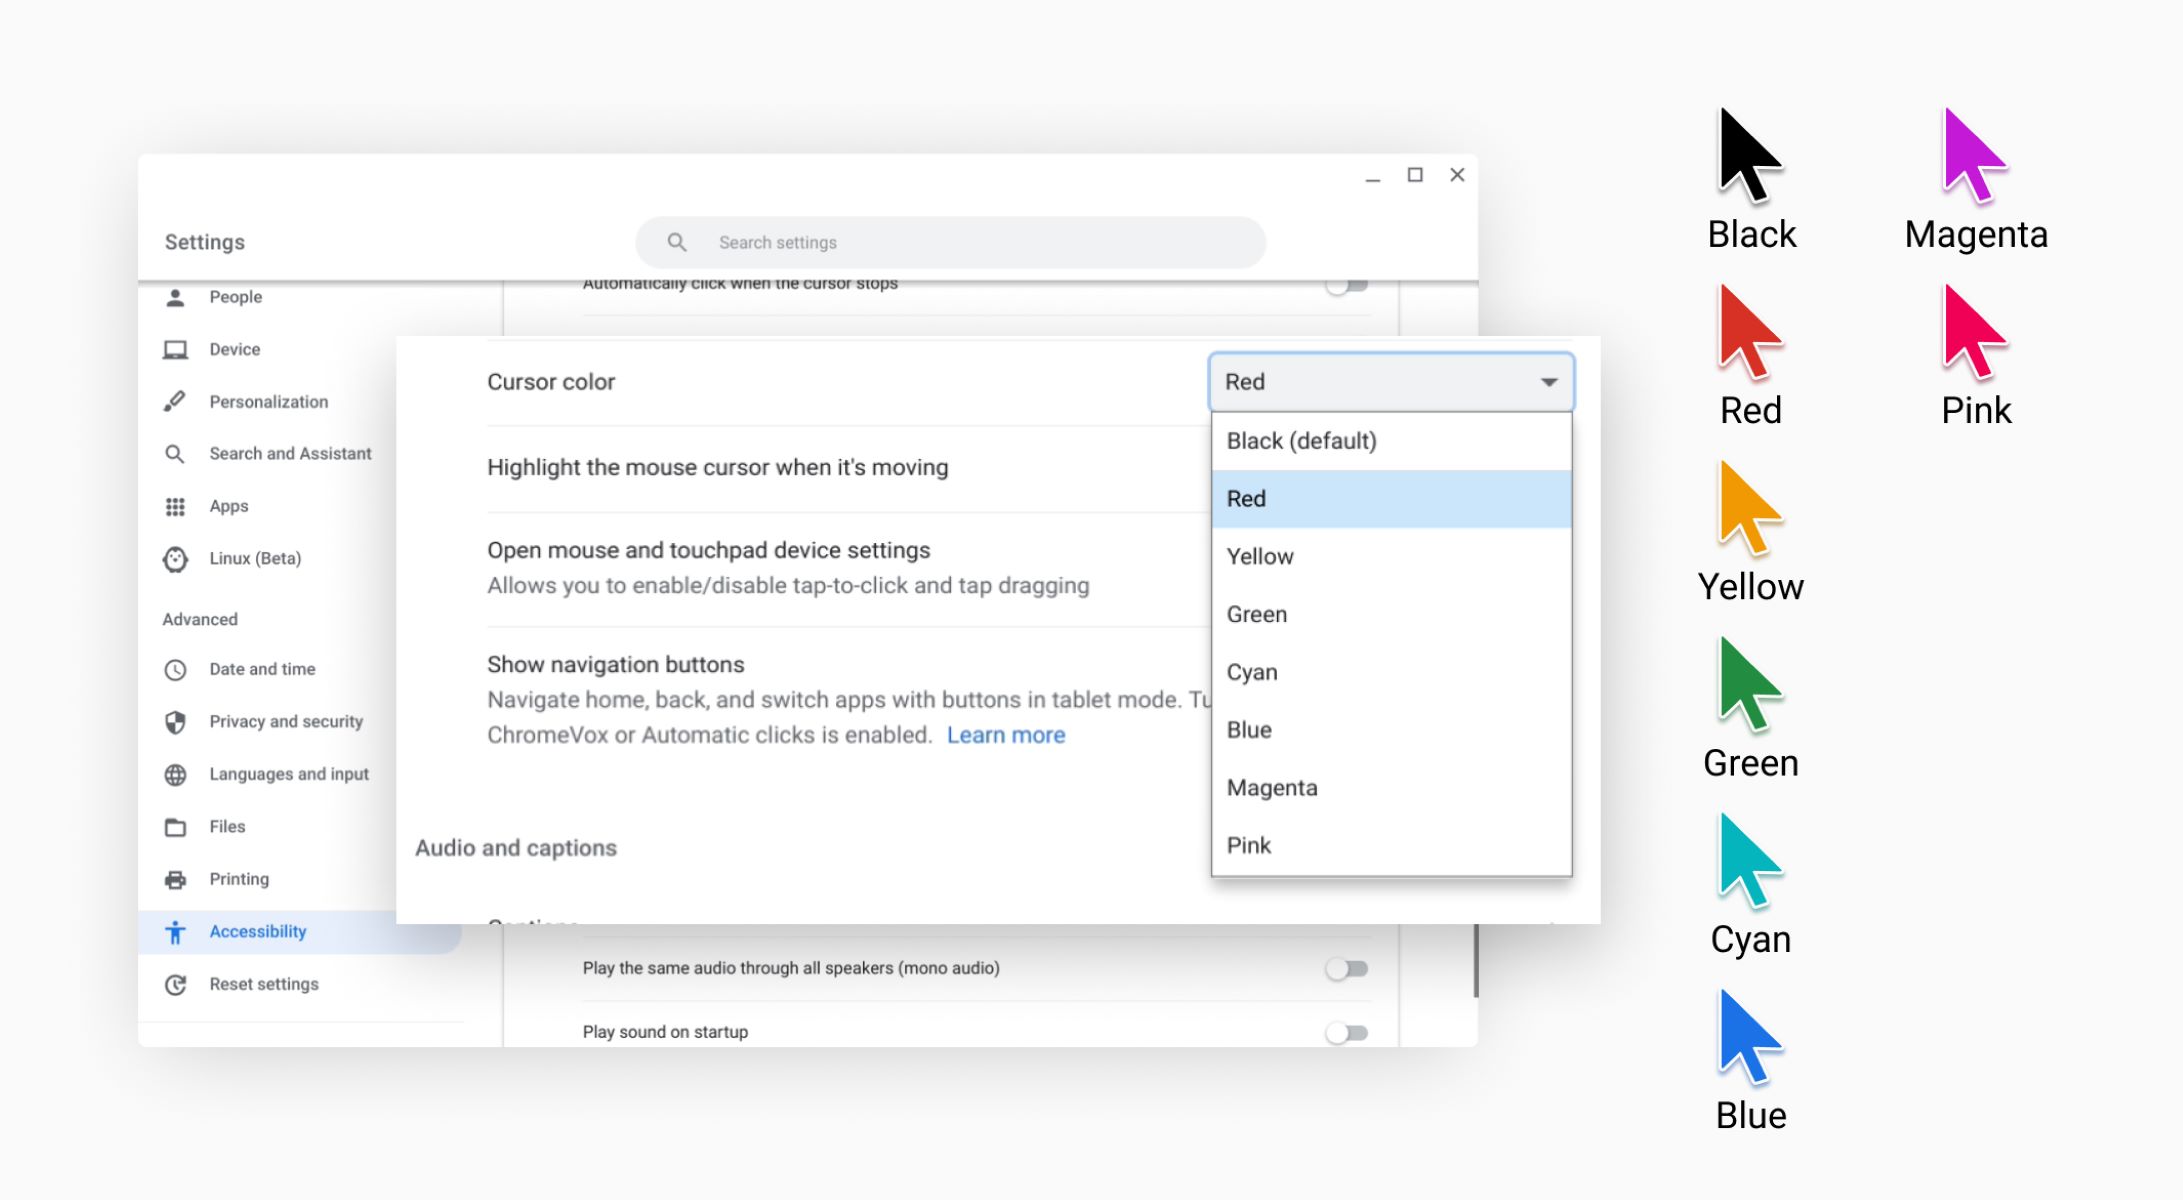
Step 4: Customizing the Mouse Color
Now that you have enabled the high contrast setting, it’s time to customize the color of your mouse cursor on your Chromebook. Follow these simple steps:
- In the accessibility menu, scroll down to find the “Mouse and touchpad” section. Click on it to access the mouse settings.
- Within the mouse settings, you will see the “Mouse cursor” option. Click on it to open the cursor customization menu.
- In the cursor customization menu, you will find various options to personalize your mouse cursor appearance. These options include size, shape, and color.
- Click on the “Color” option to select your desired mouse cursor color. A color palette will appear, allowing you to choose from a range of colors.
- Select the color that you prefer for your mouse cursor. As you select different colors, you will see a preview of the cursor color change in real-time.
Once you have selected your desired color, the mouse cursor on your Chromebook will update immediately to reflect the change. You can repeat these steps at any time to change the mouse color again, based on your mood or preference.
Customizing the color of your mouse cursor not only adds a personal touch to your Chromebook but also enhances visibility and makes it easier to locate on your screen.
Now that you have successfully customized the color of your mouse cursor, let’s move on to the next step, where you will learn how to adjust other accessibility options on your Chromebook.
Step 5: Adjusting Other Accessibility Options
Along with changing the mouse color, Chromebook offers a range of other accessibility options that you can customize. These options can enhance your overall user experience and make your Chromebook more adaptable to your specific needs. Follow these steps to adjust other accessibility options:
- In the accessibility menu, you will find various accessibility options available. These options include screen magnifier, large mouse cursor, spoken feedback, and more.
- Click on each option to explore and customize the settings according to your preferences.
- For example, if you have difficulty reading small text, you can enable the screen magnifier feature to enlarge content on your screen.
- Similarly, if you prefer a larger mouse cursor, you can enable the large mouse cursor option for improved visibility.
- Take your time to explore and adjust the accessibility options based on your individual needs and preferences.
By adjusting these accessibility options, you can further optimize your Chromebook experience and make it more accessible and user-friendly. Customizing these settings allows you to tailor the Chromebook to your specific requirements, ensuring a comfortable and enjoyable experience every time you use it.
Now that you have learned how to customize the mouse color and adjust other accessibility options, let’s move on to the final step to conclude this guide.
Step 6: Enjoy Your New Mouse Color on Chromebook
Congratulations! You have successfully changed the color of your mouse cursor on your Chromebook. Now it’s time to enjoy your personalized Chromebook experience. Here’s what you can do:
- Take a moment to admire your new mouse cursor color. Whether you chose a bold and vibrant color or a subtle and elegant shade, it adds a unique touch to your Chromebook.
- Test your new mouse color by moving the cursor around the screen. Notice how it stands out and makes it easier to track on different backgrounds.
- Continue using your Chromebook as usual, but now with an enhanced visual experience. Your customized mouse color will make it easier to navigate and interact with your favorite apps and websites.
- Share your newfound customization with friends and colleagues. They might be inspired to personalize their mouse cursor color as well!
Remember, you can always go back and change the mouse color whenever you want. Play around with different colors and find the one that suits your mood or style at any given time.
By personalizing your mouse cursor color, you have made your Chromebook truly yours. Enjoy the enhanced visual appeal and user-friendly experience that comes with it.
Now that you know how to change your mouse color on a Chromebook, you can unleash your creativity and add a personal touch to your device. Happy customizing!
Conclusion
Customizing the color of your mouse cursor on a Chromebook is a simple yet impactful way to personalize your device and enhance your user experience. By following the easy steps outlined in this guide, you can change the mouse color to a shade that suits your style and preferences.
Through accessing the settings, navigating to the accessibility menu, enabling the high contrast setting, customizing the mouse color, adjusting other accessibility options, and ultimately enjoying your new mouse color, you have gained the ability to make your Chromebook truly your own.
Not only does changing the mouse color add a personal touch, but it also improves visibility and makes it easier to locate your cursor on the screen. This customization option is just one of the many ways to make your Chromebook a more enjoyable and tailored device.
Remember, the customization options on your Chromebook are not limited to just the mouse color. You can further enhance your experience by exploring other accessibility features and adjusting settings to meet your specific needs.
So go ahead, let your creativity shine through and customize your Chromebook to make it uniquely yours. Enjoy the enhanced visual appeal, user-friendly interface, and personalized style that comes with changing the mouse color on your Chromebook!