Introduction
Welcome to this step-by-step guide on how to backup your iPhone to your MacBook Pro. Performing regular backups of your iPhone is crucial to ensure you don’t lose any important data such as contacts, messages, photos, or apps. By backing up your iPhone to your MacBook Pro, you can conveniently store your data locally, ready to be restored in case of any mishaps or when switching to a new device.
Backing up your iPhone to your MacBook Pro is a straightforward process that can be completed with just a few clicks. In this guide, we will walk you through each step, making it easy for you to secure your valuable information. Whether you are a seasoned iPhone user or just starting out, this guide is designed to help you perform the backup smoothly and effortlessly.
Before we dive into the steps, it’s important to note that you will need a MacBook Pro running macOS Catalina or later to perform the backup. If you have an older version of macOS, you can still use iTunes to backup your iPhone. Additionally, ensure that you have the latest version of iOS installed on your iPhone to avoid any compatibility issues.
Now that we have covered the essentials, let’s begin the process of backing up your iPhone to your MacBook Pro. By following the steps outlined in this guide, you will have the peace of mind knowing that your data is safe and secure.
Step 1: Connect your iPhone to your MacBook Pro
The first step in backing up your iPhone to your MacBook Pro is to establish a physical connection between the two devices. To do this, grab your iPhone charging cable and plug one end into the Lightning port on your iPhone.
Next, locate an available USB port on your MacBook Pro and connect the other end of the charging cable to it. Give it a moment, and you should see a notification on your iPhone asking for permission to trust the connected computer.
Unlock your iPhone if it is locked and tap “Trust” on the prompt that appears. This step is essential to ensure that your MacBook Pro can access the necessary data on your iPhone for the backup process.
Once you have established the connection between your iPhone and MacBook Pro, you are ready to move on to the next step and initiate the backup process.
It is worth noting that in some cases, your MacBook Pro might already be set up to automatically recognize and trust your iPhone whenever you connect it via USB. If this is the case, you can skip the trust prompt and proceed to the next step.
Now that your iPhone is connected to your MacBook Pro, let’s proceed to the next step and open Finder on your MacBook Pro.
Step 2: Unlock your iPhone and trust the computer
Before proceeding with the backup process, it is crucial to ensure that your iPhone is unlocked and trust your MacBook Pro as the connected computer. This step is necessary to establish a secure connection between the two devices and allow for data transfer.
If your iPhone is already unlocked, you can move on to the trust step. However, if it is locked, simply unlock it using your passcode, Touch ID, or Face ID. Once unlocked, you will have access to the home screen and the necessary settings.
Next, depending on your iPhone model and iOS version, you may see a trust prompt on your iPhone screen. This prompt will ask you to confirm whether you trust the computer you have connected your iPhone to.
To trust your MacBook Pro, simply tap the “Trust” button when the prompt appears. This action establishes a secure connection and allows your MacBook Pro to access the necessary data on your iPhone for the backup process.
If the trust prompt does not appear on your iPhone, it may be because you have previously connected your iPhone to your MacBook Pro or another trusted device. In this case, your iPhone may already be set to automatically trust the computer whenever you connect it via USB.
By unlocking your iPhone and trusting the connected computer, you have now taken the necessary steps to ensure a secure connection and enable the backup process. With these prerequisites fulfilled, we can move on to the next step of opening Finder on your MacBook Pro.
Step 3: Open Finder on your MacBook Pro
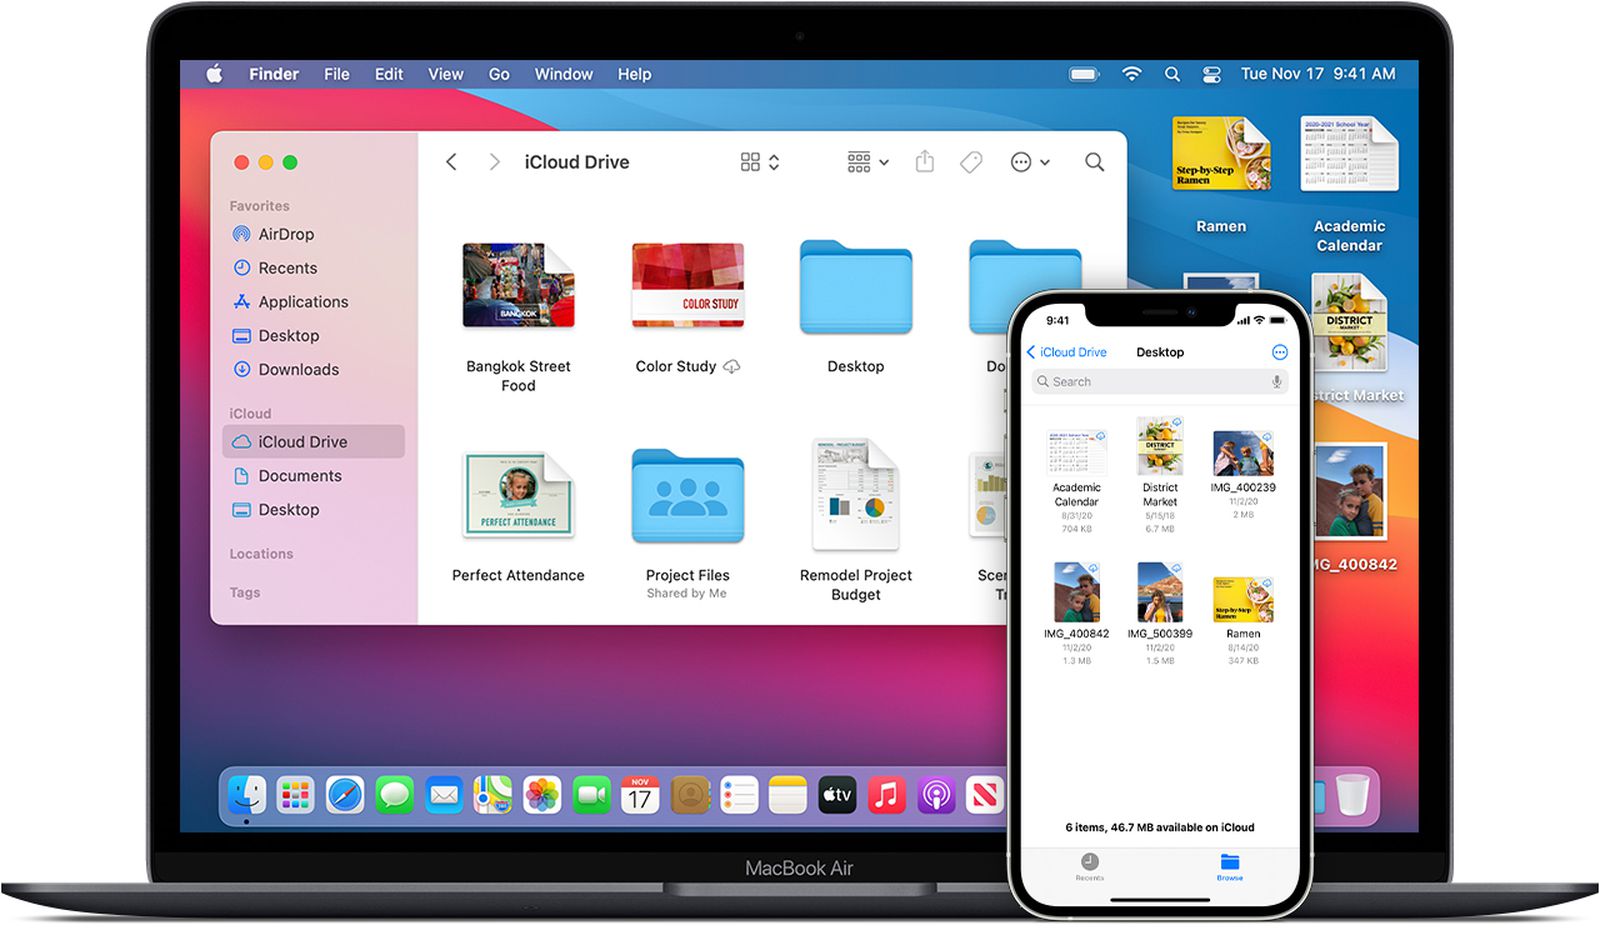
Now that your iPhone is connected and trusted, it’s time to open Finder on your MacBook Pro. Finder is the native file management app on macOS and serves as the gateway to accessing and managing your files, including your iPhone backups.
To open Finder on your MacBook Pro, you can either click on the Finder icon located on the dock, which resembles a blue and white smiley face, or use the keyboard shortcut Command + Spacebar to open Spotlight and then type “Finder” before hitting Enter.
Once the Finder window opens, you will see a sidebar on the left-hand side with various categories and locations. Look for the “Locations” section, and you should see your iPhone listed under the “Devices” category. The name of your iPhone will be displayed here.
If you cannot locate your iPhone in the sidebar, it may be due to a few reasons. Make sure your iPhone is securely connected to your MacBook Pro and that you have trusted the computer as mentioned in the previous steps.
Additionally, ensure that you are using a MacBook Pro running macOS Catalina or later. If you have an older version of macOS, you can still use iTunes instead of Finder to perform the backup process.
With Finder open and your iPhone listed in the sidebar, you are now ready to select your iPhone and proceed to the next step of choosing the backup method.
Step 4: Select your iPhone in the Finder sidebar
Once Finder is open on your MacBook Pro, it’s time to locate and select your iPhone in the sidebar. This step will allow you to access the specific settings and options related to your iPhone’s backup and sync.
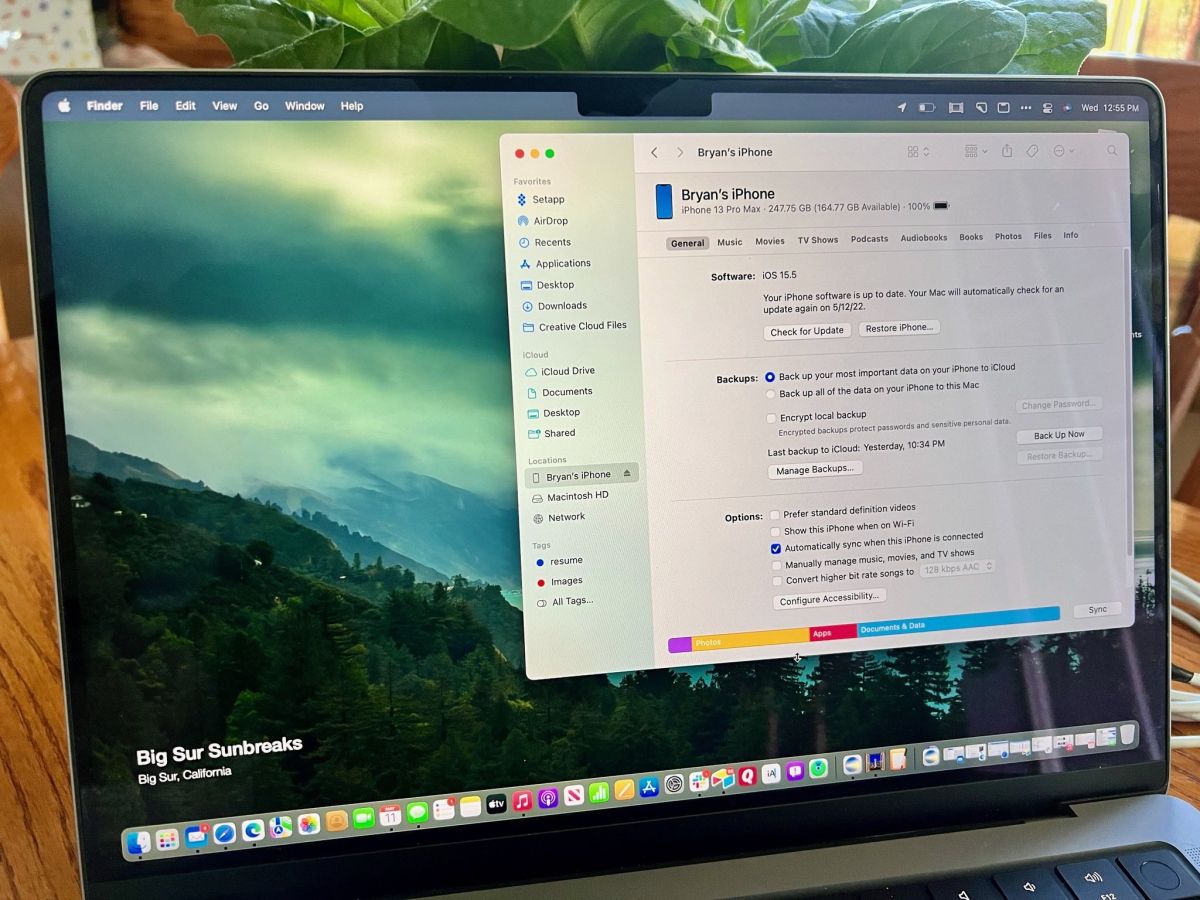
In the Finder sidebar, navigate to the “Devices” section. Here, you should see your iPhone listed by its name. Click on your iPhone’s name to select it.
When you select your iPhone in the Finder sidebar, the main window will display various details and options related to your device. These details may include the device’s name, storage capacity, software version, and other relevant information.
If you have multiple devices connected to your MacBook Pro, make sure to choose the correct iPhone from the list. Double-check the name and other details to ensure you are selecting the right device.
In case you do not see your iPhone listed in the Finder sidebar, there are a few troubleshooting steps you can try:
- Make sure your iPhone is properly connected to your MacBook Pro via the charging cable.
- Check that you have trusted your MacBook Pro on your iPhone to establish a secure connection.
- Restart your iPhone and MacBook Pro to refresh the connection.
- Try using a different USB port on your MacBook Pro.
If none of these steps resolve the issue, you may need to consult Apple Support for further assistance.
Once you have successfully selected your iPhone in the Finder sidebar, you are now ready to proceed with selecting the backup method in the next step.
Step 5: Choose the backup method
After selecting your iPhone in the Finder sidebar, it’s time to choose the backup method that best suits your needs. With the latest versions of macOS, you have two options for backing up your iPhone: iCloud backup or local backup to your MacBook Pro.
iCloud Backup: If you prefer to backup your iPhone data to Apple’s cloud storage service, iCloud, you can select the “Back Up Now” option in the main Finder window. This will initiate an iCloud backup of your iPhone, which will store your data securely in the cloud. It’s important to note that you need to be connected to a stable Wi-Fi network for an iCloud backup.
Local Backup: If you prefer to have a local backup on your MacBook Pro, you can choose the “Encrypt local backup” option in the main Finder window. This allows you to create an encrypted backup of your iPhone data on your MacBook Pro’s storage. Encryption adds an extra layer of security by protecting your backup with a password.
If you choose the local backup option with encryption, you will need to set a password for your backup. Make sure to choose a strong password that you can remember or securely store it for future reference. This password will be required when you want to restore your backup or transfer it to a new device.
Choosing between iCloud backup and local backup depends on your preferences and requirements. iCloud backup offers the convenience of accessing your data from anywhere with an internet connection, while local backup provides the peace of mind of having a physical copy of your data stored on your MacBook Pro.
Consider factors like storage space, internet connectivity, and security when making your choice. Keep in mind that both options ensure the safety of your data, but it’s important to regularly perform backups to avoid any potential data loss.
Once you have selected your preferred backup method, you can proceed to the next step to initiate the backup of your iPhone to your MacBook Pro.
Step 6: Backup your iPhone to your MacBook Pro
Now that you have chosen your backup method, it’s time to initiate the backup process and start backing up your iPhone to your MacBook Pro. Depending on the method you selected in the previous step, the process may vary slightly.
If you opted for an iCloud backup, simply click the “Back Up Now” button in the main Finder window. Your iPhone will start the backup process, and you will see a progress bar indicating the status of the backup. Keep in mind that a stable Wi-Fi connection is required for an iCloud backup.
If you chose a local backup with encryption, click the “Encrypt local backup” option in the main Finder window. Enter a strong and memorable password when prompted. The backup process will begin, and the progress bar will indicate the status of the backup.
The time it takes to complete the backup process will depend on the amount of data on your iPhone and the speed of your Wi-Fi connection or MacBook Pro’s storage read/write speed. It’s important to keep your iPhone connected to your MacBook Pro until the backup process is complete.
While the backup is in progress, you can continue to use your iPhone and MacBook Pro as usual. However, note that any changes or additions made to your iPhone’s data during the backup process may not be included in the backup. It is recommended to avoid making significant changes or transferring large amounts of data during the backup process.
Once the backup process is complete, you will receive a notification confirming the successful backup. At this point, you can proceed to the next step to monitor the backup progress or finish the backup process and safely disconnect your iPhone from your MacBook Pro.
Backing up your iPhone regularly is essential to ensure the safety and availability of your important data. By following this step-by-step guide, you can easily backup your iPhone to your MacBook Pro and have peace of mind knowing that your data is protected.
Step 7: Monitor the backup progress
While your iPhone is being backed up to your MacBook Pro, it is helpful to monitor the progress to ensure a smooth and successful backup process. Keeping an eye on the backup progress allows you to estimate the time remaining and address any issues that may arise.
To monitor the backup progress, you can refer to the progress bar displayed in the main Finder window. The progress bar indicates the percentage of the backup that has been completed. It provides a visual representation of how much data has been transferred from your iPhone to your MacBook Pro.
Depending on the size of your iPhone’s data and the speed of your Wi-Fi connection or MacBook Pro’s storage, the backup process may take some time. It is normal for the progress bar to move slower at certain stages, especially when larger files are being transferred.
While the backup is in progress, it’s important to keep your iPhone connected to your MacBook Pro and avoid interrupting the backup process. This ensures that all data is successfully transferred and included in the backup.
If you encounter any issues or errors during the backup process, such as a frozen progress bar or a failure to complete the backup, you can try the following troubleshooting steps:
- Ensure that your iPhone remains connected to your MacBook Pro and that the charging cable is secure.
- Check your Wi-Fi connection or switch to a different Wi-Fi network, if possible.
- Restart your iPhone and MacBook Pro to refresh the connection.
- If using a local backup, verify that you entered the correct encryption password and try initiating the backup again.
If you continue to experience difficulties with the backup process, it may be helpful to consult Apple Support for further assistance.
Once the backup progress reaches 100% and the process is completed, you can proceed to the final step to finish the backup process and ensure your iPhone’s data is securely backed up.
Step 8: Finish the backup process
Congratulations! You have successfully backed up your iPhone to your MacBook Pro. The final step is to complete the backup process and safely disconnect your iPhone from your MacBook Pro.
If you chose an iCloud backup, the backup process is complete as soon as the progress bar reaches 100%. Your iPhone will automatically disconnect from your MacBook Pro, and your data will be securely stored in iCloud.
If you selected a local backup with encryption, the backup process will also be considered complete once the progress bar reaches 100%. However, you need to follow a specific procedure to safely disconnect your iPhone from your MacBook Pro.
In the main Finder window, click the “Encrypt local backup” option again, and you will be prompted to enter the password you set for the backup. Enter the password and click “Done” to finalize the encryption process and ensure the security of your backup.
Once the encryption process is complete, you can safely disconnect your iPhone from your MacBook Pro by unplugging the charging cable. It is essential to disconnect your iPhone properly to avoid any data loss or corruption.
Now that your iPhone is backed up and safely disconnected, you can rest assured knowing that your valuable data is protected and ready to be restored if needed.
It is important to note that regular backups are crucial to ensure the availability and integrity of your data. Make it a habit to periodically back up your iPhone to your MacBook Pro or iCloud, especially before performing any major updates or changes to your device.
Remember to maintain a secure storage location for your MacBook Pro backups, whether it is an external drive, cloud storage, or another secure method, to prevent unauthorized access or data loss.
By following these steps and keeping your backups up to date, you can safeguard your iPhone data and have peace of mind, knowing that your important information is protected.
Conclusion
Backing up your iPhone to your MacBook Pro is a crucial step in safeguarding your valuable data and ensuring its accessibility in case of any unforeseen events. By following the step-by-step guide outlined in this article, you can easily perform the backup process and enjoy the peace of mind that comes with knowing your important information is securely backed up.
We started with connecting your iPhone to your MacBook Pro, ensuring a trusted connection between the two devices. Then, we moved on to opening Finder on your MacBook Pro, allowing you to access the necessary settings and options for the backup process.
Next, we covered how to select your iPhone in the Finder sidebar, ensuring you can access its specific settings and initiate the backup process.
After that, we discussed the two backup methods available: iCloud backup and local backup to your MacBook Pro. You were able to choose the method that best suited your preferences and requirements.
We then guided you through initiating the backup process and monitoring the progress. It is essential to keep an eye on the backup progress to ensure a successful and uninterrupted process.
Lastly, we covered the final step of finishing the backup process and safely disconnecting your iPhone from your MacBook Pro. Following this step ensures that your backup is complete and your data is secure.
Regularly performing backups of your iPhone to your MacBook Pro is highly recommended to protect your valuable information. It allows you to restore your data easily in the event of device loss, damage, or when upgrading to a new iPhone.
Remember to keep your MacBook Pro backups secure by storing them in a reliable location and periodically updating them. Additionally, consider other backup methods such as iCloud or external drives to provide an extra layer of protection for your data.
By following these steps and making backups a part of your routine, you can confidently use your iPhone, knowing that your data is protected and easily recoverable. Take the time to prioritize data backup and enjoy the peace of mind that comes with knowing your important information is safe.