Introduction
Welcome to the world of MacBook Pro! Whether you are a new user or just upgrading from a previous MacBook model, this guide will help you navigate through the features and functions of your powerful and sleek device. The MacBook Pro is known for its impressive performance, exceptional display, and innovative design, making it a popular choice for professionals, students, and creatives alike.
In this comprehensive guide, we will take you through the various aspects of using a MacBook Pro, from the basics of getting started to more advanced features and troubleshooting tips. Whether you are using it for work, entertainment, or personal use, understanding how to make the most of your MacBook Pro will greatly enhance your computing experience.
As you explore this guide, you will learn how to navigate the desktop and Finder, use applications and launchpad, manage files and folders, customize settings and preferences, connect to the internet, browse the web with Safari, manage emails with Mail, communicate with FaceTime and Messages, stay organized with Calendar and Reminders, take notes with Notes, edit photos with Photos, watch videos and listen to music with iTunes, make video calls with FaceTime, troubleshoot common issues, and discover helpful tips and tricks.
Whether you are a Mac beginner or have some experience, this guide will provide you with the knowledge and confidence to get the most out of your MacBook Pro. So, let’s dive in and unlock the full potential of your magnificent device!
Getting Started
When you first unbox your MacBook Pro, there are a few essential steps to get started. Begin by connecting the power adapter to the MacBook Pro and plugging it into a power source. This will ensure that your device has enough battery to complete the initial setup process.
Press the power button located at the top-right corner of the keyboard to turn on your MacBook Pro. As it boots up, you will be greeted by the familiar Apple logo and a progress bar indicating the loading process.
Once the loading process is complete, you will be guided through the initial setup. Follow the on-screen instructions to select your region, language, and keyboard layout. You will also be prompted to connect to a Wi-Fi network, which is necessary for software updates and online features.
Next, you will be prompted to sign in with your Apple ID or create a new one. Your Apple ID is essential for accessing various services, such as the App Store, iCloud, and iTunes. If you don’t have an Apple ID, you can create one by following the on-screen instructions.
After signing in with your Apple ID, you can choose whether to enable features like Siri, iCloud Keychain, and Find My Mac. These features can enhance your productivity and security, so it’s recommended to enable them.
Once the initial setup is complete, you will be taken to the desktop of your MacBook Pro. From here, you can begin exploring the various features and applications that the device has to offer.
It’s worth noting that your MacBook Pro comes with a set of built-in applications, such as Safari, Mail, Calendar, and more. These apps are designed to help you with everyday tasks and provide a seamless user experience.
To familiarize yourself with the layout and navigation of your MacBook Pro, spend some time exploring the menu bar at the top of the screen. Here, you will find system icons, such as battery status, Wi-Fi connectivity, volume control, and more.
In addition to the menu bar, the Dock located at the bottom of the screen provides quick access to your most-used applications. You can customize the Dock by adding or removing applications according to your preferences.
Now that you’re familiar with the initial setup and basic layout of your MacBook Pro, you’re ready to start using it for various tasks. In the following sections, we will delve deeper into the features and functions of your MacBook Pro, empowering you to make the most of this powerful device.
Basics of the MacBook Pro
Before diving into the more advanced features of your MacBook Pro, it’s essential to understand the basic components and functionality of your device. Familiarizing yourself with these basics will help you navigate through tasks and effectively utilize the capabilities of your MacBook Pro.
The MacBook Pro features a sleek and durable aluminum body, with a stunning Retina display that delivers vibrant colors and sharp details. The trackpad is large and responsive, supporting multi-touch gestures for intuitive navigation and control.
At the front of the device, you will find the display, which is where all your content will be showcased. The display is bright, crisp, and offers an excellent viewing experience for everything from productivity tasks to watching movies and editing photos.
Located above the display is the FaceTime HD camera, which allows you to make video calls, take snapshots, and record videos. The camera also supports features such as FaceTime and Photo Booth, providing a range of creative possibilities.
Below the display, you’ll find the full-size backlit keyboard, designed for comfortable and efficient typing. The keyboard includes function keys and a Touch Bar on select models, which provides context-sensitive controls, shortcuts, and customization options.
To the right of the keyboard, you’ll find the power button, which can be pressed to turn on or wake up your MacBook Pro. On the left side of the keyboard, you’ll find a row of ports, including Thunderbolt 3 (USB-C) ports, which provide fast data transfer and versatile connectivity options.
The MacBook Pro also features powerful speakers that deliver clear and immersive sound, enhancing your viewing and listening experience. This is particularly useful when watching movies, listening to music, or participating in video calls.
As for navigation, the MacBook Pro features the trackpad, which supports a range of gestures, allowing you to perform actions such as scrolling, zooming, and swiping. These gestures can be customized in the trackpad settings to suit your preferences.
In addition to the trackpad, the MacBook Pro includes various input methods, such as the keyboard, Touch Bar, and external devices like a mouse or a trackpad. Experiment with these input methods to find the most comfortable and efficient way of interacting with your device.
Now that you have an understanding of the basic components and functionality of your MacBook Pro, you’re ready to explore further and make the most of this powerful and versatile device.
Navigating the Desktop and Finder
The desktop and Finder are the central components of your MacBook Pro’s user interface. Understanding how to navigate and manage files using the desktop and Finder will greatly enhance your productivity and organization.
When you first start up your MacBook Pro, you’ll be greeted by the desktop, which serves as your main workspace. The desktop is where you can place files, folders, and shortcuts for easy access.
To navigate the desktop, move your cursor around the screen. As you move the cursor, you’ll notice that icons and other elements highlight or become active. For example, clicking on an icon will open the corresponding file or application.
The top menu bar of your screen holds various menus and system icons that provide quick access to settings, notifications, and functions. Here, you can find options for adjusting volume, screen brightness, Wi-Fi settings, and more.
One of the most important features of the macOS operating system is the Finder. The Finder is the file management application that allows you to browse and organize your files and folders on your MacBook Pro.
To open the Finder, click on the Finder icon on the Dock, which resembles a blue and white face. Alternatively, you can press Command + Spacebar to open the Spotlight search bar and type in “Finder.”
Once the Finder is open, you’ll see a sidebar on the left-hand side of the window that contains various shortcuts to commonly used locations such as your Home folder, Documents, Downloads, and Applications.
In the main section of the Finder window, you’ll see the contents of the currently selected folder. You can navigate through different folders and directories by clicking on them.
The Finder also provides a unified search feature called Spotlight, which can be accessed by clicking on the search bar at the top right corner of the Finder window or by pressing Command + Spacebar. Spotlight allows you to quickly find files, applications, and even perform calculations or look up definitions.
In addition to managing files, Finder provides various options for organizing your files and folders. You can create folders, rename files, delete or move them to different locations, and even tag them for easier identification and categorization.
By utilizing the desktop and Finder effectively, you can keep your files organized, locate them easily when needed, and navigate through your MacBook Pro with ease.
Now that you have a better understanding of navigating the desktop and Finder, you’re ready to explore and manage your files and folders more efficiently.
Using Applications and Launchpad
Applications are the heart of your MacBook Pro, allowing you to perform various tasks and activities. Understanding how to use and manage applications, as well as utilizing Launchpad, will streamline your workflow and enhance your productivity.
To access your applications, you can click on the Applications folder in the Dock or select “Applications” from the Finder sidebar. This will open a window displaying all the installed applications on your MacBook Pro.
Many frequently used applications, such as Safari, Mail, and Calendar, are also available directly from the Dock. You can easily launch these applications by clicking on their respective icons.
A convenient way to view and launch applications is by using Launchpad. To access Launchpad, click on the Launchpad icon in the Dock. This will reveal a grid of application icons, similar to the interface of an iPad or iPhone.
In Launchpad, you can swipe left or right to navigate through different pages of applications, similar to flipping through the pages of a book. You can also use the search bar at the top to quickly find a specific application by typing its name.
To launch an application from Launchpad, simply click on its icon. The application will open in a new window, ready for you to start using. You can also organize your applications in Launchpad by dragging and dropping them into different pages or folders.
Once an application is open, you can access various features and functions specific to that application. For example, in Safari, you can browse the internet, open multiple tabs, and bookmark your favorite websites.
When you’re finished using an application, you can close it by clicking on the red “X” button located in the top left corner of the application window. Alternatively, you can use the Command + Q shortcut to quit the application.
To switch between open applications, you can use the Command + Tab shortcut. Hold down the Command key and press Tab repeatedly to cycle through your open applications. Release the Command key to switch to the selected application.
Lastly, it’s important to keep your applications up to date to ensure you have the latest features and security patches. You can update your applications by opening the App Store, clicking on the Updates tab, and selecting Update All or updating individual applications.
By understanding how to use and manage applications, as well as utilizing Launchpad for quick access, you can optimize your workflow and make the most of your MacBook Pro’s capabilities.
With this knowledge, you’re now ready to explore and utilize the various applications that make your MacBook Pro an incredibly versatile and powerful tool.
Managing Files and Folders
Effective file and folder management is essential for keeping your MacBook Pro organized and improving your productivity. Understanding how to create, organize, and manipulate files and folders will help you easily locate and work with your documents, photos, and other types of files.
To create a new folder, navigate to the location where you want the folder to be created, such as the desktop or a specific directory in the Finder. Right-click or Control-click on the location and select “New Folder” from the context menu. You can then give the folder a descriptive name.
Once you have created a folder, you can start organizing your files within it. You can drag and drop files into the folder or copy and paste them. This allows you to keep related files together and easily locate them when needed.
To rename a file or folder, simply right-click or Control-click on it and select “Rename” from the context menu. Type in the new name and press Enter or Return to save the changes. This is useful to provide more meaningful names to your files and folders.
If you want to move a file or folder to a different location, you can drag and drop it to the desired location within the Finder. Alternatively, you can right-click or Control-click on the file or folder, select “Cut” or “Copy,” navigate to the desired location, and then right-click or Control-click and select “Paste.”
In the Finder, you can sort files and folders by name, date modified, size, and other attributes. To do this, go to the View menu in the menu bar and select “Arrange By” to choose the sorting option that best suits your needs.
Tags are a powerful way to organize and categorize your files and folders. Tags allow you to assign keywords or labels to files, making them easy to find using the Finder’s search function. To add a tag, right-click or Control-click on a file or folder, select “Tags,” and choose or create a tag that represents its category or purpose.
The Finder also provides a useful feature called Quick Look, which allows you to preview the contents of a file without opening it. To use Quick Look, select the file and press the Spacebar. This is handy when you quickly want to glance at the contents of a document, photo, or video.
When you no longer need a file or folder, you can delete it by dragging it to the Trash icon in the Dock. Once in the Trash, you can empty it by right-clicking or Control-clicking on the Trash icon and selecting “Empty Trash.” Be cautious when emptying the Trash, as the deleted files cannot be recovered.
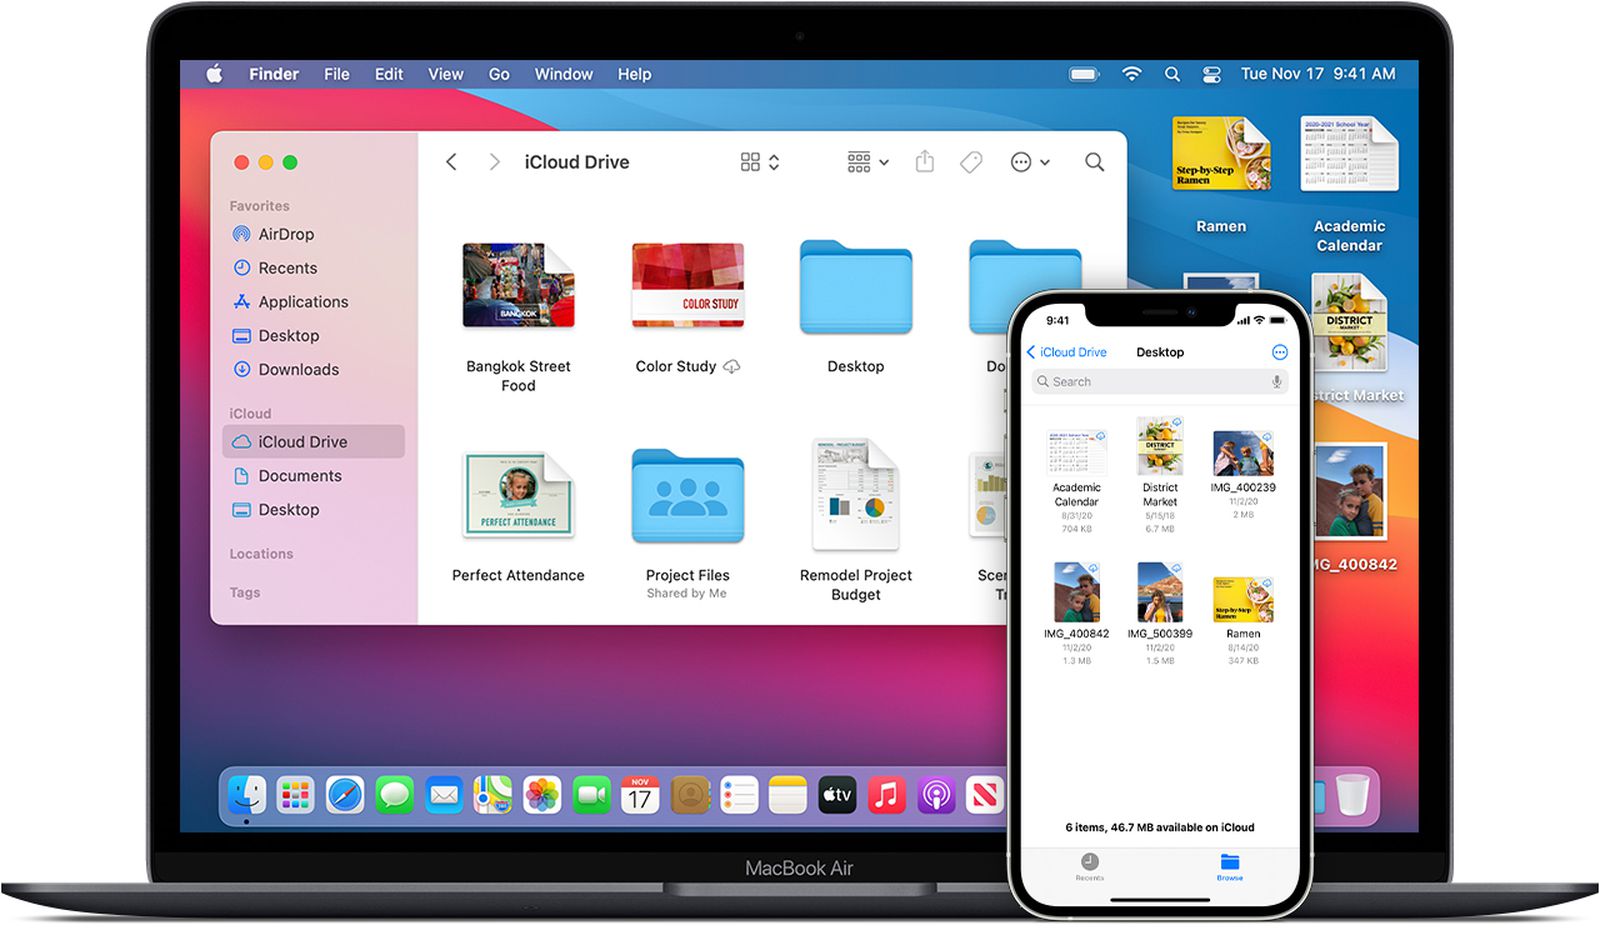
For added convenience, you can use iCloud Drive to store and sync your files across multiple devices. With iCloud Drive, you can access your files from your MacBook Pro, iPhone, iPad, or through the iCloud website. This ensures your files are always accessible and up to date.
By effectively managing your files and folders, you can keep your MacBook Pro organized, save time searching for documents, and increase your overall productivity.
Now that you’re familiar with file and folder management, you can confidently handle your documents, photos, and other files with ease.
Customizing Settings and Preferences
Your MacBook Pro comes with a wide range of settings and preferences that you can customize to personalize your user experience. Understanding how to adjust these settings will allow you to tailor your MacBook Pro to your specific needs and preferences.
To access the Settings, click on the Apple menu icon located on the top-left corner of the screen and select “System Preferences.” This will open a window displaying various categories of settings that you can modify.
One of the essential categories is “General,” where you can customize the appearance and behavior of your MacBook Pro. Here, you can adjust settings such as the appearance of buttons and scroll bars, the default font size, and the behavior of the Dock.
Under the “Desktop & Screen Saver” category, you can choose a desktop background and select screensavers for when your MacBook Pro is idle. This allows you to personalize the look and feel of your device.
In the “Dock & Menu Bar” category, you can customize the appearance and behavior of your Dock. You can adjust the size of the icons, modify the position of the Dock on the screen, add or remove applications from the Dock, and enable features like magnification and hiding.
The “Mission Control” category allows you to customize the multitasking features of your MacBook Pro. Here, you can set up gestures for navigating between open windows, configure spaces and desktops, and enable hot corners to access specific features with a flick of your mouse or trackpad.
For those who enjoy a dark mode interface, the “Appearance” category allows you to switch between a light and dark theme. The dark mode not only enhances readability in low-light environments, but it also provides a sleek and stylish look to your MacBook Pro.
In the “Security & Privacy” category, you can customize settings related to the security of your MacBook Pro. Here, you can enable a password or Touch ID for unlocking your device, set up a firewall, manage app permissions, and configure privacy preferences.
Under the “Keyboard” category, you can customize the behavior of your keyboard, including typing speed, keyboard shortcuts, function keys, and text autocorrection. Adjusting these settings can greatly enhance your typing experience and productivity.
The “Trackpad” category allows you to modify the settings of your trackpad. You can adjust scrolling speed, enable or disable gestures, configure pressure sensitivity on Force Touch trackpads, and customize other trackpad-related features.
Other categories in the System Preferences allow you to customize settings related to network connections, sound, notifications, displays, printers, and more. Take the time to explore these settings and adjust them according to your preferences.
By customizing the settings and preferences of your MacBook Pro, you can optimize your workflow, enhance your productivity, and create a personalized computing experience that suits your needs.
Now that you’re familiar with the various settings and preferences, you can start customizing your MacBook Pro to make it truly your own.
Connecting to the Internet
Connecting to the internet is essential for accessing online services, browsing the web, sending emails, and much more. Your MacBook Pro offers multiple ways to connect to the internet, ensuring that you stay connected wherever you go.
The most common way to connect to the internet is through a Wi-Fi network. To connect to a Wi-Fi network, click on the Wi-Fi icon located in the menu bar at the top-right corner of the screen. A dropdown menu will appear, listing available Wi-Fi networks in your vicinity.
Select your desired Wi-Fi network from the list and enter the network password if prompted. Once connected, the Wi-Fi icon in the menu bar will display signal strength, indicating a successful connection.
If you are in a location without a Wi-Fi network, you can connect to the internet using a dedicated Ethernet cable. MacBooks Pro typically have a built-in Ethernet port, allowing you to connect your device directly to the network using an Ethernet cable.
In some cases, you may also have the option to connect to the internet using a cellular data network. If your MacBook Pro has cellular capabilities or is connected to an iPhone with Personal Hotspot enabled, you can access the internet using your cellular data plan.
For seamless internet connectivity, you can enable the “Auto-join” feature for preferred Wi-Fi networks. This ensures that your MacBook Pro automatically connects to known networks without requiring manual intervention.
If you are experiencing connectivity issues or need to troubleshoot Wi-Fi problems, you can open the Network pane in System Preferences. Here, you can diagnose network issues, renew DHCP leases, and configure advanced network settings if necessary.
In addition to connecting to the internet, macOS includes a built-in feature called iCloud, which allows you to store files, synchronize data, and access your personal content across multiple devices. By signing in with your Apple ID, you can enable iCloud and seamlessly access your files and data from anywhere.
It’s important to remember that when connected to the internet, it’s recommended to take necessary precautions to protect your privacy and security. Enable firewall settings, use strong and unique passwords for your Wi-Fi networks and online accounts, and install reliable antivirus software to safeguard your device from potential threats.
By understanding the various methods of connecting to the internet, you can ensure seamless internet access, enhancing your productivity and connectivity on your MacBook Pro.
Now that you’re equipped with knowledge on connecting to the internet, you can enjoy all the online resources and services available to you on your MacBook Pro.
Using Safari for Browsing
Safari is the default web browser on your MacBook Pro, offering a fast and secure browsing experience. Whether you’re searching for information, shopping online, or watching videos, Safari provides numerous features and tools to enhance your browsing experience.
When you open Safari, you’ll see a clean and minimalist interface, with the address bar located at the top, bookmarks bar beneath it, and tabs at the top of the browsing window. The bookmarks bar allows you to quickly access your favorite websites with a single click.
To navigate to a website, simply type the URL or search term into the address bar and press Enter. Safari will load the webpage and display it within the browser window. You can also use the search bar within Safari to perform internet searches using your preferred search engine.
Safari offers convenient tabbed browsing, allowing you to have multiple websites open simultaneously within separate tabs. To open a new tab, click on the “+” button at the top of the tab bar or use the Command + T keyboard shortcut. This enables you to switch between webpages effortlessly.
When browsing, you can use various gestures and shortcuts to navigate within Safari. For example, you can swipe left or right with two fingers on the trackpad to navigate back or forward through your browsing history. This makes it easy to revisit previously visited pages or go back to the previous webpage.
Safari also includes a dedicated Reading List feature, which allows you to save articles, webpages, and other content for later reading. To add a webpage to your Reading List, click on the share icon at the top of the Safari window and select “Add to Reading List.”
Another valuable feature of Safari is the ability to customize your browsing experience through extensions. Safari extensions are small pieces of software that add functionality to the browser, such as ad-blockers, password managers, and productivity tools. You can find and install extensions from the Safari Extensions Gallery or other trusted sources.
Safari puts a strong emphasis on security and privacy. It includes features such as Intelligent Tracking Prevention, which blocks third-party websites from tracking your online activity, and Fraudulent Website Warning, which alerts you if you’re visiting a potentially malicious website. Safari also offers private browsing mode, allowing you to browse the internet without storing browsing history, cookies, or other data on your MacBook Pro.
If you’re using Safari on both your MacBook Pro and other Apple devices, you can take advantage of the Continuity feature called Handoff. Handoff allows you to effortlessly switch between browsing on your MacBook Pro and other devices, such as your iPhone or iPad, ensuring a seamless browsing experience.
Safari offers a wealth of features and tools designed to make your browsing experience enjoyable, efficient, and safe. By exploring the various options and customizing Safari to suit your needs, you can make the most out of your web browsing on your MacBook Pro.
Now that you have an overview of Safari, it’s time to start exploring the web and enjoying the endless possibilities it offers on your MacBook Pro.
Managing Emails with Mail
The Mail app on your MacBook Pro provides a powerful and user-friendly platform for managing your emails. From setting up email accounts to organizing your inbox and composing messages, Mail offers a range of features to streamline your email management.
To get started, open the Mail app by clicking on its icon in the Dock or by accessing it through the Applications folder. If you’re using Mail for the first time, you’ll be prompted to set up your email account(s). Simply follow the on-screen instructions and enter your email address and password to get started.
Once your email account is set up, Mail will automatically sync your inbox and display your most recent emails. You can navigate through your inbox, sent items, drafts, and other folders using the sidebar on the left-hand side of the Mail window.
To read an email, simply click on it in your inbox. The email will open in a new window, allowing you to view its contents, attachments, and any threaded conversations. You can reply, forward, or compose a new message directly from the email window.
Mail offers powerful organizational tools to help you manage your emails efficiently. You can create folders to categorize and store specific emails, such as work-related emails or personal correspondence. To create a folder, right-click or Control-click on your email account in the sidebar, select “New Mailbox,” and give it a descriptive name.
In addition to folders, you can use Mail’s built-in features such as Smart Mailboxes and Rules to automatically sort and organize your messages. Smart Mailboxes allow you to create virtual folders that display emails based on specific criteria, such as unread messages or emails from VIP contacts.
Rules, on the other hand, automate the sorting and management of your emails. You can create rules to automatically move incoming messages to specific folders, mark them as read, forward them, or perform other actions based on predefined conditions.
Composing emails with Mail is straightforward. Simply click on the “Compose” button or press Command + N to create a new email. You can enter the recipient’s email address, add a subject, write your message, and attach files if needed. Mail also supports rich text formatting, so you can make your emails visually appealing and informative.
Mail allows you to add multiple email accounts, making it a centralized hub for managing all your email correspondence. You can add accounts from popular email services like Gmail, Yahoo, and Outlook, as well as custom IMAP and POP accounts. To add a new account, go to Mail > Preferences > Accounts and click on the “+” button.
When it comes to searching for specific emails, Mail provides a robust search feature. You can enter keywords, names, or other parameters into the search bar at the top of the Mail window to quickly find the desired emails. Mail will display matching results in real-time as you type.
Mail integrates seamlessly with other apps on your MacBook Pro, such as Contacts and Calendar. It allows you to easily add contacts from received emails to your Contacts app and create calendar events from email invitations. This integration helps you stay organized and efficiently manage your communication and schedule.
With its intuitive interface and powerful features, Mail offers a comprehensive solution for managing your emails on your MacBook Pro. Take the time to explore its settings and customization options to tailor the app to your email management needs.
Now that you’re familiar with Mail, you can effectively manage your emails, stay organized, and communicate efficiently on your MacBook Pro.
Communicating with FaceTime and Messages
FaceTime and Messages are two powerful communication apps that come pre-installed on your MacBook Pro. With these apps, you can stay connected with friends, family, and colleagues through video calls, voice calls, and instant messaging.
FaceTime allows you to make high-quality video and audio calls to other Apple users, whether they are using a MacBook, iPhone, iPad, or iPod touch. To start a FaceTime call, open the FaceTime app, enter the name or phone number of the person you want to call, and click on the video or audio call button.
During a FaceTime call, you can switch between the front and rear cameras, mute or unmute your microphone, and adjust the volume. You can also utilize features like Picture-in-Picture, which allows you to continue using other applications while having a FaceTime call in a smaller window on your screen.
In addition to FaceTime, Messages is a versatile app for instant messaging. Messages allows you to send text messages, photos, videos, and other media to individuals or groups. To start a conversation, open the Messages app, select a contact, and type your message in the input field at the bottom of the conversation window.
Messages also offers various features to enhance your messaging experience. You can send and receive animated emojis, stickers, and GIFs. You can also share your location, send voice messages, and even play games with your friends right within the Messages app.
Messages also integrates seamlessly with other Apple devices, allowing you to start a conversation on your MacBook Pro and continue it on your iPhone or iPad, thanks to the Continuity feature called Handoff. To use Handoff, make sure you are signed in with the same Apple ID on both devices and have Bluetooth and Wi-Fi enabled.
Besides text-based messaging, Messages also supports FaceTime audio and video calls. If you’re in a conversation and want to switch to a FaceTime call, simply click on the video or audio call button at the top-right corner of the conversation window.
Both FaceTime and Messages offer end-to-end encryption, ensuring your calls and messages remain private and secure. This means that only you and the intended recipients can access and read your conversations.
It’s worth noting that FaceTime calls and Messages are only available for Apple users. However, you can communicate with individuals who don’t use Apple devices through alternative apps, such as Skype or Google Hangouts.
With FaceTime and Messages at your disposal, you have the tools to connect, communicate, and share with others seamlessly and conveniently on your MacBook Pro.
Now that you’re familiar with FaceTime and Messages, you can enjoy staying connected with your loved ones and colleagues, whether it’s through video calls, voice calls, or text messaging.
Staying Organized with Calendar and Reminders
Staying organized is essential for managing your daily tasks, appointments, and events. On your MacBook Pro, you have access to two powerful applications – Calendar and Reminders – that can help you stay on top of your schedule and commitments.
The Calendar app allows you to create, view, and manage your events and appointments seamlessly. To open Calendar, click on the Calendar icon in the Dock or access it through the Applications folder. Once open, you’ll see a monthly or weekly view, depending on your preference.
To add an event, simply double-click on the desired date and time in the Calendar window. Enter the details of the event, such as the title, location, start and end times, and any relevant notes. Calendar also allows you to set reminders and invite others to the event through email invitations.
Calendar integrates with other apps and services, such as Contacts and Mail. For example, you can add attendees directly from your Contacts app and receive event invitations through email, which can be automatically added to your Calendar.
You can set different types of events in Calendar, such as a one-time event, a recurring event (such as a weekly meeting), or an all-day event. This flexibility allows you to adapt to your specific scheduling needs.
In addition to Calendar, the Reminders app is a valuable tool for managing your to-do lists and tasks. Reminders allows you to create lists and add tasks that need to be completed. To open Reminders, click on the Reminders icon in the Dock or access it through the Applications folder.
Creating a reminder is straightforward. Click on the “+” button to add a new reminder, enter the task details, and set a due date and time if necessary. Reminders also allows you to add notes, attach files, and set priority levels to stay organized.
Reminders offers flexibility with its organization features. You can create multiple lists for different categories or projects, helping you stay focused and efficiently manage your tasks. You can also set reminders based on location, so you’re reminded of a task when you arrive or leave a specific place.
Both Calendar and Reminders sync seamlessly across your Apple devices using iCloud. This ensures that your events and reminders are automatically updated and accessible from your MacBook Pro, iPhone, iPad, and other Apple devices.
Furthermore, you can set up Calendar and Reminders to integrate with other services, such as Google Calendar or Microsoft Exchange. This allows you to sync your events and tasks across different platforms, making it easier to stay organized.
By utilizing Calendar and Reminders on your MacBook Pro, you can effectively manage your schedule, appointments, and tasks, ensuring that you stay organized and productive.
Now that you have a better understanding of Calendar and Reminders, you can start organizing your events and tasks and stay on top of your commitments.
Taking Notes with Notes
When it comes to capturing and organizing your thoughts, ideas, and information, the Notes app on your MacBook Pro is a powerful tool. With its intuitive interface and robust features, Notes makes it easy to jot down notes, create checklists, and collaborate with others.
To open the Notes app, click on the Notes icon in the Dock or access it through the Applications folder. Once opened, you’ll see a clean and simple interface with a list of your notes on the left-hand side and the content of the selected note on the right-hand side.
To create a new note, click on the “+” button in the Notes app or press Command + N on your keyboard. You can then start typing your note in the main window. You can also paste text, images, links, and other media directly into a note from other apps or websites.
The formatting options in Notes allow you to customize the appearance of your notes. You can change the font style, adjust text size, create headers, apply bold or italic formatting, and more. This helps you organize your notes and make them more visually appealing.
For added convenience, you can organize your notes into folders. To create a folder, go to File > New Folder or use the Command + Shift + N shortcut. You can then drag and drop notes into the folder, providing a structured and organized system for your notes.
Another useful feature of Notes is the ability to create checklists. This is handy for creating to-do lists, grocery lists, meeting agendas, or any other list-based notes. To create a checklist, simply click on the checklist icon in the formatting toolbar, and start adding items.
Notes also offers the ability to add attachments to your notes, such as photos, documents, or scanned files. You can drag and drop files directly into a note or use the Attach button in the formatting toolbar. This makes it easy to keep all related information in one place.
Notes seamlessly integrates with other apps on your MacBook Pro. For example, you can add links from Safari using the Share menu or turn an email into a note by dragging it from the Mail app and dropping it into a note. This integration helps you gather and organize information efficiently.
If you have an Apple Pencil or a compatible stylus, you can also handwrite notes directly on your MacBook Pro. Open a new note, click on the Markup icon in the formatting toolbar, and select the drawing tool. This allows you to jot down notes, create sketches, or annotate existing content.
Furthermore, Notes syncs across all your Apple devices using iCloud, ensuring that your notes are updated and accessible on your MacBook Pro, iPhone, iPad, and other Apple devices. This makes it easy to access and work on your notes wherever you are.
By leveraging the features of the Notes app on your MacBook Pro, you can efficiently capture and organize your notes, ideas, and information, helping you stay productive and organized.
Now that you have a better understanding of Notes, you can start taking notes and keeping track of important information effortlessly.
Editing Photos with Photos
Photos is a powerful built-in application on your MacBook Pro that allows you to manage and edit your photos. With its intuitive interface and robust editing tools, you can enhance, retouch, and organize your photos effortlessly.
To open the Photos app, click on the Photos icon in the Dock or access it through the Applications folder. Once opened, you’ll see your photo library, organized by date and location, in the main window.
To edit a photo, simply double-click on it to open it in the editing view. Here, you’ll find a wide range of editing tools and options to enhance the look and feel of your photos.
The editing toolbar provides various adjustments you can make to your photos, such as cropping, straightening, rotating, and applying filters. You can also adjust exposure, contrast, saturation, and other parameters to fine-tune the overall appearance of your photos.
If you want to take your edits a step further, the Photos app offers more advanced editing tools. These include adjustments for highlights, shadows, sharpness, noise reduction, and color balance. You can experiment with these tools to achieve the desired look for your photos.
In addition to basic edits, Photos allows you to apply artistic effects to your photos. You can convert your photos to black and white, apply a vintage or sepia tone, add vignettes, or experiment with other creative filters. These effects can add a unique touch to your images.
Another useful feature of Photos is its ability to remove imperfections from your photos. You can easily remove red-eye, blemishes, and unwanted objects with just a few clicks. This ensures that your photos look their best and are free from distractions.
If you have a collection of similar photos or want to explore different edits, Photos offers a non-destructive editing approach. Your original photo is always preserved, and any edits you make are saved as separate versions. This allows you to revert to the original or compare different edits side by side.
Photos also integrates with iCloud, which means that your photos are automatically synced across all your Apple devices. This enables you to access and edit your photos seamlessly on your MacBook Pro, iPhone, iPad, and other Apple devices.
After editing your photos, it’s important to organize them effectively. Photos allows you to create albums, add titles, descriptions, and tags, and use smart albums based on specific criteria. These features help you categorize and find your photos easily, even as your library grows.
Finally, if you want to showcase your edited photos, the Photos app offers various ways to create stunning presentations. You can create slideshows with customized transitions, music, and captions, or even design and print photo books directly from the app.
With the powerful editing tools and organizational features of the Photos app, you can take your photography skills to the next level and enjoy the process of enhancing and managing your photos on your MacBook Pro.
Now that you have a better understanding of the Photos app, you can start exploring your photo library, editing your favorite shots, and showcasing your creativity.
Watching Videos and Listening to Music with iTunes
iTunes is a versatile application on your MacBook Pro that allows you to watch videos and listen to music. With its vast library of content, user-friendly interface, and powerful features, iTunes provides a comprehensive multimedia experience.
To open iTunes, click on the iTunes icon in the Dock or access it through the Applications folder. Once opened, you’ll find a navigation bar at the top, giving you access to different types of media, such as Music, Movies, TV Shows, Podcasts, and more.
If you have a collection of music on your MacBook Pro, you can import it into iTunes by going to File > Add to Library. iTunes supports a wide range of audio formats, allowing you to play and organize your music files effectively.
With iTunes, you can create playlists to organize your music based on mood, genre, or any other criteria. Simply select the songs you want to include in a playlist and click on the “+” button at the bottom-left corner to create a new playlist. You can also sync your playlists with other Apple devices using iCloud, ensuring your music is accessible wherever you go.
In addition to managing your music, iTunes provides a comprehensive music store. You can browse and purchase songs, albums, and music videos from the iTunes Store. The iTunes Store offers a vast collection of music from various genres, along with exclusive content and features.
When it comes to videos, iTunes allows you to rent or purchase movies and TV shows from the iTunes Store. You can browse through various categories, discover recommendations, and enjoy your favorite movies and TV shows directly on your MacBook Pro.
iTunes also provides a range of features to enhance your video and audio experience. You can create custom video playlists, adjust playback settings, and even watch rented movies offline. iTunes also supports closed captions and subtitles for those with hearing impairments or for language support.
Another notable feature of iTunes is its integration with Apple Music. With an Apple Music subscription, you have access to a vast library of music, personalized recommendations, curated playlists, and exclusive content. You can stream or download music directly from the Apple Music catalog and sync it across your devices.
If you enjoy podcasts, the iTunes app offers an extensive collection of podcasts from various genres and topics. You can browse and subscribe to podcasts, access your favorite shows, and even download episodes for offline listening.
Lastly, iTunes allows you to sync your media with other Apple devices, such as iPhones, iPads, and iPods. This enables you to enjoy your music, movies, and TV shows on-the-go, ensuring a seamless multimedia experience across your Apple devices.
With its wide range of content options, organizational features, and integration with Apple services, iTunes provides an all-inclusive platform for watching videos and listening to music on your MacBook Pro.
Now that you have a better understanding of iTunes, you can start exploring its vast catalog, creating playlists, and enjoying your favorite multimedia content in a seamless and integrated manner.
Making Video Calls with FaceTime
FaceTime is a popular application on your MacBook Pro that allows you to make high-quality video and audio calls with other Apple users. Whether you want to connect with family, friends, or colleagues, FaceTime provides a convenient and user-friendly platform for staying in touch.
To initiate a FaceTime call, simply open the FaceTime app or use the FaceTime icon on the Dock. Once opened, you’ll see a familiar interface that displays your recent calls and a search bar at the top, allowing you to search for specific contacts.
To make a video call, select a contact from the list or use the search bar to find the person you want to call. Then, click on the video call button next to their name. If the person is using an iPhone or iPad, they will receive an incoming call notification on their device.
During a FaceTime call, you can adjust settings to optimize your experience. You can switch between the front and rear cameras by clicking on the camera flip button. You can also mute or unmute your microphone, adjust the call volume, and enable or disable the “Use Wide Screen” option.
FaceTime also offers a Picture-in-Picture feature, which allows you to continue using other applications while having a FaceTime call in a smaller window on your screen. This helps you multitask and keeps you connected without interrupting your other activities.
If you prefer to have an audio-only call, you can simply click on the audio call button when selecting a contact. This is useful when you don’t have access to a stable internet connection or when you want to conserve data usage.
FaceTime is not restricted to one-on-one calls – you can also have group video calls with up to 32 participants. To start a group FaceTime call, open the FaceTime app, click on the “+” button, and select the contacts you want to include in the call. This is a convenient way to connect with multiple people at once, whether it’s for personal or professional purposes.
FaceTime is an end-to-end encrypted service, ensuring that your calls remain private and secure. This means that only you and the participants can hear and see the content of your calls, providing peace of mind for your conversations.
Moreover, FaceTime integrates seamlessly with other Apple devices. You can initiate calls from your MacBook Pro to other Apple devices, such as iPhones, iPads, and even iPod touches. FaceTime calls can also be picked up on other devices as long as you are signed in with the same Apple ID and have FaceTime enabled.
With its intuitive interface, high-quality video and audio, and seamless integration across Apple devices, FaceTime is an excellent tool for staying connected and having face-to-face conversations with loved ones or colleagues no matter where they are.
Now that you have a better understanding of FaceTime, you can start making video and audio calls, whether it’s for catching up with friends or conducting virtual meetings.
Troubleshooting Common Issues
While the MacBook Pro is a reliable and robust device, there may be times when you encounter common issues. Fortunately, many of these issues can be resolved through simple troubleshooting techniques. Here are a few common problems and troubleshooting steps to help you overcome them:
1. Slow performance: If your MacBook Pro is running slowly, try closing unused applications, restarting your device, and ensuring you have enough available storage space. You can also check for system updates by clicking on the Apple menu > System Preferences > Software Update.
2. Wi-Fi connectivity issues: If you’re experiencing Wi-Fi connectivity problems, try turning Wi-Fi off and on again using the Wi-Fi icon in the menu bar. You can also try resetting your network settings by going to System Preferences > Network > Wi-Fi > Advanced > TCP/IP > Renew DHCP Lease.
3. Battery not charging: If your MacBook Pro is not charging, check the power adapter connection and ensure it is properly plugged into a power source. You can also try resetting the SMC (System Management Controller) by shutting down your MacBook Pro, attaching the power adapter, and then holding the Shift + Control + Option keys along with the power button for 10 seconds.
4. Frozen or unresponsive applications: When an application becomes unresponsive, try force quitting the application by clicking on the Apple menu > Force Quit (or using the Command + Option + Esc keyboard shortcut). If a specific application consistently freezes, try updating the application or reinstalling it.
5. Bluetooth connectivity problems: If you’re having trouble with Bluetooth devices, ensure that they are turned on and properly paired with your MacBook Pro. You can also try resetting the Bluetooth module by going to System Preferences > Bluetooth > Advanced > Debug > Reset the Bluetooth module.
6. External device connectivity: If you’re having issues connecting external devices like printers or external hard drives, ensure that the devices are properly connected and powered on. You can also try restarting your MacBook Pro and reconnecting the devices.
If the troubleshooting steps mentioned above do not resolve the issues, it may be helpful to consult Apple Support or visit an Apple Store for further assistance. They can provide guidance and diagnose any underlying hardware or software issues that may be causing the problem.
Remember, troubleshooting common issues is a normal part of the computing experience, and with some basic troubleshooting techniques, you can often resolve problems and keep your MacBook Pro running smoothly.
Tips and Tricks for Using Your MacBook Pro
Your MacBook Pro is a powerful and versatile device that offers numerous features and capabilities. Here are some tips and tricks to help you get the most out of your MacBook Pro:
1. Customize your trackpad gestures: In System Preferences, you can customize the gestures on your trackpad to perform actions like zooming, scrolling, and launching Mission Control. Adjust these settings to match your preferences and improve your productivity.
2. Utilize keyboard shortcuts: Familiarize yourself with common keyboard shortcuts to perform tasks more efficiently. For example, Command + Spacebar opens Spotlight search, Command + C copies selected text, and Command + V pastes copied content.
3. Use the Spotlight search feature: The Spotlight search bar, accessible by clicking on the magnifying glass icon on the top-right corner of the screen, allows you to quickly search for files, launch applications, perform calculations, access dictionary definitions, and more.
4. Take advantage of iCloud storage: iCloud offers storage space to store your files, photos, and documents securely. By enabling iCloud Drive, you can access and sync your files across all your Apple devices, ensuring seamless access and backup of your important data.
5. Enable Time Machine backups: Time Machine is a built-in backup feature that automatically backs up your entire MacBook Pro, including files, applications, and settings. Connect an external hard drive and configure Time Machine to ensure your data is consistently backed up.
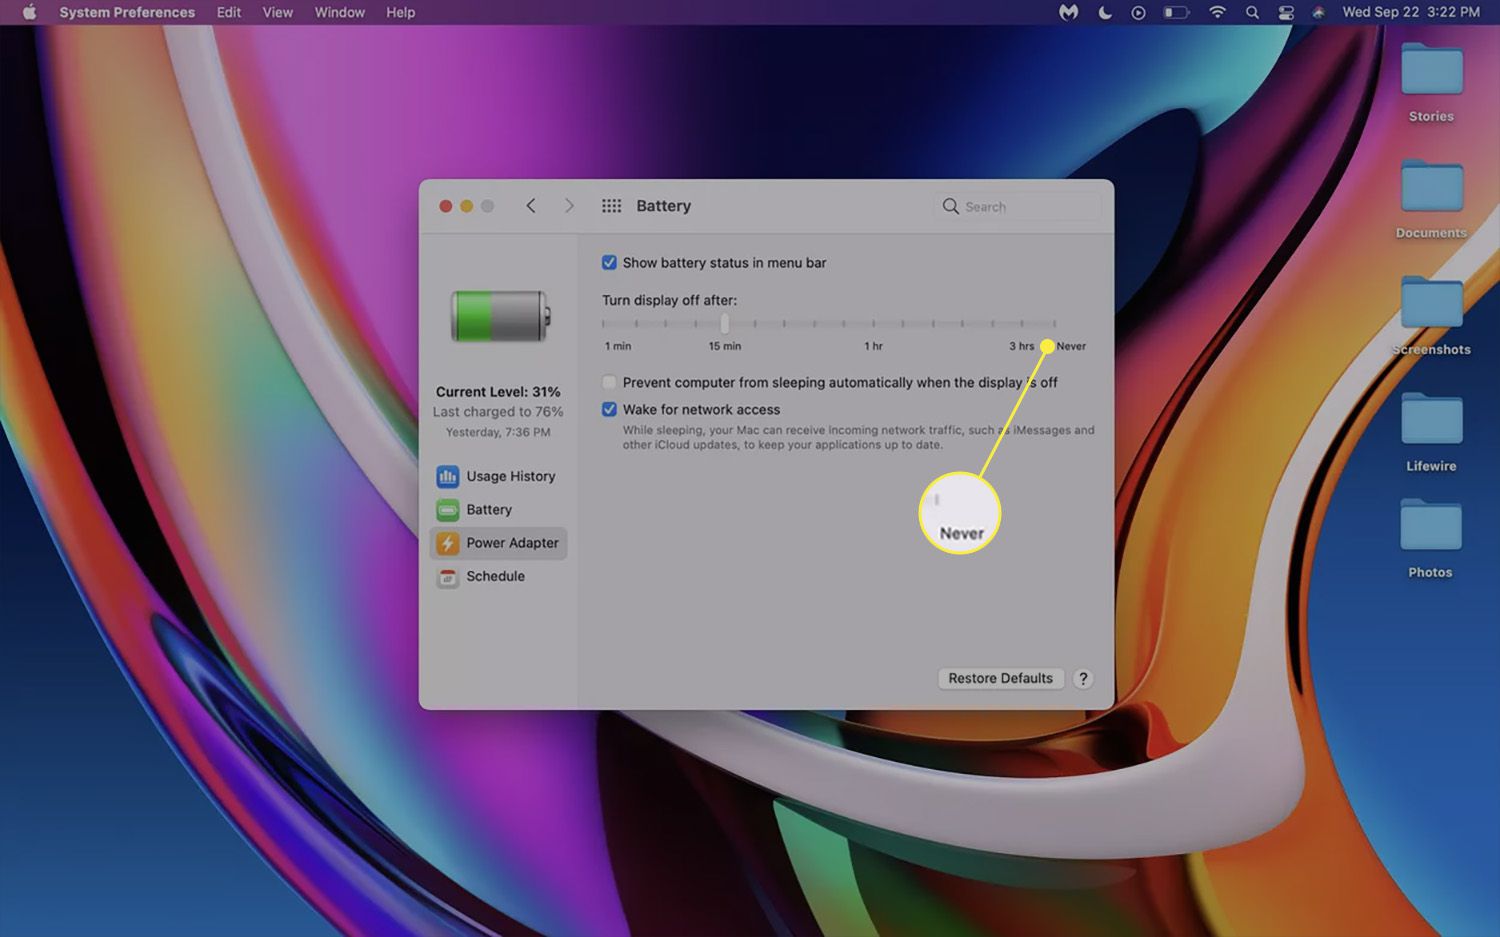
6. Maximize battery life: To optimize battery life, adjust your display brightness to an appropriate level, close unused applications, and disable unnecessary background processes. You can also view which applications are consuming the most power in the Battery section of System Preferences.
7. Enable Night Shift: Night Shift reduces the blue light emitted by your MacBook Pro’s display, making it easier on your eyes, especially during evening hours. You can enable Night Shift in System Preferences > Displays > Night Shift.
8. Embrace the multitouch gestures: Take advantage of multitouch gestures on your trackpad to navigate your MacBook Pro more efficiently. For example, use the three-finger swipe to switch between full-screen apps or the four-finger swipe to access Mission Control.
9. Secure your MacBook Pro with Touch ID: If your MacBook Pro is equipped with Touch ID, utilize this feature to secure your device and login to various accounts. You can add and manage fingerprints in the Touch ID section of System Preferences.
10. Explore the Mac App Store: Visit the Mac App Store to discover a wide range of applications designed specifically for your MacBook Pro. From productivity tools to creative software, the Mac App Store offers a wealth of options to enhance your computing experience.
By applying these tips and tricks, you can enhance your productivity, streamline your workflows, and make the most of your MacBook Pro’s capabilities. Explore and experiment with the features to customize your experience and optimize your usage.
Conclusion
Congratulations! You have now learned valuable tips and gained a deeper understanding of how to make the most out of your MacBook Pro. From getting started, navigating the desktop and Finder, using applications, connecting to the internet, and managing various aspects of your device, you are now equipped with the knowledge to confidently explore and utilize your MacBook Pro’s full potential.
Remember, customization is key. Take advantage of the settings and preferences available to you to tailor your MacBook Pro to your preferences and workflow. Whether it’s adjusting trackpad gestures, customizing system settings, or personalizing the appearance of your device, making it your own will optimize your user experience.
Troubleshooting common issues is an inevitable part of owning any device, but now you have the tools to tackle these obstacles head-on. By following the suggested troubleshooting steps, you can overcome challenges with ease and keep your MacBook Pro running smoothly.
Lastly, explore the vast range of applications available for your MacBook Pro. From productive tools to creative software, the App Store provides a wealth of options to enhance your workflow and enable you to unleash your creative potential.
By incorporating the tips and tricks, you can become a proficient MacBook Pro user, maximizing productivity, creativity, and connectivity. Continue to explore and experiment, as each individual’s usage differs, and find what works best for you.
Enjoy your journey with your MacBook Pro, and may it serve as a reliable and innovative companion in your personal and professional endeavors.