Introduction
Welcome to the world of technology and personal entertainment! Tablets running on the Android operating system have become increasingly popular due to their versatility and user-friendly interface. One of the many benefits of owning an Android tablet is the ability to enjoy music on the go. Whether you want to listen to your favorite tracks, create playlists, or explore new music, adding music to your Android tablet is a straightforward process.
In this article, we will guide you through the various methods of adding music to your tablet. We will explore options such as transferring music from your computer, accessing your favorite streaming services, using cloud storage to sync your music library, purchasing and downloading music, and creating customized playlists. Additionally, we will address common troubleshooting issues that may arise during the process.
Before diving into the different methods, it’s essential to note that the steps may vary slightly depending on the specific model of your Android tablet and the version of the Android operating system it runs. However, the general principles and processes remain the same.
So, whether you’re a music enthusiast, an audiophile, or simply looking to enjoy some tunes during your commute or workout, let’s explore the various ways to add music to your Android tablet. Get ready to enhance your tablet experience with the power of music!
Choosing a Music Player App
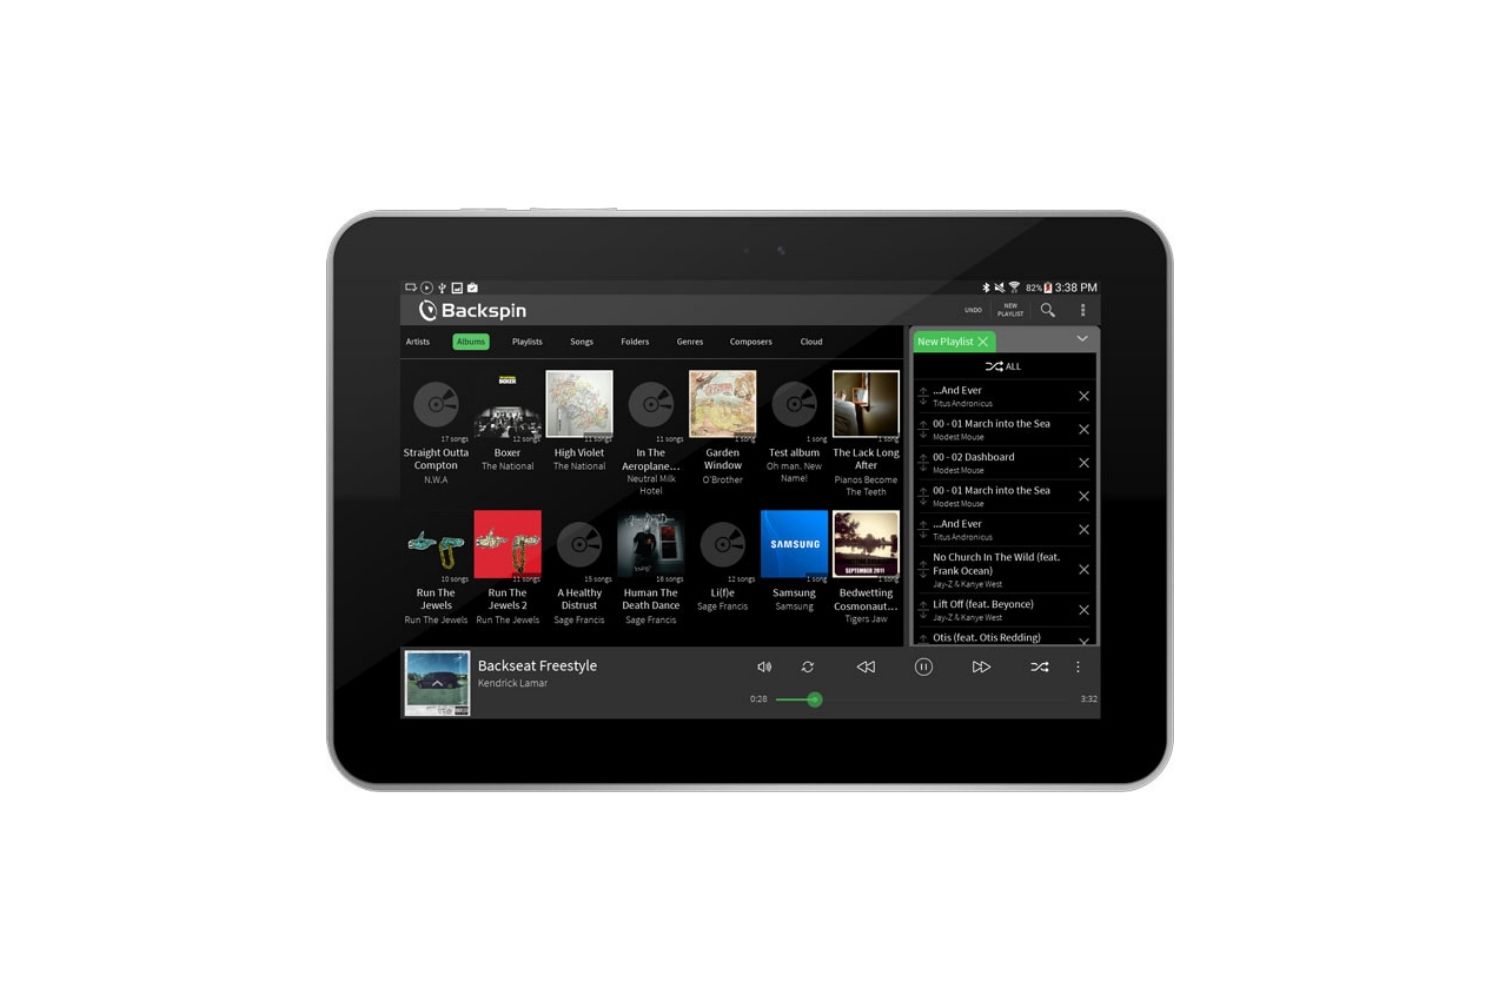
Before diving into adding music to your Android tablet, it’s important to choose a reliable and feature-rich music player app. While the default music player app provided by Android is decent, there are many third-party options available that offer enhanced functionality and a more enjoyable listening experience.
When selecting a music player app, consider the following factors:
- User Interface: Look for a music player with a clean and intuitive user interface that allows for easy navigation and control of your music library.
- Audio Quality: Ensure that the music player app supports high-quality audio formats and provides a range of equalizer settings to customize the sound to your preference.
- Library Organization: Choose a music player app that allows you to organize your music library efficiently, whether through tags, playlists, or folder-based organization.
- Streaming Support: If you frequently stream music from online platforms, opt for a music player app that integrates seamlessly with popular streaming services such as Spotify, Apple Music, or Google Play Music.
- Offline Playback: Consider whether the music player app allows you to download music for offline playback, which can be beneficial when you’re traveling or in areas with limited internet connectivity.
Here are a few popular music player apps for Android:
- Poweramp: Known for its robust audio customization options and extensive file format support, Poweramp is a popular choice among music enthusiasts.
- BlackPlayer: With its sleek and minimalist design, BlackPlayer offers a range of customization options and supports various audio formats.
- PlayerPro: PlayerPro offers a host of features, including a customizable interface, support for multiple audio formats, and integration with streaming services.
- Google Play Music: Google’s native music player app, Google Play Music, provides access to a vast library of songs and allows for seamless integration with your online music collection.
Remember, the choice of music player app ultimately depends on your personal preferences and requirements. Take some time to explore different options, read reviews, and consider the features that matter most to you. By selecting the ideal music player app, you’ll significantly enhance your music listening experience on your Android tablet.
Transferring Music from Computer to Tablet
If you have a collection of music on your computer that you want to transfer to your Android tablet, there are a couple of methods you can use. Both methods require a USB cable to connect your tablet to your computer.
Method 1: Manual Transfer
1. Connect your Android tablet to your computer using a USB cable.
2. On your computer, open the folder where your music is stored.
3. Select the music files or folders you want to transfer.
4. Right-click on the selected files and click “Copy” or press Ctrl + C.
5. Open the folder on your tablet where you want to transfer the music.
6. Right-click in the folder and click “Paste” or press Ctrl + V to transfer the music files.
7. Wait for the transfer to complete, and then safely disconnect your tablet from the computer.
Method 2: Using Android File Transfer
1. Connect your Android tablet to your computer using a USB cable.
2. On your computer, open a web browser and search for “Android File Transfer.”
3. Visit the official Android File Transfer website and download the application.
4. Install and launch Android File Transfer on your computer.
5. On your Android tablet, swipe down from the top of the screen to access the notification panel.
6. Tap on the USB connection notification and select “File transfer” or “MTP” mode.
7. On your computer, the Android File Transfer application should automatically open and display the files and folders on your tablet.
8. Navigate to the folder on your computer where your music is stored.
9. Select the music files or folders you want to transfer.
10. Drag and drop the selected files to the desired folder on your tablet to initiate the transfer.
11. Wait for the transfer to complete, and then safely disconnect your tablet from the computer.
Note: If you’re using a Mac computer, make sure to install the Android File Transfer application before proceeding with the steps above.
By following these methods, you can easily transfer your music collection from your computer to your Android tablet. Once the transfer is complete, you’ll be able to enjoy your favorite songs and albums directly from your tablet, wherever you go.
Transferring Music from Streaming Services
If you prefer streaming music rather than storing it locally on your Android tablet, you can easily access your favorite songs from popular streaming services like Spotify, Apple Music, or Google Play Music. Here’s how to transfer music from streaming services:
Method 1: Offline Listening
One of the advantages of using streaming services is the ability to download music for offline listening. Most streaming platforms offer an offline mode that allows you to save songs and playlists directly to your Android tablet. Here’s how:
1. Launch the streaming service app on your tablet and sign in to your account.
2. Browse or search for the music you want to download.
3. Look for the option to download the song, album, or playlist.
4. Tap the download icon next to the music you want to save offline.
5. Wait for the download to complete. The downloaded music will be available for offline playback within the streaming app.
6. Access the downloaded music by going to the “Downloaded” or “Offline” section of the streaming app.
Method 2: Casting
If you have a casting device such as a Chromecast or smart TV, you can stream music from your streaming service app directly to your connected devices. Here’s how to do it:
1. Ensure that your Android tablet and casting device are connected to the same Wi-Fi network.
2. Open the streaming service app on your tablet and play the desired music.
3. Look for the casting icon (usually a rectangle with a Wi-Fi signal) within the app.
4. Tap the casting icon and select the device you want to cast to from the list of available devices.
5. The music will start playing on the selected casting device, while your tablet acts as the remote control.
6. Use the controls within the streaming app to pause, play, skip tracks, or adjust the volume.
Method 3: Bluetooth Streaming
If your Android tablet supports Bluetooth connectivity, you can pair it with a Bluetooth speaker or headphones to stream music wirelessly. Here’s how to do it:
1. Turn on Bluetooth on your Android tablet and the Bluetooth speaker or headphones.
2. Open the streaming service app on your tablet and play the desired music.
3. On your tablet, go to the Bluetooth settings and scan for nearby devices.
4. Select the Bluetooth speaker or headphones from the list of available devices.
5. Wait for the devices to connect and start streaming music wirelessly.
6. Use the controls within the streaming app or the Bluetooth device to control the playback.
By utilizing these methods, you can easily transfer and enjoy music from streaming services on your Android tablet. Whether you choose to download music for offline listening, cast it to other devices, or stream it via Bluetooth, you’ll have access to a vast library of songs right at your fingertips.
Syncing Music Using Cloud Storage
If you prefer to have your music collection accessible across multiple devices, syncing your music using cloud storage is a convenient option. Cloud storage services like Google Drive, Dropbox, or OneDrive allow you to store your music files online and access them from your Android tablet. Here’s how to sync music using cloud storage:
Method 1: Upload and Download Files
1. Sign in to your cloud storage service account on your computer.
2. Create a new folder specifically for your music files, or use an existing folder.
3. Copy and paste or drag and drop your music files into the designated music folder.
4. Wait for the files to upload to the cloud storage server.
5. On your Android tablet, download the cloud storage app from the Google Play Store (e.g., Google Drive, Dropbox).
6. Install and launch the app on your tablet, then sign in to your cloud storage account.
7. Navigate to the folder where you uploaded your music files.
8. Select the music files you want to sync to your tablet.
9. Tap on the download or sync button within the cloud storage app to initiate the download process.
10. Wait for the download to complete. The music files will now be available on your tablet for offline playback.
Method 2: Automatic Sync
Some cloud storage services offer automatic syncing capabilities, allowing changes made to files on one device to automatically reflect on other connected devices. Here’s how to set up automatic syncing:
1. Sign in to your cloud storage service account on your computer.
2. Ensure that the cloud storage service app is installed and logged in on your Android tablet.
3. On your computer, navigate to the folder where your music files are stored.
4. Make any changes or additions to the music files or folders.
5. Save the changes, and the cloud storage service will automatically sync the updated files to the cloud.
6. On your Android tablet, open the cloud storage app and navigate to the music folder.
7. The changes made on your computer should be automatically reflected in the cloud storage app on your tablet.
By using cloud storage to sync your music files, you can easily access your collection from any device with an internet connection. Whether you choose to manually upload and download files or utilize automatic syncing, cloud storage provides a convenient and efficient way to manage and sync your music across devices.
Purchasing and Downloading Music
If you want to expand your music library with the latest releases or specific songs, purchasing and downloading music is an excellent option. There are various online platforms where you can buy and download music directly to your Android tablet. Here’s how to purchase and download music:
Method 1: Google Play Store
1. Open the Google Play Store app on your Android tablet.
2. Tap on the “Music” tab or search for the specific music you want to purchase.
3. Browse through the available options or use the search feature to find the music you’re looking for.
4. Once you’ve found the desired music, tap on it to view the details, including the price.
5. Tap the “Buy” button or the price listing, and follow the prompts to complete the purchase.
6. After the purchase is completed, the music will automatically download and be available for playback within the Google Play Music app.
Method 2: Online Music Stores
If you prefer specific online music stores, you can purchase music from platforms such as Amazon Music, iTunes, or Bandcamp. Here’s how:
1. Open your preferred web browser on your Android tablet.
2. Visit the website of the online music store you wish to buy from (e.g., www.amazon.com, www.apple.com/itunes).
3. Search for the music you want to purchase using the provided search bar or browse through the available categories.
4. Once you’ve found the music, click on it to view the details and pricing.
5. Follow the prompts to add the music to your cart and proceed to checkout.
6. Complete the purchase by providing the necessary payment information and confirming the transaction.
7. After the purchase, download the music files to your Android tablet according to the instructions provided by the online music store.
Once you have purchased and downloaded music to your Android tablet, you can enjoy it at any time, even without an internet connection. These methods allow you to expand your music collection with your favorite songs and albums, ensuring you have a diverse selection of music to listen to wherever you go.
Creating and Organizing Music Playlists
Creating and organizing music playlists is an excellent way to curate your music collection and cater to specific moods, occasions, or personal preferences. With the right music player app, you can easily create and manage playlists on your Android tablet. Here’s how to do it:
Method 1: Using the Default Music Player App
1. Open the default music player app on your Android tablet.
2. Navigate to your music library or the section where your songs are stored.
3. Browse through the songs and select the ones you want to add to your playlist.
4. Long-press on a song to activate the selection mode, or look for the option to select multiple songs.
5. Once you have selected the desired songs, tap on the “Add to Playlist” option or the playlist icon.
6. Choose to add the selected songs to an existing playlist or create a new one.
7. Give your playlist a name that accurately represents its content or theme.
8. Tap on the “Save” or “Done” button to finalize the creation of your playlist.
9. To access and play your playlist, go to the playlist section in the music player app and select the desired playlist.
Method 2: Third-Party Music Player Apps
If the default music player app on your Android tablet lacks advanced playlist management features, consider using third-party apps designed specifically for this purpose. Here’s how to create and organize playlists using a third-party music player app:
1. Install and open a trusted third-party music player app from the Google Play Store (e.g., Poweramp, PlayerPro, BlackPlayer).
2. Explore the features and settings within the app to familiarize yourself with the playlist creation process.
3. Once you’re ready, navigate to your music library or the section where your songs are located.
4. Select the songs you want to add to your playlist using long-press or multi-select options.
5. Look for the “Add to Playlist” or playlist icon within the app’s interface.
6. Choose to add the selected songs to an existing playlist or create a new playlist.
7. Provide a name for your playlist and save it.
8. Access your created playlists within the app and enjoy listening to your curated collections.
By creating and organizing music playlists, you can easily customize your listening experience and have quick access to your favorite songs. Whether you use the default music player app or opt for a third-party alternative, enjoy the freedom of curating your own musical journey on your Android tablet.
Troubleshooting Common Issues
While adding music to your Android tablet is usually a smooth process, you may encounter some common issues along the way. Here are a few troubleshooting tips to help you resolve these issues:
Issue 1: Music Not Showing Up in Music Player
If you have transferred or downloaded music to your tablet, but it’s not appearing in your music player app:
– Make sure the music files are in a supported format (e.g., MP3, AAC) that the music player app can recognize.
– Check if the music files are stored in the correct folder or directory that the music player app scans for music.
– Refresh the music library by restarting the music player app or rescanning for music within the app’s settings.
Issue 2: Playback Issues or Glitches
If you experience playback issues or glitches when playing music on your Android tablet:
– Make sure you have a stable internet connection if you’re streaming music from online services.
– Check the audio settings on your tablet and adjust the equalizer or sound enhancements if needed.
– Clear the cache and data of the music player app to resolve any temporary issues.
– Update the music player app to the latest version to benefit from bug fixes and performance improvements.
Issue 3: Syncing Errors with Cloud Storage
If you encounter errors or syncing issues when using cloud storage to sync your music:
– Ensure that you have a stable and reliable internet connection when syncing your music files.
– Check the storage capacity on your cloud storage account to ensure you have enough space for your music files.
– Verify that your cloud storage app is up to date and consider reinstalling it if the issue persists.
Issue 4: Incompatibility with Music Player App
If you find that certain music files are incompatible or not playing correctly with your music player app:
– Try using a different music player app that supports a wider range of file formats.
– Convert the incompatible music files to a supported format using a file conversion software or online converter.
– Update your music player app to the latest version, as new updates may include support for additional file formats.
If you continue to experience issues with adding, transferring, or playing music on your Android tablet, consider seeking assistance from the support team of your music player app, the manufacturer of your tablet, or online forums where fellow users may have encountered similar problems.
By troubleshooting common issues, you can ensure a seamless and enjoyable music experience on your Android tablet.
Conclusion
Adding music to your Android tablet opens up a world of possibilities for music enthusiasts and casual listeners alike. Whether you prefer to transfer music from your computer, stream from online services, sync using cloud storage, or purchase and download music, there are numerous methods to suit your preferences.
Choosing a reliable music player app that offers a user-friendly interface, excellent audio quality, and efficient organization of your music library is key to enhancing your music experience on your Android tablet. Consider exploring different options and reading reviews to find the app that best fits your needs.
Transferring music from your computer to your tablet allows you to enjoy your personal collection wherever you go. By following the manual transfer method or using apps like Android File Transfer, you can easily move music files and create a portable music library on your tablet.
If you prefer streaming music, there are options to download songs for offline listening or cast music to other devices. Streaming platforms like Spotify, Apple Music, or Google Play Music offer features that cater to various preferences and situations, ensuring you never have to be without your favorite tunes.
Synchronization through cloud storage services provides a way to access your music library across multiple devices. By uploading music files or utilizing automatic syncing, you can easily maintain a consistent music collection on your Android tablet.
Purchasing and downloading music allows you to expand your collection and have instant access to the latest releases. Through platforms like the Google Play Store or online music stores, you can easily browse, buy, and download music files directly to your tablet, ensuring you always have a diverse range of music at your fingertips.
Creating and organizing music playlists allows you to personalize your listening experience. Whether you use the default music player app or third-party alternatives, curating playlists with your favorite songs in different genres or moods can enhance your music enjoyment and provide effortless access to the music that resonates with you.
Lastly, troubleshooting common issues can help you overcome any obstacles that may arise during the process of adding, transferring, or playing music on your Android tablet. By addressing problems like music not appearing in your player, playback issues, syncing errors, or incompatibility with the music player app, you can ensure a seamless and uninterrupted music experience.
With these various methods and tips, you can fully harness the capabilities of your Android tablet and create a personalized music hub that caters to your unique preferences. So, crank up the volume, immerse yourself in your favorite tunes, and enjoy the incredible music experience that your Android tablet offers!