Introduction
Asana is a popular project management software that helps teams stay organized and collaborate effectively. While it offers a wide range of features and functionalities, one powerful tool that sets it apart is the ability to add custom fields to tasks. Custom fields allow users to tailor their project management experience by adding specific details and parameters to tasks.
Whether you’re tracking important deadlines, assigning priority levels, or managing specific project requirements, custom fields in Asana provide the flexibility and customization needed to meet your team’s unique needs.
In this article, we will explore how to add custom fields in Asana and illustrate how they can enhance your project management workflow. By the end of this guide, you’ll have a comprehensive understanding of how custom fields work in Asana and be equipped to utilize them effectively in your projects.
So, let’s dive in and discover the world of custom fields in Asana, and how they can help you streamline your tasks and collaborate more efficiently within your team.
What are custom fields in Asana?
Custom fields in Asana are additional data fields that can be added to tasks within a project. They allow users to define and track specific information relevant to their workflow. These custom fields can be customized to capture various types of data, such as dates, text, dropdown options, and more.
The purpose of custom fields is to provide a way to add context and structure to tasks, beyond what is available with default fields like due dates and assignees. With custom fields, you can create your own set of attributes that align with your project’s requirements, making it easier to organize, categorize, and filter tasks based on specific criteria.
For example, let’s say you are managing a software development project. You can add custom fields to track the status of a task, such as “In Progress,” “Pending Review,” or “Completed.” This allows team members to easily see the current stage of each task at a glance, without needing to dig into the task details.
Another use case for custom fields is tracking priority levels. You can create a custom field with options like “Low,” “Medium,” and “High,” and assign a priority level to each task. This ensures that everyone on the team is aware of the relative importance of each task and can prioritize their work accordingly.
Custom fields in Asana offer a high level of flexibility and scalability. You can add as many custom fields as needed to capture all the relevant data for your project. This customization empowers you to adapt Asana to your specific workflow and project management needs, enhancing collaboration and productivity within your team.
Now that we have a good understanding of what custom fields in Asana are, let’s explore why you should consider using them in your projects.
Why use custom fields in Asana?
Custom fields in Asana offer numerous benefits that can greatly enhance your project management experience. Here are some compelling reasons why you should consider using custom fields in Asana:
1. Enhanced task organization: Custom fields allow you to categorize and label tasks based on specific attributes, such as status, priority, or department. This provides a clear visual overview of your project and helps you stay organized.
2. Improved task tracking: By adding custom fields to tasks, you can easily track important details and progress. For example, you can create a custom field to track the percentage of completion or the estimated time required for each task.
3. Greater flexibility: Asana’s default fields may not capture all the information you need for your tasks. Custom fields give you the freedom to define and capture data that is relevant to your specific workflow, ensuring that you have the flexibility and control you require.
4. Streamlined collaboration: Custom fields provide a standardized way to communicate important information about tasks to your team. You can use custom fields to indicate task dependencies, assign owners, or specify required resources, making it easier for everyone to collaborate effectively.
5. Improved reporting and analytics: Custom fields allow you to filter and sort data based on specific criteria, enabling you to generate meaningful reports and gain valuable insights. This can help you identify trends, track progress, and make data-driven decisions.
6. Tailored to your specific needs: Every project is unique, and custom fields allow you to customize Asana to meet your specific requirements. You have the flexibility to create custom fields that align with your project’s goals, processes, and terminology.
7. Scalable and adaptable: As your project evolves, you may need to add new fields or modify existing ones. Custom fields in Asana are highly adaptable, allowing you to make changes as needed without disrupting your workflow.
With these benefits in mind, it’s clear that utilizing custom fields in Asana can greatly enhance your project management effectiveness. Now let’s move on to the step-by-step guide on how to add custom fields in Asana.
Step by Step Guide to Adding Custom Fields in Asana
Adding custom fields in Asana is a straightforward process that can be done within the project settings. Here’s a step-by-step guide on how to add custom fields:
Step 1: Access the project settings: Open the desired project in Asana and click on the three-dot menu icon in the project header. From the dropdown menu, select “Project settings.”
Step 2: Select “Custom fields”: In the project settings, navigate to the “Fields” tab. Here, you will find the option to manage your custom fields. Click on “Add field” to begin creating a new custom field.
Step 3: Choose the field type: Asana offers several field types to choose from, including text, number, dropdown, and date field types. Select the appropriate field type that suits your needs.
Step 4: Set the field details: Give your custom field a name that accurately reflects the data you intend to capture. For example, if you are creating a field to track the project stage, you can name it “Project Stage.”
Step 5: Customize field options (if applicable): If you selected a dropdown field type in step 3, you can define the available options for the dropdown. Add the options that are relevant to your project’s needs, such as “To Do,” “In Progress,” and “Completed.”
Step 6: Add the custom field to tasks: Once you have set up the custom field, you can start adding it to tasks within the project. Open a task, click on the “Custom Fields” button on the right-hand side of the task pane, and select the desired custom field.
Step 7: Utilize custom fields for task organization and tracking: With the custom field added to a task, you can now utilize it to organize and track tasks effectively. Assign values to the custom field based on the specific criteria you defined, such as selecting the project stage as “In Progress” or setting the priority level as “High.”
By following these steps, you can easily add custom fields to your Asana projects and customize your task management according to your specific requirements.
Next, let’s explore some tips for using custom fields effectively in Asana.
Step 1: Access the Project Settings
The first step to adding custom fields in Asana is to access the project settings. Here’s how you can do it:
1. Open the desired project: Log in to your Asana account and navigate to the project where you want to add custom fields. You can access your projects from the sidebar on the left-hand side of the Asana interface.
2. Click on the project header: Once you’re inside the project, locate the project header at the top of the page. The project header contains the project name, description, and other related options.
3. Access the three-dot menu icon: Within the project header, you’ll find a small three-dot menu icon. Click on this icon to reveal a dropdown menu with various project-related options.
4. Select “Project settings” from the dropdown menu: In the dropdown menu, scroll down until you find the “Project settings” option. Click on it to access the project settings panel.
5. Explore the project settings: Once you’re in the project settings panel, you’ll find various tabs and options related to configuring your project. Take a moment to familiarize yourself with the different settings you can modify in this section.
Accessing the project settings is the essential first step to adding custom fields in Asana. It allows you to access the customization options available for your project and tailor it to your specific needs.
Next, let’s move on to the next step: selecting “Custom fields” within the project settings.
Step 2: Select “Custom fields”
Once you have accessed the project settings in Asana, the next step is to select the “Custom fields” option. Here’s how you can do it:
1. Navigate to the “Fields” tab: Within the project settings panel, you will find different tabs to configure various aspects of your project. Locate and click on the “Fields” tab. This tab is where you can manage and add custom fields to your project.
2. Click on “Add field”: In the “Fields” tab, you will see a list of existing custom fields for your project, if any. To add a new custom field, click on the “Add field” button. This will open a dialog box where you can define the details of your custom field.
3. Define the details of the custom field: In the dialog box, you will be prompted to provide specific information about the custom field. This includes the name of the field, the field type, and any custom options (if applicable).
4. Name the custom field: Give your custom field a descriptive name that reflects the purpose or data it represents. For example, if you are creating a custom field to track task priority, you can name it “Priority” or “Task Priority.”
5. Select the field type: Asana offers various field types, such as text, number, dropdown, and date. Choose the field type that best suits the data you want to capture. For example, if you want to track the completion percentage of a task, you can select the “Number” field type.
6. Customize field options (if applicable): If you selected the dropdown field type in the previous step, you can define the available options for the dropdown. Add the options that are relevant to your project’s needs, such as different status options like “To Do,” “In Progress,” and “Completed.”
7. Save the custom field: After specifying all the necessary details, click on the “Save” or “Add” button to create the custom field. The custom field will now be available for use in your project.
By following these steps, you can easily select the “Custom fields” option within the project settings in Asana and create a new custom field. Custom fields allow you to capture specific data and add more context to your project’s tasks, enhancing your project management and organization process.
Next, we will move on to step 3: choosing the field type for your custom field.
Step 3: Choose the Field Type
After selecting the “Custom fields” option within the project settings in Asana, the next step is to choose the field type for your custom field. Here’s how you can do it:
1. Determine the data you want to capture: Before choosing the field type, consider the specific information you want to track or capture with your custom field. This will help you determine the most appropriate field type for your needs.
2. Review the available field types: Asana offers several field types to choose from, including text, number, dropdown, and date. Each field type has its own purpose and functionality, so it’s important to understand how they work.
3. Select the text field type: The text field type allows you to capture alphanumeric text data. It’s suitable for general-purpose custom fields where you need to provide descriptive information or notes.
4. Choose the number field type: The number field type allows you to capture numerical data. It’s useful when you need to track quantities or numerical values within your tasks, such as budget, time estimates, or task priority.
5. Use the dropdown field type: The dropdown field type allows you to create a selection of options from which users can choose. It’s ideal for scenarios where you want to provide predefined choices, such as task status, priority levels, or project stages.
6. Consider the date field type: The date field type enables you to capture specific dates or date ranges. It’s helpful when you need to track deadlines, milestones, or other time-related information.
7. Explore advanced field types: In addition to the basic field types mentioned above, Asana also offers advanced field types such as checkbox, attachment, and progress. These field types provide specialized functionality and can be tailored to specific use cases.
8. Choose the most appropriate field type: Based on the data you want to capture, select the field type that best suits your needs. Consider factors like the type of information, how it will be used, and the usability for your team.
By following these steps, you can effectively choose the field type for your custom field in Asana. The field type selection is important as it determines the nature of the data you will capture and how it will be utilized in your project tasks.
Next, we will move on to step 4: setting the field details for your custom field.
Step 4: Set the Field Details
Once you have chosen the field type for your custom field in Asana, the next step is to set the field details. Here’s how you can do it:
1. Give your custom field a clear and descriptive name: The name of your custom field should accurately represent the data it will capture. For example, if you are creating a custom field to track task priority, you can name it “Priority” or “Task Priority”. This will ensure that the field is easily understandable by team members.
2. Provide additional instructions (if necessary): If there are any specific instructions or guidelines for filling out the custom field, you can include them in the field details. This can help ensure consistency and understanding when team members interact with the custom field.
3. Determine the format or structure of the field (if applicable): Some field types, such as date or number, may require you to specify a specific format or structure. For example, if you are using a date field type, you can specify whether the date should be entered in a specific date format like MM/DD/YYYY or DD/MM/YYYY.
4. Consider making the custom field mandatory (if necessary): Depending on the importance or criticality of the data you are capturing, you might want to make the custom field mandatory. This ensures that team members cannot proceed without filling in the required information for the field.
5. Keep the field details concise and clear: When setting the field details, make sure to provide all the necessary information in a clear and concise manner. Avoid unnecessary or confusing instructions to ensure that team members understand how to use the custom field effectively.
6. Review and save the field details: Before finalizing the field details, take a moment to review and verify that all the information is accurately set up. Once you’re satisfied, save the field details to complete the process.
By following these steps, you can effectively set the field details for your custom field in Asana. Providing clear and accurate details for your custom field helps ensure that team members understand what information is expected and how to use the field appropriately.
Next, we will move on to step 5: customizing field options (if applicable) for your custom field in Asana.
Step 5: Customize Field Options (If Applicable)
After setting the field details for your custom field in Asana, the next step is to customize field options, if applicable. This step is relevant if you have chosen the dropdown field type or any other field type that offers customizable options. Here’s how you can customize field options:
1. Access the field options: Once you have set the field details, you will typically find an option to customize the field options. Click on this option to proceed.
2. Define the available options: For a dropdown field type, you can define the available options that users can choose from when filling out the custom field. Add the options that are relevant to your project or the specific purpose of the field.
3. Ensure clarity and relevance: When defining the options, make sure they are clear and relevant to the field and its purpose. Use descriptive labels that accurately represent the nature of the data being captured. This will help team members make the appropriate selection for the field.
4. Add, edit, or remove options: Depending on your requirements, you can add new options, edit existing options, or remove options that are no longer needed. This flexibility allows you to modify the field options as your project progresses or your needs change.
5. Set a default option (if desired): If there is a commonly used or default option for the field, you can set it as the default option. This saves time for users and ensures consistency when filling out the custom field.
6. Save the customized field options: Once you have customized the field options, make sure to save your changes. This ensures that the updated options are available for team members to select when using the custom field.
By following these steps, you can easily customize field options for your custom field in Asana. This level of customization allows you to tailor the field options to your project’s specific requirements and enables team members to provide accurate and relevant information.
Next, we will move on to step 6: adding the custom field to tasks in Asana.
Step 6: Add the Custom Field to Tasks
After creating a custom field and customizing its options, the next step in Asana is to add the custom field to tasks. Here’s how you can do it:
1. Open the task: Begin by opening the task where you want to add the custom field. This can be an existing task or a new task that you create.
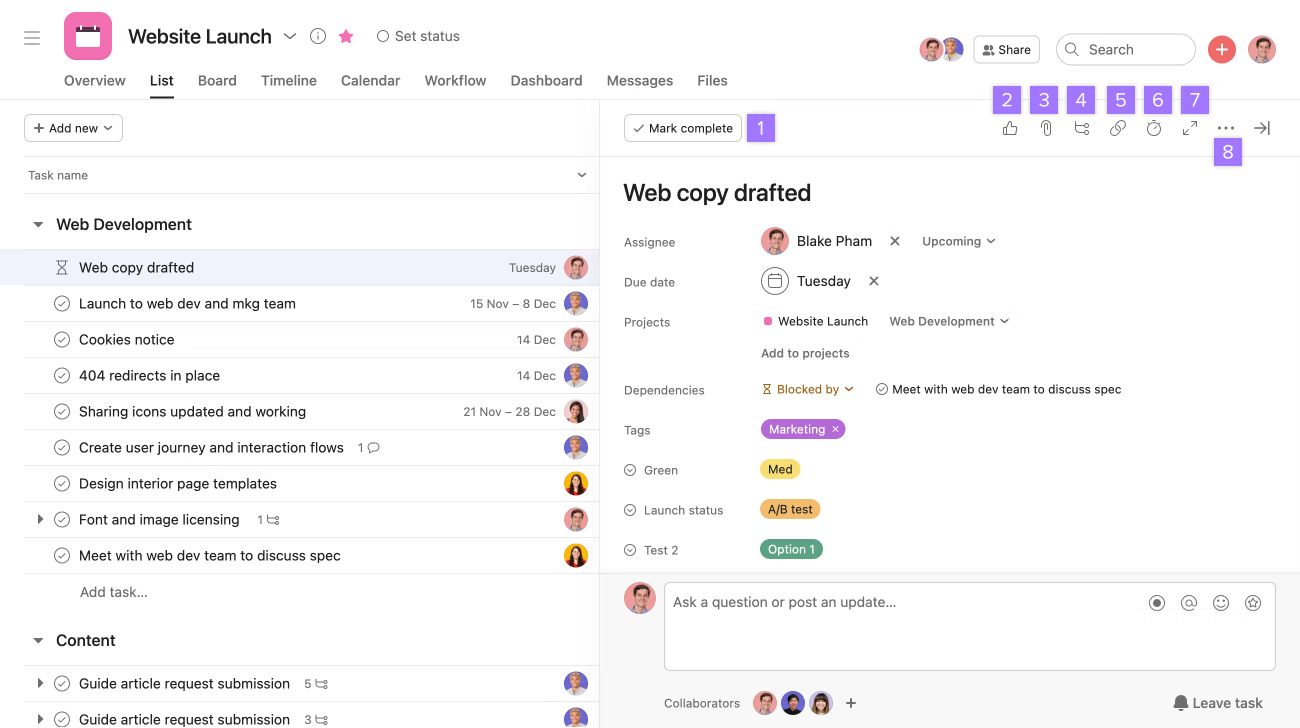
2. Locate the “Custom Fields” button: On the right-hand side of the task pane, you’ll find a button labeled “Custom Fields”. Click on this button to display the available custom fields for the task.
3. Select the custom field: From the list of available custom fields, select the custom field that you want to add to the task. This will activate the field and allow you to input or select the relevant data.
4. Provide the desired data: Depending on the field type and its requirements, input or select the appropriate data for the custom field. For example, if you have a dropdown field for task status, choose the relevant option from the dropdown menu.
5. Repeat for other tasks (if applicable): If you have multiple tasks where you want to add the custom field, repeat the process for each task. This will ensure consistent data tracking and organization across your project.
6. Update the custom field data as needed: As tasks progress or require changes, you can update the data in the custom field accordingly. This flexibility allows you to adapt the field to the evolving needs of your project.
7. Save the task: After adding and/or updating the custom field data, make sure to save the task. This ensures that the changes are reflected and recorded within Asana.
By following these steps, you can easily add the custom field to tasks in Asana. This allows you to track and organize specific information related to each task, providing a more detailed and customized view of your project.
Next, we will move on to step 7: utilizing custom fields for task organization and tracking in Asana.
Step 7: Utilize Custom Fields for Task Organization and Tracking
Once you’ve added custom fields to tasks in Asana, it’s time to utilize them for effective task organization and tracking. Here’s how you can make the most out of custom fields:
1. Organize tasks based on custom fields: Use custom fields to categorize and group tasks based on specific attributes. For example, you can use a custom field to label tasks by priority, department, or project stage. This allows you to quickly filter and sort tasks based on these criteria, providing a clear visual overview of your project’s progress.
2. Track and update custom field data: Regularly update the custom field data as tasks progress or requirements change. For instance, if you have a custom field for task status, update it to reflect the current status (e.g., “In Progress,” “On Hold,” or “Complete”). This ensures accurate and up-to-date information regarding the tasks.
3. Filter and search based on custom fields: Utilize the advanced filtering and search capabilities in Asana to narrow down tasks based on custom field values. This allows you to focus on specific subsets of tasks and identify patterns or trends across your project.
4. Generate reports using custom fields: Leverage custom fields to create customized reports and gain valuable insights into your project’s progress. For example, you can generate a report that shows all tasks with a high priority level or tasks assigned to a specific team member. These reports help you track project performance, identify bottlenecks, and make data-driven decisions.
5. Communicate task details using custom fields: Custom fields serve as a standardized way to communicate specific task details to team members. For example, if you have a custom field for required resources, team members can easily see what resources are needed for each task without digging into the task’s details. This promotes efficient collaboration and ensures that everyone has the necessary information at their fingertips.
6. Adapt and evolve custom fields as needed: Review the effectiveness of your custom fields periodically and make adjustments as needed. Project requirements and priorities may change over time, so it’s essential to ensure that your custom fields continue to serve your project’s needs effectively.
By leveraging custom fields in Asana for task organization and tracking, you can enhance your project management workflow. Custom fields provide a structured and customizable way to capture and organize specific details, enabling you to stay organized, track progress, and effectively collaborate with your team.
Lastly, let’s explore some tips for using custom fields effectively in Asana.
Tips for Using Custom Fields Effectively
To make the most out of custom fields in Asana, consider the following tips for effective utilization:
1. Plan and define custom fields thoughtfully: Before creating custom fields, carefully plan and define the specific information you need to capture. Consider your project’s unique requirements and the data that will provide the most value to your team. This helps ensure that your custom fields align with your project goals and facilitate efficient task management.
2. Keep custom field options concise: When using custom fields with dropdown options, try to keep the options concise and relevant. A long list of options might become overwhelming or confusing for users. A focused set of options provides clarity and helps ensure consistency in data entry.
3. Train your team on custom field usage: Introduce the concept of custom fields to your team and provide proper training on how to use them. Clearly communicate the purpose of each custom field and how it contributes to the project’s overall organization and tracking. This ensures that everyone on the team understands the significance of custom fields and can utilize them effectively.
4. Regularly review and update custom field values: As projects progress, it is crucial to review and update custom field values as necessary. Keep the custom field data accurate and up-to-date by regularly revisiting it and making necessary adjustments. This ensures that you have the most relevant and reliable information for task management and reporting.
5. Experiment with different custom field configurations: Asana offers various field types and options for custom fields. Don’t be afraid to experiment and try different configurations to find what works best for your team and project. Discover how different field types and options can enhance your workflow and adapt them as needed.
6. Use custom fields as a communication tool: Custom fields can help streamline communication within your team. Consider using them to provide additional context or instructions for specific tasks. For instance, you can use a custom field to indicate preferred file formats for attachments or specific instructions for completing a task. This helps ensure that important details are readily available to team members.
7. Regularly assess the effectiveness of custom fields: Periodically evaluate how well your custom fields are serving your project management needs. Assess if any adjustments or improvements are necessary. Seek feedback from your team on the usefulness and relevance of the custom fields and make adjustments based on their input.
By following these tips, you can maximize the effectiveness of custom fields in Asana and create a more streamlined and organized project management process.
With a strategic approach to custom field usage, you will enhance task organization, improve tracking efficiency, and facilitate better collaboration within your team.
Conclusion
Custom fields in Asana are a powerful tool that allows you to tailor your project management experience to your specific needs. By adding custom fields, you can capture and track relevant data, organize tasks efficiently, and gain valuable insights into your project’s progress.
In this article, we explored a step-by-step guide on how to add custom fields in Asana. We learned how to access the project settings, select custom fields, choose field types, set field details, customize field options, and add the custom fields to tasks. By following these steps, you can easily implement custom fields and start utilizing them effectively.
Furthermore, we discussed the reasons why custom fields are beneficial in Asana. From enhanced task organization and tracking to greater flexibility and tailored project management workflows, custom fields empower you to create a customized project management experience that aligns with your specific requirements.
To make the most out of custom fields, we provided tips for their effective usage. By planning thoughtfully, training your team, reviewing and updating custom field values regularly, and experimenting with different configurations, you can optimize the use of custom fields in Asana for improved collaboration and project success.
Custom fields in Asana offer a versatile and customizable way to organize, track, and manage tasks. They enhance your ability to communicate important information, filter and search for specific tasks, generate insightful reports, and adapt to evolving project needs.
Now that you have a comprehensive understanding of how to add and utilize custom fields in Asana, it’s time to apply this knowledge to your projects. Start by assessing your project requirements and identify areas where custom fields can bring additional value and organization to your tasks.
By leveraging the power of custom fields in Asana, you can streamline your project management process, collaborate effectively with your team, and achieve greater productivity and success in your projects.