Introduction
Welcome to our comprehensive guide on how to create a Gantt chart in Asana! Gantt charts have become an essential tool for project management, helping teams visualize project timelines, track progress, and effectively manage resources. Asana, a popular project management software, offers a user-friendly interface and powerful features that make creating Gantt charts a breeze.
Whether you are a project manager, team lead, or someone responsible for overseeing and tracking project timelines, mastering the art of creating Gantt charts in Asana can significantly improve your project management skills and boost your team’s productivity.
In this guide, we will walk you through a step-by-step process of creating Gantt charts in Asana. From setting up your project and adding tasks to assigning team members and tracking progress, you will learn everything you need to know to utilize Asana’s Gantt chart feature effectively.
But before we dive into the details, let’s begin by understanding what a Gantt chart is and why it is so valuable in project management.
What is a Gantt Chart?
A Gantt chart is a visual representation of a project timeline that helps you plan, schedule, and track various tasks and activities. It was developed by Henry Gantt in the early 20th century and has since become one of the most widely used project management tools.
The chart consists of horizontal bars that represent different tasks or activities and their duration. The length of each bar on the chart corresponds to the time it takes to complete the task. Additionally, the chart displays dependencies between tasks, allowing you to see the sequence in which tasks need to be completed.
One of the key features of a Gantt chart is its ability to provide a clear overview of the project timeline, enabling project managers and team members to visualize the entire project at a glance. It helps in identifying critical tasks, understanding how different activities are interconnected, and managing resources and deadlines efficiently.
Gantt charts offer several benefits for project management, including:
- Visualizing Project Timelines: Gantt charts provide a clear and intuitive representation of project timelines, making it easier to understand and communicate the project schedule to all stakeholders.
- Task Dependency Management: By highlighting task dependencies, Gantt charts help you identify any potential bottlenecks or conflicts, ensuring that tasks are completed in the correct order.
- Resource Allocation: With a Gantt chart, you can assign team members and allocate resources to specific tasks, ensuring that everyone is aware of their responsibilities and preventing resource overbooking.
- Progress Tracking: Gantt charts allow you to track the progress of each task and compare it to the planned schedule. This helps you identify delays and take proactive measures to keep the project on track.
- Communication and Collaboration: Gantt charts facilitate effective communication and collaboration among team members, as they provide a visual representation of the project plan that can be easily shared and discussed.
Overall, Gantt charts are a powerful tool that enhances project planning, coordination, and monitoring. In the next section, we will delve into the step-by-step process of creating a Gantt chart in Asana, a popular project management software.
Benefits of Using Gantt Charts in Project Management
Gantt charts offer numerous advantages in project management, making them a valuable tool for organizing and controlling project timelines. Let’s explore some of the key benefits:
- Visualizing Project Schedule: Gantt charts provide a visual representation of the project timeline, allowing project managers and team members to easily understand and communicate the project schedule. This visual overview helps in planning and coordinating tasks effectively.
- Identifying Task Dependencies: Gantt charts clearly display the relationships and dependencies between tasks. By visualizing these dependencies, project managers can ensure that tasks are scheduled in the correct order and avoid any bottlenecks or delays.
- Resource Management: Gantt charts allow project managers to allocate resources efficiently by assigning specific team members to tasks. This helps in balancing workload, preventing resource overallocation, and ensuring that each task has the necessary resources to be completed on time.
- Tracking Progress: Gantt charts enable project managers to track the progress of tasks throughout the project lifecycle. By comparing the planned schedule with the actual progress, they can identify any delays or deviations and take proactive measures to keep the project on track.
- Adjusting Priorities: As projects evolve, priorities may change. Gantt charts make it easy to modify task priorities and timelines by simply adjusting the bar lengths or dependencies. This flexibility allows project managers to adapt to changing circumstances and optimize project execution.
- Enhancing Communication: Gantt charts serve as a visual aid for project meetings, presentations, and discussions. They provide a clear and concise overview of the project plan, making it easier to communicate project progress, deadlines, and resource allocation to stakeholders.
- Predicting Project Completion: By analyzing the Gantt chart, project managers can estimate project completion dates based on the progress of tasks. This helps in setting realistic expectations and managing client and stakeholder communication.
- Improving Team Collaboration: Gantt charts promote collaboration and teamwork by providing a shared view of the project plan. Team members can see how their tasks fit into the larger project timeline and understand dependencies, facilitating effective coordination and cooperation.
Overall, Gantt charts are an indispensable tool for project managers, helping them streamline project planning, optimize resource allocation, track progress, and enhance communication and collaboration. In the following sections, we will guide you through the process of creating a Gantt chart in Asana, leveraging these benefits to manage your projects effectively.
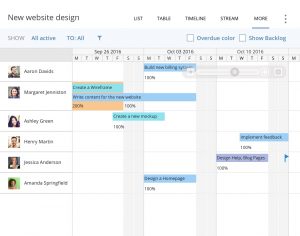
Step-by-Step Guide to Creating a Gantt Chart in Asana
Asana is a popular project management software that offers a built-in Gantt chart feature, making it easy to create and manage project timelines. Follow these steps to create a Gantt chart in Asana:
- Setting Up Your Project in Asana: Start by creating a new project in Asana and give it a descriptive name. Choose a project template or create a custom project from scratch.
- Adding Tasks to Your Project: Begin by adding all the necessary tasks to your project. Assign clear and concise names to each task to ensure clarity and specificity.
- Setting Task Start and End Dates: Specify the start and end dates for each task in the project. You can do this by clicking on the task and selecting the calendar icon to set the due date.
- Linking Tasks and Creating Dependencies: Identify task dependencies by linking them together. This will create a visual representation of the order in which tasks need to be completed. To link tasks, select the “Add Dependency” option and choose the appropriate task.
- Assigning Team Members and Resources: Assign team members to each task and allocate resources as necessary. This will ensure that everyone knows their responsibilities and can collaborate effectively.
- Customizing Your Gantt Chart View: Asana allows you to customize the Gantt chart view to suit your preferences. You can adjust the timeline scale, choose different colors for tasks, and customize the layout to display the information you need.
- Updating and Tracking Progress: Regularly update the progress of tasks in Asana to keep your Gantt chart up to date. As tasks are completed, mark them as done to reflect the progress accurately.
By following these steps, you will be able to create a comprehensive and visually appealing Gantt chart in Asana. Now you can effectively manage your project timelines, track progress, and ensure smooth coordination among team members.
Setting Up Your Project in Asana
The first step in creating a Gantt chart in Asana is to set up your project. Asana provides a user-friendly interface and various project templates to choose from. Here’s how to set up your project:
- Create a New Project: Log in to your Asana account and click on the “+” button in the sidebar to create a new project. Give your project a descriptive name that reflects its objective.
- Choose a Project Template: Asana allows you to select a project template that aligns with your specific project requirements. Alternatively, you can create a custom project from scratch by choosing the “Blank Project” option.
- Add Project Details: Provide additional details about the project, such as the start and end dates, project owner, description, and any other relevant information. This will help provide context to team members and stakeholders.
- Set Project Privacy: Determine the privacy settings for your project. Choose whether you want it to be publicly accessible or limited to specific team members.
- Invite Team Members: Invite relevant team members to join the project. This ensures that everyone is aware of their responsibilities and can collaborate effectively.
By setting up your project in Asana, you establish a foundation for creating and managing the Gantt chart. It provides a centralized space where you can organize tasks, communicate with team members, and track progress efficiently.
Now that your project is set up, you are ready to move on to the next step: adding tasks to your project.
Adding Tasks to Your Project
Once you have set up your project in Asana, it’s time to add tasks to your project. Tasks represent the specific activities or actions that need to be accomplished to complete the project. Here’s how to add tasks to your project in Asana:
- Click on the “+ Add Task” Button: Within your project, locate the “+ Add Task” button and click on it to create a new task.
- Provide a Task Name: Give your task a clear and descriptive name that accurately represents the activity to be completed.
- Add Task Description: If needed, provide additional information and details about the task in the description field. This can include specific instructions, requirements, or important notes that team members should be aware of.
- Assign Task to a Team Member: Assign the task to a specific team member responsible for completing it. This ensures accountability and clarity regarding task ownership.
- Add Due Date: Establish a deadline for the task by setting a due date. This helps in managing and prioritizing tasks within the project timeline.
- Organize Tasks with Sections: Asana allows you to create sections within your project to group related tasks together. This helps in organizing and categorizing tasks based on their purpose, phase, or department.
- Repeat Tasks (if applicable): If there are recurring tasks in your project, you can set them to repeat at a specific interval. This feature saves time by automatically generating tasks at the designated frequency.
By adding tasks to your project in Asana, you create a clear roadmap of activities that need to be accomplished for project completion. This establishes transparency and clarity among team members, enabling effective collaboration and task management.
Once you have added tasks to your project, the next step is to assign start and end dates to each task. We will explore this in detail in the next section.
Setting Task Start and End Dates
Setting task start and end dates is a crucial step in creating a Gantt chart in Asana. By defining the duration of each task, you can establish a clear project timeline and understand the dependencies between tasks. Here’s how to set task start and end dates in Asana:
- Select the Task: Click on the task you want to set the start and end dates for. This will open up the task details.
- Choose the Due Date: In the task details, click on the due date field and select the specific date by clicking on the calendar icon. This will be the task’s end date or deadline.
- Find the Start Date: If the task has a specific start date, you can add it by clicking on the start date field in the task details and selecting the desired date.
- Use Duration: Alternatively, you can set task start and end dates using the task duration. After selecting the end date, click on the task duration option and choose the number of days or weeks the task will take.
- Consider Dependencies: When setting task start and end dates, keep task dependencies in mind. Ensure that tasks are scheduled in the correct order based on their dependencies to maintain a logical and efficient workflow.
- Repeat for Other Tasks: Repeat the process for all the tasks in your project, setting the appropriate start and end dates based on their dependencies and duration.
By setting task start and end dates in Asana, you establish the sequence and timeline of tasks in your project. This information is crucial for creating an accurate and comprehensive Gantt chart that reflects the project’s schedule and progress.
Once you have set the task dates, you can move on to the next step of creating your Gantt chart – linking tasks and creating dependencies. We will explore this in detail in the following section.
Linking Tasks and Creating Dependencies
In project management, tasks often have dependencies, meaning that certain tasks must be completed before others can begin. Linking tasks and creating dependencies in Asana allows you to visualize the order and relationships between tasks in your Gantt chart. Here’s how to link tasks and create dependencies in Asana:
- Select the Task: Choose the task that has a dependency on another task or needs to be connected to another task.
- Click on the “+ Add Dependency” Option: In the task details, find the option to add a dependency and click on it.
- Choose the Predecessor Task: Select the task that needs to be completed before the dependent task can start. Asana will automatically update the task’s dependencies.
- Repeat for Additional Dependencies: If the task has multiple dependencies, follow the same steps to add them one by one. Asana will display the dependencies in the task details.
By linking tasks and creating dependencies in Asana, you create a logical flow of tasks in your project. This ensures that tasks are scheduled in the correct order and that team members understand the relationship between different activities.
Once you have set up task dependencies, you can visualize them in your Gantt chart. Tasks will be connected with arrows, indicating the sequence in which they need to be completed. This clear representation of task dependencies allows you to effectively manage your project and adjust the schedule as needed.
Next, we will explore the step of assigning team members and allocating resources to tasks in your project.
Assigning Team Members and Resources
Assigning team members and allocating resources to tasks is a critical aspect of project management. In Asana, you can easily assign team members and ensure that the necessary resources are available for each task. Here’s how to assign team members and resources in Asana:
- Select the Task: Choose the task you want to assign a team member or allocate resources to.
- Click on the “Assignee” Field: In the task details, locate the “Assignee” field and click on it.
- Choose a Team Member: Select the appropriate team member from the list of available team members. This will assign the task to the selected team member, indicating their responsibility.
- Allocate Resources: If the task requires specific resources, such as equipment, materials, or budget, you can add resource information to the task description or custom fields. This ensures that all necessary resources are accounted for and available when needed.
- Monitor Workload: Asana provides a workload view that allows you to see how tasks are distributed among team members. This helps in balancing the workload and identifying any potential resource constraints.
- Collaborate with Team Members: Assigned team members can communicate, share updates, and collaborate with other team members directly within Asana. This promotes effective teamwork and coordination.
By assigning team members and allocating resources in Asana, you ensure that each task has a responsible person and the necessary resources to complete it successfully. This enhances accountability, collaboration, and resource management within your project.
Once you have assigned team members and allocated resources, the next step is customizing your Gantt chart view to suit your project needs. We will explore this customization step in the following section.
Customizing Your Gantt Chart View
Asana provides various customization options to tailor your Gantt chart view to meet your specific project requirements. Customizing your Gantt chart view allows you to focus on the relevant information and display it in a way that suits your preferences. Here’s how to customize your Gantt chart view in Asana:
- Adjust Timeline Scale: Asana allows you to zoom in or out of your Gantt chart to modify the timeline scale. This helps you view the project schedule at a higher level or with increased granularity, depending on your needs.
- Choose Task Colors: You can customize the color of tasks in your Gantt chart to highlight specific categories, priorities, or phases. This visual differentiation makes it easier to understand the project’s progress and identify critical tasks.
- Add Task Columns: Asana allows you to add additional columns to display additional task information in your Gantt chart. These columns can include task assignees, due dates, task dependencies, or any other relevant details you want to track.
- Filter Tasks: You can apply filters to your Gantt chart to focus on specific tasks or criteria. This allows you to easily review tasks assigned to specific team members, tasks within a certain timeframe, or tasks related to specific project milestones.
- Group Tasks: Asana enables you to group tasks in your Gantt chart based on specific criteria. This can be done by project sections, task assignees, or any other custom grouping that suits your project’s organizational structure.
- Save Custom Views: If you have a preferred Gantt chart configuration, you can save it as a custom view. This way, you can quickly access your preferred setup without having to reconfigure your Gantt chart view each time.
Customizing your Gantt chart view in Asana helps you focus on the most relevant and essential project information. It allows you to present the data in a way that is visually appealing and conducive to effective project management.
Now that you have customized your Gantt chart view, the next step is updating and tracking the progress of tasks in your project. This will be covered in the following section.
Updating and Tracking Progress
Updating and tracking the progress of tasks is a critical aspect of project management. By regularly monitoring the progress, you can ensure that the project stays on track and make necessary adjustments as needed. In Asana, you can easily update and track task progress in your Gantt chart. Here’s how:
- Mark Tasks as Complete: As team members complete tasks, they can mark them as done in Asana. This updates the task progress and allows you to track completed tasks in your Gantt chart.
- Update Task Dates: If there are any changes to the duration or timing of tasks, you can update the task start and end dates in Asana. This keeps your Gantt chart up to date and provides an accurate representation of the project timeline.
- Track Dependencies: As you mark tasks as complete or make changes to task dates, Asana automatically adjusts the dependent tasks in your Gantt chart. This allows you to visualize the impact of changes on the overall project schedule.
- Track Overall Progress: Asana provides progress indicators in your Gantt chart to show the completion status of the entire project. This helps you quickly assess how the project is progressing and if any tasks are lagging behind.
- Communicate Updates: Use Asana’s communication features to keep team members informed about task updates and progress. This promotes transparency and ensures that everyone is on the same page regarding project status.
- Review and Analyze: Regularly review your Gantt chart to analyze the progress, identify any schedule deviations or bottlenecks, and take necessary actions to keep the project on track.
By updating and tracking progress in Asana, you maintain a real-time view of task completion and project status. This allows you to stay informed, make data-driven decisions, and effectively manage your project from start to finish.
Now that you have learned how to update and track progress, you have a solid understanding of creating and managing a Gantt chart in Asana. You can leverage these skills to enhance your project management capabilities and successfully execute your projects.
Conclusion
Creating a Gantt chart in Asana can significantly contribute to effective project management by providing a visual representation of project timelines, facilitating task tracking, and promoting collaboration among team members. By following the step-by-step guide outlined in this article, you can successfully create and manage a Gantt chart in Asana.
We started by understanding the concept of Gantt charts and the benefits they offer in project management. We then explored how to set up a project in Asana and add tasks to it. Next, we delved into setting task start and end dates, linking tasks, and creating dependencies to establish a logical sequence of activities. We also learned how to assign team members, allocate resources, and customize the Gantt chart view to suit specific project needs. Lastly, we discussed the importance of updating and tracking progress to ensure project success.
With Asana’s intuitive interface and powerful features, you can effectively manage your project timelines, track progress, and collaborate seamlessly with your team. The Gantt chart feature in Asana empowers you to visualize your project plan, identify dependencies, optimize resource allocation, and make data-driven decisions to keep your project on track.
By utilizing the knowledge gained from this guide, you are well-equipped to create and maintain a Gantt chart in Asana for your future projects. Embrace the power of Gantt charts and Asana to elevate your project management skills and achieve project success with ease.