Introduction
Welcome to the world of scanning with your smartphone! Gone are the days of bulky and expensive scanners, as technology has evolved to empower us with the ability to scan documents, photos, and even 3D objects using the device we carry in our pockets every day.
In this article, we will explore the wonders of scanning with a smartphone, how it works, and the numerous benefits it offers. Whether you need to digitize important documents for work, preserve cherished memories, or simply streamline your workflow, scanning with your smartphone is a convenient and efficient solution.
Gone are the days of scrambling to find a scanner or copier when you need to send a document in a hurry. With just a few taps on your smartphone screen, you can capture high-quality scans and instantly share them via email, messaging apps, or cloud storage services.
Not only does using a smartphone for scanning save you time and effort, but it also eliminates the need for physical storage space, as all your scanned documents are conveniently stored in digital form. This makes it easier to organize, search, and access your files on the go, putting an end to the clutter and hassle of traditional paperwork.
Furthermore, the advancements in smartphone camera technology ensure that you can capture clear and detailed scans, even in low-light environments. The built-in editing features of scanning apps allow you to enhance the quality of your scans, crop them, adjust the colors, and even convert scanned text into editable documents.
Whether you are a student looking to digitize your notes, a freelancer needing to scan contracts and receipts, or a small business owner looking to streamline your paperwork, scanning with a smartphone is an invaluable tool in our digital age. So, let’s dive in and discover how you can unleash the power of your smartphone to scan and digitize your world!
Understanding Scanning with a Smartphone
Scanning with a smartphone is a process that allows you to convert physical documents, photos, or objects into digital formats using the device’s built-in camera. The principle behind this technology is similar to that of a traditional scanner, but with the added convenience and portability of your smartphone.
When you scan with a smartphone, the camera captures an image of the document or object you want to digitize. The scanned image is then processed by specialized scanning apps, which utilize algorithms to enhance the quality and clarity of the scan.
One of the key factors in achieving high-quality scans with your smartphone is the resolution of the camera. Most modern smartphones come equipped with high-resolution cameras that are capable of capturing intricate details in the scanned images. This ensures that your digitized documents are clear and legible, without compromising on the quality.
Another important aspect to consider is lighting conditions. Adequate lighting is crucial to capture sharp and well-defined scans. Natural light or well-lit environments are ideal for scanning, as they minimize shadows and improve the overall image quality. However, if you find yourself in a low-light situation, many scanning apps offer features like flash or automatic image correction to compensate for the lack of lighting.
Scanning with a smartphone is not limited to documents alone. You can also scan photographs, business cards, receipts, and even three-dimensional objects like artwork or products. The versatility of smartphone scanning opens up a world of possibilities, allowing you to capture and preserve a wide range of physical media in digital form.
Understanding the basics of scanning with a smartphone sets the foundation for utilizing this powerful tool effectively. In the following sections, we will explore the benefits of using a smartphone for scanning, different types of scanning apps available, popular apps in the market, step-by-step guides, and useful tips for successful scanning. So, let’s embark on a journey to unlock the full potential of your smartphone!
Benefits of Using a Smartphone for Scanning
Using a smartphone for scanning offers numerous benefits that make it a preferred choice for individuals and businesses. Let’s explore some of the advantages:
- Portability: One of the primary benefits of using a smartphone for scanning is the convenience and portability it provides. You can carry your scanning device with you wherever you go, eliminating the need for bulky equipment or finding a scanner at a separate location.
- Cost-effective: Traditional scanners can be expensive, especially if you require high-quality scans or specific features. In contrast, most smartphones already come with a built-in camera, which makes scanning a cost-effective solution.
- Time-efficient: Scanning with a smartphone saves you time that would otherwise be spent setting up a traditional scanner or navigating complex software. With just a few taps on your smartphone screen, you can capture a scan and have it ready to share or store in a matter of seconds.
- Convenience: With scanning apps readily available on app stores, you can easily install and access them on your smartphone. These apps offer features like document organization, cloud integration, and OCR (Optical Character Recognition) to make your scanning experience even more convenient and efficient.
- Digitize on the go: Smartphone scanning allows you to digitize documents wherever you are. Whether you are traveling, attending a meeting, or working remotely, you have the flexibility to scan and store important documents without being bound to a physical scanner.
- Space-saving: Physical documents can take up a significant amount of space in your office or home. By scanning them with your smartphone, you can create a digital library of files, freeing up valuable space and reducing clutter.
- Edit and share instantly: Scanning apps often come with built-in editing tools that allow you to crop, rotate, or adjust the scanned image as needed. Additionally, you can easily share scanned documents via email, messaging apps, or cloud storage services, improving collaboration and communication.
- Accessibility: Digital scans are easily searchable and accessible compared to physical documents. With the ability to tag and categorize your scanned files, you can quickly retrieve specific documents with just a few clicks.
These are just a few of the many benefits that come with using a smartphone for scanning. Whether you are a student, professional, or simply someone who wants to reduce paper clutter, smartphone scanning is a game-changer. In the next section, we will dive into the different types of scanning apps available for smartphones, so you can choose the one that suits your needs best.
Types of Scanning Apps
When it comes to scanning with a smartphone, there are various types of scanning apps available to cater to different needs and preferences. Let’s explore the different types:
- Basic Scanning Apps: These apps provide essential scanning capabilities, allowing you to capture documents, photos, and other physical media with your smartphone’s camera. They generally offer features like cropping, rotation, and basic editing options. Basic scanning apps are straightforward and user-friendly, making them suitable for everyday scanning needs.
- OCR Scanning Apps: OCR (Optical Character Recognition) scanning apps go beyond basic scanning functionalities by converting scanned documents into editable text. This feature is especially useful when you need to extract text from documents or convert scanned materials into searchable PDFs. OCR apps use powerful algorithms to recognize text patterns and preserve formatting, making them ideal for businesses, students, and researchers.
- Document Management Apps: Document management apps are designed to help you organize, store, and retrieve your scanned files efficiently. They offer features like cloud storage integration, tagging, categorization, and advanced search options. These apps allow you to create a digital filing system, making it easier to manage and locate specific documents whenever you need them.
- Specialized Scanning Apps: Some scanning apps cater to specific requirements, such as scanning business cards, whiteboards, or receipts. These specialized apps often have features tailored to the specific type of document or media, providing better accuracy and convenience. Whether you need to digitize business contacts, capture brainstorming sessions, or track expenses, specialized scanning apps can streamline the process for you.
- Scanner Manufacturer Apps: Many scanner manufacturers offer dedicated scanning apps that integrate seamlessly with their hardware. These apps are designed to optimize the scanning experience, providing advanced features and compatibility with specific scanner models. If you have a scanner from a particular manufacturer, their dedicated scanning app may offer the best integration and performance for your device.
Each type of scanning app comes with its own set of features and benefits. Consider your specific scanning needs and preferences when choosing an app for your smartphone. Additionally, it’s always a good idea to read user reviews and compare different apps to ensure compatibility with your smartphone model and operating system.
Now that we’ve explored the types of scanning apps available, let’s move on to the next section, where we will discuss some popular scanning apps for smartphones that you can consider.
Popular Scanning Apps for Smartphones
When it comes to scanning with your smartphone, there is an abundance of scanning apps available for both iOS and Android devices. These apps offer a range of features to meet your scanning needs. Let’s explore some of the popular scanning apps:
- Adobe Scan: Adobe Scan is a widely recognized and reliable scanning app that offers powerful scanning features. It utilizes OCR technology to convert scanned documents into searchable and editable text. With Adobe Scan, you can also create multi-page PDFs, annotate scanned documents, and seamlessly integrate with other Adobe tools.
- CamScanner: CamScanner is a versatile scanning app that allows you to digitize documents, business cards, receipts, and more. It provides automatic edge detection, smart cropping, and image enhancement features to ensure high-quality scans. CamScanner also offers cloud storage integration, easy sharing options, and OCR capabilities.
- Microsoft Office Lens: Microsoft Office Lens is a powerful scanning app from Microsoft that integrates seamlessly with the Office suite. It offers features like OCR, PDF, and image conversion, as well as intelligent cropping and perspective correction. Office Lens also provides one-click sharing to OneDrive and integration with other Microsoft apps like Word, PowerPoint, and OneNote.
- Google Drive: While Google Drive is primarily a cloud storage and file management app, it also includes a scanning feature. With Google Drive, you can scan documents and save them directly to your Drive. The app offers basic editing tools, automatic backup, and easy sharing options, making it a convenient choice for those already using Google’s ecosystem.
- Scanbot: Scanbot is a feature-rich scanning app that offers a wide range of functionalities. It provides high-quality scanning, OCR capabilities, smart file naming, document encryption, and automatic cloud backup. Scanbot also integrates with various cloud storage services like Dropbox, Google Drive, and OneDrive for seamless file organization and sharing.
These popular scanning apps have earned their reputation by consistently delivering reliable and efficient scanning experiences. However, it’s important to note that the app choices may vary depending on your specific needs, smartphone platform, and personal preferences.
Before finalizing your choice, it’s recommended to explore the features, reviews, and ratings of different scanning apps. Additionally, consider whether the app offers the necessary integration with other tools and services you use in your workflow.
Now that you have an idea of the popular scanning apps available, let’s move on to the next section, where we will provide a step-by-step guide on how to scan with your smartphone.
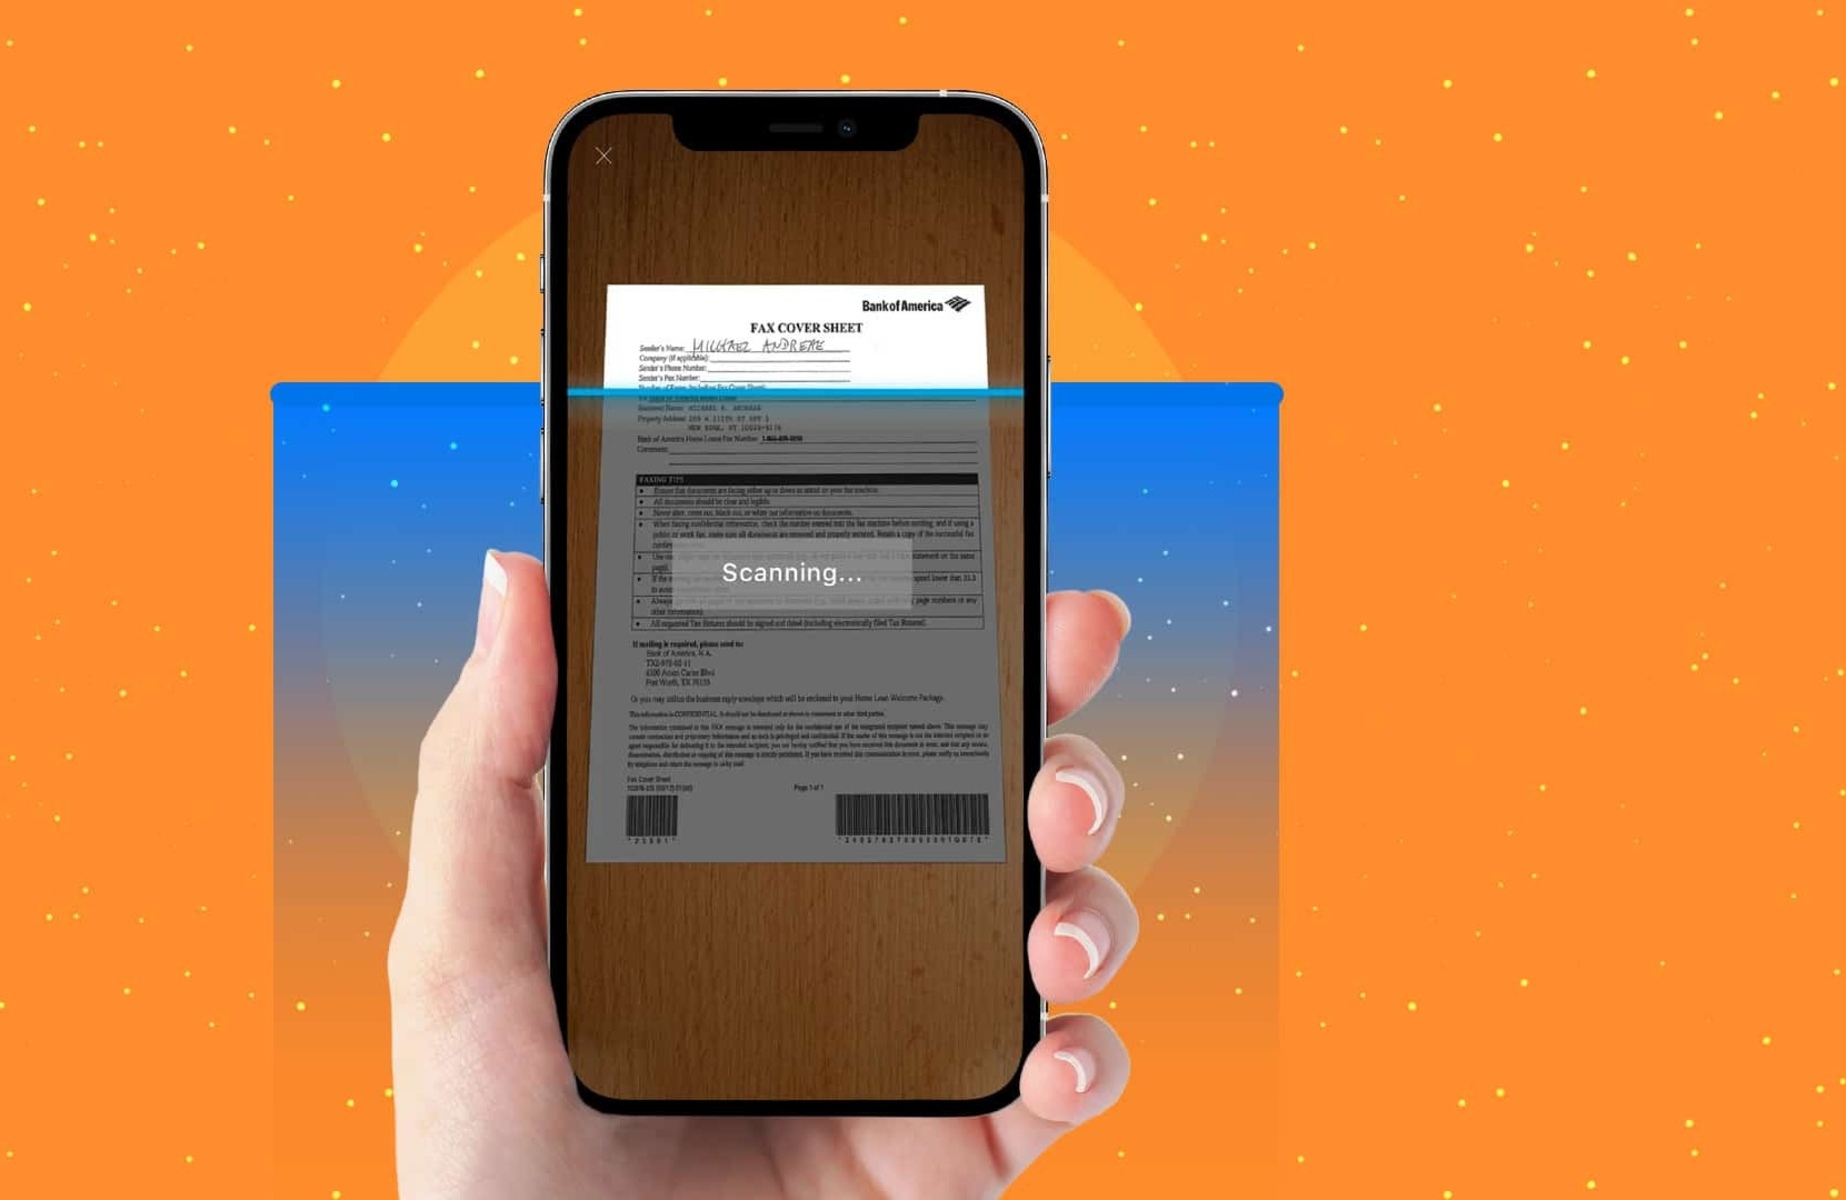
Step-by-Step Guide to Scanning with Your Smartphone
Scanning with your smartphone is quick and easy, allowing you to digitize documents, photos, and more in just a few simple steps. Follow this step-by-step guide to get started:
- Choose a scanning app: Select a scanning app that suits your needs and install it on your smartphone. Refer to the previous section for popular scanning app recommendations.
- Open the scanning app: Launch the scanning app on your smartphone by tapping its icon on the home screen or app drawer.
- Position the document: Place the document, photo, or object you want to scan on a flat surface with good lighting. Make sure the entire area you want to capture is within the view of your smartphone’s camera.
- Capture the scan: In the scanning app, tap the ‘Scan’ or camera icon to activate the camera. Align your smartphone’s camera with the document and capture the scan by tapping the shutter button. Some apps also offer features like automatic capture for a hands-free experience.
- Edit the scan (optional): After capturing the scan, you can make adjustments if needed. Most scanning apps allow you to crop the scan, rotate it, adjust the brightness or color, and apply filters to enhance the image quality.
- Save the scan: Once you are satisfied with the scan, tap the ‘Save’ or ‘Done’ button to save it. Choose a relevant name or add any additional information required by the app.
- Organize and manage scans: Use the scanning app’s features to organize your scanned documents. This may involve creating folders, assigning tags or labels, and utilizing cloud storage integration to keep your scans organized and easily accessible.
- Share or export the scan: When you need to share the scanned document, tap the ‘Share’ button within the scanning app. You can choose to send the scan via email, messaging apps, or save it to cloud storage services for easy sharing and collaboration.
- Review and adjust: Once you have completed the scanning process, take a moment to review the quality of the scan. If necessary, you can make further adjustments using the editing tools provided by the scanning app.
- Repeat the process: Now that you have successfully scanned one document, you can repeat the process to scan additional files. The more you practice, the more proficient you will become in capturing high-quality scans with your smartphone.
Following these step-by-step instructions will help you effectively scan documents and other materials using your smartphone. Remember to explore the features and settings of your chosen scanning app to leverage its full potential and maximize your scanning experience.
In the next section, we will share some valuable tips for successful scanning with your smartphone, so be sure to read on!
Tips for Successful Scanning with Your Smartphone
To ensure that you achieve high-quality scans with your smartphone, consider the following tips:
- Lighting: Good lighting is essential for clear and detailed scans. Whenever possible, position your document in a well-lit area or utilize natural light to eliminate shadows and improve the overall image quality.
- Stability: Keep your smartphone steady while capturing scans to avoid blurry or distorted images. Consider using a tripod or stabilizing your phone against a stable surface for sharper results.
- Focus and framing: Make sure the document or object you want to scan is in focus and properly framed within the camera viewfinder. Align the edges of the document with the edges of the screen to capture the entire content accurately.
- Clean your lens: Wipe the camera lens of your smartphone with a soft cloth to remove any smudges or dirt that may affect the clarity of your scans. A clean lens will result in sharper and more detailed images.
- Choose the right resolution: Adjust the resolution settings in your scanning app to ensure the appropriate balance between file size and image quality. Higher resolutions are ideal for detailed documents, while lower resolutions can save storage space for less important scans.
- Take multiple scans: If you are not satisfied with the quality of a scan, don’t hesitate to try again. Experiment with different angles, lighting conditions, or distance to achieve the best possible result.
- Edit and enhance: Utilize the editing tools provided by your scanning app to improve the quality of your scans. Adjust brightness, contrast, and color settings as needed, and use filters or enhancement options to optimize the appearance of your scanned documents.
- Label and organize: Develop a consistent naming and organizing system for your scanned files. Use descriptive names or labels that help you quickly identify and retrieve specific documents when needed.
- Secure your scans: If your scanning app offers encryption or password protection features, consider using them to secure sensitive or confidential scanned documents. This ensures that your scans remain private and protected from unauthorized access.
- Regularly backup your scans: Regularly back up your scanned files to external storage or cloud services to prevent data loss. This provides an additional layer of protection and ensures that your scans are accessible even if you change or lose your smartphone.
By following these tips, you can enhance your scanning experience and produce high-quality digital documents with your smartphone. Remember, practice makes perfect, so keep scanning and experimenting to find the best techniques that work for you.
In the final section, we will address some common issues and troubleshooting tips, so stay tuned!
Common Issues and Troubleshooting
While scanning with your smartphone is generally a smooth and hassle-free experience, you may encounter some common issues along the way. Here are a few common problems and troubleshooting tips:
- Blurry scans: Blurry scans can occur if there is a lack of stability or if the camera lens is dirty. Ensure your smartphone is steady or use a tripod, clean the camera lens, and try capturing the scan again.
- Dark or underexposed scans: If your scans turn out too dark or underexposed, check the lighting conditions. Use natural light or adjust the brightness settings in your scanning app to enhance the image visibility.
- Missing edges of scans: Sometimes, scans may miss the edges of a document, resulting in incomplete capture. Ensure that the entire document is within the camera viewfinder, aligning the edges with the edges of the screen for complete coverage.
- Distorted or skewed scans: Skewed scans can happen if the smartphone is not properly aligned with the document. Make sure to hold the device parallel to the document and keep it perpendicular to the edges for accurate scans.
- Poor text recognition: If the OCR (Optical Character Recognition) feature of your scanning app is not accurately recognizing text, try improving the lighting conditions, using higher camera resolutions, or adjusting the focus on the document to enhance text legibility.
- File size issues: Large file sizes can consume storage space and affect the performance of your smartphone. Adjust the resolution settings in your scanning app to reduce file sizes without compromising image quality.
- App compatibility: Ensure that your smartphone and operating system are compatible with the scanning app you choose to avoid any compatibility issues or functionality limitations.
- Cloud storage sync problems: If you encounter issues with syncing your scanned files to cloud storage services, check your internet connection, verify your login credentials, and ensure that the selected cloud service is correctly linked to your scanning app.
- App crashes or freezes: If your scanning app crashes or freezes frequently, try updating the app to the latest version or reinstalling it. Clearing temporary app data and restarting your smartphone can also help resolve any performance issues.
- Limited document size: Some scanning apps may have limitations on the size of documents they can handle. If you need to scan large documents, consider using apps that offer multi-page scanning or stitching features to combine several scans into a single document.
If you encounter any of these issues while scanning with your smartphone, troubleshoot them using the suggested tips. Remember to refer to the app’s user guide or online support resources for specific troubleshooting steps and additional assistance.
With these troubleshooting tips in mind, you are now equipped to tackle any challenges that might arise during your scanning journey. In the concluding section, we will summarize the key points covered in this article and reiterate the advantages of using a smartphone for scanning.
Conclusion
Scanning with a smartphone is a game-changing technology that offers convenience, portability, and efficiency. It allows you to digitize documents, photos, and objects, transforming them into easily accessible digital files. With the right scanning app and some helpful tips, you can achieve high-quality scans that meet your specific needs.
We explored the benefits of using a smartphone for scanning, including its cost-effectiveness, time efficiency, and space-saving capabilities. The versatility of smartphone scanning opens up a world of possibilities for students, professionals, and individuals alike.
We discussed different types of scanning apps, such as basic scanning apps, OCR scanning apps, document management apps, specialized scanning apps, and scanner manufacturer apps. Each app type offers unique features to cater to various scanning requirements.
We also introduced some popular scanning apps, including Adobe Scan, CamScanner, Microsoft Office Lens, Google Drive, and Scanbot. These apps have gained popularity for their reliable performance and extensive features.
To help you get started, we provided a step-by-step guide on how to scan with your smartphone. By following the steps and considering tips like lighting, stability, and framing, you can capture high-quality scans effortlessly.
Additionally, we shared troubleshooting tips for common scanning issues, such as blurry scans, dark images, or missing edges. These tips will help you overcome challenges and achieve optimal scanning results.
In conclusion, scanning with a smartphone revolutionizes the way we capture and manage documents. It offers convenience, accessibility, and efficiency while eliminating the need for traditional scanners. Whether you’re a student, professional, or simply looking to declutter your physical space, scanning with your smartphone is a valuable tool at your fingertips.
So, embrace the power of your smartphone, choose the right scanning app, and unlock the potential to scan and digitize your world with ease!