Introduction
Welcome to the digital age, where smartphones have become an integral part of our daily lives. From communicating with friends and family to managing our finances, smartphones allow us to accomplish a wide range of tasks conveniently and efficiently. But did you know that you can also send faxes right from your smartphone?
Gone are the days where you needed a traditional fax machine and a dedicated phone line to send a fax. With the advancements in technology, you can now send faxes directly from your smartphone, saving you time, money, and the hassle of dealing with bulky equipment.
In this article, we will guide you through the process of sending a fax from your smartphone. We will cover the steps, tools, and services you need to get started. Whether you need to send important documents, contracts, or signed forms, sending a fax from your smartphone is a convenient solution.
By following the steps outlined in this guide, you’ll be able to send faxes on the go, without the need for physical documents or a traditional fax machine. So, let’s dive into the world of digital faxing and explore how you can send faxes seamlessly from the palm of your hand.
Step 1: Install a Fax App on Your Smartphone
The first step towards sending a fax from your smartphone is to install a reliable fax app. There are several fax apps available for both Android and iOS devices, each with its own set of features and functionalities. You can easily find these apps by searching for “fax app” in the app store on your smartphone.
Once you have identified a suitable fax app, download and install it on your device. Make sure to read the app’s reviews and ratings to ensure that it meets your requirements and has a user-friendly interface. Look for apps that offer a seamless user experience and have good reviews regarding reliability and security.
After installing the fax app, open it and proceed to sign up or create an account. You will be asked to provide your personal information, such as your name, email address, and phone number. Some apps may also require you to verify your phone number through a verification code sent via SMS.
It is important to choose a fax app that offers secure storage and transmission of your documents. Look for apps that have encryption features to protect your sensitive information. Additionally, check if the app offers cloud storage integration, which allows you to access your faxes from multiple devices and ensures that your documents are securely stored.
Once you have completed the signup process and set up your account, you are now ready to start sending faxes directly from your smartphone. The fax app will provide you with a virtual fax number, which you can use to send and receive faxes. This eliminates the need for a physical phone line and allows for more flexibility and convenience.
Installing a fax app on your smartphone is the first step towards embracing the digital faxing revolution. With a fax app at your disposal, you’ll have the power to send and receive faxes anytime, anywhere, right from the palm of your hand. So, let’s move on to the next step and explore how you can sign up for a fax service provider.
Step 2: Sign Up for a Fax Service Provider
Now that you have installed a fax app on your smartphone, the next step is to sign up for a fax service provider. A fax service provider is a company that offers the infrastructure and technology to send and receive faxes digitally. They act as the bridge between your fax app and the traditional fax network.
When choosing a fax service provider, there are a few factors to consider. Firstly, check the pricing plans and packages offered by different providers. Some providers offer subscription-based plans that allow you to send and receive a certain number of faxes per month, while others charge on a per-fax basis. Compare the pricing options and choose one that aligns with your faxing needs and budget.
Another important consideration is the coverage area offered by the fax service provider. Ensure that the provider has a wide coverage area, allowing you to send faxes to both local and international destinations. Additionally, check if the provider supports different file formats, such as PDF, DOC, or JPG, as this will ensure that you can fax a variety of document types.
Security is also a crucial aspect to evaluate when selecting a fax service provider. Look for providers that offer end-to-end encryption to safeguard your confidential documents during transmission. This ensures that your faxes are protected from unauthorized access and guarantees the privacy of your sensitive information.
Furthermore, consider the additional features and functionalities offered by the fax service provider. Some providers offer features like digital signatures, fax scheduling, and fax broadcasting, which can further enhance your faxing experience. Evaluate these features and choose a provider that aligns with your specific requirements.
Once you have selected a fax service provider, sign up for an account on their website or through the fax app. Provide the necessary information, such as your name, email address, and billing details. Some providers may offer a free trial period, allowing you to test their services before committing to a paid plan.
By signing up for a fax service provider, you gain access to the essential backend infrastructure that allows your smartphone to communicate with traditional fax machines. This seamless integration enables you to send and receive faxes hassle-free, without the need for physical fax machines or dedicated phone lines. With that done, let’s move on to the next step and explore how you can create an account and get a fax number.
Step 3: Create an Account and Get a Fax Number
Now that you have signed up for a fax service provider, it’s time to create an account and obtain a fax number. The fax number is an essential component that enables others to send faxes to you digitally.
Start by logging into your account on the fax service provider’s website or through the fax app. Look for the option to create a new fax number or assign one to your account. Some providers may offer the ability to choose a specific area code or a toll-free number, depending on your preferences and availability.
After selecting your desired fax number, confirm the assignment and make sure that it is linked to your account. This fax number will be used to identify and route incoming faxes to your smartphone. It is important to note that this number operates entirely in the digital realm and does not require a physical phone line.
Once you have obtained your fax number, ensure that it is prominently displayed on your business cards, website, and any other communication materials where people may need to send you a fax. This will allow others to easily send faxes to you using the provided fax number.
With the fax number assigned to your account, you are now ready to receive faxes directly on your smartphone. Whenever someone sends a fax to your assigned fax number, it will be delivered to your selected fax app, where you can access, view, and manage it conveniently.
Creating an account and obtaining a fax number completes the setup process of your digital faxing system. This virtual fax number acts as a direct line of communication between your smartphone and the traditional fax network, enabling you to send and receive faxes seamlessly from anywhere at any time.
Now that you have your account and fax number set up, let’s move on to the next step and explore how you can import or scan the document you want to fax.
Step 4: Import or Scan the Document You Want to Fax
Now that you have your fax service provider account set up and a fax number assigned, it’s time to import or scan the document you want to fax. Whether it’s an important contract, a signed form, or any other document, you can easily digitize it and prepare it for faxing.
If the document you want to fax already exists in digital format, such as a PDF or an image file, you can simply import it into your fax app. Open the app and navigate to the section where you can compose a new fax. Look for the option to import files, and select the document from your smartphone’s storage.
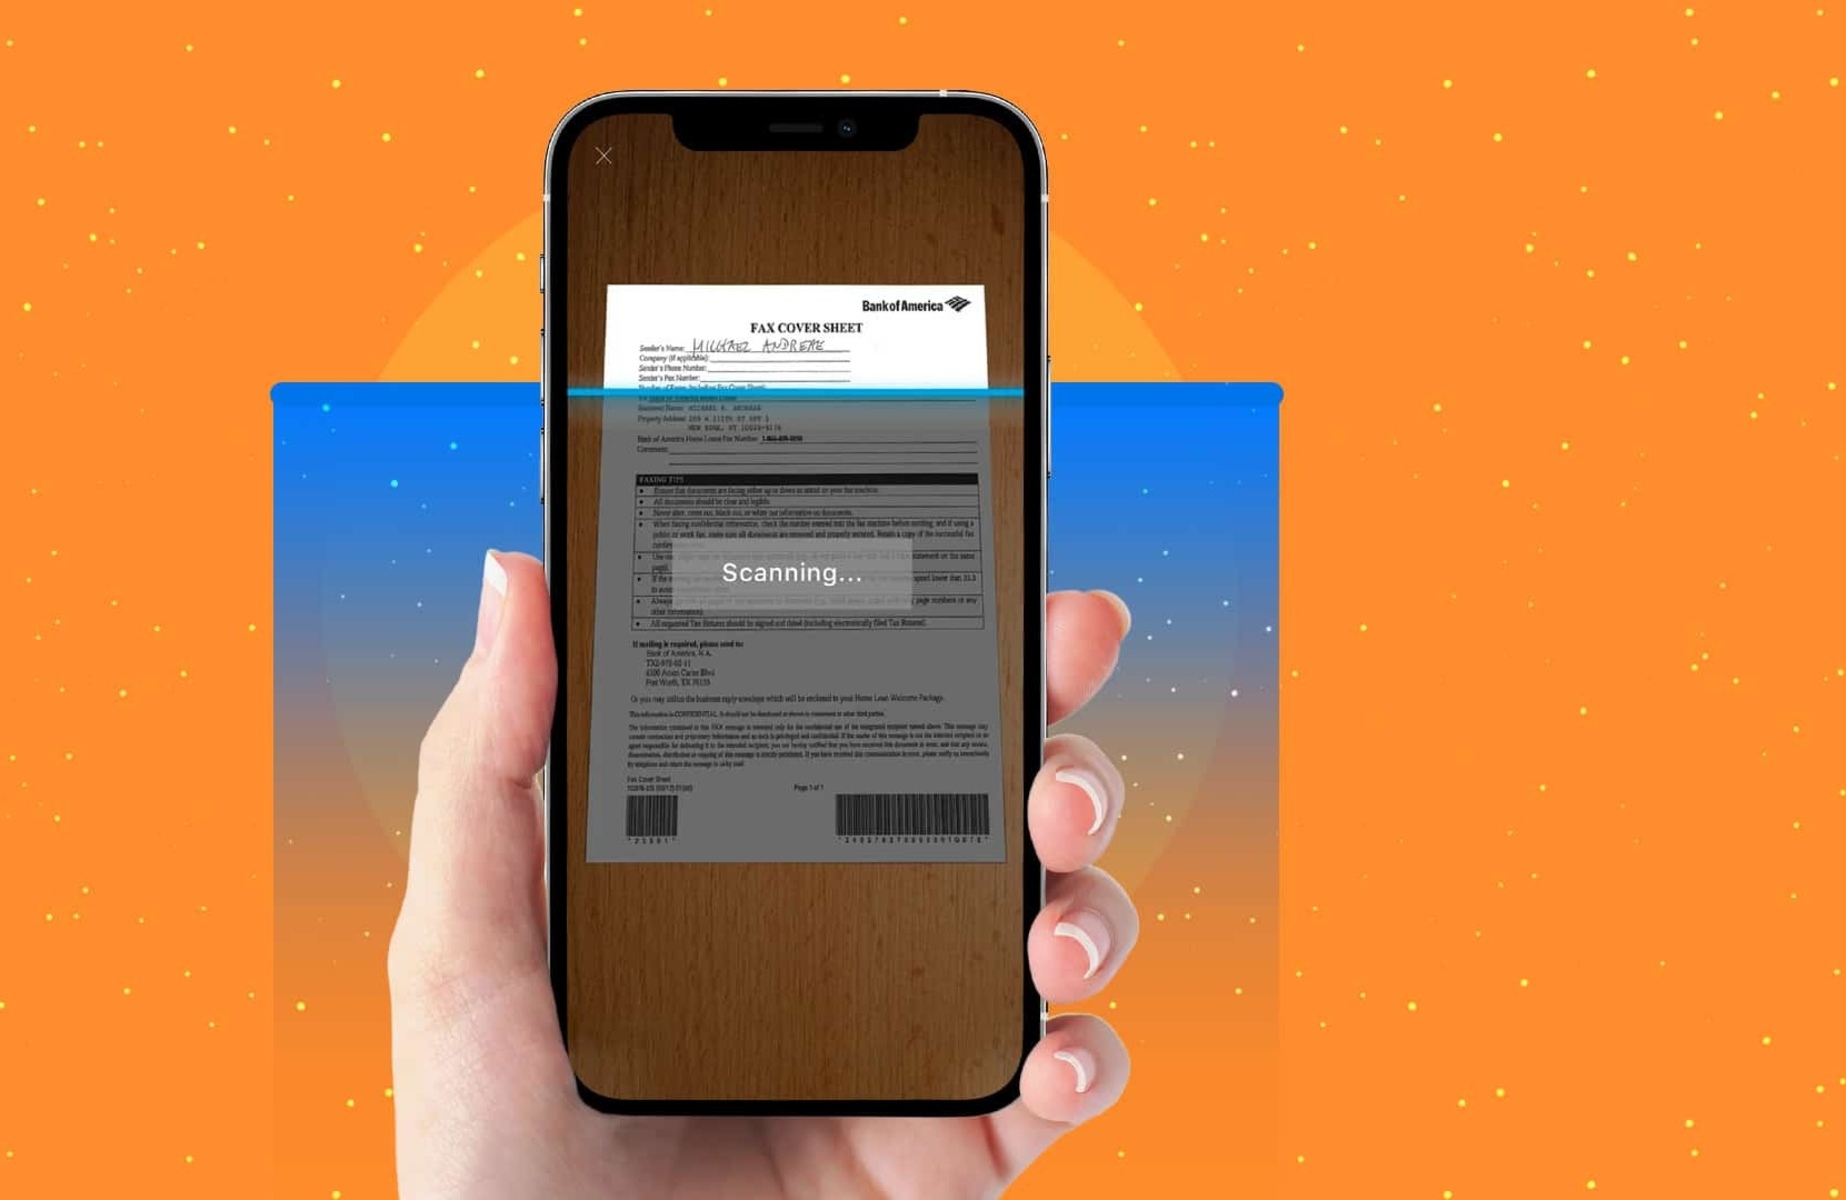
If the document you want to fax is in physical form, you will need to scan it to convert it into a digital format. Most smartphones nowadays come with built-in scanning apps or features that allow you to easily capture and convert physical documents into digital files.
To scan a document, open the scanning app on your smartphone and position the document within the camera’s frame. Ensure that the lighting conditions are adequate for a clear and legible image. Follow the instructions provided by the scanning app to capture the document. Once captured, you can save it as a PDF or an image file on your smartphone.
Once you have imported or scanned the document, you may need to make some adjustments or edits before sending it as a fax. Some fax apps offer basic editing tools, such as cropping, rotating, or resizing, to ensure that the document appears correctly to the recipient.
Review the imported or scanned document in your fax app, and make any necessary adjustments. Check for clarity, readability, and organization. Remove any personal or sensitive information that should not be included in the fax.
By importing or scanning the document you want to fax, you are now ready to compose and customize your fax. In the next step, we will explore how to compose the fax and make it personalized to suit your needs.
Step 5: Compose and Customize Your Fax
Now that you have imported or scanned the document you want to fax, it’s time to compose and customize your fax before sending it. This step allows you to add a personal touch to your fax and make it more professional and tailored to your recipient.
In your fax app, you will find a composing interface where you can customize the content of your fax. Start by adding a cover page, which serves as the introductory page of your fax. It typically includes your company’s logo, contact information, and a brief message introducing the document or explaining its purpose. Some fax apps may provide pre-designed cover page templates that you can choose from.
After the cover page, proceed to add the document you want to fax. Ensure that it is properly positioned and aligned within the fax composition. Some apps allow you to rearrange pages, rotate them if necessary, and even add annotations or signatures.
In addition to the document, you may want to include additional pages or supporting materials in your fax, such as additional forms, contracts, or relevant information. Make sure to organize them logically and ensure that the recipient can easily navigate through the fax’s content.
Once you have composed the contents of your fax, review it for any errors or inconsistencies. Check for spelling or formatting issues to ensure that your fax appears professional and polished. Take the time to proofread and verify that all the included information is accurate and up-to-date.
Customization options may vary depending on the fax app you are using. Some apps allow you to add headers, footers, watermarks, or annotations to your fax. Others may offer advanced formatting options, such as font styles, sizes, and colors. Explore the available options in your fax app and make the necessary adjustments to customize your fax according to your preferences.
By composing and customizing your fax, you add a professional touch to your communication and make it more visually appealing to your recipients. In the next step, we will explore how to enter the recipient’s fax number and prepare your fax for sending.
Step 6: Enter the Recipient’s Fax Number
Now that you have composed and customized your fax, it’s time to enter the recipient’s fax number. The recipient’s fax number is crucial for ensuring that your fax reaches the intended destination.
In your fax app, look for the option to enter the recipient’s fax number. Some apps may provide a dedicated field for this, while others may require you to go through the fax sending process and enter the number at a specific stage.
To enter the recipient’s fax number, make sure you have it readily available. Double-check the number for accuracy, as even a small error can result in your fax being sent to the wrong destination or not being delivered at all.
You can enter the recipient’s fax number manually, typically by inputting the digits on your smartphone’s keypad. Alternatively, some fax apps offer the option to select the recipient’s fax number from your contacts, making it even more convenient and error-free.
When entering the fax number, be mindful of any country or area codes required for international faxes. Ensure that you include all the necessary digits, and if prompted, select the appropriate country or region from the provided options.
After entering the recipient’s fax number, take a moment to review the information to ensure its accuracy. Some apps may offer a preview of the fax transmission details, allowing you to verify that you are sending the fax to the correct number.
At this point, you may also have the option to add a subject or message to accompany your fax. A brief note or message can provide additional context or instructions for the recipient.
By entering the recipient’s fax number accurately, you ensure that your fax is sent to the intended recipient and reaches its destination without any issues. In the next step, we will explore how to preview and send your fax.
Step 7: Preview and Send the Fax
After entering the recipient’s fax number and finalizing the details of your fax, it’s time to preview and send it. This step allows you to review the content, formatting, and recipient information before initiating the fax transmission.
In your fax app, look for the option to preview your fax. This will give you a glimpse of how the final fax will appear to the recipient. Take the time to carefully review each page of the fax, paying attention to the layout, font sizes, and any annotations or signatures that you have included.
Ensure that all the pages are in the correct order and that there aren’t any missing or duplicated pages. If necessary, make any final adjustments or edits to improve the overall appearance and clarity of the fax.
Once you are satisfied with the preview, it’s time to send the fax. Locate the send button or option in your app, typically represented by an arrow or a “Send” label. Before initiating the transmission, make sure you have a stable internet connection or a reliable network signal to ensure a smooth and uninterrupted fax delivery.
When you click or tap the send button, your fax app will initiate the transmission process. The app will connect to your fax service provider’s infrastructure, which in turn will establish a connection with the recipient’s fax machine or their connected digital fax service.
During the sending process, you may see a progress indicator or status update that informs you about the transmission progress. This allows you to track the progress of your fax and ensures that it is being delivered successfully.
After the fax has been sent, your fax app may provide a confirmation or acknowledgement message to confirm the successful transmission. This gives you peace of mind, knowing that your fax has been sent and is on its way to the recipient.
It’s important to note that the delivery time of faxes may vary depending on the recipient’s fax machine or their fax service provider. Some faxes may be delivered almost instantly, while others may take a few minutes or longer to reach the recipient.
By previewing and sending your fax, you have successfully completed the process of sending a fax from your smartphone. You can now breathe a sigh of relief, knowing that your fax has been transmitted digitally and without the need for traditional fax machines or complicated setups.
Congratulations! You have now learned how to send a fax from your smartphone. With the right fax app, a reliable fax service provider, and a digital document in hand, you have the power to send faxes conveniently and efficiently, no matter where you are. Embrace the ease and convenience of digital faxing and enjoy the many benefits it offers.
Conclusion
Sending a fax from your smartphone has never been easier. By following the steps outlined in this guide, you can now send important documents, contracts, and signed forms hassle-free, without the need for a traditional fax machine or dedicated phone line.
Through the installation of a fax app on your smartphone, signing up for a fax service provider, and obtaining a virtual fax number, you have the infrastructure in place to send and receive faxes digitally. This not only saves you time and money but also allows for greater flexibility and convenience.
With the ability to import or scan documents, compose and customize faxes, and enter recipient’s fax numbers, you have complete control over the content and delivery of your faxes. You can add a personal touch, include additional pages or supporting materials, and make necessary adjustments to ensure that your fax is professional and tailored to the recipient.
By previewing and sending your fax, you can rest assured that your document will be transmitted securely and efficiently. With digital transmission, you can track the progress of your fax and receive confirmation of successful delivery. Say goodbye to lost faxes and enjoy the peace of mind that comes with a streamlined and reliable faxing process.
With the convenience of sending faxes directly from your smartphone, you now have the freedom to work remotely, handle documents on the go, and streamline your business operations. Embrace the digital faxing revolution and take advantage of the seamless integration of technology and communication.
So, why wait? Install a fax app on your smartphone, sign up for a fax service provider, and start sending faxes effortlessly. Say goodbye to the hassle of traditional fax machines and embrace the digital age of faxing. Send faxes anytime, anywhere, and stay connected in a fast-paced and ever-evolving world.
Get ready to explore the possibilities of digital faxing and unlock a new level of convenience, efficiency, and productivity. Happy faxing!