Introduction
Sharing photos is a great way to connect with friends, family, and loved ones. With Google Photos, you can easily share your cherished moments captured in images and albums. Whether you want to share a vacation album, a collection of event photos, or even just a single snapshot, Google Photos provides various options to conveniently share your memories.
In this article, we will guide you through the steps on how to share your photos and albums using Google Photos. Whether you want to share them via links, social media platforms, or through email, we’ve got you covered. Additionally, we will also explore how you can customize your sharing options to ensure a personalized experience for both you and your recipients.
Google Photos offers a user-friendly interface and seamless integration with other Google services, making it easy to access, organize, and share your photos. Whether you’re a casual user or a photography enthusiast, sharing your photos using Google Photos allows you to preserve and relive your special moments with others.
So, if you’re ready to dive into the world of sharing photos through Google Photos, let’s get started!
Step 1: Accessing Google Photos
To begin sharing your photos using Google Photos, the first step is to access the platform. Here’s how:
1. Open your preferred web browser and navigate to the Google Photos website.
2. Sign in to your Google account. If you don’t have one, you can easily create a new account by clicking on the “Create account” option.
3. Once you’re signed in, you’ll be directed to the Google Photos homepage. Here, you’ll find all your photos and albums organized in a visually appealing and easy-to-navigate interface.
4. If you prefer to access Google Photos on your mobile device, you can download the Google Photos app from the Google Play Store (for Android) or the App Store (for iOS).
That’s it! You’re now ready to start sharing your photos and albums using Google Photos. You can now move on to the next step to learn how to select the photos or albums you want to share.
Step 2: Selecting Photos or Albums to Share
Once you’ve accessed Google Photos, the next step is to choose the specific photos or albums you want to share. Let’s dive into the process:
1. On the Google Photos homepage, browse through your library to locate the photos or albums you wish to share. You can use the scrolling feature or search bar to quickly find specific images or albums.
2. To select multiple photos, simply click or tap on each image while holding down the Ctrl key (Windows) or Command key (Mac) on your keyboard. Alternatively, you can use the select feature provided by Google Photos by clicking on the checkbox icon located at the top corner of each photo.
3. If you want to share an entire album, click or tap on the album to open it. You’ll find an option to select all the photos within the album using the select icon provided by Google Photos.
4. You can also create a new album specifically for sharing purposes. To do this, select the desired photos first and then click or tap on the “+” icon to create a new album. Give the album an appropriate name and proceed to the next step.
Once you have selected the photos or albums you want to share, you’re ready to move on to the next step and explore different ways to share them using Google Photos.
Step 3: Sharing Photos or Albums via Link
One of the easiest ways to share your photos or albums with others is by generating and sending a shareable link. The recipients can then access the photos or albums directly by clicking on the provided link. Here’s how to do it:
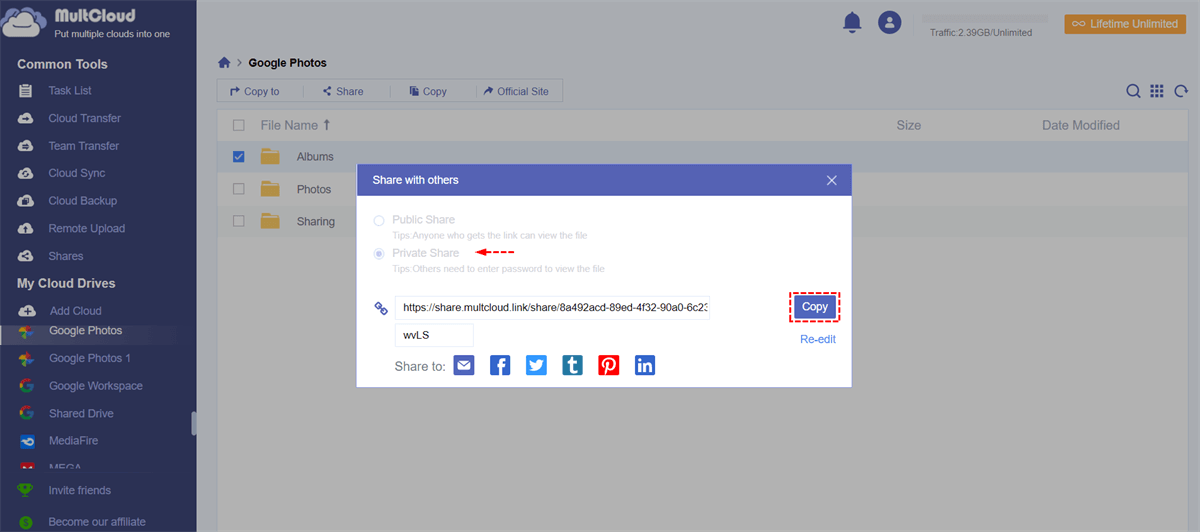
1. After selecting the desired photos or albums, click on the “Share” button located at the top of the Google Photos interface. It looks like a square with an upward arrow.
2. A pop-up window will appear with different sharing options. Select the “Create link” option.
3. You can now choose the desired settings for the shareable link. By default, the link will allow others to view the photos or albums. However, you can also grant them the ability to comment or even contribute their own photos.
4. Once you have chosen the appropriate settings, click on the “Copy link” button to copy the link to your clipboard.
5. You can now share the link with your desired recipients. You can paste it into an email, instant message, or any other communication platform you prefer. The recipients can simply click on the link to access the shared photos or albums.
Note that the link generated by Google Photos allows anyone with the link to access the shared content, so be mindful of the privacy implications when sharing sensitive or personal photos.
That’s it! You have successfully shared your photos or albums via a shareable link using Google Photos. In the next step, we will explore how to share photos or albums through various social media platforms.
Step 4: Sharing Photos or Albums via Social Media
Sharing your photos or albums on social media platforms is a popular way to showcase your memorable moments with a wider audience. Fortunately, Google Photos offers seamless integration with various social media platforms, allowing you to easily share your favorite photos and albums. Here’s how:
1. After selecting the desired photos or albums, click on the “Share” button at the top of the Google Photos interface.
2. From the sharing options, select the social media platform you want to share your photos or albums on. Google Photos provides integration with popular platforms like Facebook, Twitter, Instagram, and more.
3. You’ll be prompted to log in to your social media account if you haven’t already. Enter your credentials and grant Google Photos the necessary permissions to access your account.
4. Once authenticated, you can customize the sharing options, such as adding captions, tags, or selecting an album to upload your photos to.
5. Click on the “Share” or “Post” button to share the selected photos or albums directly to your chosen social media platform. The photos or albums will now be visible to your followers or friends on the platform.
Sharing your photos or albums on social media allows you to engage with your network and receive feedback or reactions from your connections. It’s a great way to keep your loved ones updated on your latest adventures or special moments.
Remember to review the privacy settings of both Google Photos and your social media accounts to ensure that you’re comfortable with who can view and interact with your shared content.
Now that you know how to share your photos or albums via social media, let’s explore another popular sharing option: sharing through email.
Step 5: Sharing Photos or Albums via Email
Sharing your photos or albums via email is a convenient and personalized way to send your memories directly to individuals or groups. With Google Photos, you can easily attach photos or albums to your email and share them with your desired recipients. Let’s go through the steps:
1. After selecting the photos or albums you want to share, click on the “Share” button at the top of the Google Photos interface.
2. From the sharing options, select the “Email” option. A new email composition window will appear.
3. In the email composition window, enter the email addresses of the recipients in the appropriate field. You can enter multiple email addresses separated by commas or use the “CC” and “BCC” fields as needed.
4. Customize the email subject and body according to your preference. You can add a personal message, provide context for the shared photos or albums, or convey any additional information you want to include.
5. Click on the “Send” button to send the email with the attached photos or albums to your recipients.
The recipients will receive the email with your personalized message and a link or attachment to access the shared photos or albums. They can simply click on the provided link or download the attachment to view and enjoy the memories you’ve shared.
When sharing via email, keep in mind the file size restrictions of email providers. If the size of your photos or albums exceeds the allowable limit, you may need to consider resizing or compressing the files or opting for alternative methods of sharing, such as generating a shareable link.
Now that you know how to share your photos or albums via email, let’s move on to the next step and explore how to customize your sharing options to ensure a personalized experience for both you and your recipients.
Step 6: Customizing Sharing Options
Google Photos offers various customization options to personalize your sharing experience. These options allow you to control who can access your shared photos or albums, add comments, or even contribute their own photos. Let’s explore how you can customize your sharing options:
1. After selecting the photos or albums you want to share, click on the “Share” button at the top of the Google Photos interface.
2. From the sharing options, choose the desired sharing method, such as creating a link, sharing via social media, or sending via email.
3. Before sharing, you can customize the settings for each sharing option. For example, when generating a shareable link, you can choose whether recipients can view, comment, or contribute photos. You can also set an expiration date for the link to restrict access after a certain period.
4. If you’re sharing via social media, you can add captions, tags, or choose specific albums to upload your photos to.
5. When sharing via email, you can personalize the subject, body, and any additional information you want to include. Additionally, you can choose whether to attach the photos directly or include a link for recipients to access.
By customizing your sharing options, you can ensure that your shared photos are viewed and enjoyed according to your preferences. Whether you want to maintain complete privacy or encourage collaboration and interaction, Google Photos gives you the flexibility to tailor the sharing experience.
Keep in mind that ensuring the privacy and security of your shared photos is essential. Review the sharing settings, access permissions, and expiration dates regularly to maintain control over who can view and interact with your shared content.
Now that you’ve learned how to customize your sharing options, let’s move on to the final step and explore how to view the photos or albums you’ve shared.
Step 7: Viewing Shared Photos or Albums
After successfully sharing your photos or albums using Google Photos, it’s important to understand how recipients can view and access the shared content. Let’s explore how to view shared photos or albums:
1. If you’ve shared photos or albums via a shareable link, recipients can simply click on the provided link to access the shared content. The link will direct them to a web page where they can view the photos or albums in their browser without needing a Google account.
2. If you’ve shared photos or albums via email, recipients can access the shared content by opening the email and clicking on the provided link or downloading the attached photos. If you’ve included a link, it will redirect them to the Google Photos web page where they can view the shared content.
3. If you’ve shared photos or albums via social media, recipients can view the shared content by visiting your social media profile or by clicking on the shared post. Depending on your privacy settings, they may be able to like, comment, or share the post as well.
4. Recipients who have a Google account can also view shared photos or albums by signing in to their account and visiting the “Sharing” tab in Google Photos. They can navigate to the “Shared with you” section to find the shared content.
When viewing shared photos or albums, recipients can browse through the images, zoom in or out, and even download the photos if the sharing settings permit. They can also leave comments or react to the shared content, depending on the sharing options set by the sharer.
It’s important to note that shared photos or albums can be viewed on various devices, including desktop computers, laptops, smartphones, and tablets. Google Photos provides a responsive and user-friendly interface, optimizing the viewing experience across different platforms.
By understanding how recipients can view the shared content, you can ensure that your friends, family, or colleagues have a seamless and enjoyable experience exploring the special moments you’ve shared with them.
Now that you know how to view shared photos or albums, you’ve completed all the steps required to successfully share your memories using Google Photos! Whether it’s sharing through links, social media, or email, Google Photos offers a convenient and versatile platform to connect with others through photography.
Conclusion
Sharing your photos and albums is a wonderful way to connect with others and preserve your precious memories. With Google Photos, the process of sharing becomes effortless and customizable, allowing you to share your cherished moments in a way that suits your preferences. Throughout this guide, we explored the steps involved in sharing photos and albums using Google Photos.
We began by accessing Google Photos, whether through the web interface or the mobile app. Then, we learned how to select the specific photos or albums we wanted to share. From there, we explored different methods of sharing, including generating shareable links, sharing via social media, and sending through email.
Additionally, we discussed the importance of customizing your sharing options to personalize the experience for both you and your recipients. By modifying settings such as who can view, comment, or contribute to the shared content, you have control over how your memories are enjoyed.
Finally, we looked at how recipients can view the shared photos and albums, whether by clicking on a link, accessing an email attachment, or visiting your social media profiles. The flexibility of Google Photos ensures that your shared content can be easily viewed on various devices.
Sharing your photos using Google Photos opens up a world of possibilities, allowing you to connect with friends, family, and loved ones regardless of distance. Whether it’s sharing everyday moments, special occasions, or breathtaking landscapes, Google Photos provides a platform to share and relive the magic captured in your photos.
So, start sharing your memories today using Google Photos, and let your photos become a bridge that connects hearts and captures the beauty of life.