Introduction
When using a tablet, there are often moments when you want to capture what’s on the screen and save it for later. Whether you want to capture a memorable moment in a game, document an important message, or simply share information with someone, taking a screenshot on a tablet can be incredibly useful.
Tablets, with their large touchscreen displays, offer several methods for capturing screenshots. Depending on the brand and model of your tablet, you may have different options available to you. In this article, we’ll explore the variety of methods you can use to take a screenshot on a tablet.
Taking a screenshot on a tablet is a simple process that can be accomplished using either physical buttons, an on-screen navigation bar, gesture controls, or a third-party screenshot app. Each method has its own advantages and may work differently depending on the tablet’s operating system.
Throughout this article, we will provide step-by-step instructions for each method, ensuring that no matter what kind of tablet you have, you can easily capture screenshots and make the most out of your device.
With this comprehensive guide, you’ll have all the knowledge you need to quickly and effortlessly capture screenshots on your tablet, empowering you to save and share important information with ease.
Different Methods for Taking a Screenshot on a Tablet
There are multiple methods available for taking a screenshot on a tablet, catering to different tablet models and operating systems. Let’s explore the various options:
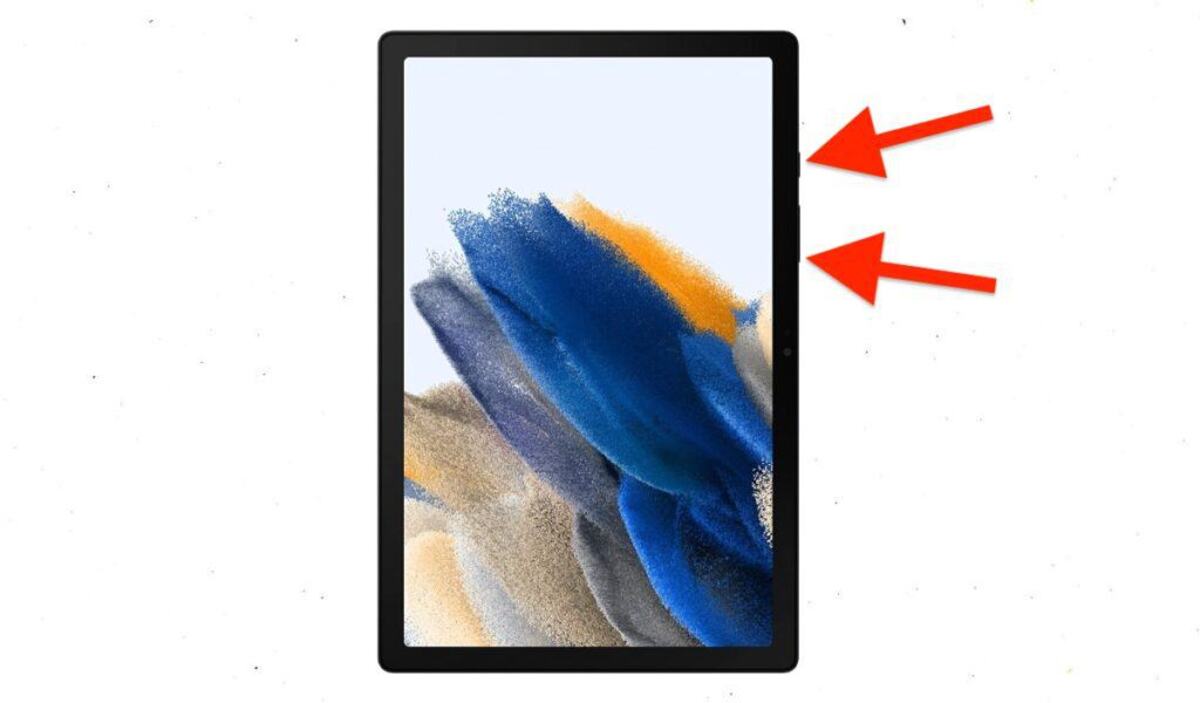
1. Using the Physical Buttons: One of the most common methods to take a screenshot on a tablet is by using the physical buttons. This method is typically consistent across different tablet brands. By pressing a combination of buttons, such as the Home button and the Power button, simultaneously, you can capture a screenshot of the current screen.
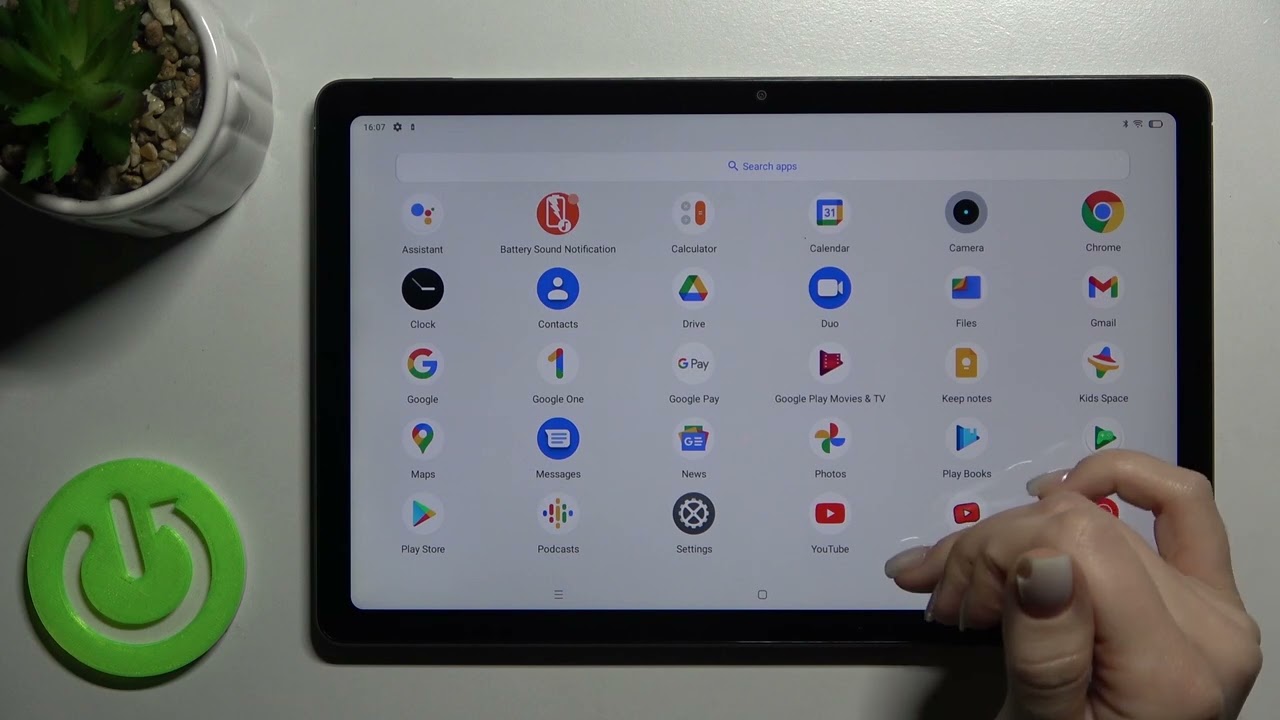
2. Using the On-Screen Navigation Bar: Some tablets, particularly those running on Android or iOS, have an on-screen navigation bar that includes a dedicated screenshot button. By tapping on this button, you can instantly take a screenshot without the need to press any physical buttons.
3. Using Gesture Controls: In recent years, some tablets have introduced gesture controls as a convenient way to take a screenshot. By swiping your hand across the screen or using a specific gesture, the tablet recognizes the action as a command to capture a screenshot. This method offers a touch-free and intuitive experience.
4. Using a Third-Party Screenshot App: In addition to the built-in screenshot features, there are numerous third-party apps available on app stores that offer advanced screenshot functionalities. These apps often provide additional editing and sharing options, allowing you to customize your screenshots before saving or sending them.
It’s worth noting that the availability and functionality of these methods may vary depending on your tablet’s brand, model, and operating system version. Therefore, it’s essential to refer to the user manual or the tablet’s support documentation for specific instructions tailored to your device.
Now that we’ve covered the different methods available, in the following sections, we will explore each method in more detail, providing step-by-step instructions to help you capture screenshots on your tablet seamlessly.
Method 1: Using the Physical Buttons
One of the most common and widely applicable methods for taking a screenshot on a tablet is by using the physical buttons. This method is generally consistent across different tablet brands, making it a reliable option. Here’s how you can capture a screenshot using the physical buttons:
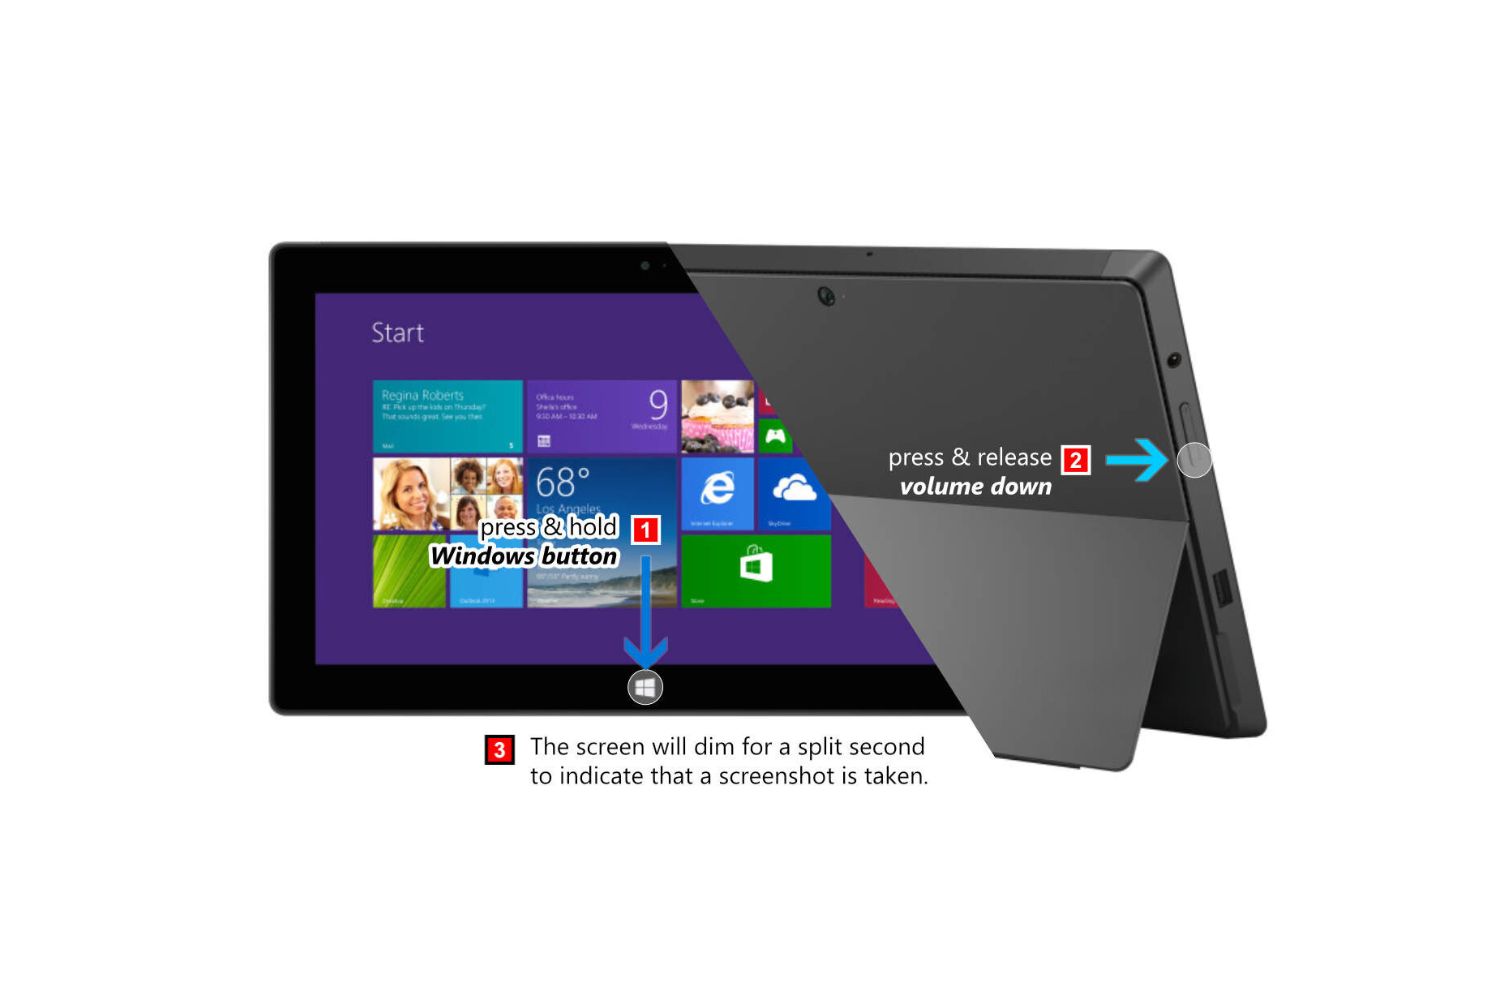
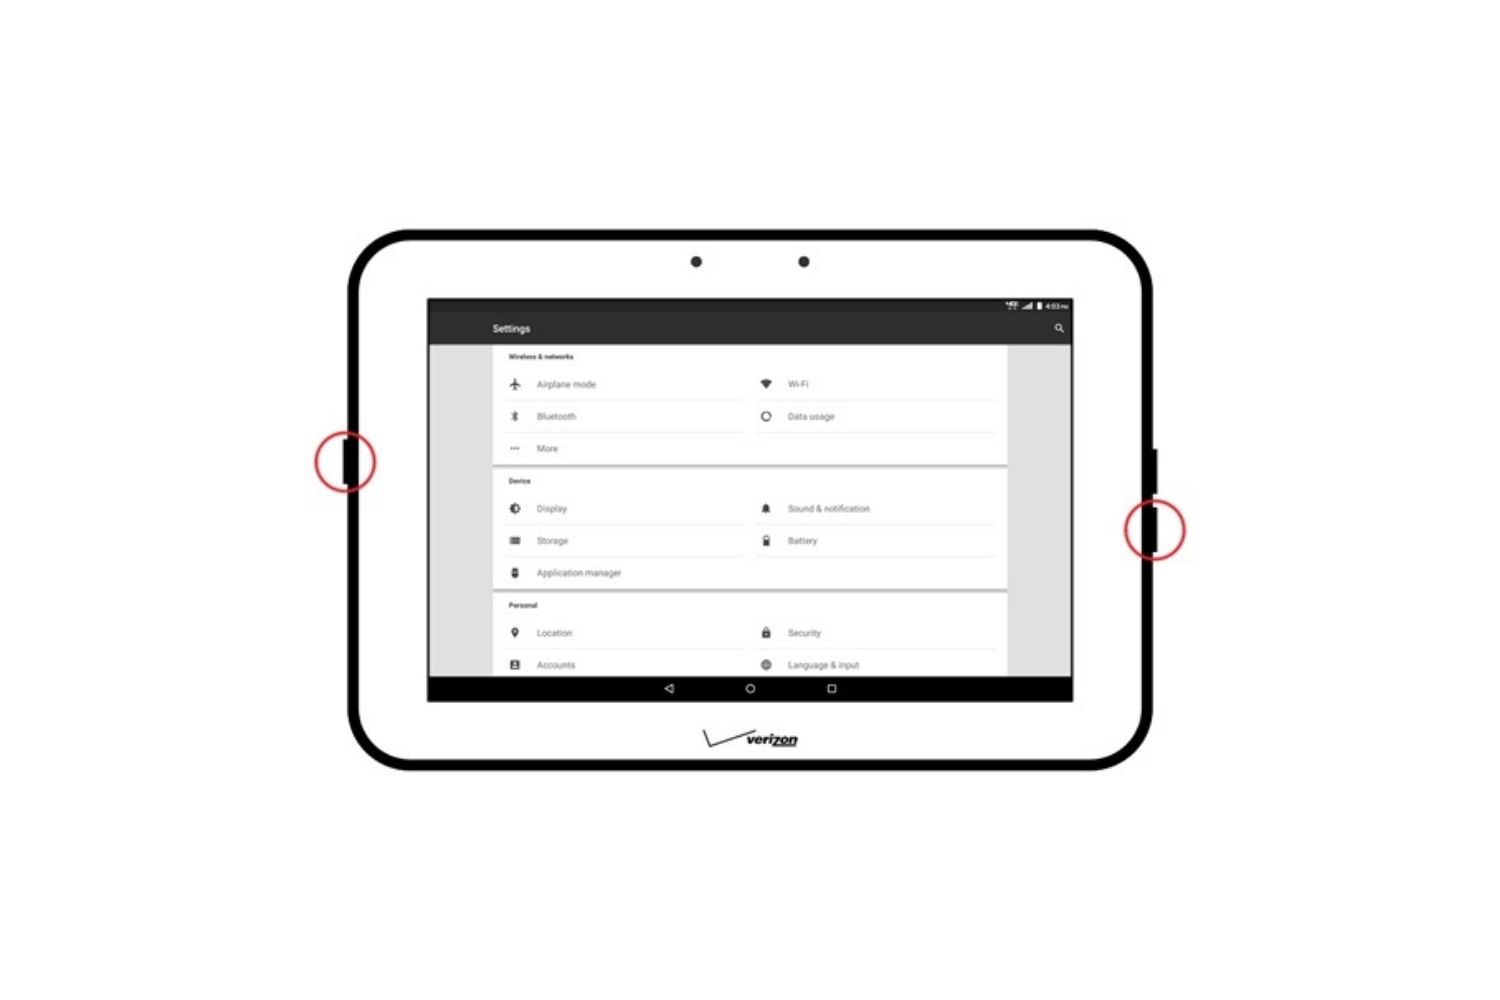
Step 1: Identify the buttons: Take a look at your tablet and locate the physical buttons present on the device. The most common combination includes the Home button and the Power button. However, depending on your tablet’s make and model, it may vary slightly.
Step 2: Prepare the screen: Navigate to the screen that you want to capture as a screenshot. Ensure that the content or information you wish to capture is visible on the screen.
Step 3: Press the button combination: Once you’re ready, simultaneously press and hold the designated combination of buttons. In most cases, this involves pressing and holding the Home button and the Power button together for a few seconds.
Step 4: Capture the screenshot: After holding the buttons for a moment, you should see a flash or hear a camera shutter sound, indicating that the screenshot has been successfully captured. The screenshot will then be saved in your tablet’s gallery or screenshot folder.
Step 5: Access the screenshot: To view your captured screenshot, go to your tablet’s Photos app or Gallery app. Look for the Screenshots folder or Album, where you’ll find all the screenshots you’ve taken.
Remember that the specific button combination to take a screenshot may vary between different tablet models and brands. If the Home and Power button combination doesn’t work for your tablet, consult the user manual or visit the manufacturer’s website for precise instructions tailored to your device.
Using the physical buttons to take a screenshot is a straightforward and reliable method, ensuring that you can capture important moments or information on your tablet with ease.
Method 2: Using the On-Screen Navigation Bar
Many tablets, especially those running on Android or iOS, have an on-screen navigation bar that includes a dedicated screenshot button. This makes it incredibly convenient to capture screenshots without the need to press any physical buttons. Here’s how you can use the on-screen navigation bar to take a screenshot:
Step 1: Navigate to the desired screen: Go to the screen that you want to capture as a screenshot. Ensure that the content or information you wish to capture is visible on the screen.
Step 2: Locate the screenshot button: Look for the screenshot button on the on-screen navigation bar. It is usually represented by a camera icon or a square-shaped icon with two lines on either side.
Step 3: Tap the screenshot button: Once you’ve found the screenshot button, simply tap on it. This will trigger the tablet to capture a screenshot of the current screen.
Step 4: View the screenshot: After taking the screenshot, a notification may appear briefly indicating that the screenshot has been captured. You can swipe down the notification shade and tap on the screenshot notification to view and access the captured screenshot instantly.
Step 5: Access the screenshot later: If you miss the notification or want to access the screenshot later, you can find it in your tablet’s Photos app or Gallery app. Look for the Screenshots folder or Album, where all the screenshots on your tablet are stored.
Note that the availability of the on-screen screenshot button may vary depending on the tablet’s operating system version and the manufacturer’s customization. If you can’t find the screenshot button on your tablet’s navigation bar, consult the user manual or search for specific instructions online.
Using the on-screen navigation bar to capture screenshots offers a user-friendly and convenient method to quickly capture and access screenshots on your tablet without the need for physical buttons.
Method 3: Using Gesture Controls
Gesture controls have become increasingly popular as a convenient and touch-free method for taking screenshots on certain tablets. This method allows you to capture a screenshot with a simple hand gesture or specific motion. Here’s how you can use gesture controls to take a screenshot on your tablet:
Step 1: Enable gesture controls: Go to the Settings menu on your tablet and navigate to the ‘Gestures’ or ‘Motion’ settings. Look for an option related to capturing a screenshot with a gesture or motion and make sure it is turned on.
Step 2: Prepare the screen: Navigate to the screen that you want to capture. Ensure that the content or information you wish to capture is visible on the screen.
Step 3: Perform the gesture: Different tablets may have varying gestures for capturing a screenshot. It could involve swiping your hand across the screen in a specific direction, pinching the screen, or using a particular motion. Check your tablet’s user manual or the settings menu for the specific gesture required on your device.
Step 4: Capture the screenshot: Once you have performed the gesture, the tablet’s sensors will detect the action and capture a screenshot of the current screen. You may feel a slight vibration or see a visual indication that the screenshot has been successfully taken.
Step 5: Access the screenshot: To view the captured screenshot, go to your tablet’s Photos app or Gallery app. Look for the Screenshots folder or Album, where you’ll find all the screenshots taken using the gesture controls.
It’s important to note that not all tablets support gesture controls for capturing screenshots. This feature is often available on newer models or those running specific versions of the operating system. Check your tablet’s specifications or consult the manufacturer’s website to ensure that your device supports this method.
Using gesture controls to capture screenshots provides a touch-free and intuitive experience, making it a convenient option for those who prefer a hands-free approach.
Method 4: Using a Third-Party Screenshot App
In addition to the built-in screenshot features, you can also utilize third-party screenshot apps to enhance your screenshot-taking capabilities on your tablet. These apps offer additional features like image editing, customizable settings, and easy sharing options. Here’s how you can use a third-party screenshot app to capture screenshots on your tablet:
Step 1: Choose a third-party app: Explore your tablet’s app store and search for popular screenshot apps. Read reviews, check ratings, and compare features to find an app that suits your needs and preferences. Some popular options include Snagit, Screenshot Easy, and Nimbus Screenshot.
Step 2: Download and install the app: Once you’ve chosen an app, download and install it on your tablet. Follow the on-screen instructions to complete the installation process.
Step 3: Launch the app and grant necessary permissions: Open the app and grant any permissions it requires, such as access to your photos or storage, so that it can save captured screenshots.
Step 4: Customize settings if needed: Explore the app’s settings menu to customize options like screenshot format, quality, storage location, and any additional features or shortcuts that the app offers.
Step 5: Capture a screenshot with the app: Once you have customized the settings, you can use the app’s interface or assigned shortcut to capture a screenshot. Follow the app’s instructions, which may include tapping a button, shaking your device, or using a specified gesture.
Step 6: Access and manage your screenshots: Most screenshot apps provide a built-in gallery or folder where you can view, edit, and manage your captured screenshots. You can access the app’s gallery to browse through your screenshots, choose to edit them, or share them directly from within the app.
Using a third-party screenshot app allows you to have more control and flexibility over your screenshot-taking experience. You can explore various editing options, add annotations, crop images, or apply filters before saving or sharing them.
Before downloading a third-party app, ensure that it comes from a reputable source and has positive user reviews to avoid any security risks or malware. Always be cautious about granting app permissions, and only download apps from reliable app stores or official websites.
With a reliable third-party screenshot app, you can enhance your screenshot-taking capabilities and unleash your creativity when capturing and sharing content on your tablet.
Conclusion
Capturing screenshots on your tablet can be a useful and practical feature, whether you want to preserve a memorable moment, share important information, or keep a record of something significant. We’ve explored the different methods available for taking screenshots on a tablet, which include using the physical buttons, the on-screen navigation bar, gesture controls, and third-party screenshot apps.
Using the physical buttons is a common and reliable method that works across various tablet brands. It involves pressing and holding a combination of buttons, such as the Home button and the Power button, to capture a screenshot.
The on-screen navigation bar provides a convenient way to take screenshots without the need for physical buttons. Tablets running on Android or iOS often include a dedicated screenshot button on the navigation bar, offering a quick and straightforward method to capture screenshots.
Gestures controls offer a touch-free approach where you can capture a screenshot by performing specific hand gestures or motions. This method adds convenience and intuitiveness to the screenshot-taking process.
For those looking for advanced features, third-party screenshot apps provide additional functionality, such as image editing, customizable settings, and easy sharing options. These apps expand your screenshot-taking capabilities and allow you to personalize and enhance your screenshots.
Remember to consult your tablet’s user manual or the manufacturer’s support documentation for precise instructions tailored to your device and operating system version. Different tablets may have slight variations in the methods and button combinations required to capture screenshots.
Whether you choose to use the physical buttons, the on-screen navigation bar, gesture controls, or third-party screenshot apps, capturing screenshots on your tablet can be a simple and efficient way to save and share information. Explore the methods provided in this guide to find the one that best suits your tablet and your preferences. With the ability to take screenshots on your tablet, you can capture and preserve important moments, information, and memories with ease.