Introduction
Welcome to the fascinating world of Windows tablets! As an owner of a Windows tablet, you have the power to enjoy all the convenience and functionality of a traditional computer with the added versatility of a portable device. One of the essential skills you should have is the ability to take screenshots on your Windows tablet. Whether you want to capture an important piece of information, share a memorable moment, or troubleshoot technical issues, knowing how to take a screenshot can be incredibly helpful.
In this guide, we will explore various methods for taking screenshots on a Windows tablet. Whether you prefer using hardware buttons, dedicated screenshot tools, or the classic Print Screen key, we’ll cover all the bases. By the end of this article, you’ll be equipped with the knowledge you need to become a screenshot-savvy Windows tablet user.
Before we delve into the different techniques, it’s important to note that the exact process may vary slightly depending on your specific Windows tablet model and operating system version. Be sure to consult your device’s user manual or search for any specific instructions tailored to your tablet if needed.
Understanding the hardware buttons
Before we dive into the various methods of taking screenshots on a Windows tablet, it’s essential to understand the hardware buttons that play a significant role in this process. Although the exact placement and configuration may differ depending on your tablet model, we’ll cover the most common buttons found on Windows tablets.
Firstly, let’s look at the Windows logo button. This button, typically located at the front or side of the tablet, is the key to many important functions, including taking screenshots. It is denoted by the familiar Windows logo and serves as a shortcut to the Start menu and various system actions.
The volume buttons are another crucial component when it comes to capturing screenshots on a Windows tablet. Most tablets have volume control buttons, usually located along the side, which allow you to adjust the device’s audio output. These volume buttons also work in tandem with other buttons to initiate the screenshot process.
Lastly, some tablets may have a dedicated hardware button specifically designed for taking screenshots. This button, often labeled as “Screen Capture” or “Screenshot,” serves as a quick and convenient way to capture the screen without having to use combinations of other buttons.
Understanding these hardware buttons is essential because they will be integral to the methods we’ll explore in the next sections. Now that you have a good grasp of the hardware buttons, let’s move on to the different techniques you can use to take screenshots on your Windows tablet.
Taking a screenshot with the Windows key + volume down button
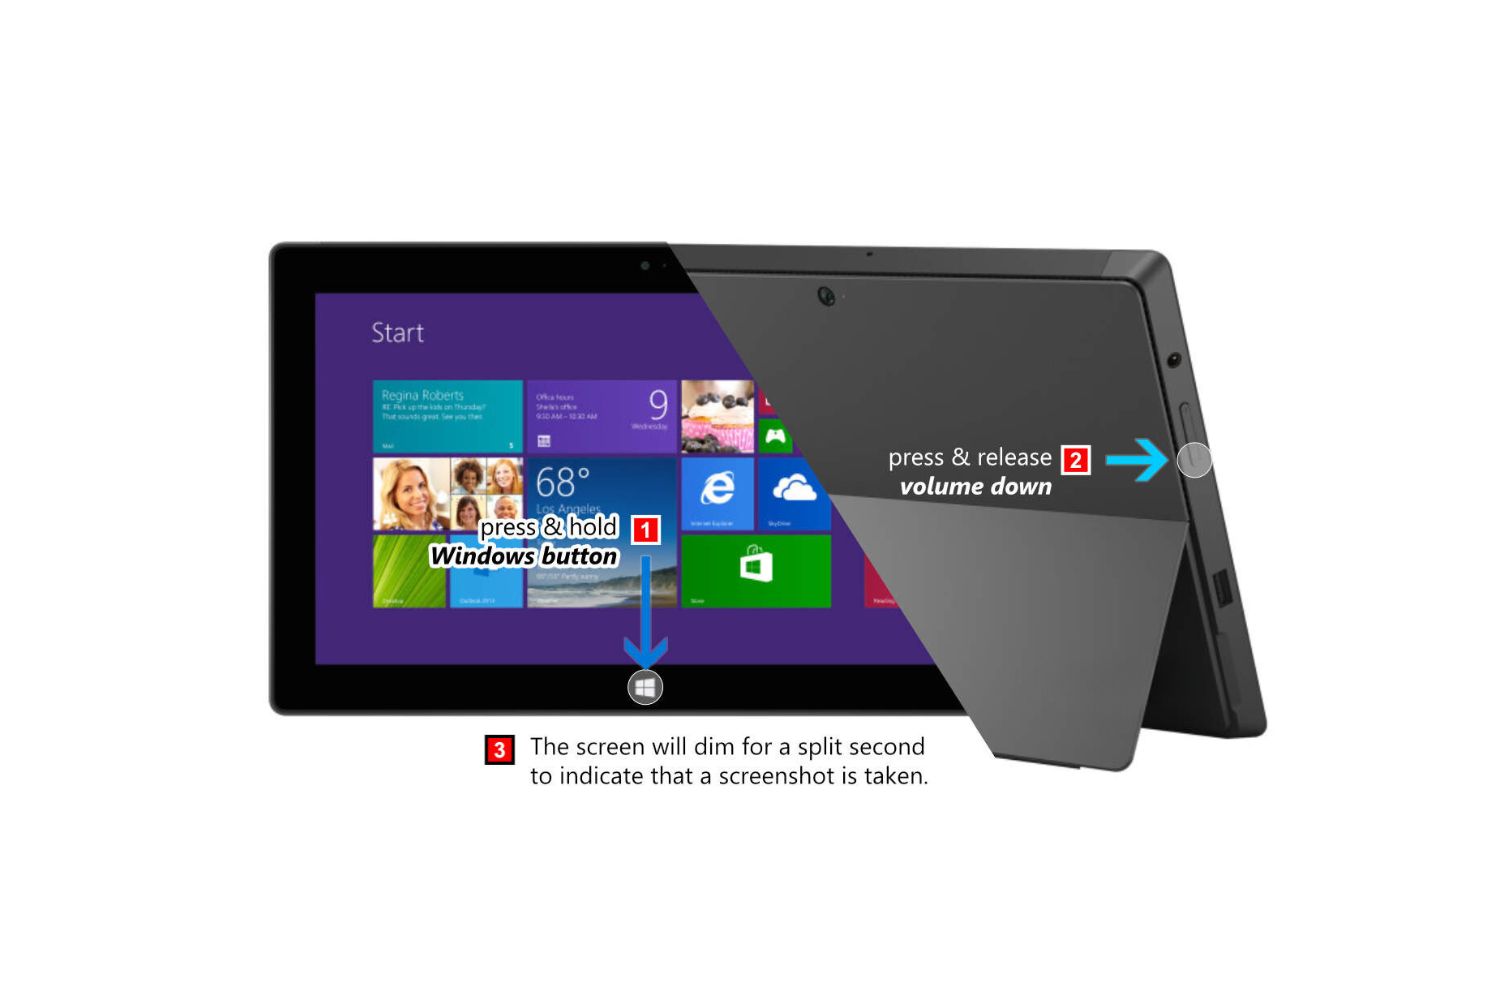
If your Windows tablet has a physical Windows logo button and volume control buttons, you can take a screenshot by pressing a combination of these buttons. This method is relatively simple and works consistently across various tablet models.
To capture a screenshot using this method, follow these steps:
- Locate the Windows logo button and volume down button on your tablet. These buttons are typically found on opposite sides of the device.
- Navigate to the screen or content you want to capture in the screenshot.
- Press and hold the Windows logo button and the volume down button simultaneously for a few seconds.
- You may hear a camera shutter sound or see a brief screen flash, indicating that the screenshot has been successfully captured.
- Open the Screenshots folder in the Photos app or go to the Pictures library on your tablet to access the screenshot. You can easily find the Screenshots folder by tapping on the Photos app, selecting Albums, and then looking for the Screenshots album.
It’s worth noting that the Screenshots folder may vary slightly depending on your tablet’s operating system version. However, the general navigation to find the captured screenshots should remain relatively consistent.
Using the Windows logo button and volume down button combination is a quick and reliable method for capturing screenshots on your Windows tablet. It is especially handy when you need to capture the entire screen quickly. However, if you prefer more control over the area you want to capture, let’s move on to the next method using the Snipping Tool.
Using the snipping tool
If you want more flexibility in capturing specific areas of your Windows tablet’s screen, the Snipping Tool is the perfect solution. This built-in tool allows you to select and capture precisely what you want, making it ideal for capturing a specific portion of an application, website, or document.
Here’s how you can use the Snipping Tool to take a screenshot:
- Open the Start menu on your Windows tablet and search for “Snipping Tool.”
- Select the Snipping Tool app from the search results to open it.
- Once the Snipping Tool window is open, click on the “New” button.
- Your screen will dim, with a cursor appearing as a “+” symbol.
- Click and drag the cursor to select the area you want to capture in the screenshot.
- Release the cursor to take the screenshot.
- The captured screenshot will open in the Snipping Tool window.
- From the Snipping Tool window, you can annotate or highlight parts of the screenshot using the available tools, such as the pen or highlighter.
- Click on the “File” menu and select “Save As” to save the screenshot to your desired location on your tablet.
The Snipping Tool provides a convenient way to precisely capture any portion of your tablet’s screen. Whether you need to highlight specific details, crop out unnecessary elements, or make annotations, the Snipping Tool offers the flexibility to customize your screenshots.
However, if you’re looking for an even quicker method to capture a specific area without launching a separate tool, let’s explore the next method using the Windows key + shift + S shortcut.
Capturing a specific area with the Windows key + shift + S
Windows tablets running on Windows 10 or later versions offer a convenient shortcut for capturing a specific area of the screen without the need for additional tools. The Windows key + shift + S combination opens the Snip & Sketch tool, allowing you to select and capture any desired portion of the screen.
Here’s how you can use this shortcut to take a screenshot:
- Make sure you’re on the screen or content that you want to capture.
- Press and hold the Windows key, followed by the Shift key.
- While holding both keys, press the S key. This will dim the screen and display a small toolbar at the top of the screen.
- Click and drag the cursor to select the specific area you want to capture. As you drag, a rectangular outline will appear, indicating the area that will be captured.
- Release the cursor to take the screenshot, and the captured image will be saved to the clipboard.
- To access the screenshot, open an image editing or word processing application, and paste the screenshot using the Ctrl + V keyboard shortcut.
- From there, you can save the screenshot to your desired location or make any necessary edits.
The Windows key + shift + S combination is ideal for capturing a specific area of the screen quickly and easily. It eliminates the need to launch separate tools or navigate through menus, making it a convenient option for capturing precise screenshots on your Windows tablet.
However, if you prefer a more traditional method of taking screenshots, let’s move on to the next technique using the Print Screen key and the Snip & Sketch app.
Screenshotting with the Print Screen key and the Snip & Sketch app
If you’re familiar with taking screenshots on a Windows computer, you’ll be pleased to know that the same method can be applied to your Windows tablet. By utilizing the Print Screen key and the Snip & Sketch app, you can quickly capture your tablet’s entire screen or a selected area.
Here’s a step-by-step guide on how to use the Print Screen key and the Snip & Sketch app:
- Locate the Print Screen key on your tablet’s keyboard. The key may be labeled as “PrtScn” or “Print Screen.”
- Navigate to the content or screen you want to capture in the screenshot.
- Press the Print Screen key once to capture the entire screen or the selected area, based on your device’s configuration.
- Open the Snip & Sketch app. You can find it by typing “Snip & Sketch” in the Start menu search or by searching for it in the All Apps list.
- In the Snip & Sketch app, click on the new snip button (camera icon) at the top-left corner of the window.
- The captured screenshot will appear in the Snip & Sketch app, allowing you to make annotations or edits if desired.
- To save the screenshot, click on the floppy disk icon or select “Save As” from the File menu in the Snip & Sketch app.
- Choose a location to save the screenshot and provide a name for the file.
- Click on “Save” to save the screenshot to your desired location on your tablet.
The combination of the Print Screen key and the Snip & Sketch app is a versatile and user-friendly method for taking screenshots on your Windows tablet. It enables you to capture both the entire screen and specific areas effortlessly, providing flexibility to suit your needs.
Now that you’ve learned various methods for capturing screenshots on your Windows tablet, let’s explore how to save and access your screenshots in the next section.
Saving and accessing your screenshots
After capturing screenshots on your Windows tablet, it’s essential to know how to save and access them for future use. By default, your tablet will save the screenshots in a designated folder and provide easy ways to access them.
Here’s how you can save and access your screenshots:
- Firstly, locate the Screenshots folder on your tablet. Depending on your tablet’s operating system version, you can find this folder in the Photos app or the Pictures library. To access it through the Photos app, open the app, select Albums, and look for the Screenshots album.
- When you open the Screenshots folder, you’ll find all the screenshots you have captured arranged in chronological order.
- To save a screenshot to a different location or folder, simply drag and drop the screenshot file to your desired location.
- If you have connected your tablet to a cloud storage service or have an external storage device attached, you can also save the screenshots directly to those locations.
- To access your saved screenshots, you can either navigate to the Screenshots folder whenever you need them or use the Photos app to browse through the Screenshots album.
- If you prefer a more organized approach, you can create subfolders within the Screenshots folder to categorize your screenshots based on specific projects, purposes, or date ranges.
- Additionally, you can also easily share your screenshots by selecting the screenshot file, clicking on the Share button, and choosing your preferred method for sharing, such as email, messaging apps, or social media.
By following these steps, you’ll be able to effectively manage and access your captured screenshots on your Windows tablet. Whether you want to refer back to them later, share them with others, or organize them for easy retrieval, knowing how to save and access your screenshots is essential.
Now that you’re equipped with the knowledge of taking, saving, and accessing screenshots on your Windows tablet, you can make the most out of this powerful feature to enhance your productivity and communication.
Conclusion
Capturing screenshots on your Windows tablet allows you to preserve important information, share memorable moments, troubleshoot issues, and enhance your productivity. Throughout this guide, we’ve explored various methods for taking screenshots on a Windows tablet, including using hardware buttons, the Snipping Tool, the Windows key + shift + S shortcut, and the Print Screen key with the Snip & Sketch app.
Understanding the hardware buttons on your tablet is crucial as they play an integral role in capturing screenshots. Whether it’s using the Windows key + volume down button for a quick full-screen capture or utilizing the Snipping Tool to capture specific areas, each method offers its own advantages.
The Windows key + shift + S shortcut and the Print Screen key with the Snip & Sketch app provide even more flexibility and customization in capturing screenshots. These methods allow you to select specific regions of the screen and provide options for making annotations or edits before saving your screenshots.
It’s important to note that even though the exact steps may vary slightly depending on your tablet model and operating system version, the general principles discussed in this guide should still be applicable. Consult your tablet’s user manual or search for specific instructions tailored to your device if needed.
Lastly, saving and accessing your captured screenshots is essential for their future use. By familiarizing yourself with the Screenshots folder and the Photos app, you can easily manage, organize, and share your screenshots as per your preference.
Now that you have the knowledge and skills to take, save, and access screenshots on your Windows tablet, you can leverage this capability to improve your efficiency, communication, and overall user experience. So go ahead and capture those important moments or valuable information effortlessly, and make the most of your Windows tablet’s features!