Introduction
So, you’ve just purchased a Logitech webcam, excited to connect with friends, family, or colleagues through video calls and conferences. However, you quickly realize that your webcam isn’t working as expected. Frustration sets in, and you find yourself wondering, “How do I get my Logitech webcam to work?” Well, fear not! In this guide, we’ll walk you through troubleshooting steps to help you resolve the issue and get your Logitech webcam up and running.
A reliable and functioning webcam is essential in today’s digital age, especially with the increasing use of video communication platforms. Whether you need it for work, education, or connecting with loved ones, a properly functioning webcam ensures that you can be seen and heard clearly during online interactions.
Before diving into the troubleshooting steps, it’s important to note that the specific solutions may vary depending on the model of your Logitech webcam and the operating system you are using. However, the general troubleshooting steps discussed here should provide a good starting point for most webcam issues.
Throughout this guide, we’ll cover various aspects of troubleshooting, including checking the USB port, ensuring the webcam is enabled, updating Logitech webcam drivers, adjusting webcam settings, and testing the webcam with other applications. We’ll also address common issues that users often encounter and provide guidance on how to resolve them.
While this guide aims to assist you in getting your Logitech webcam to work, it’s worth noting that some issues may require further assistance from Logitech’s support team. In such cases, we’ll guide you on how to contact their support for prompt and accurate assistance.
Now, without further ado, let’s start troubleshooting and get your Logitech webcam back on track for uninterrupted video chatting and conferencing!
Troubleshooting the Connection
When your Logitech webcam isn’t working, the first step is to troubleshoot the connection between your webcam and the computer. Issues with the connection can often be the cause of malfunctioning webcams. Here are some steps you can take to resolve connection-related problems:
1. Check the USB port: Ensure that your Logitech webcam is properly connected to a functioning USB port on your computer. Try unplugging and re-plugging the USB cable to make sure it’s securely connected. If possible, try connecting the webcam to a different USB port to rule out any issues with the current port.
2. Ensure the webcam is enabled: Sometimes, the webcam may be disabled in the computer’s settings, preventing it from working. To check if the webcam is enabled, go to the Device Manager (for Windows users, press Windows key + X and select Device Manager) and look for the webcam under “Imaging devices” or “Cameras.” If the webcam is disabled, right-click on it and select “Enable.”
3. Restart your computer: A simple restart can often resolve connectivity issues. Restart your computer and check if the webcam starts working correctly afterward.
4. Try a different USB cable: If you have access to another USB cable, try using it to connect your Logitech webcam to your computer. A faulty USB cable can sometimes cause connectivity problems. If the webcam starts working with a different cable, it’s an indication that the original cable needs to be replaced.
5. Test the webcam on another computer: To isolate the issue and determine whether it’s related to your computer or the webcam itself, try connecting your Logitech webcam to another computer. If the webcam works on a different computer, it suggests that the problem lies with your computer’s configuration or settings.
By following these troubleshooting steps, you can address connection-related issues and increase the chances of resolving the problem with your Logitech webcam. If the problem persists, proceed to the next section for further troubleshooting options.
Checking the USB Port
One of the common causes of Logitech webcam issues is a faulty or improperly connected USB port. Checking the USB port and ensuring its proper functionality can help resolve the problem. Here’s what you can do:
1. Inspect the USB port: Start by visually inspecting the USB port on your computer. Look for any visible damage, such as bent pins or debris inside the port. If you notice any physical damage, it may be necessary to consult a professional for repair or consider using a different USB port.
2. Connect to a different USB port: If the USB port appears to be undamaged, try connecting your Logitech webcam to a different USB port on your computer. This helps determine whether the issue is specific to a particular port or if it is more widespread.
3. Check power supply: In some cases, USB ports may not provide sufficient power to the webcam, resulting in functionality issues. If your Logitech webcam has an external power supply option, ensure that it is properly connected and powered on.
4. Remove other USB devices: Disconnect any unnecessary USB devices connected to your computer. Sometimes, conflicts can arise when multiple USB devices are connected simultaneously, leading to connectivity issues with the webcam.
5. Use a USB hub or extension cable: If you’re still experiencing connectivity problems, consider using a high-quality USB hub or extension cable. Sometimes, the distance between the webcam and the computer can cause signal degradation, and using an extension cable or hub can help maintain a stable connection.
By thoroughly checking the USB port, ensuring it is functioning correctly, and employing some of the techniques mentioned above, you can increase the chances of resolving Logitech webcam issues related to connectivity. If the problem persists, move on to the next troubleshooting step.
Ensuring the Webcam is Enabled
Another common reason for Logitech webcam problems is the webcam being disabled in the computer’s settings. It’s essential to ensure that the webcam is enabled to allow it to function correctly. Here’s what you can do:
1. Check system settings: On Windows, go to the Start menu and open the Settings app. Then, navigate to the “Privacy” section and select “Camera” from the left-hand menu. Make sure the “Allow apps to access your camera” toggle is turned on.
2. Enable webcam in device manager: For Windows users, you can check if the webcam is enabled in the Device Manager. Press the Windows key + X and select “Device Manager” from the menu. Expand the “Imaging devices” or “Cameras” category, right-click on your Logitech webcam, and choose the “Enable” option if it’s available.
3. Check webcam settings in applications: If you’re using a specific application for video calls or conferencing, such as Zoom or Skype, check the settings within that application. Look for options related to the webcam and ensure it is selected as the default camera device.
4. Update webcam drivers: Outdated or incompatible webcam drivers can cause issues. Visit the Logitech website or use the Logitech G HUB software (if applicable) to download and install the latest webcam drivers for your specific Logitech model.
5. Restart the computer: Sometimes, simply restarting your computer can resolve conflicts and allow the webcam to be enabled properly. After the restart, check if the webcam starts working correctly.
By ensuring that the webcam is enabled in the system settings, the device manager, and the application settings, you can eliminate the possibility of it being disabled and increase the chances of resolving Logitech webcam issues. If the problem persists, don’t worry — there are additional troubleshooting steps we can explore.
Updating Logitech Webcam Drivers
Outdated or incompatible drivers can often cause Logitech webcam issues. It’s crucial to keep your webcam drivers up to date to ensure optimal performance. Here’s how you can update your Logitech webcam drivers:
1. Visit the Logitech website: Start by visiting the official Logitech website and navigating to their support or drivers page. Look for the appropriate driver download section, usually categorized by webcam model or series.
2. Locate the correct drivers: Identify the correct driver for your Logitech webcam model and download it. Ensure that you select the driver compatible with your operating system (e.g., Windows 10, macOS).
3. Install the drivers: Once the driver file is downloaded, double-click on it to begin the installation process. Follow the on-screen instructions to complete the installation. It may be necessary to restart your computer to apply the driver changes.
4. Use Logitech G HUB (if applicable): If you have a Logitech gaming webcam, you may need to use the Logitech G HUB software to update the drivers. Launch the software, navigate to the “Downloads” or “Updates” section, and check for any available driver updates. Follow the instructions provided to update the drivers.
5. Automatic driver update tools: If you prefer a more automated approach, you can use third-party driver update tools that can scan your system and update the Logitech webcam drivers. However, exercise caution and only download and use reputable and trustworthy software from reliable sources.
Updating the Logitech webcam drivers should help resolve compatibility issues and improve the overall performance of your webcam. If you are still experiencing problems, let’s move on to the next troubleshooting step.
Adjusting Webcam Settings
Adjusting the settings of your Logitech webcam can often improve its performance and resolve certain issues. Here are some steps you can take to adjust the webcam settings:
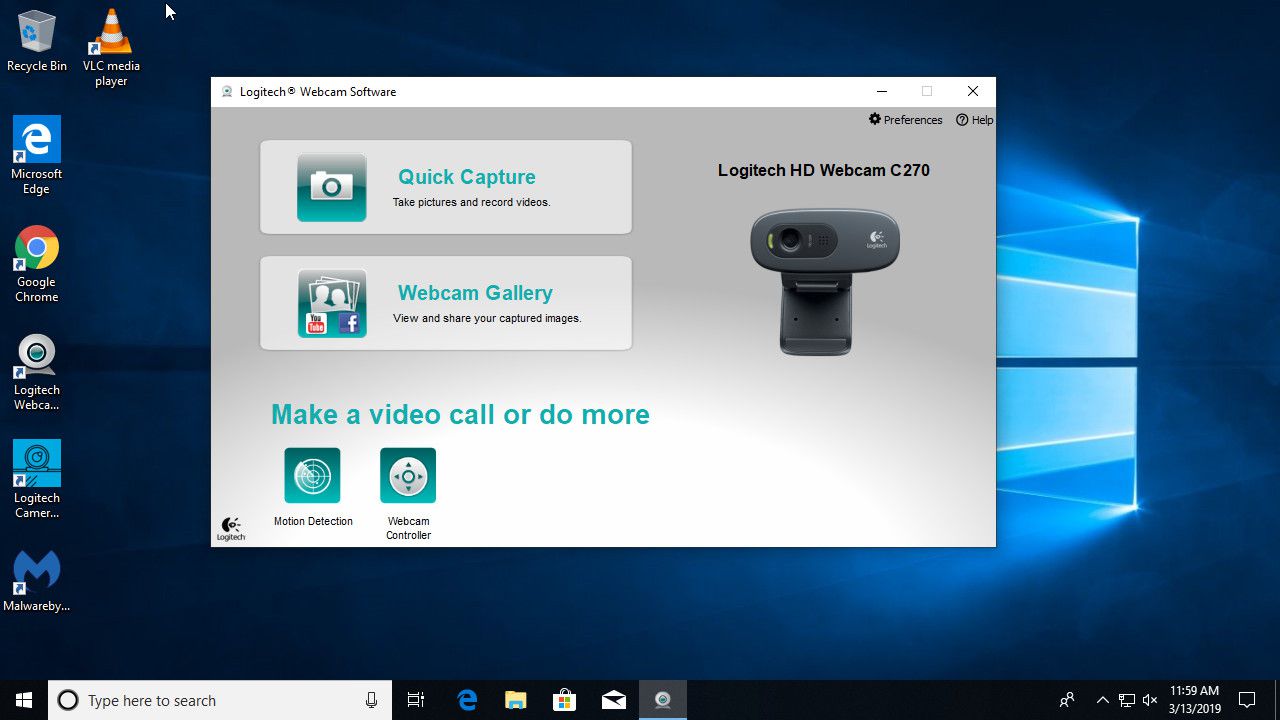
1. Logitech Webcam Software: If your Logitech webcam comes with specific software, such as Logitech Capture or Logitech Camera Settings, install and launch it. These software options allow you to access advanced settings and make adjustments specific to your webcam model.
2. Image and video quality: Within the webcam software or application, look for settings related to image and video quality. Adjust features such as brightness, contrast, exposure, and white balance to achieve the desired visual output.
3. Focus and zoom: If your Logitech webcam supports autofocus or manual focus, use the software or application to adjust the focus settings. You can also experiment with zoom options to frame your video properly.
4. Microphone settings: If your webcam has an integrated microphone, check the audio settings within the webcam software or application. Ensure that the microphone is selected as the default audio input device and adjust the volume and sensitivity settings as needed.
5. Privacy and security: Consider reviewing the privacy and security settings of your webcam software or application. Ensure that the necessary permissions are granted for the webcam to function correctly, while still prioritizing your privacy preferences.
6. Default settings: If you have made extensive changes to the webcam settings, and the webcam is still not performing as expected, consider restoring the default settings. Look for an option to reset or restore the webcam settings within the software or application.
By adjusting and fine-tuning the webcam settings, you can optimize the image quality, audio performance, and overall functionality of your Logitech webcam. If the issues persist, let’s move on to the next troubleshooting step.
Testing the Webcam with Other Applications
If your Logitech webcam is still not working properly, it’s essential to check whether the problem is specific to a particular application or if it persists across different applications. Here’s how you can test the webcam with other applications:
1. Native webcam app: Most operating systems have built-in native webcam applications that allow you to capture photos or record videos. Open the native app (such as Camera on Windows or Photo Booth on macOS) and check if the webcam functions correctly. If it does, it suggests that the issue may be with the specific application you were previously experiencing problems with.
2. Video conferencing apps: Test your webcam with different video conferencing applications, such as Zoom, Microsoft Teams, or Skype. Start a video call or join a test meeting within each application and observe if the webcam functions as expected. If it works fine in one application but not in others, it could indicate compatibility issues with those specific platforms.
3. Third-party webcam software: Install and try using third-party webcam software, such as OBS Studio or ManyCam. These applications provide advanced webcam functionalities and can help diagnose if the problem lies with the webcam or the software you were previously using.
4. Test on another computer: If possible, connect your Logitech webcam to a different computer and test it there. If the webcam works flawlessly on another computer, it suggests that the issue may be with your current computer’s hardware or software configurations.
By testing your Logitech webcam with various applications and on different computers, you can gather crucial information about the nature of the problem. This step will help you determine whether the issue is application-specific, computer-specific, or related to the webcam itself.
If the webcam still doesn’t work properly after testing with different applications, let’s move on to the next troubleshooting step.
Troubleshooting Common Issues
Logitech webcams can encounter several common issues that may hinder their performance. Let’s explore some of these issues and how you can troubleshoot them:
1. Poor image quality: If you’re experiencing poor image quality, make sure the lens is clean and free from smudges or dust. Adjust the webcam settings for brightness, contrast, and exposure to improve the image. Additionally, ensure that the lighting in your environment is adequate for better image clarity.
2. Audio issues: If the audio from your webcam is distorted or not working, check the microphone settings in the webcam software or application. Ensure that the microphone is not muted and that the volume levels are appropriate. If needed, consider using an external microphone for better audio quality.
3. Webcam freezing or lagging: Webcam freezing or lagging can be caused by various factors. Start by closing any other applications that may be using the webcam simultaneously. Additionally, check for any driver updates and ensure that your computer’s resources are not overwhelmed by running too many applications or processes in the background.
4. Compatibility issues with specific applications: Some webcams may encounter compatibility issues with certain applications. Check the application’s system requirements and ensure that your Logitech webcam meets them. Consider reaching out to the application’s support team or forums for guidance on troubleshooting compatibility issues.
5. Webcam not recognized by the computer: If your computer fails to detect the Logitech webcam, try connecting it to a different USB port. Check the device manager to ensure that the webcam is not disabled or has any driver-related issues. If the problem persists, consider reinstalling the webcam drivers or contacting Logitech support for further assistance.
6. Overheating: If your webcam becomes excessively hot during prolonged use, it may lead to performance issues. Ensure that the webcam is properly ventilated and not obstructed by any objects. If the problem persists, contact Logitech support for guidance on addressing the overheating issue.
By troubleshooting these common issues, you can often resolve the problems you encounter with your Logitech webcam. Keep in mind that specific solutions may vary depending on the webcam model and the operating system you are using.
If you have followed the troubleshooting steps and are still facing issues with your Logitech webcam, it is recommended to reach out to Logitech support for personalized assistance.
Contacting Logitech Support
If you have exhausted all troubleshooting steps and your Logitech webcam is still not functioning correctly, it may be necessary to reach out to Logitech’s support team for further assistance. Here’s how you can contact Logitech support:
1. Logitech Support Website: Visit the Logitech official website and navigate to the “Support” or “Contact Us” section. Look for options to contact support, such as live chat, email, or phone support. Provide them with detailed information about the issue you are experiencing with your Logitech webcam.
2. Community Forums: Logitech hosts community forums where users can ask questions and seek help from other Logitech product owners. Browse through the forums to see if there are any similar issues faced by other users and if there are any recommended solutions provided by the community.
3. Social Media: Logitech has a presence on various social media platforms. Reach out to Logitech’s official accounts on platforms like Twitter or Facebook and send them a direct message detailing your issue. They may be able to provide guidance or direct you to the appropriate support channels.
4. Phone Support: Some Logitech products come with specific phone support for technical assistance. Check the product documentation or packaging to see if there is a dedicated support phone number provided. Call the number and provide the necessary details to troubleshoot the issue with a Logitech support representative.
5. Warranty Coverage: If your Logitech webcam is still under warranty, you may be eligible for a replacement or repair. Contact Logitech support and inquire about your warranty coverage for further assistance with the issue.
When contacting Logitech support, be prepared to provide them with relevant details such as the model and serial number of your webcam, the operating system you are using, and a description of the issue you are facing. This information will help the support team provide you with the most accurate and effective assistance.
Remember to be patient and polite when interacting with Logitech support representatives. They are there to help you resolve your issues and provide the best possible support.
By reaching out to Logitech support, you can receive personalized assistance and guidance tailored to your specific webcam-related concerns.
Conclusion
Having a properly functioning Logitech webcam is crucial for seamless video communication with friends, family, and colleagues. If you are facing issues with your Logitech webcam, it can be frustrating, but fortunately, there are several troubleshooting steps you can take to resolve the problems.
In this guide, we discussed various troubleshooting techniques, starting from checking the USB port and ensuring the webcam is enabled, to updating the webcam drivers, adjusting the webcam settings, and testing the webcam with different applications. We also explored common issues and offered solutions to address them.
If the troubleshooting steps do not resolve the problem, it is recommended to contact Logitech support. Their support team can provide personalized assistance and guide you through resolving the issues specific to your Logitech webcam.
Remember to provide necessary information such as the webcam model, operating system details, and a clear description of the problem when reaching out to Logitech support. This will help them provide you with the most accurate and efficient guidance.
With the help of Logitech support and following the troubleshooting steps outlined in this guide, you can increase the chances of getting your Logitech webcam back to working order. Enjoy seamless and high-quality video conversations with your loved ones, colleagues, and friends!