Introduction
Understanding the specifications of our computer’s hardware is crucial, whether we use it for work, gaming, or daily tasks. One important component that directly impacts our system’s performance is the RAM (Random Access Memory). RAM plays a key role in how quickly our computer can run programs, multitask, and handle data.
Knowing the amount and type of RAM installed on your computer can help you make informed decisions about system upgrades and troubleshoot performance issues. Fortunately, checking the RAM on different operating systems is a straightforward process. In this article, we will guide you on how to find out what RAM you have on various platforms like Windows, Mac, Linux, Android, and iOS.
Whether you are a computer enthusiast, a tech professional, or simply curious about your computer’s specifications, learning how to check your RAM will empower you to understand your device better. So, let’s dive into the specific methods for each operating system and uncover the hidden secrets of your system’s memory!
Checking RAM on Windows
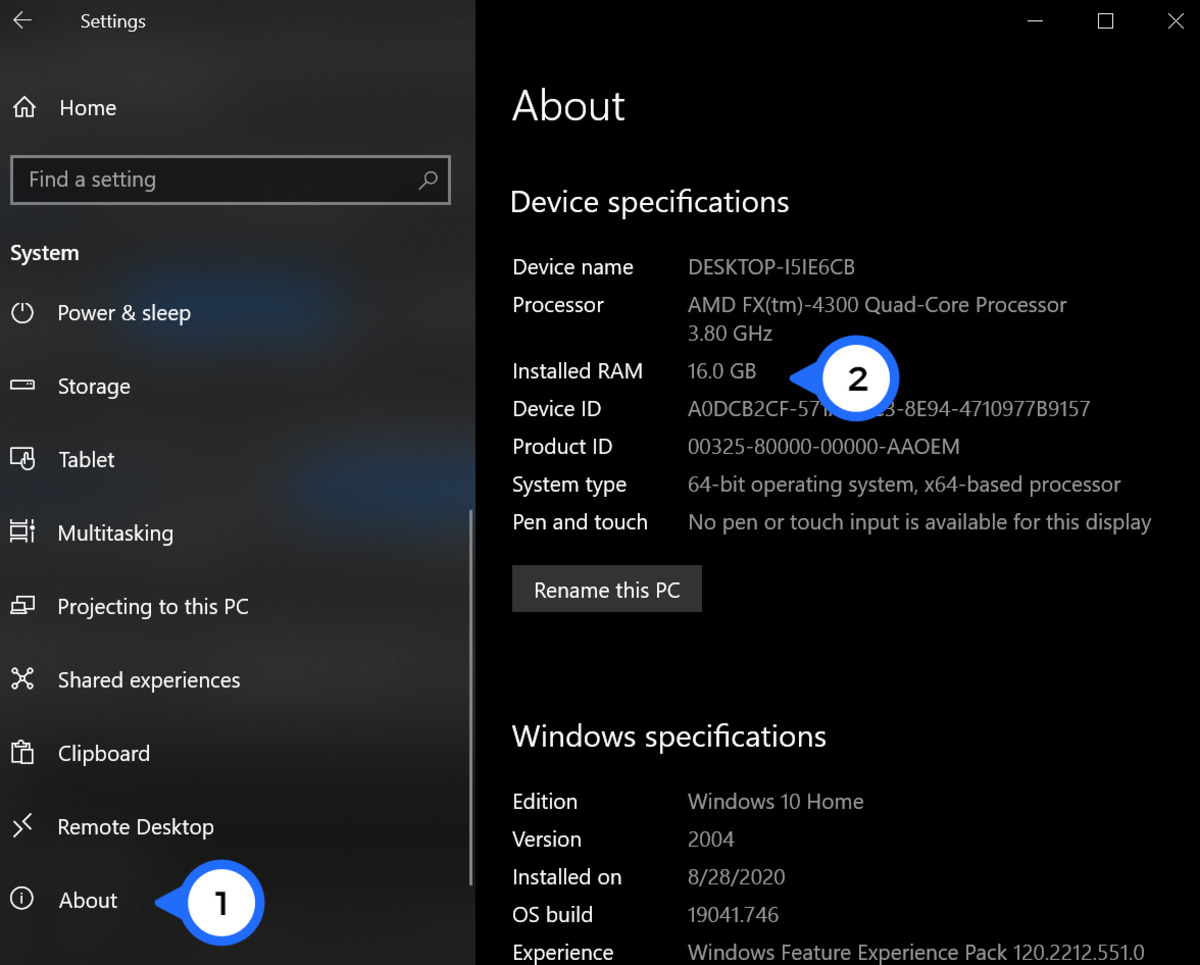
Windows provides a built-in tool called “System Information” that allows you to access detailed information about your computer’s hardware, including the RAM. Follow these steps to check your RAM on Windows:
- Press the Windows key on your keyboard or click on the Windows icon in the taskbar to open the Start menu.
- Type “System Information” in the search bar and select the corresponding result.
- In the System Information window, navigate to the left-hand side and expand the “Components” category.
- Click on the “Memory” option under the “Components” category to view detailed information about your RAM.
- On the right-hand side, you will find details such as the total physical memory, available memory, and memory slots used.
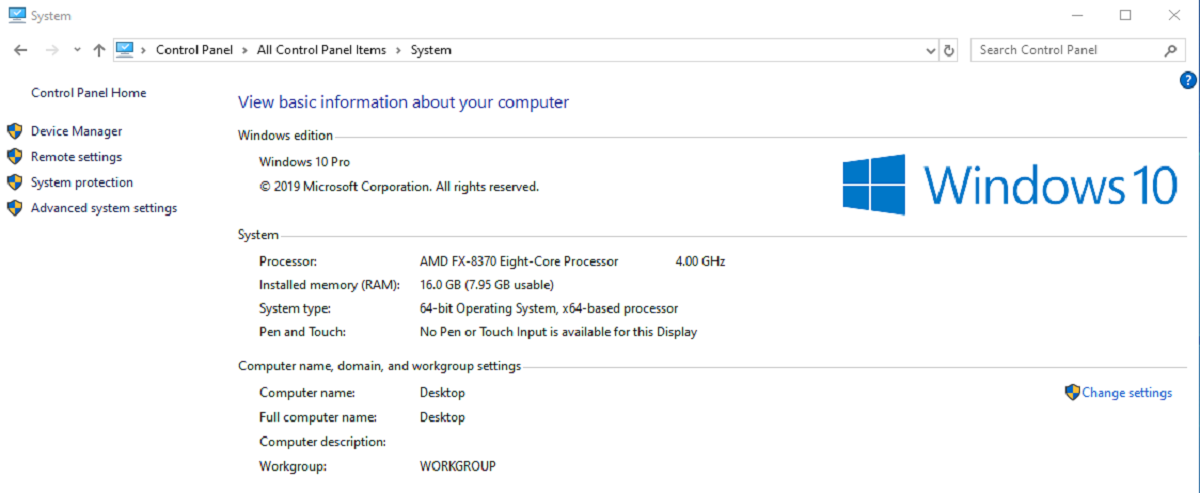
Additionally, you can use the keyboard shortcut Windows key + Pause/Break to open the System window. In the System window, you will find information about your installed RAM. Look for the “Installed memory (RAM)” section, which displays the total installed RAM on your system.
By following these steps, you can easily check the amount and other specifications of the RAM installed on your Windows computer. This information can be valuable for upgrading your system’s memory or troubleshooting any performance-related issues.
Checking RAM on Mac
Mac users can check the RAM installed on their devices using the built-in “About This Mac” feature. Follow these steps to find out what RAM you have on your Mac:
- Click on the Apple menu in the top-left corner of the screen.
- Select “About This Mac” from the dropdown menu.
- In the window that appears, click on the “Memory” tab. Here, you will find information about the installed RAM, including the total memory capacity and the type of memory module.
- For more detailed information about the RAM, click on the “System Report” button.
- In the “System Information” window, navigate to the “Hardware” section in the sidebar.
- Under the “Hardware” section, click on “Memory” to view additional details such as speed, the number of installed memory modules, and the configuration of each module.
By following these steps, you can easily access detailed information about the RAM installed on your Mac computer. This knowledge can help you determine if your system meets the requirements of certain software or if it’s time for a RAM upgrade to boost your Mac’s performance.
Checking RAM on Linux
Linux users have different methods to check their RAM, depending on the distribution and desktop environment they are using. Here are a few common ways to find out what RAM you have on Linux:
- Using the Command Line: Open a terminal and type the following command:
sudo dmidecode -t memory
This command will provide detailed information about the RAM installed on your Linux system. You can view details such as the size, speed, type, and manufacturer of the memory modules.
- Using System Monitoring Tools: Linux provides various system monitoring tools that can display real-time information about your system’s hardware, including RAM. Popular tools like htop or gnome-system-monitor provide an easy-to-understand graphical interface that displays RAM usage and other system metrics.
- Accessing System Information: Some Linux distributions have a system information viewer that allows you to access hardware details. For example, in Ubuntu, you can open the “System Settings” application, navigate to the “Details” section, and click on “Overview” to view information about your installed RAM.
These methods should work on most Linux distributions and will provide you with valuable information about your RAM configuration. Knowing the specifics of your system’s memory can aid in troubleshooting and optimizing performance.
Checking RAM on Android
Checking the amount of RAM on an Android device can be done through the system settings. The steps may vary slightly depending on the Android version and device manufacturer. Here’s a general guide to check your RAM on Android:
- Open the “Settings” app on your Android device. You can usually find it in the app drawer or by swiping down from the top of the screen and tapping the gear-shaped icon.
- Scroll down and find the “About phone” or “About device” option. Tap on it.
- In the “About phone” menu, there should be a section called “Memory” or “RAM.” Tap on it to view the information about the RAM installed on your Android device.
- Here, you will see the total amount of RAM in your device, often displayed in megabytes (MB) or gigabytes (GB). Some devices may also show the amount of RAM currently in use.
Please note that the specific steps and wording may differ slightly based on your Android device’s manufacturer and software version. If you’re unable to find the RAM information in the “About phone” section, you can also try searching for “Memory” or “RAM” in the settings search bar for quicker access.
Knowing the amount of RAM on your Android device can be useful for understanding its capabilities and performance limitations. It can also help you determine if it’s necessary to close unnecessary apps or consider upgrading to a device with more RAM if you find your current device struggling with multitasking or resource-intensive applications.
Checking RAM on iOS
Unlike other operating systems, iOS on iPhones and iPads does not provide a direct way to check the amount of RAM installed on the device through the system settings. However, there are a few indirect methods you can use to get an idea of the RAM capacity on your iOS device:
- Using System Monitoring Apps: There are several third-party system monitoring apps available on the App Store that can provide detailed information about your iOS device’s hardware, including RAM. These apps typically display real-time metrics such as memory usage, CPU usage, and battery health. Examples of popular system monitoring apps include System Status Lite and iStat.
- Checking with Xcode: If you have access to a Mac computer with Xcode installed, you can connect your iOS device to the computer and use the Xcode developer tools to get detailed information about your device’s hardware. This method is more technical and is typically used by developers for debugging and performance analysis.
Due to the limitations imposed by Apple’s iOS ecosystem, the available options for directly checking the RAM on your iOS device are limited. However, using system monitoring apps can give you insight into your device’s performance and memory usage.
It’s worth noting that iOS devices generally have efficient memory management systems that optimize performance and minimize memory usage. While knowing the exact amount of RAM may not be as crucial on iOS as it is on other platforms, understanding your iOS device’s performance capabilities can help you make informed decisions about resource-intensive apps and multitasking.
Conclusion
Knowing how to check the RAM on your computer or mobile device is essential for understanding its capabilities, troubleshooting performance issues, and making informed decisions about system upgrades. In this article, we explored the methods for checking RAM on various platforms.
For Windows users, accessing the “System Information” tool or using the keyboard shortcut Windows key + Pause/Break provides detailed information about the installed RAM. Mac users can find information about their RAM by navigating to the “About This Mac” menu and clicking on the “Memory” tab. Linux users can use the command line or system monitoring tools to check their RAM. Android users can access the RAM information through the device’s settings, usually found under “About phone” or “About device”. As for iOS users, exploring third-party system monitoring apps on the App Store can provide insights into memory usage.
By understanding the amount and specifications of the RAM installed on your device, you can ensure your system meets the requirements of specific applications and make informed decisions when it comes to upgrading your memory for better performance.
Remember, checking your RAM is just one aspect of maintaining and optimizing your computer or mobile device. Regularly updating software, managing background applications, and performing routine maintenance tasks can also contribute to a smooth and efficient system.
So, whether you’re a tech enthusiast, a curious user, or a professional seeking more control over your device, use the methods outlined in this article to discover the hidden secrets of your computer or mobile device’s memory.